ActiveMQ学习(四)Spring整合ActiveMQ
因为2018年的第一场雪,比以往时候来的更晚一些,所以,本篇文章隔了近5个月才更新,抱歉来的有点晚了各位,
不是人造革,皮是真的皮,啊弥陀佛,罪过罪过……本篇,将继续跟随以往的脚步,使用Spring MVC+ActiveMQ+Maven+Tomcat,做一个整合的简单实例。
1. 开发环境
1.1 版本工具
- Spring 4.1.8
- ActiveMQ 5.14.5
- JDK 1.7
- Tomcat 7
- Eclipse Mars+Maven
- ActiveMQ服务已经启动
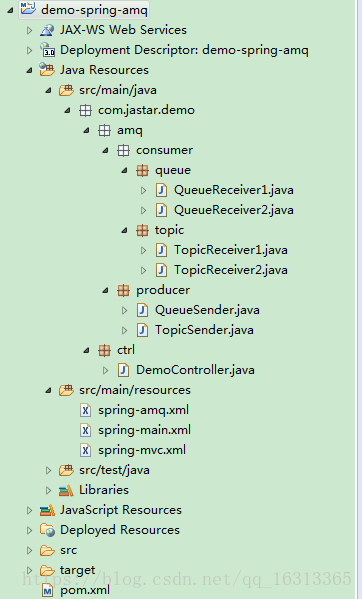
1.2 项目结构
1.3 Maven依赖
推荐使用介个:
<dependency>
    <groupId>org.apache.activemqgroupId>
    <artifactId>activemq-springartifactId>
    <version>5.14.5version>
dependency>
不推荐使用介个(FAQ中说明):
<dependency>
    <groupId>org.apache.activemqgroupId>
    <artifactId>activemq-allartifactId>
    <version>5.14.5version>
dependency>
2. 项目配置
为了简单粗暴及猿友们易懂,我就直接上代码了,代码中有详细的注释,重要的地方我也会在文章中指出。
2.1 配置AMQ(spring-amq.xml)
<beans xmlns="http://www.springframework.org/schema/beans"
    xmlns:context="http://www.springframework.org/schema/context"
    xmlns:xsi="http://www.w3.org/2001/XMLSchema-instance" xmlns:amq="http://activemq.apache.org/schema/core"
    xmlns:jms="http://www.springframework.org/schema/jms"
    xsi:schemaLocation="http://www.springframework.org/schema/beans
        http://www.springframework.org/schema/beans/spring-beans-4.1.xsd
        http://www.springframework.org/schema/context
        http://www.springframework.org/schema/context/spring-context-4.1.xsd
        http://www.springframework.org/schema/jms
        http://www.springframework.org/schema/jms/spring-jms-4.1.xsd
        http://activemq.apache.org/schema/core
        http://activemq.apache.org/schema/core/activemq-core-5.14.5.xsd">


    <amq:connectionFactory id="amqConnectionFactory"
        brokerURL="tcp://localhost:61616" userName="admin" password="admin" />


    <bean id="connectionFactory"
        class="org.springframework.jms.connection.CachingConnectionFactory">

        <property name="targetConnectionFactory" ref="amqConnectionFactory">property>


        <property name="sessionCacheSize" value="100" />
    bean>


    <bean id="jmsQueueTemplate" class="org.springframework.jms.core.JmsTemplate">

        <constructor-arg ref="connectionFactory" />

        <property name="pubSubDomain" value="false" />
    bean>


    <bean id="jmsTopicTemplate" class="org.springframework.jms.core.JmsTemplate">

        <constructor-arg ref="connectionFactory" />

        <property name="pubSubDomain" value="true" />
    bean>


    <jms:listener-container destination-type="queue"
        container-type="default" connection-factory="connectionFactory"
        acknowledge="auto">
        <jms:listener destination="my.queue" ref="queueReceiver1" />
        <jms:listener destination="my.queue" ref="queueReceiver2" />
    jms:listener-container>


    <jms:listener-container destination-type="topic"
        container-type="default" connection-factory="connectionFactory"
        acknowledge="auto">
        <jms:listener destination="my.topic" ref="topicReceiver1" />
        <jms:listener destination="my.topic" ref="topicReceiver2" />
    jms:listener-container>

beans>
来,看黑板,敲重点:
(1)首先配置AMQ的连接工厂,在上篇文章的代码中,我们首先创建的就是此对象。
(2)配置Spring内部的连接工厂,主要是对AMQ的工厂进行了封装,便于管理;Spring提供了多种连接工厂,介绍如下两个:
- SingleConnectionFactory;
对于建立JMS服务器链接的请求会一直返回同一个链接,并且会忽略Connection的close方法调用。 - CachingConnectionFactory;
继承了SingleConnectionFactory,拥有前者的所有功能,同时它新增了缓存,可以提升效率,它和AMQ的PooledConnectionFactory都是比较推荐的。
(3)配置生产者
在Spring中,我们不再使用AMQ的原生对象进行消息的发送,而是使用Spring提供的一个模板类,当当当当——JmsTemplate。它就相当于我们之前使用过的
HibernateTemplate,所以,配置生产者最核心的就是配置JmsTemplate;对于消息发送者而言,它在发送消息的时候要知道自己该往哪里发,为此,我们在定义
JmsTemplate的时候需要注入一个Spring提供的ConnectionFactory对象。另外,配置
JmsTemplate时,需要知道发送哪种类型的消息,一是点对点,二是订阅/发布,表现出来就是通过JmsTemplate的pubSubDomain属性来定义。
(4)配置消费者
- 在实际使用中,我们一般不使用消费者对象去手动获取消息,而是通过消息监听器(MessageListenerContainer)来实现,通过
destination属性来指定其要监听的目的地。 - 除了监听目的地之外,还需要知道到哪里监听,所以指定一个
connection-factory就是理所应当的了。 - 另外就是监听器对应我们的实际处理类,通过
ref进行引用。 - 推荐使用DefaultMessageListenerContainer,它允许异步接收消息并缓存session和消息consumer,而且还可以根据消息数量动态的增加或缩减监听器的数量。
2.2 配置Spring MVC
除了spring-amq.xml是重中之重,其他的都没有什么特别的配置,在此不再做详细说明,更多配置请查看源码。
(1)spring-main.xml:
<beans xmlns="http://www.springframework.org/schema/beans"
    xmlns:aop="http://www.springframework.org/schema/aop" xmlns:context="http://www.springframework.org/schema/context"
    xmlns:p="http://www.springframework.org/schema/p" xmlns:tx="http://www.springframework.org/schema/tx"
    xmlns:xsi="http://www.w3.org/2001/XMLSchema-instance"
    xsi:schemaLocation="http://www.springframework.org/schema/beans
       http://www.springframework.org/schema/beans/spring-beans-4.1.xsd
       http://www.springframework.org/schema/context
       http://www.springframework.org/schema/context/spring-context-4.1.xsd
       http://www.springframework.org/schema/aop
       http://www.springframework.org/schema/aop/spring-aop-4.1.xsd
       http://www.springframework.org/schema/tx
       http://www.springframework.org/schema/tx/spring-tx-4.1.xsd">


    <context:component-scan base-package="com.jastar.demo.amq" />

beans>
(2)spring-mvc.xml:
<beans xmlns="http://www.springframework.org/schema/beans"
    xmlns:mvc="http://www.springframework.org/schema/mvc" xmlns:xsi="http://www.w3.org/2001/XMLSchema-instance"
    xmlns:context="http://www.springframework.org/schema/context"
    xsi:schemaLocation="
                http://www.springframework.org/schema/beans
                http://www.springframework.org/schema/beans/spring-beans.xsd
                http://www.springframework.org/schema/context
                http://www.springframework.org/schema/context/spring-context-4.1.xsd
                http://www.springframework.org/schema/mvc
                http://www.springframework.org/schema/mvc/spring-mvc-4.1.xsd">


    <context:component-scan base-package="com.jastar.demo.ctrl" />

    <mvc:annotation-driven />

    <bean class="org.springframework.web.servlet.view.InternalResourceViewResolver">
        <property name="prefix" value="/WEB-INF/res/">property>
        <property name="suffix" value=".jsp">property>
    bean>
beans>
3. 编写代码
同样,大部分代码较为简单,在此只展示部分,更多请查看源码。
3.1 消息生产者
QueueSender.java:
package com.jastar.demo.amq.producer;

import javax.jms.JMSException;
import javax.jms.Message;
import javax.jms.Session;

import org.springframework.beans.factory.annotation.Autowired;
import org.springframework.beans.factory.annotation.Qualifier;
import org.springframework.jms.core.JmsTemplate;
import org.springframework.jms.core.MessageCreator;
import org.springframework.stereotype.Component;

/**
 * 队列消息生产者
 *
 * @author Jastar·Wang
 * @date 2018年4月4日
 * @since 1.0
 */
@Component
public class QueueSender {

    @Autowired
    @Qualifier("jmsQueueTemplate")
    private JmsTemplate jmsTemplate;

    /**
     * 发送一条消息到指定的队列(目标)
     *
     * @param queueName
     *            队列名称
     * @param message
     *            消息内容
     */
    public void send(String queueName, final String message) {
        jmsTemplate.send(queueName, new MessageCreator() {
            @Override
            public Message createMessage(Session session) throws JMSException {
                // 其他的还有createXXXMessage(...)
                return session.createTextMessage(message);
            }
        });
    }

}
3.2 消息消费者
QueueReceiver1.java:
package com.jastar.demo.amq.consumer.queue;

import javax.jms.JMSException;
import javax.jms.Message;
import javax.jms.MessageListener;
import javax.jms.TextMessage;

import org.springframework.stereotype.Component;

/**
 * 队列消息消费者1
 *
 * @author Jastar·Wang
 * @date 2018年4月4日
 * @since 1.0
 */
@Component
public class QueueReceiver1 implements MessageListener {

    @Override
    public void onMessage(Message message) {
        try {
            /*
             * 实际项目中拿到String类型的message(通常是JSON字符串)之后,会进行反序列化成对象,做进一步的处理
             */
            System.out.println("QueueReceiver1接收到消息:" + ((TextMessage) message).getText());
        } catch (JMSException e) {
            e.printStackTrace();
        }
    }
}
4. 测试
Pass、过、要不起……
港真,私下已测试success,在此就不再放到这里来说了,运行项目访问首页即可,傻瓜式操作。
5. FAQ
5.1 关于AMQ的jar包依赖
答:市面上出现了使用activemq-all.jar和不使用它的方式(如我开头提到的),在这里,我个人推荐使用“activemq-spring”的形式,因为:
- activemq-all.jar中整合了很多的东西,例如Spring,如果再引用Spring本身的话,可能会导致jar包冲突而出错,另外,还整合了其他一系列框架。(整合Spring是从activemq-all.jar的5.12.0的版本开始的,其他的就不知道了)
- activemq-all.jar足足有15M大,而需要什么引用什么顶多了几M,单看这点,滋滋滋……
5.2 关于spring-amq.xml的配置形式
答:市面上同样存在着两种配置形式,一种是使用amq和jms形式的标签(本文即是),另一种是使用spring的传统bean的配置形式,虽然配置不同,但两者效果都一样,都正确,不过个人觉得前者略简单,不过需要注意引用namespace:
http://www.springframework.org/schema/jms
http://www.springframework.org/schema/jms/spring-jms-4.1.xsd
http://activemq.apache.org/schema/core
http://activemq.apache.org/schema/core/activemq-core-5.14.5.xsd
5.3 关于本文
答:博主菜鸟一只,本文的部分内容及大部分代码都是参考csdn于亮 大神的文章,包括JSP页面,没懒得改,项目使用了maven进行升级,对理论部分略有完善,在此只作为学习总结使用。
5.4 源码
传送门:戳我戳我
……
“纸上得来终觉浅,绝知此事要躬行。——鲁迅”
“鲁迅:这话我真没说过。”
……
