IBM WebSphere Application Server 9.0.0.2 部署Spring Boot 2.x
IBM WebSphere Application Server 9.0.0.2 部署Spring Boot2.x 项目
- 目录
- 1:创建JDBC 提供程序
- 2:创建数据源
- 3:创建数据源认证信息(JAAS - J2C)
- 4:认证数据源
- 5:Spring Boot 项目配置注意
- 5-1:继承 SpringBootServletInitializer 类实现 configure 方法
- 5-2:web.xml 配置 JNDI
- 5-3:web 项目打包时排掉 tomcat 包
- 5-4:我的 application.yml 文件配置
- 5-5:我的 application-dev.yml 文件配置
- 6:打包部署
- 6-1:打包(略)
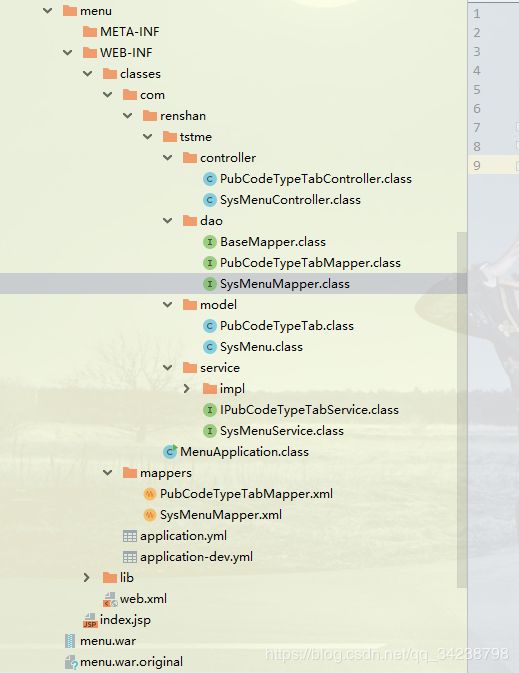
- 6-2:包结构图
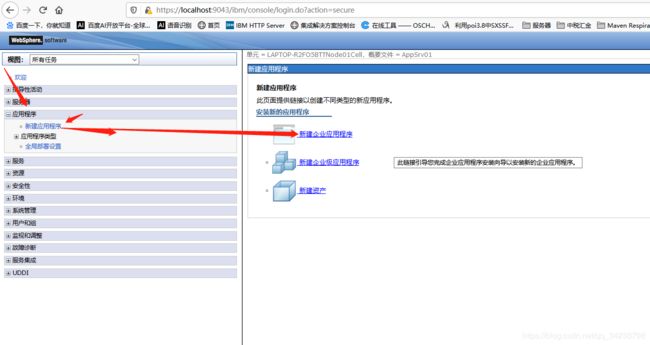
- 6-3:登录 WebSphere Application Server → 新建企业应用程序
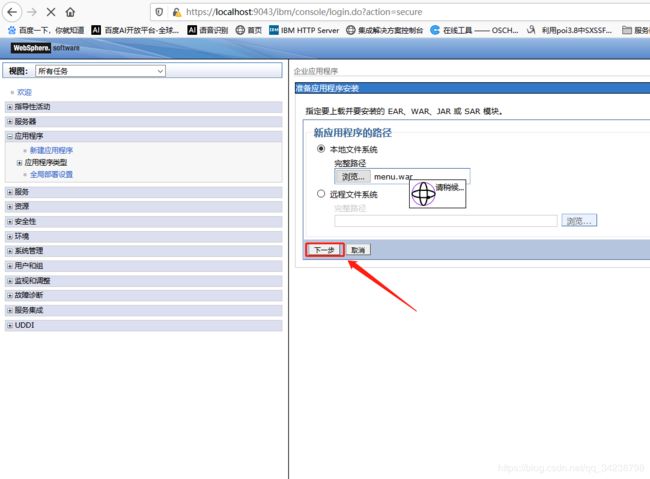
- 6-4:本地文件系统上传
- 6-5: 选择安装选项 (不做任何操作,下一步)
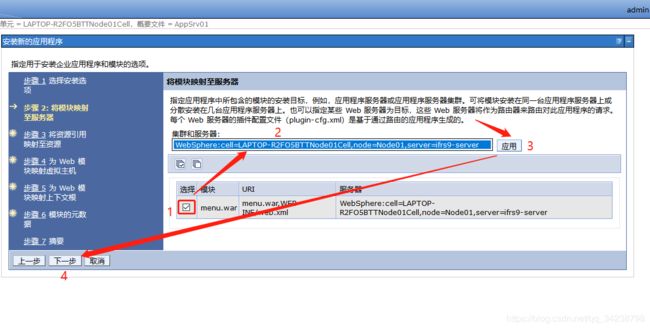
- 6-6:将模块映射至服务器: 勾选项目(模块)
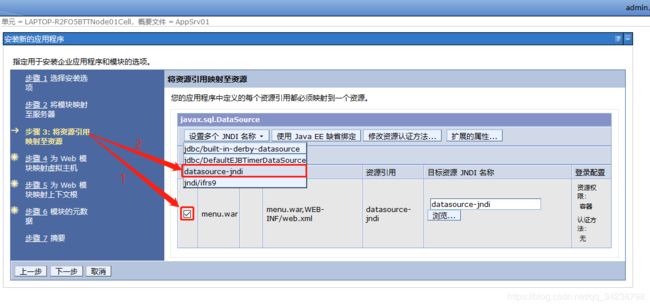
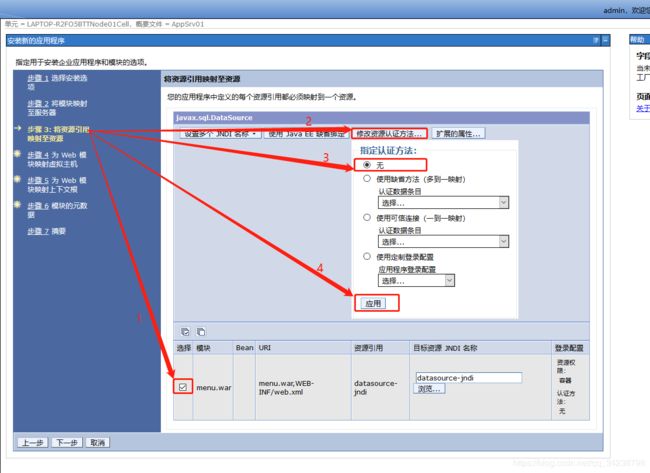
- 6-7:将资源引用映射至资源
- 6-7-1:选择你所引用的JNDI资源
- 6-7-2:指定认证方法
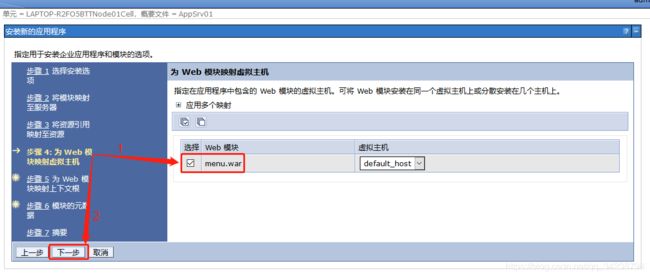
- 6-8:为 Web 模块映射虚拟主机
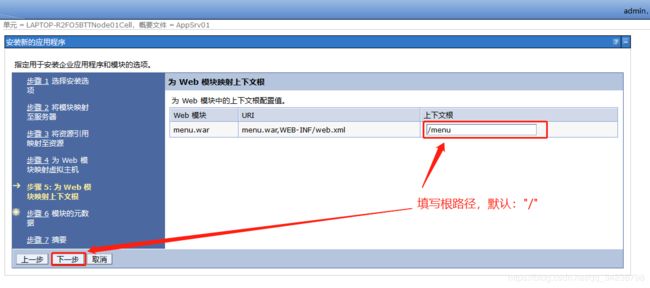
- 6-9:为 Web 模块映射上下文根
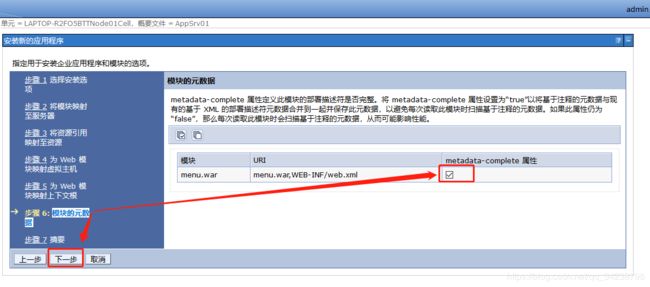
- 6-10:模块的元数据 (勾上)
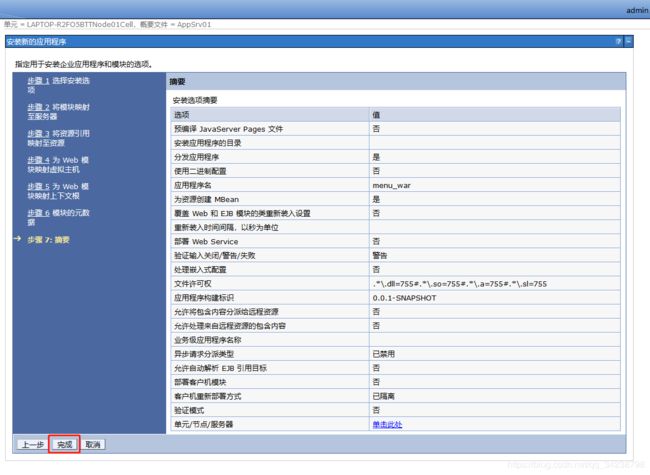
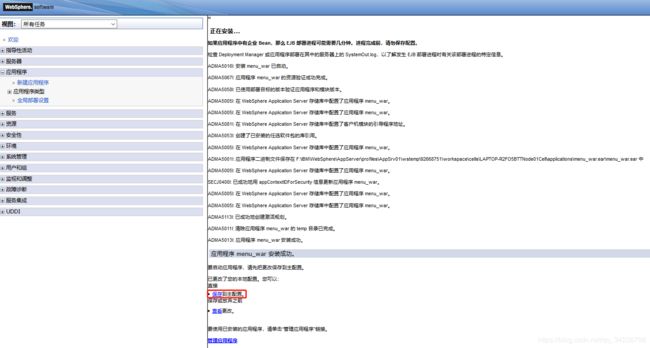
- 6-11:摘要 (完成并保存)
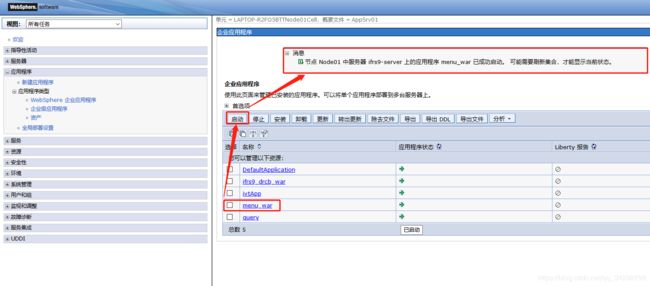
- 7:启动程序
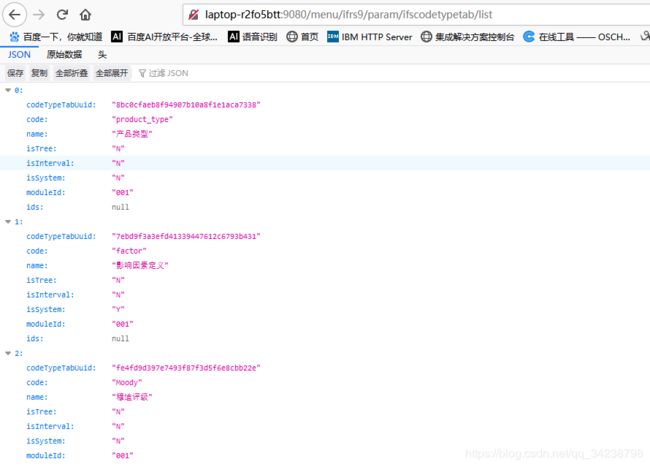
- 8:测试程序
目录
上一篇博客讲了WebSphere Application Server如何安装,今天来说一下。如何使用它部署Spring Boot2.x项目。部署时我们需要 注意 哪些 关键性的问题!
1:创建JDBC 提供程序
登录成功之后如下图所示:
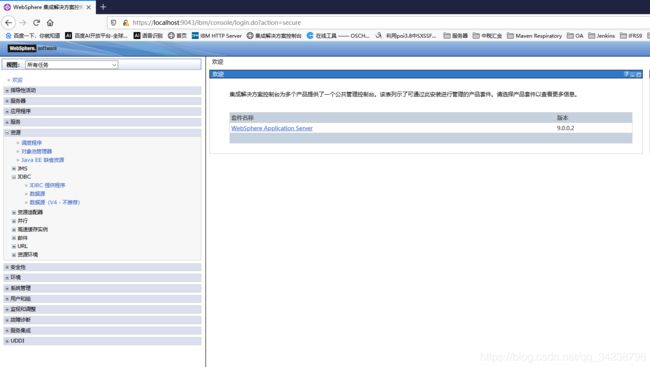
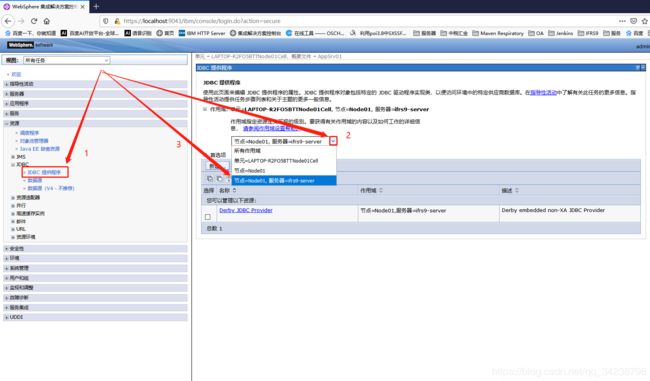
按步骤选择相应的服务器节点如下图所示:
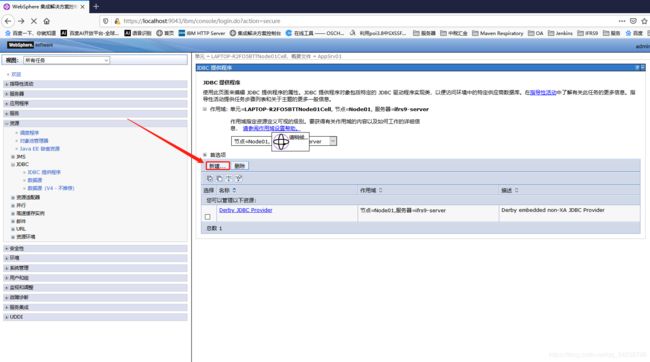
点击新建如下图:
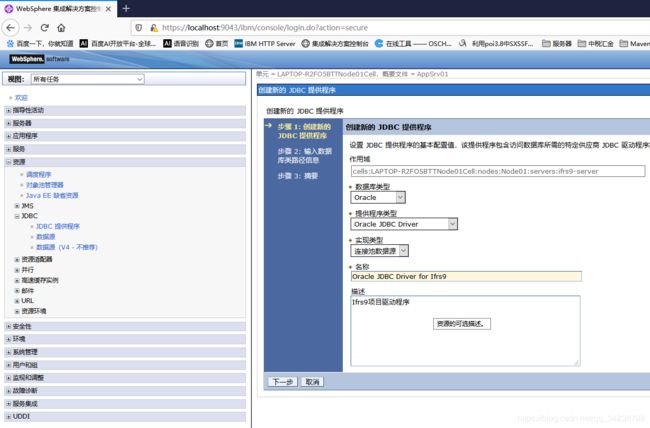
选择相应的驱动属性 点击下一步如下图:
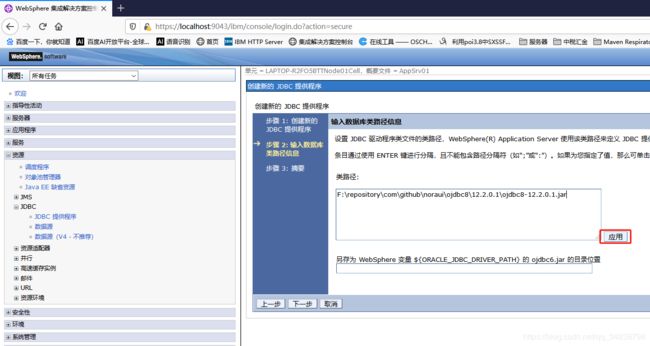
一定要填写绝对路径 点击确定如下图:
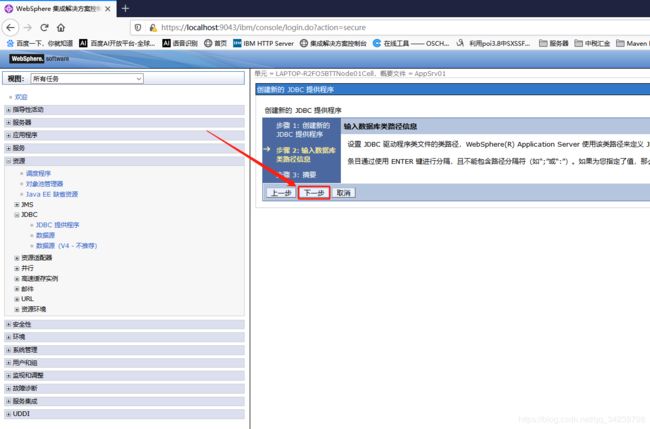
下一步如下图:
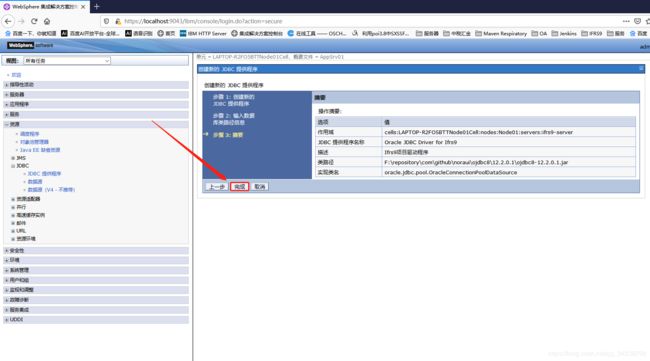
点击完成如下图:
保存 如下图:
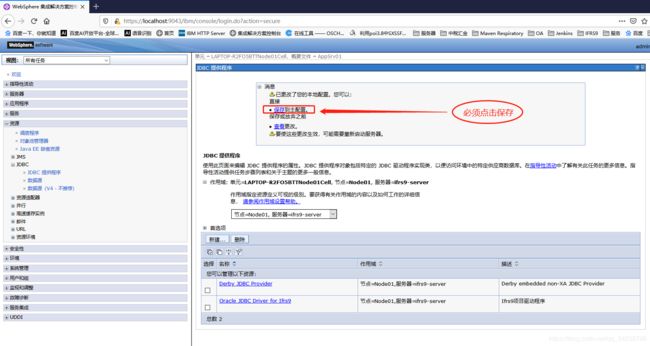
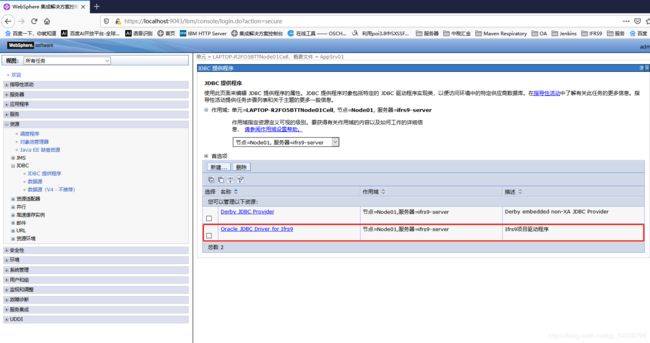
2:创建数据源
点击数据源并选择其 作用域范围 如下图:
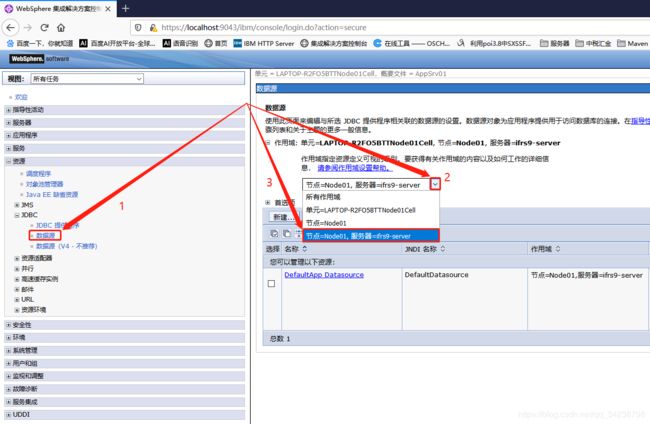
点击新建如下图:
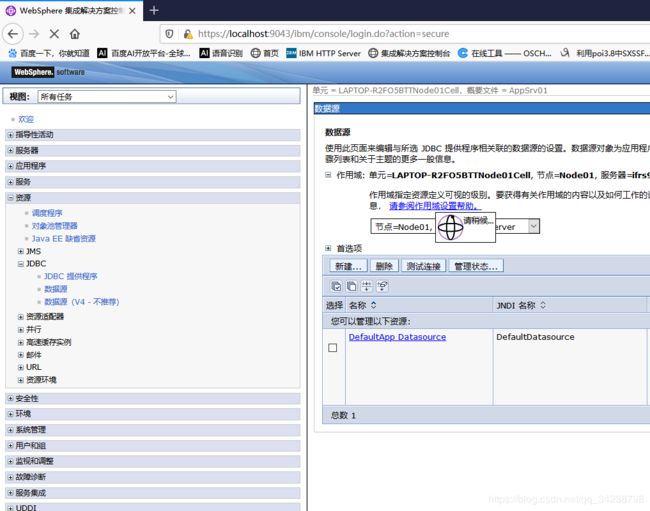
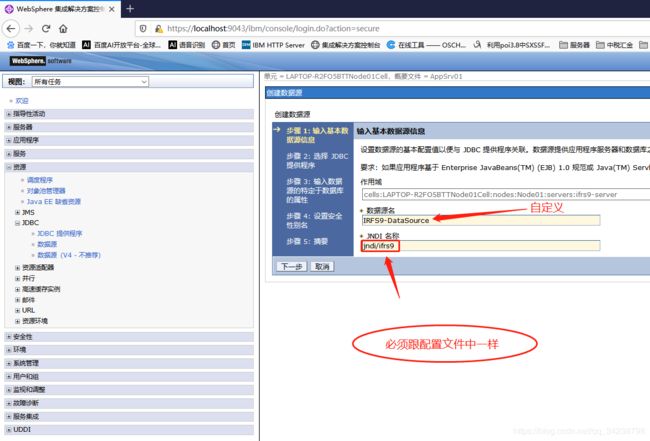
JNDI名称 必须 与项目配置文件中一模一样,然后点击下一步,如下:
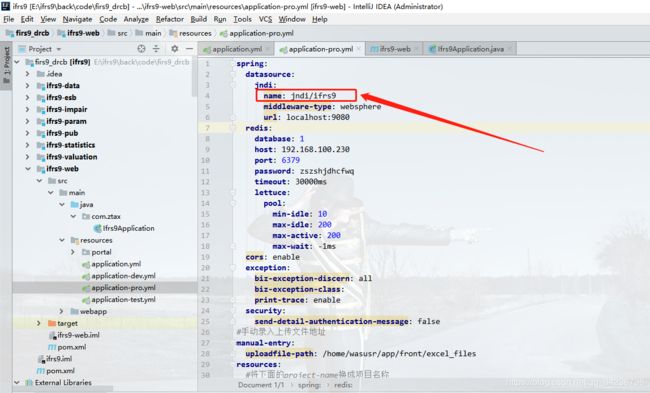
项目配置文件如下图所示:
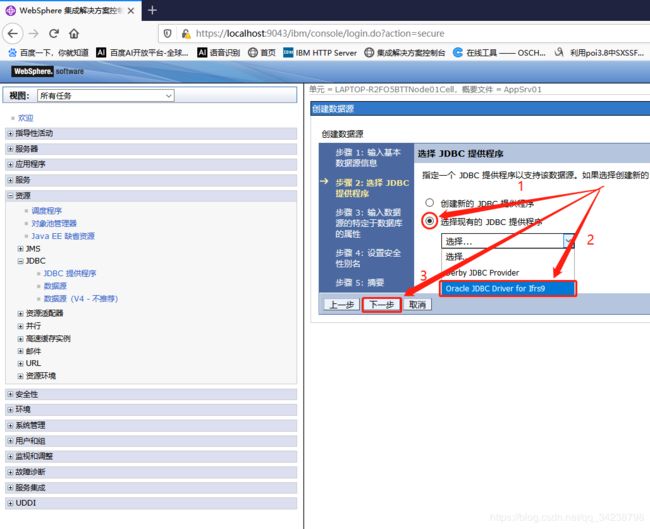
选择现有的JDBC驱动程序 点击下一步如下图:
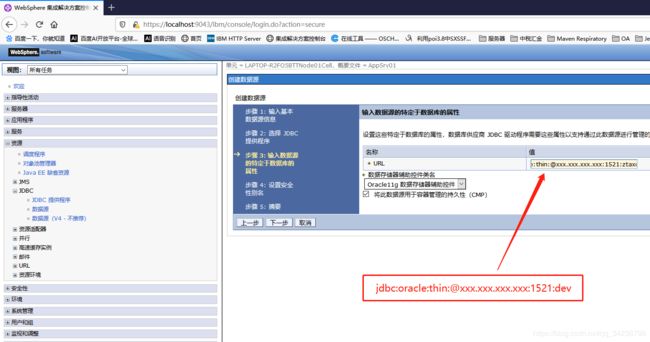
如下图 xxx.xxx.xxx.xxx 部分是你的数据库 IP ,点击下一步:
这里先不创建认证信息 点击下一步:

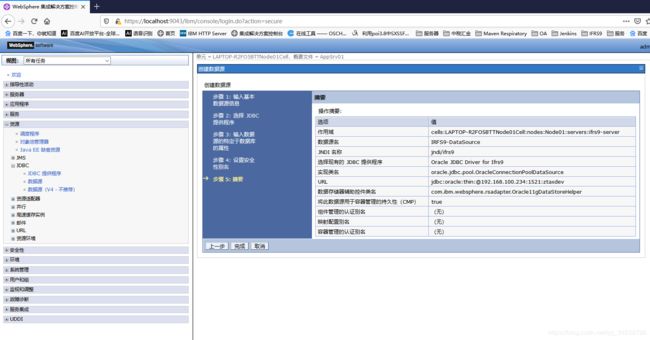
点击 完成:
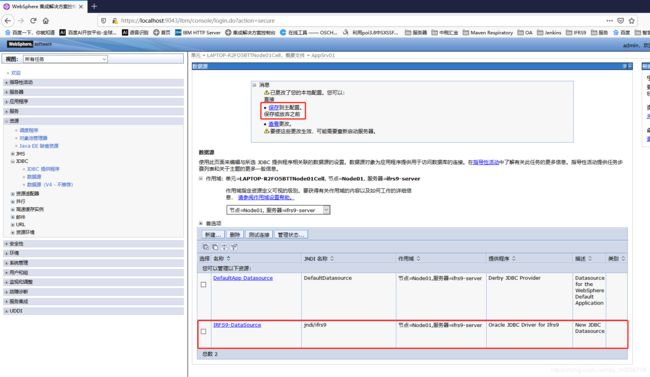
可见下方红框内已经显示我们新建的数据源了 点击 保存如下:
3:创建数据源认证信息(JAAS - J2C)
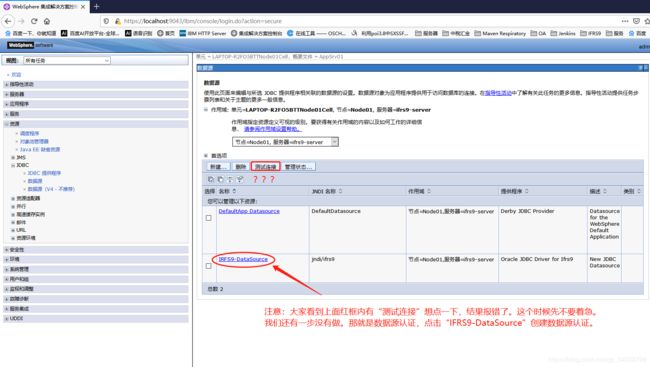
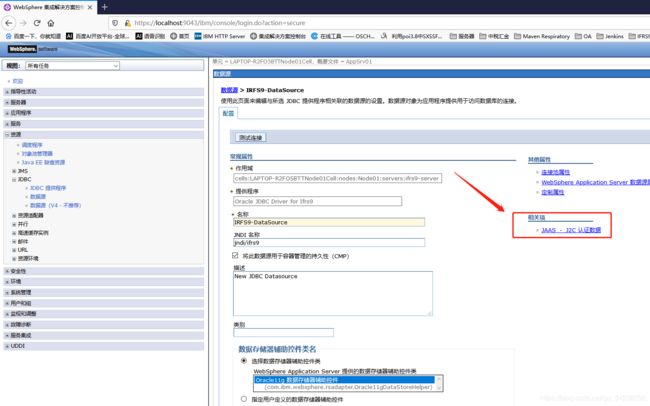
进入数据源详情页点击 JAAS - J2C认证数据
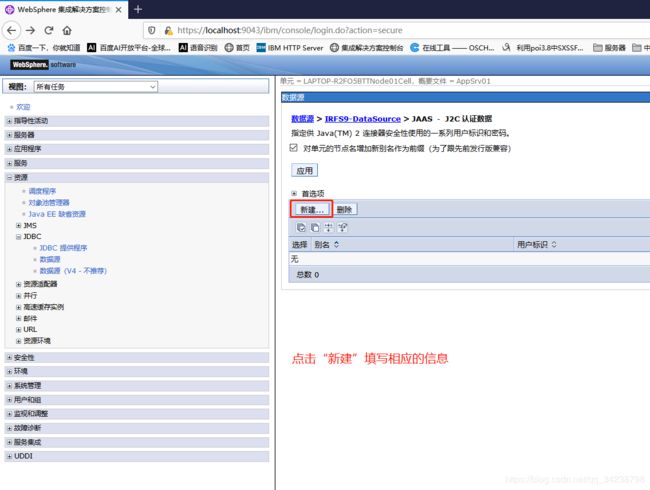
点击 “新建” 填写相应的信息:
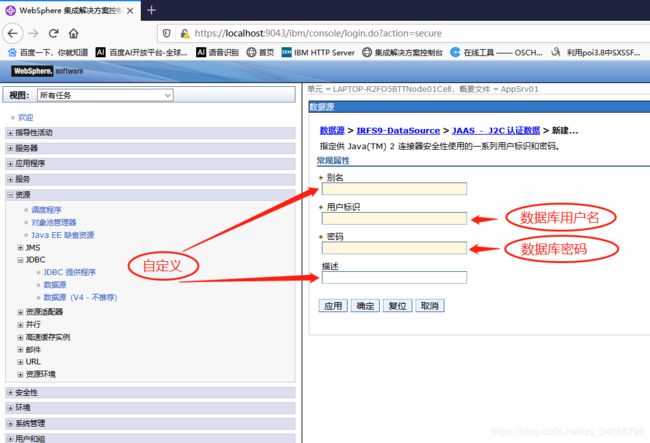
填写数据源用户名及密码认证信息如下图:
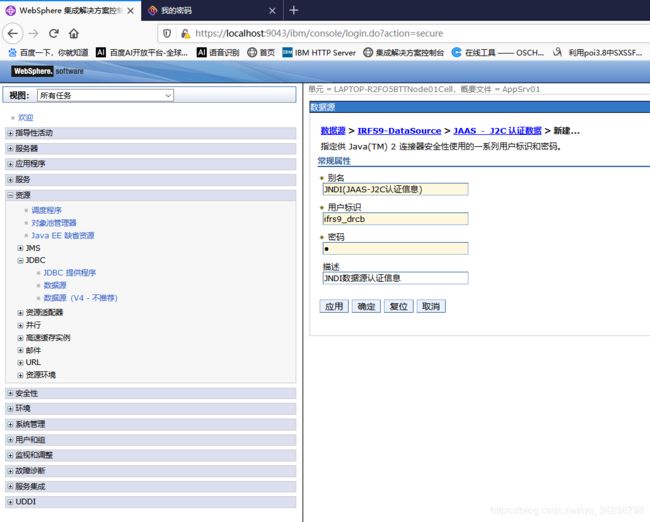
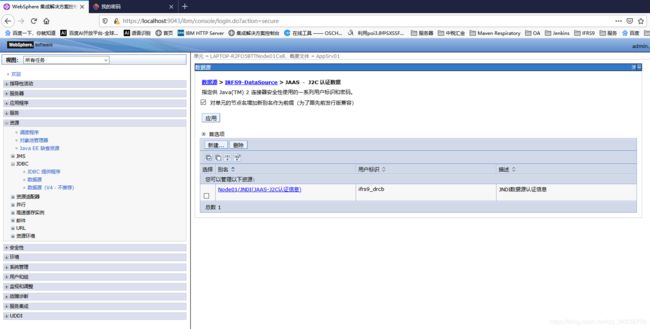
点击 “应用” 以及 “保存” :
4:认证数据源
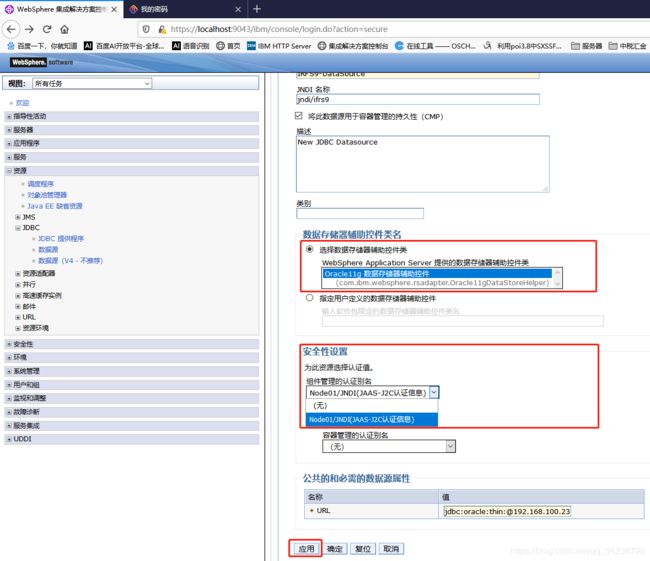
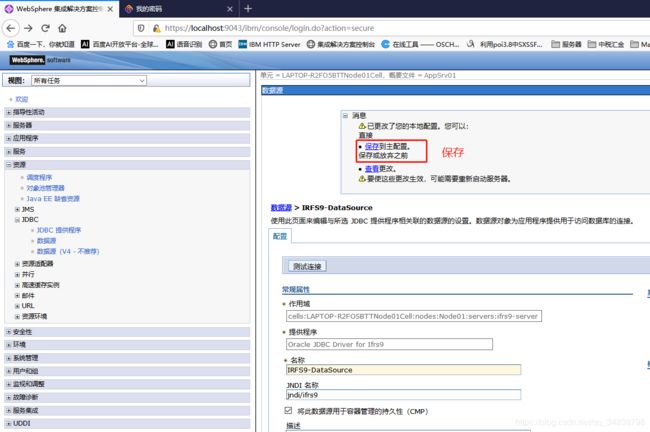
点击 进入数据源详情信息页面,然后往下找到 (安全性设置–>组件管理的认证别名 )选择认证信息点击 “应用”:

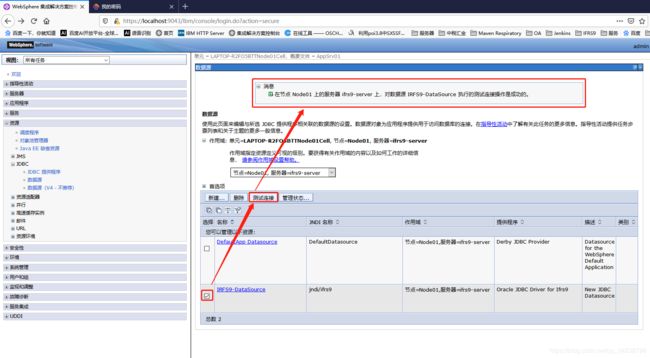
测试数据源:
5:Spring Boot 项目配置注意
5-1:继承 SpringBootServletInitializer 类实现 configure 方法
代码样例:
package com.renshan;

import org.springframework.boot.SpringApplication;
import org.springframework.boot.autoconfigure.SpringBootApplication;
import org.springframework.boot.builder.SpringApplicationBuilder;
import org.springframework.boot.web.servlet.support.SpringBootServletInitializer;

@SpringBootApplication
public class MenuApplication extends SpringBootServletInitializer {

    @Override
    protected SpringApplicationBuilder configure(SpringApplicationBuilder builder) {
        return builder.sources(MenuApplication.class);
    }
    public static void main(String[] args) {
        SpringApplication.run(MenuApplication.class, args);
    }

}
5-2:web.xml 配置 JNDI
通过 JNDI 获取数据源的方式有两种写法:
web.xml 样例一:
<?xml version="1.0" encoding="UTF-8"?>
<web-app xmlns:xsi="http://www.w3.org/2001/XMLSchema-instance"
         xmlns="http://xmlns.jcp.org/xml/ns/javaee"
         xsi:schemaLocation="http://xmlns.jcp.org/xml/ns/javaee
         http://xmlns.jcp.org/xml/ns/javaee/web-app_3_1.xsd" id="WebApp_ID" version="3.1">

  <resource-ref>
    <description>JNDI数据源引用</description>
    <res-ref-name>jndi/projectName</res-ref-name>
    <res-type>javax.sql.DataSource</res-type>
    <res-auth>Container</res-auth>
  </resource-ref>

  <welcome-file-list>
    <welcome-file>index.jsp</welcome-file>
  </welcome-file-list>
</web-app>
web.xml 样例二:
<?xml version="1.0" encoding="UTF-8"?>
<web-app xmlns:xsi="http://www.w3.org/2001/XMLSchema-instance"
        xmlns="http://xmlns.jcp.org/xml/ns/javaee"
        xsi:schemaLocation="http://xmlns.jcp.org/xml/ns/javaee
        http://xmlns.jcp.org/xml/ns/javaee/web-app_3_1.xsd" id="WebApp_ID" version="3.1">

 <resource-ref>
   <description>JNDI数据源引用</description>
   <res-ref-name>java:comp/env/jndi/projectName</res-ref-name>
   <res-type>javax.sql.DataSource</res-type>
   <res-auth>Container</res-auth>
 </resource-ref>

 <welcome-file-list>
   <welcome-file>index.jsp</welcome-file>
 </welcome-file-list>
</web-app>
两种配置的不同之处:
☆ java:comp/env/jndi/projectName(虚地址) → 映射描述符 → jdbc/testDS (实际的地址)
★ jndi/projectName(实际的地址)
先者态度温和,后者塔读强硬。
元素 resource-ref 下的子元素描述如下:
★ res-ref-name是资源工厂引用名的名称。该名称是一个与java:comp/env上下文相对应的JNDI名称,并且在整个Web应用中必须是惟一的。
★ res-auth表明:servlet代码通过编程注册到资源管理器,或者是容器将代表servlet注册到资源管理器。该元素的值必须为Application或Container。
★ res-sharing-scope表明:是否可以共享通过给定资源管理器连接工厂引用获得的连接。该元素的值必须为Shareable(默认值)或Unshareable。
5-3:web 项目打包时排掉 tomcat 包
样例:
        <dependency>
            <groupId>org.springframework.boot</groupId>
            <artifactId>spring-boot-starter-web</artifactId>
            <exclusions>
                <exclusion>
                    <groupId>org.springframework.boot</groupId>
                    <artifactId>spring-boot-starter-tomcat</artifactId>
                </exclusion>
            </exclusions>
        </dependency>
        <dependency>
            <groupId>org.springframework.boot</groupId>
            <artifactId>spring-boot-starter-tomcat</artifactId>
            <scope>provided</scope>
        </dependency>
至于为什么定义 scope 为 provided 往下看:
Maven 依赖中的 scope
scope元素的作用:控制 dependency 元素的使用范围。通俗的讲,就是控制 Jar 包在哪些范围被加载和使用。☆★☆★☆★☆★☆★☆★☆★☆★☆★☆★☆★☆★☆★☆★☆★☆★☆★☆★☆★☆★☆★☆★☆★☆★☆★☆★☆★☆★☆★
compile(默认)
含义:compile 是默认值,如果没有指定 scope 值,该元素的默认值为 compile。被依赖项目需要参与到当前项目的编译,测试,打包,运行等阶段。打包的时候通常会包含被依赖项目。
provided
含义:被依赖项目理论上可以参与编译、测试、运行等阶段,相当于compile,但是再打包阶段做了exclude的动作。
适用场景:例如, 如果我们在开发一个web 应用,在编译时我们需要依赖 servlet-api.jar,但是在运行时我们不需要该 jar 包,因为这个 jar 包已由应用服务器提供,此时我们需要使用 provided 进行范围修饰。
runtime
含义:表示被依赖项目无需参与项目的编译,但是会参与到项目的测试和运行。与compile相比,被依赖项目无需参与项目的编译。
适用场景:例如,在编译的时候我们不需要 JDBC API 的 jar 包,而在运行的时候我们才需要 JDBC 驱动包。
test
含义: 表示被依赖项目仅仅参与测试相关的工作,包括测试代码的编译,执行。
适用场景:例如,Junit 测试。
system
含义:system 元素与 provided 元素类似,但是被依赖项不会从 maven 仓库中查找,而是从本地系统中获取,systemPath 元素用于制定本地系统中 jar 文件的路径。例如下方例子:
<dependency>
    <groupId>com.renshan</groupId>
    <artifactId>kings-power</artifactId>
    <version>12.0.1.2</version>
    <scope>system</scope>
    <systemPath>${basedir}/WebContent/WEB-INF/lib/kings-power.jar</systemPath>
</dependency>
import
它只使用在 dependencyManagement 中,表示从其它的 pom 中导入 dependency 的配置
5-4:我的 application.yml 文件配置
#server:
#  port: 8888
#  servlet:
#    context-path:
# 上面四行已经用不到了,在WAS中都有定义

spring:
  profiles:
    active: dev
5-5:我的 application-dev.yml 文件配置
spring:
  datasource:
    jndi-name: java:comp/env/datasource-jndi
  resources:
    static-locations:
mybatis:
  mapper-locations: classpath:mappers/*.xml
  configuration:
    log-impl: org.apache.ibatis.logging.stdout.StdOutImpl
