Vue项目搭建流程中的知识点(移动端)
项目初始化
1 . 对 Index.html 文件中 mate标签进行完善
禁止移动端用户缩小放大页面,比例始终是1:1
<meta name="viewport" content="width=device-width,initial-scale=1.0,minimum-scale=1.0,maximum-scale=1.0,user-scalable=no">
2 . reset.css
1 . 先引入 reset.css ,就是重置页面样式表(把不同手机的初始化样式做一个统一)
reset.css 代码网上很多,随便找一个 ,放在 assets 文件下自定义一个css 文件下即可
2 . 再引入一个 border.css 文件(解决移动端 1px 边框的问题)
3 . 再引入一个 fastclick 库 (解决移动端click时间 300ms 延迟的问题)
(目前主流浏览器都自带解决移动端click时间 300ms 延迟的问题的问题,
只需要在css文件中引入
html{
	touch-action:manipulation;
}
)
在 Git 终端,项目目录下 输入 npm install fastclick --save,下载依赖包
4 . 再去 iconfont 阿里巴巴矢量库创建一个 项目矢量库
3 .
安装 stylus(类似less sess之类的css编辑) 依赖包
npm install stylus --save
npm install stylus-loader --save
4 .iconfont 的引入
在 main.js 中引入 iconfont
iconfont 的使用:
先设置要使用iconfont标签的类名class=“iconfont” 再将iconfont代码复制进去即可
<div class="header-right">
城市
<span class="iconfont arror-icon"></span>
</div>
5 . 轮播图
插件地址https://github.com/surmon-china/vue-awesome-swiper
使用第三方的插件库 vue-awesome-swiper 来实现轮播图
在 Git 终端,项目目录下 输入 npm install [email protected] --save,下载依赖包
首先在 main.js 文件中引入:
import Vue from ‘vue’
import VueAwesomeSwiper from 'vue-awesome-swiper’
还需要引入css文件:
import ‘swiper/css/swiper.css’ 如果这个报错
就引入这个 import 'swiper/dist/css/swiper.css’
然后使用
Vue.use(VueAwesomeSwiper)
6 . axios 进行 ajax 请求
安装 axios
npm install axios --save
axios 的基本使用方法
	mounted() {
        this.getCityInfo();
    },
    methods: {
        getCityInfo:function(){
            // axios.get('./api/city.json')
            // .then(this.getCityInfoSucc)
            axios.get('./api/city.json')
            .then((data) => {
                this.getCityInfoSucc(data)
            });
        },
        getCityInfoSucc:function(reslut){
            reslut = reslut.data
            if( reslut.ret && reslut.data ){
                this.city = reslut.data.cities;
            }
        }
    },
7 . better-scroll 插件的使用
https://github.com/ustbhuangyi/better-scroll
下载 better-scroll 插件
npm install better-scroll --save
	// 先将其导入 script标签内
	import Bscroll from 'better-scroll'
	export default {
    props:{
        city:Object,
        hot:Array,
    },
    name: 'CityList',
    // 再在生命周期函数 mounted 中,将其实例化,并传入需要使用 scroll 的DOM元素
    mounted() {
        this.scroll = new Bscroll(this.$refs.wrapper);
    }
}
better-scroll 点击右侧 字母 跳转到指定 区域的功能
letter 为其他组件传递过来的参数
ele 为 上面获取到的DOM 元素,切记 this.$ refs[this.letter] 这样可能获取的是数组,
this.$ refs[this.letter][0] 所以可能需要这样写
	watch: {
        letter:function(){
            if(this.letter){
                const ele = this.$refs[this.letter][0];
                console.log(ele)
                this.scroll.scrollToElement(ele)
            }
        }
    },
8 . vuex 进行数据的 数据共享
各个页面,多个组件之间进行复杂的数据传值很困难的时候,可以这样去想
如果我们能把这些公用的数据资源放到一个公共的存储空间中去
当某一组件改变了这个公共的数据,其他组件都能感知到

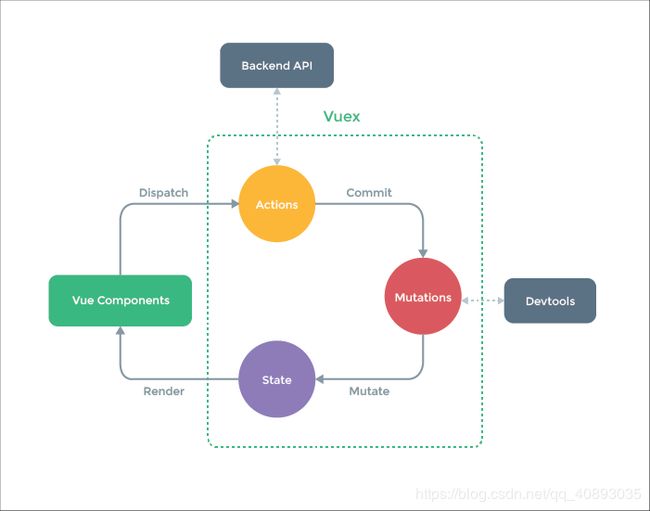
如图:
State 存储的是公用的数据
Actions 做一些异步处理,或者批量的同步操作
Mutations 同步的对数据的改变
组件想改变公用的数据必须先调用 Actions ,然后做一些异步处理,或者批量的同步操作,
然后Actions 再去调用 Mutations 只有通过 Mutations 最终才可以改变公用数据的值。
有时也可以直接略过 Actions ,让组件直接去调用 Mutations 修改 State 里的数据。
当组件调用 Actions 时,需要调用一个 Dispatch 方法来操作 Actions
然后,组件(components)去调用 Mutations 或者 Actions 去调用 Mutations 时,都需要经过 Commit 来操作Mutations
(其实就是一个单向数据的改变流程)
创建一个 store 区域,也就是图中的虚线包裹的区域,紧接着创建了一个 state 区域,里面存放了一个数据,city
import Vue from 'vue'
import Vuex from 'vuex'

Vue.use(Vuex)

export default new Vuex.Store({
    state:{
        city:'北京'
    },
})
然后将创建的区域,引入到 main.js 里, 并注册,这样大家都可以使用了,
import store from './store'
new Vue({
el: '#app',
router,
// 这里注册
store:store,
components: { App },
template: '组件 通过 Dispatch 方法对数据进行修改
1 . 在 methods 里给指定 DOM绑定事件,将参数传递进函数
		<div class="button-wrapper"
            v-for="(item, index) in hot" :key="item.id"
            @click="handleCityClick(item.name)"
            >
2 . 在组件下面的 methods 里定义一个方法,将city参数传递进去,然后调用 store 的 dispatch () 方法,
传递两个参数,第一个是 changeCity ,需要在实例化 Vuex的文件中进行定义的函数
methods: {
      handleCityClick:function(city){
        this.$store.dispatch('changeCity',city);
      }
    },
3 . 在实例化 Vuex 的文件中进行 actions 的定义,下面的函数名对应上面的 changeCity ,两个参数,第一个不知道干啥的,好像是上下文,第二个是 this.$store.dispatch(‘changeCity’,city) 传递的参数,city
import Vue from 'vue'
import Vuex from 'vuex'

Vue.use(Vuex)

export default new Vuex.Store({
    state:{
        city: '上海'
    },
    actions:{
        changeCity(ctx,city){
            console.log(city);
        }
    }
})
4 . 根据 Vuex 的图可知,想改变公共的数据,必须 通过actions 执行 commit() 函数
ctx 可以执行 commit() ,
传入两个参数:
第一个是 要在下面的 mutations 中找到函数
第二个是 传递过来的 city 参数,也就是要修改的 参数
然后 state.city = city; 的意思是,公共数据 state 下面的city 属性 ,变成传递过来的 city 的值
import Vue from 'vue'
import Vuex from 'vuex'

Vue.use(Vuex)

export default new Vuex.Store({
    state:{
        city: '上海'
    },
    actions:{
        changeCity(ctx,city){
            ctx.commit('changeCity',city)
        }
    },
    mutations:{
        changeCity(state,city){
            state.city = city;
        }
    }
})
上面也说了,数据比较小时,可以跳过 Actions ,组件(components) 直接调用 commit() 函数,来调用 mutations 中的 函数,改变 state 里面的值
	methods: {
      handleCityClick:function(city){
        this.$store.commit('changeCity',city);
      }
    },
Vuex 的 高级使用 及 localStorage
localStorage 本地存储
在调用Vuex 时,设置 localStorage.city = city;
使用 localStorage 浏览器 可能直接抛出异常,代码就整个都运行不了了,建议加上异常捕获
import Vue from 'vue'
import Vuex from 'vuex'

Vue.use(Vuex)

let defaultCity = '上海'
try {
    if(localStorage.city){
        defaultCity = localStorage.city
    }
} catch (error) {

}
export default new Vuex.Store({
    state:{
        city: defaultCity
    },
    actions:{
        changeCity(ctx,city){
            ctx.commit('changeCity',city)
        }
    },
    mutations:{
        changeCity(state,city){
            state.city = city;
            try {
                localStorage.city = city;
            } catch (error) {

            }
        }
    }
})
mapState , mapMutations , 简单了解一下吧
import {mapState , mapMutations } from 'vuex'
	computed: {
        // mapState的意思是,把Vuex中的city公用数据,映射到computed计算属性中的
        // city中,同时完成赋值和传值
        ...mapState(['city']),
        // mapState方法中的参数也可以是一个对象
        // 意思是,把Vuex中的city公用数据,映射到computed计算属性中的currentCity里
        // ...mapState({
        //     currentCity:'city'
        // })
    }
…mapMutations([‘changeCity’])
翻译一下就是,我在 vuex 池子中,有一个 changeCity 函数,把这个函数映射到 methods 中的changeCity 函数中,和上面一样,完成了赋值和传值,然后调用该方法,传递参数就行
	methods: {
      handleCityClick:function(city){
        this.changeCity(city)
        this.$router.push('/')
      },
      ...mapMutations(['changeCity'])
    }
这两个是等价的,一模一样的
	methods: {
        handleCityClick:function(city){
            this.$store.dispatch('changeCity',city);
            this.$router.push('/')
        }
    },
9 . vue-router 的使用
编程式的导航
// 在 Vue 实例内部,可以通过 $router 访问路由实例
// 因此可以调用 this.$router.push
// 当点击 router-link 时,这个方法会在内部调用
// 所以说点击 router-link :to="…" 等同于调用 router.push(…)
	methods: {
        handleCityClick:function(city){
            this.$store.dispatch('changeCity',city);
            this.$router.push('/')
        }
    },
10 . 性能优化之 keep-alive
在 App.vue 中添加 keep-alive 标签
keep-alive 是 vue 中自带的标签,可以将已经加再过一次的文件放进内存中
如ajax请求文件,这样就不需要一次一次的发送ajax请求
当使用 keep-alive 时,组件里会多出一个生命周期函数 activated
    <keep-alive>
      <!-- router-view的意思就是当前路由所对应的文件 -->
      <router-view/>
    </keep-alive>
activated 每次返回具有 activated生命周期 的页面(也就是重新被显示的时候),activated都会被自动执行
我们想实现一个每次点击不同城市,返回首页时,首页会显示不同城市的内容,可以通过
activated来实现
首先我们需要引入 mapState ,将vuex中的 city 数据项拿出来
import { mapState } from 'vuex'
computed: {
      ...mapState(['city'])
  },
然后我们在发送ajax请求的时候,使用?传递参数的形式,吧city的值传递过去
getHomeInfo:function(){
          axios.get('/api/index.json?city=' + this.city)
          .then(this.getHomeInfoSucc)
      },
最后我们设置一个 lastCity 作为中间变量,this.lastCity !== this.city 如果上次选择的城市和这次选的城市不同时,重新调用ajax请求,并将 this.lastCity = this.city;
mounted() {
      this.lastCity = this.city
      // mounted() 生命周期函数只会加载一次
      this.getHomeInfo();
  },
  activated() {
      if(this.lastCity !== this.city){
          this.lastCity = this.city;
          this.getHomeInfo();
      }
  },
组件中定义的name值是干什么的?
1 . 在定义递归组件时需要用到name值
2 . 对某个页面取消缓存时,我们要在 keep-alive exclude 的属性上设置组件名,可以取消该页面的缓存
(我们知道,当页面设置keep-alive时,生命周期中会多出两个生命周期函数activated 和deactivated,但是 exclude 属性中添加的组件,activated 和 deactivated 生命周期就失效了)
原因:
activated 和 deactivated 将会在 树内的所有嵌套组件中触发。将组件排除在外并不会触发
(简单地说就是,keep-alive 组件将 exclude 属性名中的组件,踢出keep-alive的管理范围了,所以这个组件没法使用activated 和deactivated 生命周期函数)
解决方法:
将原本写在 activated 中的写到 mounted 中
原本写在 deactivated 中的写到 beforeDestroy中
mounted() {
 window.addEventListener(“scroll”, this.sideFloat)
  }
beforeDestroy() {
window.removeEventListener(“scroll”, this.sideFloat)
}
<!-- 注意并不是每次请求都想从缓存中取东西的 exclude="Detail" 的意思是将组件名为
     Detail的页面,不会被缓存,每次进入Detail时,mounted都会被执行
     -->
    <keep-alive exclude="Detail">
3 . Vue.tools ,页面中调试Vue时,会显示一个个的组件名