Retorfit2.0+Rxjava1+Okhttp3实现soap协议的Webservice
最近业余接了一个项目,服务器端使用的是SOAP协议来传输数据,虽然之前也使用过ksoap包来实现SOAP协议传输,但懂不能一直停留在之前的技术上吧… 所以,这次我想换个方法来实现SOAP协议传输。
既然要换SOAP协议的实现方法,那么就先研究一下这个SOAP协议具体是个什么东东
下面是一段SOAP请求:
POST /WebServices/WeatherWebService.asmx HTTP/1.1

User-Agent: Mozilla/4.0 (compatible; MSIE 6.0; MS Web Services Client Protocol 2.0.50727.3603)
Content-Type: text/xml; charset=utf-8
SOAPAction: "http://WebXml.com.cn/getSupportCity"
Host: www.webxml.com.cn
Content-Length: 348
Expect: 100-continue
Connection: Keep-Alive

<soap:Envelope xmlns:soap="http://schemas.xmlsoap.org/soap/envelope/" xmlns:xsi="http://www.w3.org/2001/XMLSchema-instance" xmlns:xsd="http://www.w3.org/2001/XMLSchema"><soap:Body><getSupportCity xmlns="http://WebXml.com.cn/"><byProvinceName>广东byProvinceName>getSupportCity>soap:Body>soap:Envelope>
上面的内容显示,其实SOAP协议实现的就是一个HTTP的POST请求,不过使用了SOAPAction来标识请求的内容是SOAP协议的,接收端需要根据SOAP协议来解析内容;最后的XML格式的内容就是SOAP具体的请求内容了。
明白了这层关系,那么我们就可以考虑使用retrofit和okhttp来实现SOAP协议了。
本文使用到的库:
 // Rxjava
    compile 'io.reactivex:rxandroid:1.2.1'
    compile 'io.reactivex:rxjava:1.1.6'
    // okhttp3
    compile 'com.squareup.okhttp3:okhttp:3.7.0'
    compile 'com.squareup.okhttp3:logging-interceptor:3.7.0'
    compile 'com.squareup.okhttp3:okhttp-urlconnection:3.7.0'
    // Retorfit2
    compile 'com.squareup.retrofit2:retrofit:2.2.0'
    //将网络请求转化成java bean对象 也可以自定义
    compile 'com.squareup.retrofit2:converter-gson:2.2.0'
    compile 'com.squareup.retrofit2:converter-scalars:2.2.0'
    //XML解析
    compile('com.squareup.retrofit2:converter-simplexml:2.2.0') {
        exclude group: 'xpp3', module: 'xpp3'
        exclude group: 'stax', module: 'stax-api'
        exclude group: 'stax', module: 'stax'
    }
    //retrofit和rxandroid连接
    compile 'com.squareup.retrofit2:adapter-rxjava:2.2.0'
注:由于SOAP使用的是XML的数据格式,因此需要使用xml解析器,但需要去掉retrofit中默认的xml格式解析的模块。
首先,需要对okhttp3进行一些设置,包括缓存以及超时机制等,直接上代码:
 //------------------------设置缓存策略------------------------------------
 OkHttpClient.Builder okHttpClient = getdefOkhttp();
 //设置Cache目录
 okHttpClient.cache(defcache());
 //设置缓存
 okHttpClient.addInterceptor(defcacheInterceptor);
 okHttpClient.addNetworkInterceptor(defcacheInterceptor);
 //--------------------------------------------------------------
 mOkHttpClient = okHttpClient.build();
/**
* 缓存
*
* @return
*/
private static Cache defcache() {
int cacheSize = 10 * 1024 * 1024;
return new Cache(new File(FileUtil.getRootPath() + File.separator + "cache"), cacheSize);
}/**
* 缺省OKHttp配置
*
* @return
*/
private static OkHttpClient.Builder getdefOkhttp() {
//Log相关
HttpLoggingInterceptor logging = new HttpLoggingInterceptor();
logging.setLevel(HttpLoggingInterceptor.Level.BODY);
OkHttpClient.Builder okHttpClient = new OkHttpClient.Builder();
okHttpClient.connectTimeout(10, TimeUnit.SECONDS);
okHttpClient.readTimeout(8, TimeUnit.SECONDS);
okHttpClient.writeTimeout(8, TimeUnit.SECONDS);
okHttpClient.addInterceptor(logging);
//失败重连
okHttpClient.retryOnConnectionFailure(true);
return okHttpClient;
}然后,配置retrofit2,注意使用的是SimpleXmlConverterFactory:
Retrofit.Builder retrofitBuilder = new Retrofit.Builder()
                .baseUrl(url)
                //设置OKHttpClient
                .client(mOkHttpClient)
                .addConverterFactory(ScalarsConverterFactory.create())
                .addConverterFactory(SimpleXmlConverterFactory.create(new Persister(new AnnotationStrategy())))
                .addCallAdapterFactory(RxJavaCallAdapterFactory.create());
        return retrofitBuilder.build().create(serviceClass);
OK,以上完成了HTTP请求的通信配置,接下来就是组装SOAP请求内容以及解析SOAP返回值的部分。
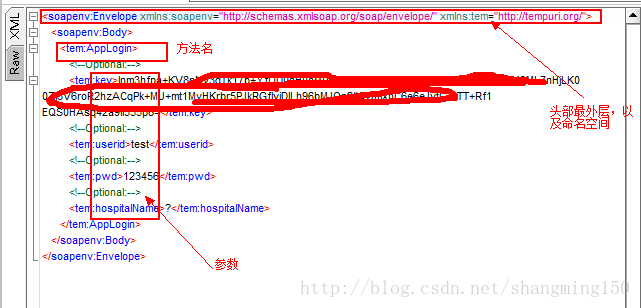
首先,我们需要使用一个工具:SOAPUI,来确定服务器端的SOAP协议版本,协议的命名空间。方法名称以及参数等信息,举个栗子:
请求内容:
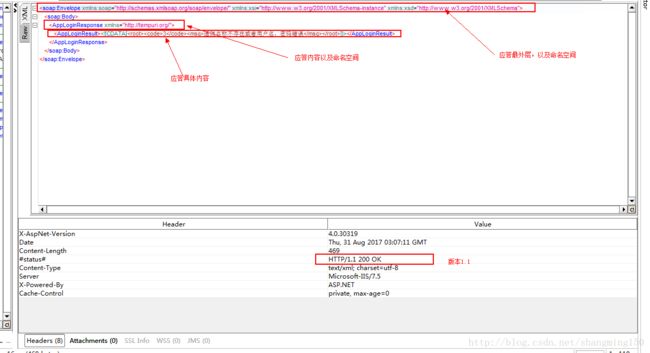
应答内容:(请忽略应答错误内容….)
整明白请求以及应答的头部以及具体内容之后,接下来就是哟个retrofit的simplexml解析器来组装请求和解析应答:(注解的方式)
请求内容:
// 请求头部最外层接口
public abstract class ISOAPReqEnv {
    @Element(name = "soapenv:Body")
    ISOAPReqBody mBody = null;
}

// 请求头部body接口
public abstract class ISOAPReqBody {

}

// 请求头部env层以及body层的实现,因为所有请求的这两层格式都一样
@Root(name = "soapenv:Envelope")
@NamespaceList({
        @Namespace(reference = "http://tempuri.org/", prefix = "tem"),
        @Namespace(reference = "http://schemas.xmlsoap.org/soap/envelope/", prefix = "soapenv")
})
public class SOAPReqEnv extends ISOAPReqEnv {
    public SOAPReqEnv(ISOAPReqBody body) {
        this.mBody = body;
    }
}
......

// 登录请求body
@Root(name = "soapenv:Body", strict = false)
public class SOAPLoginReqBody extends ISOAPReqBody {
    @Element(name = "tem:AppLogin")
    private SOAPLoginReqParams mLoginParams;

    public SOAPLoginReqBody(SOAPLoginReqParams loginParams) {
        this.mLoginParams = loginParams;
    }
}
// 登录请求参数
@Root(name = "tem:AppLogin", strict = false)
public class SOAPLoginReqParams {
    @Element(name = "tem:key")
    private String mKey;
    @Element(name = "tem:userid")
    private String mUserId;
    @Element(name = "tem:pwd")
    private String mPwd;
    @Element(name = "tem:hospitalName")
    private String hospital;

    public SOAPLoginReqParams(String key, String userId, String pwd) {
        this.mKey = key;
        this.mUserId = userId;
        this.mPwd = pwd;
    }
}
说明一下参数,如果参数中存在数组,可使用数组注解:
@ElementArray(name = "tem:filespath", entry = "tem:string")
    private String[] mFilePaths;
应答内容:
// 应答头部最外层
@Root(name = "Envelope")
@NamespaceList({
        @Namespace(reference = "http://www.w3.org/2001/XMLSchema-instance", prefix = "xsi"),
        @Namespace(reference = "http://www.w3.org/2001/XMLSchema", prefix = "xsd"),
        @Namespace(reference = "http://schemas.xmlsoap.org/soap/envelope/", prefix = "soap")
})
public class SOAPLoginResEnv {
    @Element(name = "Body")
    SOAPLoginResBody mBody = null;

    public SOAPLoginResBody getBody() {
        return mBody;
    }
}

// 应答头部body
@Root(name = "Body", strict = false)
public class SOAPLoginResBody {
    @Element(name = "userLoginResponse")
    private SOAPLoginResParams mLoginParams;

    public SOAPLoginResParams getLoginParams() {
        return mLoginParams;
    }
}

// 应答内容
@Root(name = "userLoginResponse", strict = false)
@Namespace(reference = "http://tempuri.org/")
public class SOAPLoginResParams{
    @Element(name = "userLoginResult")
    private String mResult;

    public String getResult() {
        return mResult;
    }

    public void setResult(String result) {
        mResult = result;
    }
}
由于我们这边服务端的应答内容都是自行组装的xml格式的字符串,所以我们的应答内容中就只有一个String类型的response。
如果你的应答内容也是一个类似请求参数类型的,那么可以继续使用请求参数类型的注解方式来解析。
最后,由于我们使用了rxjava1的方式来进行一步的网络请求和解析,我们需要这样发送请求和接收应答:
// 发送请求接口
public interface IServiceStore {
/*
* 指定请求头:
* "Content-Type: text/xml; charset=utf-8"指定文本格式,及编码格式
* SOAPAction的值为
* 分解为http://tempuri.org/ + userLogin,其实就是命名空间+接口名
*/
@Headers({
"Content-Type: text/xml; charset=utf-8",
"SOAPAction: http://tempuri.org/userLogin"
})
@POST("webToPad.asmx")
Observable userLogin(@Body ISOAPReqEnv requestEnvelope);
}
public static void login(ISOAPReqEnv soapReqEnv, final ResultCallback callback) {
createStore();
......
// 发送请求接收应答的实现
public static void login(ISOAPReqEnv soapReqEnv, final ResultCallback callback) {
createStore();
mRxServiceStore.userLogin(soapReqEnv).subscribeOn(Schedulers.io()).observeOn(AndroidSchedulers.mainThread()).subscribe(new Subscriber() {
@Override
public void onCompleted() {
}
@Override
public void onError(@NonNull Throwable e) {
e.printStackTrace();
callback.fail((Exception) e);
}
@Override
public void onNext(@NonNull SOAPLoginResEnv isoapResEnv) {
String result = isoapResEnv.getBody().getLoginParams().getResult();
if (isSuccess(result)) {
callback.success(result);
} else {
onError(new Exception(StringUtil.getMiddle(result, "" , "")));
}
}
});
}
......
private static IServiceStore mRxServiceStore;
private static void createStore() {
mRxServiceStore = createService(IServiceStore.class);
}
这样就完成了SOAP协议的实现。