Cent OS 7 安装 离线版 Mysql 5.7并设置开机自启
CentOS 7 安装 离线版 Mysql 5.7并设置开机自启
- 安装包说明
- 开始安装
- MySql 安装结束
请尊重他人劳动成果 欢迎您的转载,请在首页加上源地址: https://blog.csdn.net/telltao/article/details/89881424
本人网站: www.telltao.cn github: https://github.com/telltao 欢迎您的访问~
安装包说明
MySql mysql-5.7.22-linux-glibc2.12-x86_64.tar.gz
百度网盘: 链接:https://pan.baidu.com/s/1AOTD_HU4Ar5e2RyYqOvFLg 提取码:2d61
开始安装
连接我们的centos服务器 我目前用的是xshell+xftp工具
-
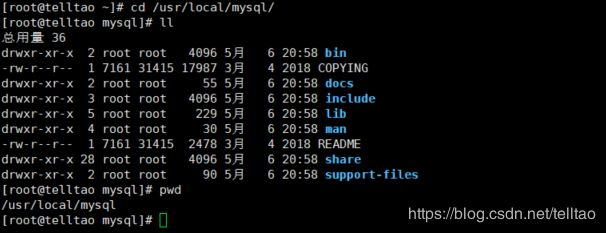
查看我们的MySql
-
执行解压缩命令并移动到 /usr/local/jdk/
# 建议安装在 /usr/local/mysql/ #执行解压缩命令 [root@telltao ~]# tar -zxvf mysql-5.7.22-linux-glibc2.12-x86_64.tar.gz #将压缩完后的文件夹移动到 jdk文件夹下, 注意 mv 命令将 mysql-5.7.22-linux....已重名为mysql [root@telltao ~]# mv mysql-5.7.22-linux-glibc2.12-x86_64 /usr/local/mysql ``` -
创建用户和组
[root@telltao mysql]# groupadd mysql [root@telltao mysql]# useradd -r -g mysql mysql -
给mysql 用户指定专有用户和用户组
[root@telltao mysql]# mkdir /usr/local/mysql/data -
指定用户和用户组
[root@telltao ~]# cd /usr/local/ [root@telltao local]# chown -R mysql mysql/ [root@telltao local]# chgrp -R mysql mysql/ [root@telltao local]# -
初始化MySql
[root@telltao ~]# cd /usr/local/mysql/bin/ #执行初始化命令 [root@telltao bin]# ./mysqld --initialize --user=mysql --basedir=/usr/local/mysql/ --datadir=/usr/local/mysql/data/ --lc_messages_dir=/usr/local/mysql/share --lc_messages=en_US -
记住自动生成的登录密码,方便一会儿使用
-
配置 my.cnf
[mysqld]
lower_case_table_names=1
basedir="/usr/local/mysql"
 #自定义mysql安装主目录
datadir="/usr/local/mysql/data"
 #数据库数据文件目录
character-set-server=utf8
#服务器字符集
sql_mode=STRICT_TRANS_TABLES,NO_ZERO_IN_DATE,NO_ZERO_DATE,ERROR_FOR_DIVISION_BY_ZERO,NO_AUTO_CREATE_USER,NO_ENGINE_SUBSTITUTION
#日志以表的形式输出
#log_output ='TABLE' ;
#是否记录没有使用索引的查询
#log_queries_not_using_indexes = 'OFF';
#慢查询的阈值,单位:秒
#long_query_time = 10 ;
#开启慢查询记录日志
#slow_query_log = 'ON';

[client]
default-character-set=utf8
#客户端链接字符集
[mysql]
default-character-set=utf8
然后保存并退出
- 启动MySql服务
[root@telltao ~]# cd /usr/local/mysql/bin/
[root@telltao bin]# ./mysqld_safe --user=mysql &
[1] 56975
[root@telltao bin]# Logging to '/usr/local/mysql/data/telltao.com.err'.
2019-05-06T13:44:15.152541Z mysqld_safe Starting mysqld daemon with databases from /usr/local/mysql/data
[root@telltao bin]#
- 设置为开机启动
[root@telltao bin]# cd /usr/local/mysql/support-files/
[root@telltao support-files]# cp mysql.server /etc/init.d/mysql
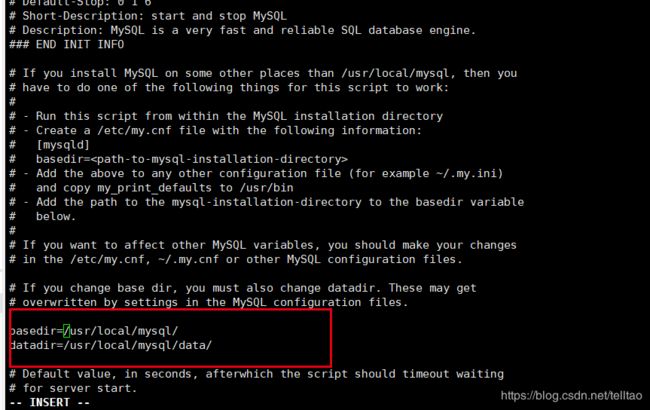
[root@telltao support-files]# vi /etc/init.d/mysql
1. 将mysql文件中的 basedir 和 datadir 补全
#执行授权命令
[root@telltao support-files]# chmod +x /etc/init.d/mysql
[root@telltao support-files]# chkconfig --add mysql
[root@telltao support-files]#
- 服务的启动命令
#查看状态
service mysql status
#停止服务
service mysql stop
#启动服务
service mysql start
#重启服务
service mysql restart
13 登录mysql
#遇到问题
[root@telltao ~]# mysql -uroot -p
bash: mysql: 未找到命令...
#不急 我们慢慢解决
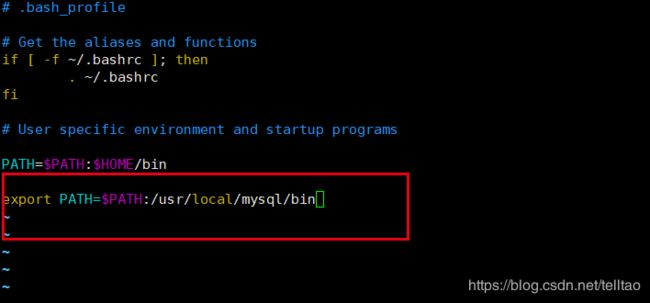
#因为这是由于系统默认会查找/usr/bin下的命令,由于未做映射 所以无法识别
vim ~/.bash_profile
#执行重新加载命令
[root@telltao ~]# source ~/.bash_profile
[root@telltao ~]# mysql -uroot -p
Enter password:
Welcome to the MySQL monitor.  Commands end with ; or \g.
Your MySQL connection id is 2
Server version: 5.7.22

Copyright (c) 2000, 2018, Oracle and/or its affiliates. All rights reserved.

Oracle is a registered trademark of Oracle Corporation and/or its
affiliates. Other names may be trademarks of their respective
owners.

Type 'help;' or '\h' for help. Type '\c' to clear the current input statement.

mysql>
#登录成功后,修改密码
mysql> set password=password("root");
Query OK, 0 rows affected, 1 warning (0.00 sec)
#授权他人登录
mysql> grant all privileges on *.* to'root' @'%' identified by 'root';
Query OK, 0 rows affected, 1 warning (0.00 sec)
#使授权生效
mysql> flush privileges;
Query OK, 0 rows affected (0.01 sec)
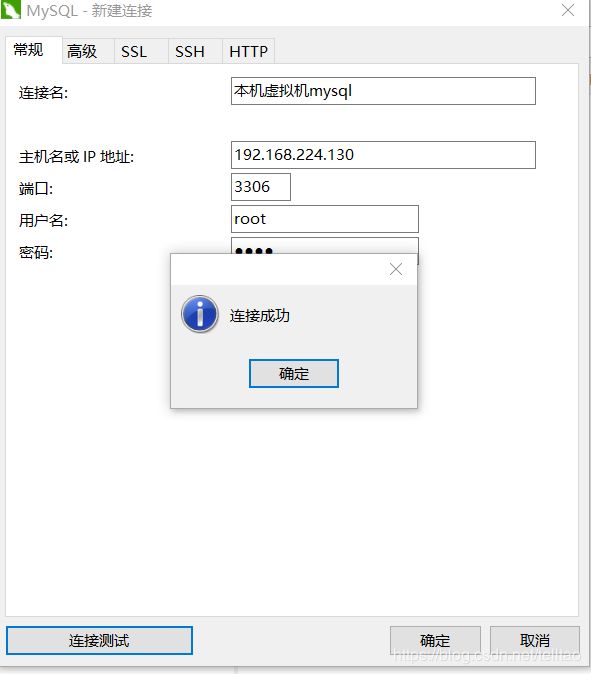
- 使用 navicat premium 远程登录
MySql 安装结束
请尊重他人劳动成果 欢迎您的转载,请在首页加上源地址: https://blog.csdn.net/telltao/article/details/89881424


