并发编程-原理
目录
- 1.指令级并行原理
- 1.1.名词
- 1.2鱼罐头的故事
- 1.3指令重排序优化
- 1.4支持流水线的处理器
- 1.5SuperScalar 处理器
- 2.CPU 缓存结构原理
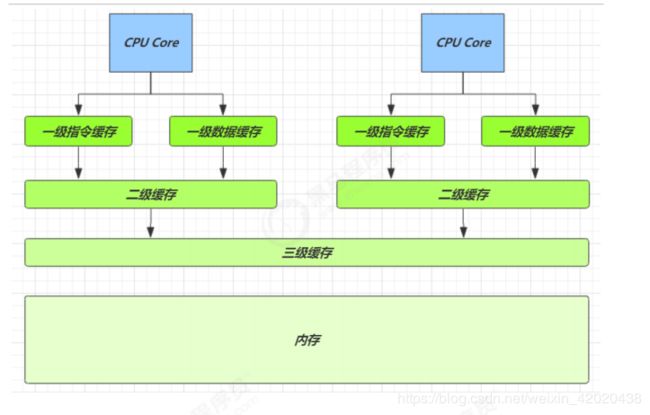
- 2.1 CPU 缓存结构
- 2.2 CPU 缓存读
- 2.3 CPU 缓存一致性
- 2.4 内存屏障
- 3.volatile 原理
- 3.1 如何保证可见性
- 3.2如何保证有序性
- 3.3double-checked locking 问题
- 3.4double-checked locking 解决
- 4.final 原理
- 4.1 设置 final 变量的原理
- 4.2 获取 final 变量的原理
- 5.Monitor 原理
- 5.1Monitor 被翻译为监视器或管程
- 6.synchronized 原理(字节码层面来分析)
- 7.synchronized 原理进阶
- 7.1 轻量级锁
- 7.2 锁膨胀
- 7.3 自旋优化
- 7.4 偏向锁
- 7.5 锁消除
- 8.wait notify 原理
- 9.join 原理
- 10.park unpark 原理
- 11.AQS 原理
- 11.1 概述
- 11.2实现不可重入锁
- 12.ReentrantLock 原理
- 12.1 非公平锁实现原理
- 12.2 可重入原理
- 12.3 可打断原理
- 12.4公平锁实现原理
- 12.5 条件变量实现原理
- 13.读写锁原理
- 14.Semaphore 原理
- 15.ConcurrentHashMap 原理
- 16.LinkedBlockingQueue 原理
1.指令级并行原理
1.1.名词
Clock Cycle Time
主频的概念大家接触的比较多,而 CPU 的 Clock Cycle Time(时钟周期时间),等于主频的倒数,意思是 CPU 能够识别的最小时间单位,比如说 4G 主频的 CPU 的 Clock Cycle Time 就是 0.25 ns,作为对比,我们墙上挂钟的Cycle Time 是 1s
例如,运行一条加法指令一般需要一个时钟周期时间
CPI
有的指令需要更多的时钟周期时间,所以引出了 CPI (Cycles Per Instruction)指令平均时钟周期数
IPC
IPC(Instruction Per Clock Cycle) 即 CPI 的倒数,表示每个时钟周期能够运行的指令数
CPU 执行时间
程序的 CPU 执行时间,即我们前面提到的 user + system 时间,可以用下面的公式来表示
程序 CPU 执行时间 = 指令数 * CPI * Clock Cycle Time
1.2鱼罐头的故事
加工一条鱼需要 50 分钟,只能一条鱼、一条鱼顺序加工…
可以将每个鱼罐头的加工流程细分为 5 个步骤:
- 去鳞清洗 10分钟
- 蒸煮沥水 10分钟
- 加注汤料 10分钟
- 杀菌出锅 10分钟
- 真空封罐 10分钟
即使只有一个工人,最理想的情况是:他能够在 10 分钟内同时做好这 5 件事,因为对第一条鱼的真空装罐,不会影响对第二条鱼的杀菌出锅…
1.3指令重排序优化
事实上,现代处理器会设计为一个时钟周期完成一条执行时间最长的 CPU 指令。为什么这么做呢?可以想到指令还可以再划分成一个个更小的阶段,例如,每条指令都可以分为: 取指令 - 指令译码 - 执行指令 - 内存访问 - 数据写回 这 5 个阶段
术语参考:
instruction fetch (IF)
instruction decode (ID)
execute (EX)
memory access (MEM)
register write back (WB)
在不改变程序结果的前提下,这些指令的各个阶段可以通过重排序和组合来实现指令级并行,这一技术在 80’s 中叶到 90’s 中叶占据了计算架构的重要地位。
提示:
分阶段,分工是提升效率的关键!
指令重排的前提是,重排指令不能影响结果,例如
// 可以重排的例子
int a = 10; // 指令1
int b = 20; // 指令2
System.out.println( a + b );
// 不能重排的例子
int a = 10; // 指令1
int b = a - 5; // 指令2
1.4支持流水线的处理器
现代 CPU 支持多级指令流水线,例如支持同时执行 取指令 - 指令译码 - 执行指令 - 内存访问 - 数据写回 的处理器,就可以称之为五级指令流水线。这时 CPU 可以在一个时钟周期内,同时运行五条指令的不同阶段(相当于一条执行时间最长的复杂指令),IPC = 1,本质上,流水线技术并不能缩短单条指令的执行时间,但它变相地提高了
指令地吞吐率。
提示:
奔腾四(Pentium 4)支持高达 35 级流水线,但由于功耗太高被废弃
1.5SuperScalar 处理器
大多数处理器包含多个执行单元,并不是所有计算功能都集中在一起,可以再细分为整数运算单元、浮点数运算单元等,这样可以把多条指令也可以做到并行获取、译码等,CPU 可以在一个时钟周期内,执行多于一条指令,IPC> 1
2.CPU 缓存结构原理
2.1 CPU 缓存结构
查看 cpu 缓存
Architecture: x86_64
CPU op-mode(s): 32-bit, 64-bit
Byte Order: Little Endian
CPU(s): 1
On-line CPU(s) list: 0
Thread(s) per core: 1
Core(s) per socket: 1
Socket(s): 1
NUMA node(s): 1
Vendor ID: GenuineIntel
CPU family: 6
Model: 142
Model name: Intel(R) Core(TM) i7-8565U CPU @ 1.80GHz
Stepping: 11
CPU MHz: 1992.002
BogoMIPS: 3984.00
Hypervisor vendor: VMware
Virtualization type: full
L1d cache: 32K
L1i cache: 32K
L2 cache: 256K
L3 cache: 8192K
NUMA node0 CPU(s): 0
速度比较
| 从 cpu 到 | 大约需要的时钟周期 |
|---|---|
| 寄存器 | 1 cycle |
| L1 | 3~4 cycle |
| L2 | 10~20cycle |
| L3 | 40~45 cycle |
| 内存 | 120~240 cycle |
查看 cpu 缓存行
⚡ root@yihang01 ~ cat /sys/devices/system/cpu/cpu0/cache/index0/coherency_line_size
64
cpu 拿到的内存地址格式是这样的
[高位组标记][低位索引][偏移量]
2.2 CPU 缓存读
读取数据流程如下
- 根据低位,计算在缓存中的索引
- 判断是否有效
0 去内存读取新数据更新缓存行
1 再对比高位组标记是否一致
一致,根据偏移量返回缓存数据
不一致,去内存读取新数据更新缓存行
2.3 CPU 缓存一致性
MESI 协议
- E、S、M 状态的缓存行都可以满足 CPU 的读请求
- E 状态的缓存行,有写请求,会将状态改为 M,这时并不触发向主存的写
- E 状态的缓存行,必须监听该缓存行的读操作,如果有,要变为 S 状态
- M 状态的缓存行,必须监听该缓存行的读操作,如果有,先将其它缓存(S 状态)中该缓存行变成 I 状态(即
- 的流程),写入主存,自己变为 S 状态
- S 状态的缓存行,有写请求,走 4. 的流程
- S 状态的缓存行,必须监听该缓存行的失效操作,如果有,自己变为 I 状态
- I 状态的缓存行,有读请求,必须从主存读取
2.4 内存屏障
Memory Barrier(Memory Fence)
可见性
- 写屏障(sfence)保证在该屏障之前的,对共享变量的改动,都同步到主存当中
- 而读屏障(lfence)保证在该屏障之后,对共享变量的读取,加载的是主存中最新数据
有序性 - 写屏障会确保指令重排序时,不会将写屏障之前的代码排在写屏障之后
- 读屏障会确保指令重排序时,不会将读屏障之后的代码排在读屏障之前
3.volatile 原理
volatile 的底层实现原理是内存屏障,Memory Barrier(Memory Fence)
- 对 volatile 变量的写指令后会加入写屏障
- 对 volatile 变量的读指令前会加入读屏障
3.1 如何保证可见性
- 写屏障(sfence)保证在该屏障之前的,对共享变量的改动,都同步到主存当中
public void actor2(I_Result r) {
 num = 2;
 ready = true; // ready 是 volatile 赋值带写屏障
 // 写屏障
}
- 而读屏障(lfence)保证在该屏障之后,对共享变量的读取,加载的是主存中最新数据
public void actor1(I_Result r) {
 // 读屏障
 // ready 是 volatile 读取值带读屏障
 if(ready) {
 r.r1 = num + num;
 } else {
 r.r1 = 1;
 }
}
还是那句话,不能解决指令交错:
- 写屏障仅仅是保证之后的读能够读到最新的结果,但不能保证读跑到它前面去
- 而有序性的保证也只是保证了本线程内相关代码不被重排序
3.2如何保证有序性
同上(读写屏障的作用)3.3double-checked locking 问题
以著名的 double-checked locking 单例模式为例
public final class Singleton {
 private Singleton() { }
 private static Singleton INSTANCE = null;
 public static Singleton getInstance() {
 if(INSTANCE == null) { // t2
 // 首次访问会同步,而之后的使用没有 synchronized
 synchronized(Singleton.class) {
 if (INSTANCE == null) { // t1
 INSTANCE = new Singleton();
 }
 }
 }
 return INSTANCE;
 }
}
以上的实现特点是:
- 懒惰实例化
- 首次使用 getInstance() 才使用 synchronized 加锁,后续使用时无需加锁
- 有隐含的,但很关键的一点:第一个 if 使用了 INSTANCE 变量,是在同步块之外
但在多线程环境下,上面的代码是有问题的,getInstance 方法对应的字节码为:
0: getstatic #2 // Field INSTANCE:Lcn/itcast/n5/Singleton;
3: ifnonnull 37
6: ldc #3 // class cn/itcast/n5/Singleton
8: dup
9: astore_0
10: monitorenter
11: getstatic #2 // Field INSTANCE:Lcn/itcast/n5/Singleton;
14: ifnonnull 27
17: new #3 // class cn/itcast/n5/Singleton
20: dup
21: invokespecial #4 // Method "":()V
24: putstatic #2 // Field INSTANCE:Lcn/itcast/n5/Singleton;
27: aload_0
28: monitorexit
29: goto 37
32: astore_1
33: aload_0
34: monitorexit
35: aload_1
36: athrow
37: getstatic #2 // Field INSTANCE:Lcn/itcast/n5/Singleton;
40: areturn
其中
-
17 表示创建对象,将对象引用入栈 // new Singleton
-
20 表示复制一份对象引用 // 引用地址
-
21 表示利用一个对象引用,调用构造方法
-
24 表示利用一个对象引用,赋值给 static INSTANCE
也许 jvm 会优化为:先执行 24,再执行 21。如果两个线程 t1,t2 按如下时间序列执行: -
关键在于 0: getstatic 这行代码在 monitor 控制之外,它就像之前举例中不守规则的人,可以越过 monitor 读取INSTANCE 变量的值
-
这时 t1 还未完全将构造方法执行完毕,如果在构造方法中要执行很多初始化操作,那么 t2 拿到的是将是一个未初始化完毕的单例
-
对 INSTANCE 使用 volatile 修饰即可,可以禁用指令重排,但要注意在 JDK 5 以上的版本的 volatile 才会真正有效
3.4double-checked locking 解决
public final class Singleton {
 private Singleton() { }
 private static volatile Singleton INSTANCE = null;
 public static Singleton getInstance() {
 // 实例没创建,才会进入内部的 synchronized代码块
 if (INSTANCE == null) {
 synchronized (Singleton.class) { // t2
 // 也许有其它线程已经创建实例,所以再判断一次
 if (INSTANCE == null) { // t1
 INSTANCE = new Singleton();
 }
 }
 }
 return INSTANCE;
 }
}
字节码上看不出来 volatile 指令的效果
// -------------------------------------> 加入对 INSTANCE 变量的读屏障
0: getstatic #2 // Field INSTANCE:Lcn/itcast/n5/Singleton;
3: ifnonnull 37
6: ldc #3 // class cn/itcast/n5/Singleton
8: dup
9: astore_0
10: monitorenter -----------------------> 保证原子性、可见性
11: getstatic #2 // Field INSTANCE:Lcn/itcast/n5/Singleton;
14: ifnonnull 27
17: new #3 // class cn/itcast/n5/Singleton
20: dup
21: invokespecial #4 // Method "":()V
24: putstatic #2 // Field INSTANCE:Lcn/itcast/n5/Singleton;
// -------------------------------------> 加入对 INSTANCE 变量的写屏障
27: aload_0
28: monitorexit ------------------------> 保证原子性、可见性
29: goto 37
32: astore_1
33: aload_0
34: monitorexit
35: aload_1
36: athrow
37: getstatic #2 // Field INSTANCE:Lcn/itcast/n5/Singleton;
40: areturn
如上面的注释内容所示,读写 volatile 变量时会加入内存屏障(Memory Barrier(Memory Fence)),保证下面
两点:
可见性
- 写屏障(sfence)保证在该屏障之前的 t1 对共享变量的改动,都同步到主存当中
- 而读屏障(lfence)保证在该屏障之后 t2 对共享变量的读取,加载的是主存中最新数据
有序性 - 写屏障会确保指令重排序时,不会将写屏障之前的代码排在写屏障之后
- 读屏障会确保指令重排序时,不会将读屏障之后的代码排在读屏障之前
- 更底层是读写变量时使用 lock 指令来多核 CPU 之间的可见性与有序性
4.final 原理
4.1 设置 final 变量的原理
理解了 volatile 原理,再对比 final 的实现就比较简单了
public class TestFinal {
  final int a = 20;
  }
字节码
0: aload_0
1: invokespecial #1 // Method java/lang/Object."":()V
4: aload_0
5: bipush 20
7: putfield #2 // Field a:I
 <-- 写屏障
10: return
发现 final 变量的赋值也会通过 putfield 指令来完成,同样在这条指令之后也会加入写屏障,保证在其它线程读到它的值时不会出现为 0 的情况
4.2 获取 final 变量的原理
5.Monitor 原理
5.1Monitor 被翻译为监视器或管程
每个 Java 对象都可以关联一个 Monitor 对象,如果使用 synchronized 给对象上锁(重量级)之后,该对象头的Mark Word 中就被设置指向 Monitor 对象的指针
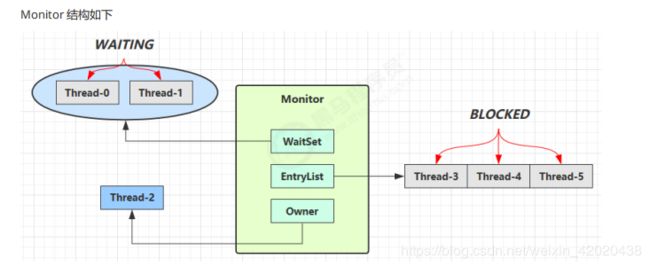
- 刚开始 Monitor 中 Owner 为 null
- 当 Thread-2 执行 synchronized(obj) 就会将 Monitor 的所有者 Owner 置为 Thread-2,Monitor中只能有一个 Owner
- 在 Thread-2 上锁的过程中,如果 Thread-3,Thread-4,Thread-5 也来执行 synchronized(obj),就会进入EntryList BLOCKED
- Thread-2 执行完同步代码块的内容,然后唤醒 EntryList 中等待的线程来竞争锁,竞争的时是非公平的
- 图中 WaitSet 中的 Thread-0,Thread-1 是之前获得过锁,但条件不满足进入 WAITING 状态的线程,后面讲wait-notify 时会分析
注意:
synchronized 必须是进入同一个对象的 monitor 才有上述的效果
不加 synchronized 的对象不会关联监视器,不遵从以上规则
6.synchronized 原理(字节码层面来分析)
底层就是使用monitor
monitor 有操作系统提供,我们每次加锁的时候,object锁对象会和monitor进行关联,object对象中的markword 会记录monitor 的地址,从而可以找到monitor对象。
markword 有自己的结构。详见 并发编程-4.6 java对象头。
static final Object lock = new Object();
static int counter = 0;
public static void main(String[] args) {
    synchronized (lock) {
    counter++;
 }
}
对应的字节码为
public static void main(java.lang.String[]);
 descriptor: ([Ljava/lang/String;)V
 flags: ACC_PUBLIC, ACC_STATIC
 Code:
 stack=2, locals=3, args_size=1
 0: getstatic #2 // <- lock引用 (synchronized开始)
 3: dup
 4: astore_1 // lock引用 -> slot 1
 5: monitorenter // 将 lock对象 MarkWord 置为 Monitor 指针
 6: getstatic #3 // <- i
 9: iconst_1 // 准备常数 1
 10: iadd // +1
 11: putstatic #3 // -> i
 14: aload_1 // <- lock引用
 15: monitorexit // 将 lock对象 MarkWord 重置, 唤醒 EntryList
 16: goto 24
 19: astore_2 // e -> slot 2
 20: aload_1 // <- lock引用
 21: monitorexit // 将 lock对象 MarkWord 重置, 唤醒 EntryList
 22: aload_2 // <- slot 2 (e)
 23: athrow // throw e
 24: return
 Exception table:
 from to target type
 6 16 19 any
 19 22 19 any
 LineNumberTable:
 line 8: 0
 line 9: 6
 line 10: 14
 line 11: 24
 LocalVariableTable:
 Start Length Slot Name Signature
 0 25 0 args [Ljava/lang/String;
 StackMapTable: number_of_entries = 2
 frame_type = 255 /* full_frame */
 offset_delta = 19
 locals = [ class "[Ljava/lang/String;", class java/lang/Object ]
 stack = [ class java/lang/Throwable ]
 frame_type = 250 /* chop */
 offset_delta = 4
注意
方法级别的 synchronized 不会在字节码指令中有所体现
7.synchronized 原理进阶
7.1 轻量级锁
轻量级锁的使用场景:如果一个对象虽然有多线程要加锁,但加锁的时间是错开的(也就是没有竞争),那么可以使用轻量级锁来优化。
轻量级锁对使用者是透明的,即语法仍然是 synchronized
假设有两个方法同步块,利用同一个对象加锁
static final Object obj = new Object();
public static void method1() {
 synchronized( obj ) {
 // 同步块 A
 method2();
 }
}
public static void method2() {
 synchronized( obj ) {
 // 同步块 B
 }
}
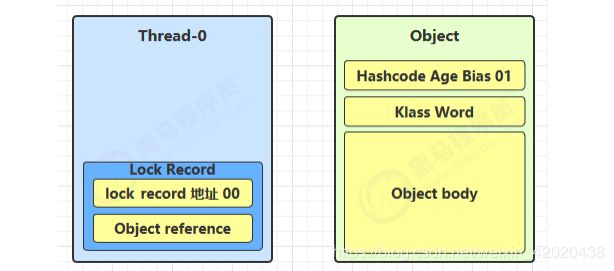
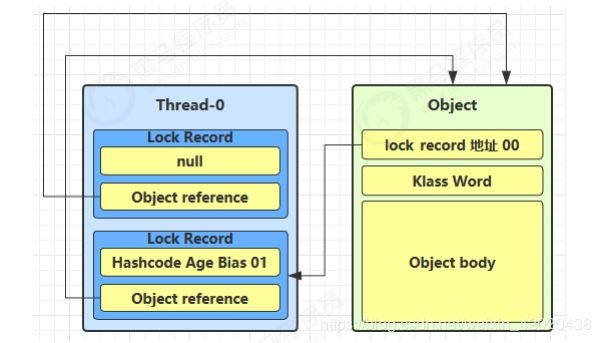
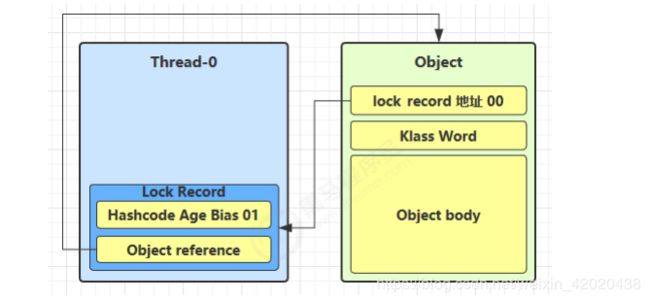
- 创建锁记录(Lock Record)对象,每个线程都的栈帧都会包含一个锁记录的结构,内部可以存储锁定对象的 Mark Word
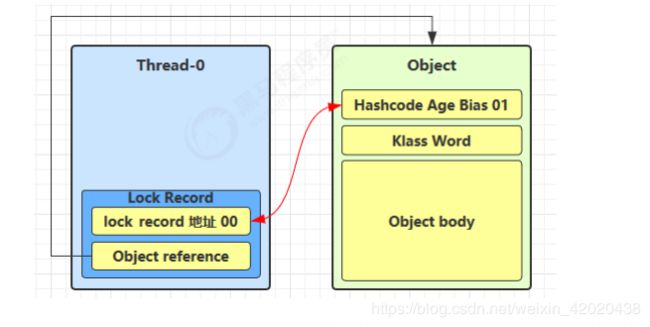
- 让锁记录中 Object reference 指向锁对象,并尝试用 cas 替换 Object 的 Mark Word,将 Mark Word 的值存入锁记录
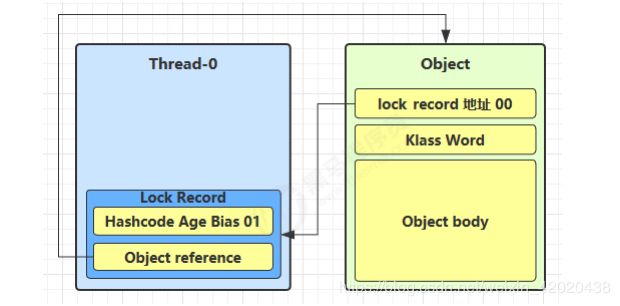
- 如果 cas 替换成功,对象头中存储了 锁记录地址和状态 00 ,表示由该线程给对象加锁,这时图示如下
- 如果 cas 失败,有两种情况
1.如果是其它线程已经持有了该 Object 的轻量级锁,这时表明有竞争,进入锁膨胀过程
2. 如果是自己执行了 synchronized 锁重入,那么再添加一条 Lock Record 作为重入的计数
- 当退出 synchronized 代码块(解锁时)如果有取值为 null 的锁记录,表示有重入,这时重置锁记录,表示重入计数减一
- 当退出 synchronized 代码块(解锁时)锁记录的值不为 null,这时使用 cas 将 Mark Word 的值恢复给对象头
成功,则解锁成功
失败,说明轻量级锁进行了锁膨胀或已经升级为重量级锁,进入重量级锁解锁流程
7.2 锁膨胀
如果在尝试加轻量级锁的过程中,CAS 操作无法成功,这时一种情况就是有其它线程为此对象加上了轻量级锁(有竞争),这时需要进行锁膨胀,将轻量级锁变为重量级锁。
static Object obj = new Object();
public static void method1() {
 synchronized( obj ) {
 // 同步块
 }
}
- 当 Thread-1 进行轻量级加锁时,Thread-0 已经对该对象加了轻量级锁
- 这时 Thread-1 加轻量级锁失败,进入锁膨胀流程
即为 Object 对象申请 Monitor 锁,让 Object 指向重量级锁地址
然后自己进入 Monitor 的 EntryList BLOCKED
- 当 Thread-0 退出同步块解锁时,使用 cas 将 Mark Word 的值恢复给对象头,失败。这时会进入重量级解锁流程,即按照 Monitor 地址找到 Monitor 对象,设置 Owner 为 null,唤醒 EntryList 中 BLOCKED 线程
7.3 自旋优化
重量级锁竞争的时候,还可以使用自旋来进行优化,如果当前线程自旋成功(即这时候持锁线程已经退出了同步块,释放了锁),这时当前线程就可以避免阻塞。
自旋重试成功的情况
| 线程 1 (core 1 上) | 对象 Mark | 线程 2 (core 2 上) |
|---|---|---|
| 10(重量锁) | ||
| 访问同步块,获取 monitor | 10(重量锁)重量锁指针 | |
| 成功(加锁) | 10(重量锁)重量锁指针 | |
| 执行同步块 | 10(重量锁)重量锁指针 | |
| 执行同步块 | 10(重量锁)重量锁指针 | 访问同步块,获取 monitor |
| 执行同步块 | 10(重量锁)重量锁指针 | 自旋重试 |
| 执行完毕 | 10(重量锁)重量锁指针 | 自旋重试 |
| 成功(解锁) | 01(无锁) | 自旋重试 |
| 10(重量锁)重量锁指针 | 成功(加锁) | |
| 10(重量锁)重量锁指针 | 执行同步块 |
- 自旋重试失败的情况
| 线程 1 (core 1 上) | 对象 Mark | 线程 2 (core 2 上) |
|---|---|---|
| 10(重量锁) | ||
| 访问同步块,获取 monitor | 10(重量锁)重量锁指针 | |
| 成功(加锁) | 10(重量锁)重量锁指针 | |
| 执行同步块 | 10(重量锁)重量锁指针 | |
| 执行同步块 | 10(重量锁)重量锁指针 | 访问同步块,获取 monitor |
| 执行同步块 | 10(重量锁)重量锁指针 | 自旋重试 |
| 执行同步块 | 10(重量锁)重量锁指针 | 自旋重试 |
| 执行同步块 | 10(重量锁)重量锁指针 | 自旋重试 |
| 执行同步块 | 10(重量锁)重量锁指针 | 自旋重试 |
| 执行同步块 | 10(重量锁)重量锁指针 | 阻塞 |
- 自旋会占用 CPU 时间,单核 CPU 自旋就是浪费,多核 CPU 自旋才能发挥优势。
- 在 Java 6 之后自旋锁是自适应的,比如对象刚刚的一次自旋操作成功过,那么认为这次自旋成功的可能性会高,就多自旋几次;反之,就少自旋甚至不自旋,总之,比较智能。
- Java 7 之后不能控制是否开启自旋功能
7.4 偏向锁
轻量级锁在没有竞争时(就自己这个线程),每次重入仍然需要执行 CAS 操作。
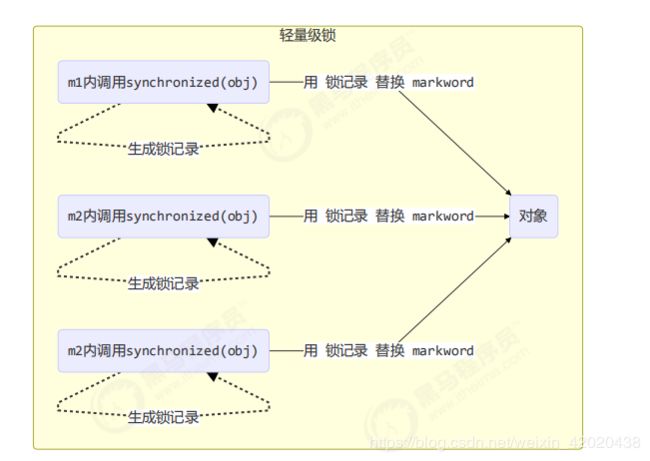
Java 6 中引入了偏向锁来做进一步优化:只有第一次使用 CAS 将线程 ID 设置到对象的 Mark Word 头,之后发现这个线程 ID 是自己的就表示没有竞争,不用重新 CAS。以后只要不发生竞争,这个对象就归该线程所有
例如
static final Object obj = new Object();
public static void m1() {
 synchronized( obj ) {
 // 同步块 A
 m2();
 }
}
public static void m2() {
 synchronized( obj ) {
 // 同步块 B
 m3();
 }
}
public static void m3() {
 synchronized( obj ) {
  // 同步块 C
 }
}
一个对象创建时:
- 如果开启了偏向锁(默认开启),那么对象创建后,markword 值为 0x05 即最后 3 位为 101,这时它的thread、epoch、age 都为 0
- 偏向锁是默认是延迟的,不会在程序启动时立即生效,如果想避免延迟,可以加 VM 参数 -XX:BiasedLockingStartupDelay=0 来禁用延迟
- 如果没有开启偏向锁,那么对象创建后,markword 值为 0x01 即最后 3 位为 001,这时它的 hashcode、age 都为 0,第一次用到 hashcode 时才会赋值
1) 测试延迟特性
2) 测试偏向锁
class Dog {}
利用 jol 第三方工具来查看对象头信息(注意这里我扩展了 jol 让它输出更为简洁)
// 添加虚拟机参数 -XX:BiasedLockingStartupDelay=0
public static void main(String[] args) throws IOException {
 Dog d = new Dog();
 ClassLayout classLayout = ClassLayout.parseInstance(d);
 new Thread(() -> {
 log.debug("synchronized 前");
 System.out.println(classLayout.toPrintableSimple(true));
 synchronized (d) {
 log.debug("synchronized 中");
 System.out.println(classLayout.toPrintableSimple(true));
 }
 log.debug("synchronized 后");
 System.out.println(classLayout.toPrintableSimple(true));
 }, "t1").start();
 }
输出(101结尾代表偏向锁 001 代表正常的锁 00 结尾代表轻量级锁 10结尾代表重量级锁)
11:08:58.117 c.TestBiased [t1] - synchronized 前
00000000 00000000 00000000 00000000 00000000 00000000 00000000 00000101
11:08:58.121 c.TestBiased [t1] - synchronized 中
00000000 00000000 00000000 00000000 00011111 11101011 11010000 00000101
11:08:58.121 c.TestBiased [t1] - synchronized 后
00000000 00000000 00000000 00000000 00011111 11101011 11010000 00000101
注意
处于偏向锁的对象解锁后,线程 id 仍存储于对象头中
3)测试禁用
在上面测试代码运行时在添加 VM 参数 -XX:-UseBiasedLocking 禁用偏向锁
输出
11:13:10.018 c.TestBiased [t1] - synchronized 前
00000000 00000000 00000000 00000000 00000000 00000000 00000000 00000001
11:13:10.021 c.TestBiased [t1] - synchronized 中
00000000 00000000 00000000 00000000 00100000 00010100 11110011 10001000
11:13:10.021 c.TestBiased [t1] - synchronized 后
00000000 00000000 00000000 00000000 00000000 00000000 00000000 00000001
- 测试 hashCode
正常状态对象一开始是没有 hashCode 的,第一次调用才生成
撤销 - 调用对象 hashCode
调用了对象的 hashCode,但偏向锁的对象 MarkWord 中存储的是线程 id,如果调用 hashCode 会导致偏向锁被撤销
- 轻量级锁会在锁记录中记录 hashCode
- 重量级锁会在 Monitor 中记录 hashCode
在调用 hashCode 后使用偏向锁,记得去掉 -XX:-UseBiasedLocking
11:22:10.386 c.TestBiased [main] - 调用 hashCode:1778535015
11:22:10.391 c.TestBiased [t1] - synchronized 前
00000000 00000000 00000000 01101010 00000010 01001010 01100111 00000001
11:22:10.393 c.TestBiased [t1] - synchronized 中
00000000 00000000 00000000 00000000 00100000 11000011 11110011 01101000
11:22:10.393 c.TestBiased [t1] - synchronized 后
00000000 00000000 00000000 01101010 00000010 01001010 01100111 00000001
撤销 - 其它线程使用对象
当有其它线程使用偏向锁对象时,会将偏向锁升级为轻量级锁
private static void test2() throws InterruptedException {
 Dog d = new Dog();
 Thread t1 = new Thread(() -> {
 synchronized (d) {
 log.debug(ClassLayout.parseInstance(d).toPrintableSimple(true));
 }
 synchronized (TestBiased.class) {
 TestBiased.class.notify();
 }
 // 如果不用 wait/notify 使用 join 必须打开下面的注释
 // 因为:t1 线程不能结束,否则底层线程可能被 jvm 重用作为 t2 线程,底层线程 id 是一样的
 /*try {
 System.in.read();
 } catch (IOException e) {
 e.printStackTrace();
 }*/
 }, "t1");
 t1.start();
 Thread t2 = new Thread(() -> {
 synchronized (TestBiased.class) {
 try {
 TestBiased.class.wait();
 } catch (InterruptedException e) {
 e.printStackTrace();
 }
 }
 log.debug(ClassLayout.parseInstance(d).toPrintableSimple(true));
 synchronized (d) {
 log.debug(ClassLayout.parseInstance(d).toPrintableSimple(true));
 }
 log.debug(ClassLayout.parseInstance(d).toPrintableSimple(true));
 }, "t2");
 t2.start();
}
输出
[t1] - 00000000 00000000 00000000 00000000 00011111 01000001 00010000 00000101
[t2] - 00000000 00000000 00000000 00000000 00011111 01000001 00010000 00000101
[t2] - 00000000 00000000 00000000 00000000 00011111 10110101 11110000 01000000
[t2] - 00000000 00000000 00000000 00000000 00000000 00000000 00000000 00000001
撤销 - 调用 wait/notify(因为只有重量级锁才有这两个方法)
public static void main(String[] args) throws InterruptedException {
 Dog d = new Dog();
 Thread t1 = new Thread(() -> {
 log.debug(ClassLayout.parseInstance(d).toPrintableSimple(true));
 synchronized (d) {
 log.debug(ClassLayout.parseInstance(d).toPrintableSimple(true));
 try {
 d.wait();
 } catch (InterruptedException e) {
 e.printStackTrace();
 }
 log.debug(ClassLayout.parseInstance(d).toPrintableSimple(true));
 }
 }, "t1");
 t1.start();
 new Thread(() -> {
 try {
 Thread.sleep(6000);
 } catch (InterruptedException e) {
 e.printStackTrace();
 }
 synchronized (d) {
 log.debug("notify");
 d.notify();
 }
 }, "t2").start();
}
输出
[t1] - 00000000 00000000 00000000 00000000 00000000 00000000 00000000 00000101
[t1] - 00000000 00000000 00000000 00000000 00011111 10110011 11111000 00000101
[t2] - notify
[t1] - 00000000 00000000 00000000 00000000 00011100 11010100 00001101 11001010
批量重偏向
如果对象虽然被多个线程访问,但没有竞争,这时偏向了线程 T1 的对象仍有机会重新偏向 T2,重偏向会重置对象的 Thread ID
当撤销偏向锁阈值超过 20 次后,jvm 会这样觉得,我是不是偏向错了呢,于是会在给这些对象加锁时重新偏向至加锁线程
private static void test3() throws InterruptedException {
 Vector<Dog> list = new Vector<>();
 Thread t1 = new Thread(() -> {
 for (int i = 0; i < 30; i++) {
 Dog d = new Dog();
 list.add(d);
 synchronized (d) {
 log.debug(i + "\t" + ClassLayout.parseInstance(d).toPrintableSimple(true));
 }
 }
 synchronized (list) {
 list.notify();
 }
 }, "t1");
 t1.start();

 Thread t2 = new Thread(() -> {
 synchronized (list) {
 try {
 list.wait();
 } catch (InterruptedException e) {
 e.printStackTrace();
 }
 }
 log.debug("===============> ");
 for (int i = 0; i < 30; i++) {
 Dog d = list.get(i);
 log.debug(i + "\t" + ClassLayout.parseInstance(d).toPrintableSimple(true));
 synchronized (d) {
 log.debug(i + "\t" + ClassLayout.parseInstance(d).toPrintableSimple(true));
 }
 log.debug(i + "\t" + ClassLayout.parseInstance(d).toPrintableSimple(true));
 }
 }, "t2");
 t2.start();
}
批量撤销
当撤销偏向锁阈值超过 40 次后,jvm 会这样觉得,自己确实偏向错了,根本就不该偏向。于是整个类的所有对象都会变为不可偏向的,新建的对象也是不可偏向的
static Thread t1,t2,t3;
private static void test4() throws InterruptedException {
 Vector<Dog> list = new Vector<>();
 int loopNumber = 39;
 t1 = new Thread(() -> {
 for (int i = 0; i < loopNumber; i++) {
 Dog d = new Dog();
 list.add(d);
 synchronized (d) {
 log.debug(i + "\t" + ClassLayout.parseInstance(d).toPrintableSimple(true));
 }
 }
 LockSupport.unpark(t2);
 }, "t1");
 t1.start();
 t2 = new Thread(() -> {
 LockSupport.park();
 log.debug("===============> ");
 for (int i = 0; i < loopNumber; i++) {
 Dog d = list.get(i);
 log.debug(i + "\t" + ClassLayout.parseInstance(d).toPrintableSimple(true));
 synchronized (d) {
 log.debug(i + "\t" + ClassLayout.parseInstance(d).toPrintableSimple(true));
 }
 log.debug(i + "\t" + ClassLayout.parseInstance(d).toPrintableSimple(true));
 }
 LockSupport.unpark(t3);
 }, "t2");
 t2.start();
 t3 = new Thread(() -> {
 LockSupport.park();
 log.debug("===============> ");
 for (int i = 0; i < loopNumber; i++) {
 Dog d = list.get(i);
 log.debug(i + "\t" + ClassLayout.parseInstance(d).toPrintableSimple(true));
 synchronized (d) {
 log.debug(i + "\t" + ClassLayout.parseInstance(d).toPrintableSimple(true));
 }
 log.debug(i + "\t" + ClassLayout.parseInstance(d).toPrintableSimple(true));
 }
 }, "t3");
 t3.start();
 t3.join();
 log.debug(ClassLayout.parseInstance(new Dog()).toPrintableSimple(true));
}
7.5 锁消除
@Fork(1)
@BenchmarkMode(Mode.AverageTime)
@Warmup(iterations=3)
@Measurement(iterations=5)
@OutputTimeUnit(TimeUnit.NANOSECONDS)
public class MyBenchmark {
 static int x = 0;
 @Benchmark
 public void a() throws Exception {
 x++;
 }
 @Benchmark
 public void b() throws Exception {
 Object o = new Object();
 synchronized (o) {
 x++;
 }
 }
}
java -jar benchmarks.jar
Benchmark Mode Samples Score Score error Units
c.i.MyBenchmark.a avgt 5 1.542 0.056 ns/op
c.i.MyBenchmark.b avgt 5 1.518 0.091 ns/op
java -XX:-EliminateLocks -jar benchmarks.jar
Benchmark Mode Samples Score Score error Units
c.i.MyBenchmark.a avgt 5 1.507 0.108 ns/op
c.i.MyBenchmark.b avgt 5 16.976 1.572 ns/op
锁粗化
对相同对象多次加锁,导致线程发生多次重入,可以使用锁粗化方式来优化,这不同于之前讲的细分锁的粒度。
8.wait notify 原理
- Owner 线程发现条件不满足,调用 wait 方法,即可进入 WaitSet 变为 WAITING 状态
- BLOCKED 和 WAITING 的线程都处于阻塞状态,不占用 CPU 时间片
- BLOCKED 线程会在 Owner 线程释放锁时唤醒
- WAITING 线程会在 Owner 线程调用 notify 或 notifyAll 时唤醒,但唤醒后并不意味者立刻获得锁,仍需进入EntryList 重新竞争
9.join 原理
是调用者轮询检查线程 alive 状态
  //t1.join();     主线程等待t1线程执行完毕以后再执行

public static void main(String[] args) throws InterruptedException
    {
        System.out.println("main start");

        Thread t1 = new Thread(new Worker("thread-1"));
        t1.start();
        t1.join();
        System.out.println("main end");
    }
在上面的例子中,main线程要等到t1线程运行结束后,才会输出“main end”。如果不加t1.join(),main线程和t1线程是并行的。而加上t1.join(),程序就变成是顺序执行了。
//t1.join();  等价于下面的代码
synchronized (t1) {
 // 调用者线程进入 t1 的 waitSet 等待, 直到 t1 运行结束
 while (t1.isAlive()) {
 t1.wait(0);
 }
}
下面这段代码并没有实现让其他线程并发执行,线程是顺序执行的。
public static void main(String[] args) throws InterruptedException
    {
        System.out.println("main start");

        Thread t1 = new Thread(new Worker("thread-1"));
        Thread t2 = new Thread(new Worker("thread-2"));
        t1.start();
        //等待t1结束,这时候t2线程并未启动
        t1.join();

        //t1结束后,启动t2线程
        t2.start();
        //等待t2结束
        t2.join();

        System.out.println("main end");
    }
为了让t1、t2线程并行,我们可以稍微改一下代码,下面给出完整的代码:
public class JoinTest
{

    public static void main(String[] args) throws InterruptedException
    {
        System.out.println("main start");

        Thread t1 = new Thread(new Worker("thread-1"));
        Thread t2 = new Thread(new Worker("thread-2"));

        t1.start();
        t2.start();

        t1.join();
        t2.join();

        System.out.println("main end");
    }
}

class Worker implements Runnable
{

    private String name;

    public Worker(String name)
    {
        this.name = name;
    }

    @Override
    public void run()
    {
        for (int i = 0; i < 10; i++)
        {
            try
            {
                Thread.sleep(1l);
            }
            catch (InterruptedException e)
            {
                e.printStackTrace();
            }
            System.out.println(name);
        }
    }

}
注意
join 体现的是【保护性暂停】模式,请参考之
10.park unpark 原理
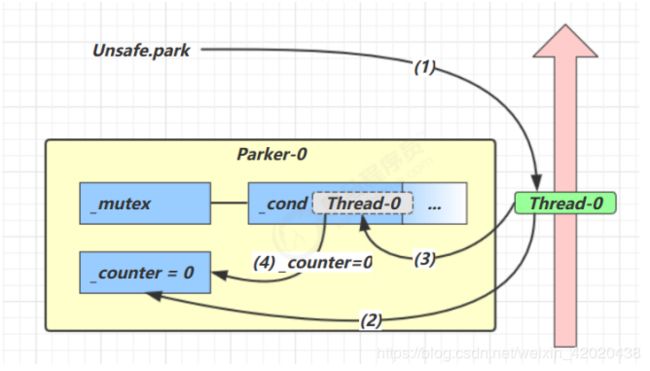
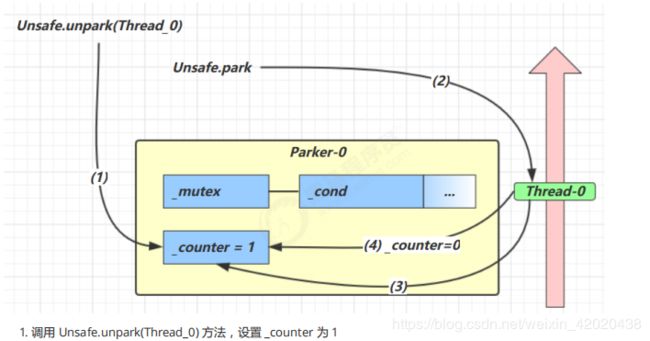
每个线程都有自己的一个 Parker 对象,由三部分组成 _counter , _cond 和 _mutex 打个比喻
- 线程就像一个旅人,Parker 就像他随身携带的背包,条件变量就好比背包中的帐篷。
- _counter 就好比背包中的备用干粮(0 为耗尽,1 为充足)
- 调用 park 就是要看需不需要停下来歇息
1.如果备用干粮耗尽,那么钻进帐篷歇息
2. 如果备用干粮充足,那么不需停留,继续前进 - 调用 unpark,就好比令干粮充足
1.如果这时线程还在帐篷,就唤醒让他继续前进
2.如果这时线程还在运行,那么下次他调用 park 时,仅是消耗掉备用干粮,不需停留继续前进 - 因为背包空间有限,多次调用 unpark 仅会补充一份备用干粮
- 当前线程调用 Unsafe.park() 方法
- 检查 _counter ,本情况为 0,这时,获得 _mutex 互斥锁
- 线程进入 _cond 条件变量阻塞
- 设置 _counter = 0
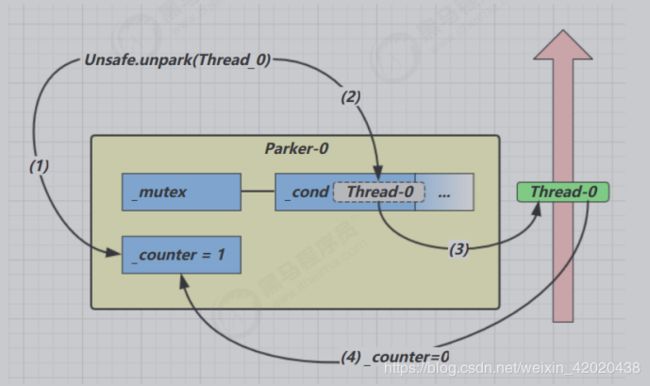
- 调用 Unsafe.unpark(Thread_0) 方法,设置 _counter 为 1
- 唤醒 _cond 条件变量中的 Thread_0
- Thread_0 恢复运行
- 设置 _counter 为 0
- 调用 Unsafe.unpark(Thread_0) 方法,设置 _counter 为 1
- 当前线程调用 Unsafe.park() 方法
- 检查 _counter ,本情况为 1,这时线程无需阻塞,继续运行
- 设置 _counter 为 0
11.AQS 原理
11.1 概述
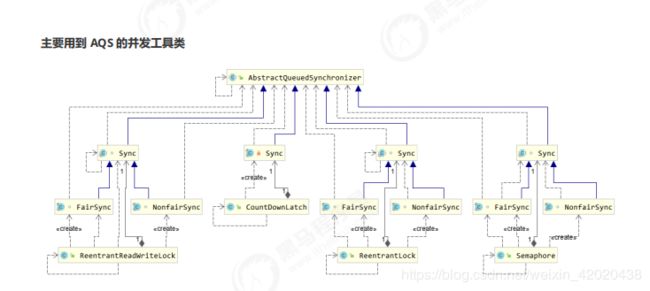
全称是 AbstractQueuedSynchronizer,是阻塞式锁(syncronized)和相关的同步器工具的框架
-
用 state 属性来表示资源的状态(分独占模式和共享模式),子类需要定义如何维护这个状态,控制如何获取锁和释放锁
getState - 获取 state 状态
setState - 设置 state 状态
compareAndSetState - cas 机制设置 state 状态
独占模式是只有一个线程能够访问资源,而共享模式可以允许多个线程访问资源 -
提供了基于 FIFO 的等待队列,类似于 Monitor 的 EntryList
-
条件变量来实现等待、唤醒机制,支持多个条件变量,类似于 Monitor 的 WaitSet
子类主要实现这样一些方法(默认抛出 UnsupportedOperationException)
- tryAcquire
- tryRelease
- tryAcquireShared
- tryReleaseShared
- isHeldExclusively
获取锁的姿势
// 如果获取锁失败
if (!tryAcquire(arg)) {
 // 入队, 可以选择阻塞当前线程 park unpark
}
释放锁的姿势
// 如果释放锁成功
if (tryRelease(arg)) {
 // 让阻塞线程恢复运行
}
11.2实现不可重入锁
自定义同步器
final class MySync extends AbstractQueuedSynchronizer {
 @Override
 protected boolean tryAcquire(int acquires) {
 if (acquires == 1){
 if (compareAndSetState(0, 1)) {
 setExclusiveOwnerThread(Thread.currentThread());
 return true;
 }
 }
 return false;
 }
 @Override
 protected boolean tryRelease(int acquires) {
 if(acquires == 1) {
 if(getState() == 0) {
 throw new IllegalMonitorStateException();
 }
 setExclusiveOwnerThread(null);
 setState(0);
 return true;
 }
 return false;
 }
 protected Condition newCondition() {
 return new ConditionObject();
 }
 @Override
 protected boolean isHeldExclusively() {
 return getState() == 1;
  }
}
自定义锁
有了自定义同步器,很容易复用 AQS ,实现一个功能完备的自定义锁
class MyLock implements Lock {
 static MySync sync = new MySync();
 @Override
 // 尝试,不成功,进入等待队列
 public void lock() {
 sync.acquire(1);
 }
 @Override
 // 尝试,不成功,进入等待队列,可打断
 public void lockInterruptibly() throws InterruptedException {
 sync.acquireInterruptibly(1);
 }
 @Override
 // 尝试一次,不成功返回,不进入队列
 public boolean tryLock() {
 return sync.tryAcquire(1);
 }
 @Override
 // 尝试,不成功,进入等待队列,有时限
 public boolean tryLock(long time, TimeUnit unit) throws InterruptedException {
 return sync.tryAcquireNanos(1, unit.toNanos(time));
 }
 @Override
 // 释放锁
 public void unlock() {
 sync.release(1);
 }
 @Override
 // 生成条件变量
 public Condition newCondition() {
 return sync.newCondition();
 }
}
测试一下
MyLock lock = new MyLock();

new Thread(() -> {
 lock.lock();
 try {
 log.debug("locking...");
 sleep(1);
 } finally {
 log.debug("unlocking...");
 lock.unlock();
 }
},"t1").start();
new Thread(() -> {
 lock.lock();
 try {
 log.debug("locking...");
 } finally {
 log.debug("unlocking...");
 lock.unlock();
 }
},"t2").start()
输出( t2 在t1 解锁以后才能加锁 )
22:29:28.727 c.TestAqs [t1] - locking...
22:29:29.732 c.TestAqs [t1] - unlocking...
22:29:29.732 c.TestAqs [t2] - locking...
22:29:29.732 c.TestAqs [t2] - unlocking...
12.ReentrantLock 原理
12.1 非公平锁实现原理
- 非公平锁实现原理
加锁解锁流程
先从构造器开始看,默认为非公平锁实现
public ReentrantLock() {
 sync = new NonfairSync();
}
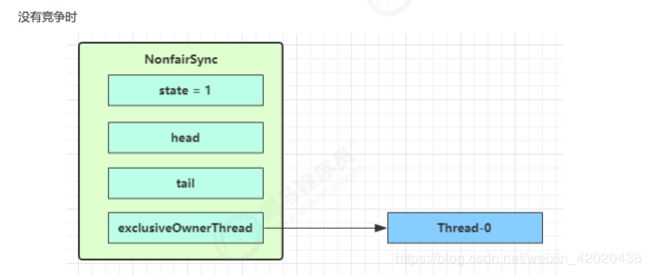
NonfairSync 继承自 AQS
没有竞争时
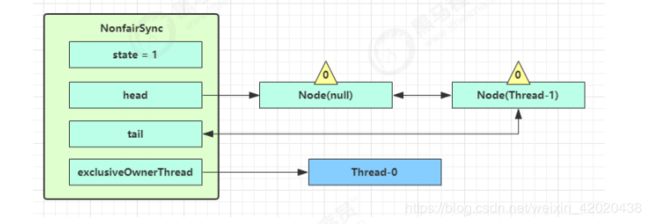
第一个竞争出现时
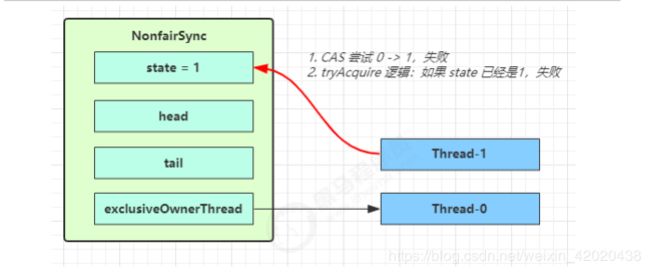
Thread-1 执行了
1. CAS 尝试将 state 由 0 改为 1,结果失败
2. 进入 tryAcquire 逻辑,这时 state 已经是1,结果仍然失败
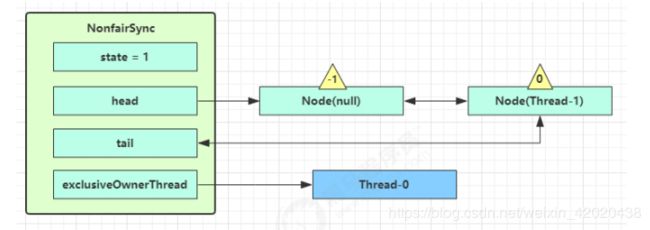
3. 接下来进入 addWaiter 逻辑,构造 Node 队列
- 图中黄色三角表示该 Node 的 waitStatus 状态,其中 0 为默认正常状态
- Node 的创建是懒惰的
- 其中第一个 Node 称为 Dummy(哑元)或哨兵,用来占位,并不关联线程
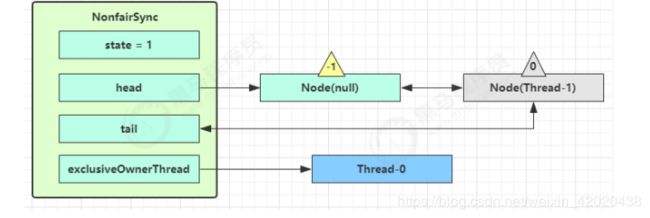
- acquireQueued 会在一个死循环中不断尝试获得锁,失败后进入 park 阻塞
- 如果自己是紧邻着 head(排第二位),那么再次 tryAcquire 尝试获取锁,当然这时 state 仍为 1,失败
- 进入 shouldParkAfterFailedAcquire 逻辑,将前驱 node,即 head 的 waitStatus 改为 -1,这次返回 false
- shouldParkAfterFailedAcquire 执行完毕回到 acquireQueued ,再次 tryAcquire 尝试获取锁,当然这时
state 仍为 1,失败 - 当再次进入 shouldParkAfterFailedAcquire 时,这时因为其前驱 node 的 waitStatus 已经是 -1,这次返回
true - 进入 parkAndCheckInterrupt, Thread-1 park(灰色表示)
再次有多个线程经历上述过程竞争失败,变成这个样子

Thread-0 释放锁,进入 tryRelease 流程,如果成功
- 设置 exclusiveOwnerThread 为 null
- state = 0

当前队列不为 null,并且 head 的 waitStatus = -1,进入 unparkSuccessor 流程
找到队列中离 head 最近的一个 Node(没取消的),unpark 恢复其运行,本例中即为 Thread-1
回到 Thread-1 的 acquireQueued 流程
如果加锁成功(没有竞争),会设置
exclusiveOwnerThread 为 Thread-1,state = 1
head 指向刚刚 Thread-1 所在的 Node,该 Node 清空 Thread
原本的 head 因为从链表断开,而可被垃圾回收
如果这时候有其它线程来竞争(非公平的体现),例如这时有 Thread-4 来了
如果不巧又被 Thread-4 占了先
- Thread-4 被设置为 exclusiveOwnerThread,state = 1
- Thread-1 再次进入 acquireQueued 流程,获取锁失败,重新进入 park 阻塞
加锁源码
// Sync 继承自 AQS
static final class NonfairSync extends Sync {
 private static final long serialVersionUID = 7316153563782823691L;

 // 加锁实现
 final void lock() {
 // 首先用 cas 尝试(仅尝试一次)将 state 从 0 改为 1, 如果成功表示获得了独占锁
 if (compareAndSetState(0, 1))
 setExclusiveOwnerThread(Thread.currentThread());
 else
 // 如果尝试失败,进入 ㈠
 acquire(1);
 }

 // ㈠ AQS 继承过来的方法, 方便阅读, 放在此处
 public final void acquire(int arg) {
 // ㈡ tryAcquire
 if (
 !tryAcquire(arg) &&
 // 当 tryAcquire 返回为 false 时, 先调用 addWaiter ㈣, 接着 acquireQueued ㈤
 acquireQueued(addWaiter(Node.EXCLUSIVE), arg)
 ) {
 selfInterrupt();
 }
 }

 // ㈡ 进入 ㈢
 protected final boolean tryAcquire(int acquires) {
 return nonfairTryAcquire(acquires);
 }

 // ㈢ Sync 继承过来的方法, 方便阅读, 放在此处
 final boolean nonfairTryAcquire(int acquires) {
 final Thread current = Thread.currentThread();
 int c = getState();
 // 如果还没有获得锁
 if (c == 0) {
 // 尝试用 cas 获得, 这里体现了非公平性: 不去检查 AQS 队列
 if (compareAndSetState(0, acquires)) {
 setExclusiveOwnerThread(current);
 return true;
 }
 }
 // 如果已经获得了锁, 线程还是当前线程, 表示发生了锁重入
 else if (current == getExclusiveOwnerThread()) {
 // state++
 int nextc = c + acquires;
 if (nextc < 0) // overflow
 throw new Error("Maximum lock count exceeded");
 setState(nextc);
 return true;
 }
 // 获取失败, 回到调用处
 return false;
 }

 // ㈣ AQS 继承过来的方法, 方便阅读, 放在此处
 private Node addWaiter(Node mode) {
  // 将当前线程关联到一个 Node 对象上, 模式为独占模式
 Node node = new Node(Thread.currentThread(), mode);
 // 如果 tail 不为 null, cas 尝试将 Node 对象加入 AQS 队列尾部
 Node pred = tail;
 if (pred != null) {
 node.prev = pred;
 if (compareAndSetTail(pred, node)) {
 // 双向链表
 pred.next = node;
 return node;
 }
 }
 // 尝试将 Node 加入 AQS, 进入 ㈥
 enq(node);
 return node;
 }

 // ㈥ AQS 继承过来的方法, 方便阅读, 放在此处
 private Node enq(final Node node) {
 for (;;) {
 Node t = tail;
 if (t == null) {
 // 还没有, 设置 head 为哨兵节点(不对应线程,状态为 0)
 if (compareAndSetHead(new Node())) {
 tail = head;
 }
 } else {
 // cas 尝试将 Node 对象加入 AQS 队列尾部
 node.prev = t;
 if (compareAndSetTail(t, node)) {
 t.next = node;
 return t;
 }
 }
 }
 }

 // ㈤ AQS 继承过来的方法, 方便阅读, 放在此处
 final boolean acquireQueued(final Node node, int arg) {
 boolean failed = true;
 try {
 boolean interrupted = false;
 for (;;) {
 final Node p = node.predecessor();
 // 上一个节点是 head, 表示轮到自己(当前线程对应的 node)了, 尝试获取
 if (p == head && tryAcquire(arg)) {
 // 获取成功, 设置自己(当前线程对应的 node)为 head
 setHead(node);
 // 上一个节点 help GC
 p.next = null;
 failed = false;
 // 返回中断标记 false
 return interrupted;
 }
 if (
 // 判断是否应当 park, 进入 ㈦
 shouldParkAfterFailedAcquire(p, node) &&
 // park 等待, 此时 Node 的状态被置为 Node.SIGNAL ㈧
 parkAndCheckInterrupt()
 ) {
 interrupted = true;
 }
 }
 } finally {
 if (failed)
 cancelAcquire(node);
 }
 }

 // ㈦ AQS 继承过来的方法, 方便阅读, 放在此处
 private static boolean shouldParkAfterFailedAcquire(Node pred, Node node) {
 // 获取上一个节点的状态
 int ws = pred.waitStatus;
 if (ws == Node.SIGNAL) {
 // 上一个节点都在阻塞, 那么自己也阻塞好了
 return true;
 }
 // > 0 表示取消状态
 if (ws > 0) {
 // 上一个节点取消, 那么重构删除前面所有取消的节点, 返回到外层循环重试
 do {
 node.prev = pred = pred.prev;
 } while (pred.waitStatus > 0);
 pred.next = node;
 } else {
 // 这次还没有阻塞
 // 但下次如果重试不成功, 则需要阻塞,这时需要设置上一个节点状态为 Node.SIGNAL
 compareAndSetWaitStatus(pred, ws, Node.SIGNAL);
 }
 return false;
 }

 // ㈧ 阻塞当前线程
 private final boolean parkAndCheckInterrupt() {
 LockSupport.park(this);
 return Thread.interrupted();
 }
}
注意
是否需要 unpark 是由当前节点的前驱节点的 waitStatus == Node.SIGNAL 来决定,而不是本节点的waitStatus 决定
解锁源码
// Sync 继承自 AQS
static final class NonfairSync extends Sync {
 // 解锁实现
 public void unlock() {
 sync.release(1);
 }

 // AQS 继承过来的方法, 方便阅读, 放在此处
 public final boolean release(int arg) {
 // 尝试释放锁, 进入 ㈠
 if (tryRelease(arg)) {
 // 队列头节点 unpark
 Node h = head;
 if (
 // 队列不为 null
 h != null &&
 // waitStatus == Node.SIGNAL 才需要 unpark
 h.waitStatus != 0
 ) {
 // unpark AQS 中等待的线程, 进入 ㈡
 unparkSuccessor(h);
 }
 return true;
 }
 return false;
 }

 // ㈠ Sync 继承过来的方法, 方便阅读, 放在此处
 protected final boolean tryRelease(int releases) {
 // state--
 int c = getState() - releases;
 if (Thread.currentThread() != getExclusiveOwnerThread())
 throw new IllegalMonitorStateException();
 boolean free = false;
 // 支持锁重入, 只有 state 减为 0, 才释放成功
 if (c == 0) {
 free = true;
 setExclusiveOwnerThread(null);
 }
 setState(c);
 return free;
 }

 // ㈡ AQS 继承过来的方法, 方便阅读, 放在此处
 private void unparkSuccessor(Node node) {
 // 如果状态为 Node.SIGNAL 尝试重置状态为 0
 // 不成功也可以
 int ws = node.waitStatus;
 if (ws < 0) {
 compareAndSetWaitStatus(node, ws, 0);
 }
 // 找到需要 unpark 的节点, 但本节点从 AQS 队列中脱离, 是由唤醒节点完成的
 Node s = node.next;
 // 不考虑已取消的节点, 从 AQS 队列从后至前找到队列最前面需要 unpark 的节点
 if (s == null || s.waitStatus > 0) {
 s = null;
 for (Node t = tail; t != null && t != node; t = t.prev)
 if (t.waitStatus <= 0)
 s = t;
 }
 if (s != null)
 LockSupport.unpark(s.thread);
 }
}
12.2 可重入原理
static final class NonfairSync extends Sync {
 // ...

 // Sync 继承过来的方法, 方便阅读, 放在此处
 final boolean nonfairTryAcquire(int acquires) {
 final Thread current = Thread.currentThread();
 int c = getState();
 if (c == 0) {
 if (compareAndSetState(0, acquires)) {
 setExclusiveOwnerThread(current);
 return true;
 }
 }
 // 如果已经获得了锁, 线程还是当前线程, 表示发生了锁重入
 else if (current == getExclusiveOwnerThread()) {
 // state++
 int nextc = c + acquires;
 if (nextc < 0) // overflow
 throw new Error("Maximum lock count exceeded");
 setState(nextc);
 return true;
 }
 return false;
 }

 // Sync 继承过来的方法, 方便阅读, 放在此处
 protected final boolean tryRelease(int releases) {
 // state--
 int c = getState() - releases;
 if (Thread.currentThread() != getExclusiveOwnerThread())
 throw new IllegalMonitorStateException();
 boolean free = false;
 // 支持锁重入, 只有 state 减为 0, 才释放成功
 if (c == 0) {
 free = true;
 setExclusiveOwnerThread(null);
 }
  setState(c);
 return free;
 }
}
12.3 可打断原理
不可打断模式
在此模式下,即使它被打断,仍会驻留在 AQS 队列中,一直要等到获得锁后方能得知自己被打断了
// Sync 继承自 AQS
static final class NonfairSync extends Sync {
 // ...

 private final boolean parkAndCheckInterrupt() {
 // 如果打断标记已经是 true, 则 park 会失效
 LockSupport.park(this);
 // interrupted 会清除打断标记
 return Thread.interrupted();
 }

 final boolean acquireQueued(final Node node, int arg) {
 boolean failed = true;
 try {
 boolean interrupted = false;
 for (;;) {
 final Node p = node.predecessor();
 if (p == head && tryAcquire(arg)) {
 setHead(node);
 p.next = null;
 failed = false;
 // 还是需要获得锁后, 才能返回打断状态
 return interrupted;
 }
 if (
 shouldParkAfterFailedAcquire(p, node) &&
 parkAndCheckInterrupt()
 ) {
 // 如果是因为 interrupt 被唤醒, 返回打断状态为 true
 interrupted = true;
 }
 }
 } finally {
 if (failed)
 cancelAcquire(node);
 }
 }

 public final void acquire(int arg) {
 !tryAcquire(arg) &&
 acquireQueued(addWaiter(Node.EXCLUSIVE), arg)
 ) {
 // 如果打断状态为 true
 selfInterrupt();
 }
 }

 static void selfInterrupt() {
 // 重新产生一次中断
 Thread.currentThread().interrupt();
 }
}
可打断模式
static final class NonfairSync extends Sync {
 public final void acquireInterruptibly(int arg) throws InterruptedException {
 if (Thread.interrupted())
 throw new InterruptedException();
 // 如果没有获得到锁, 进入 ㈠
 if (!tryAcquire(arg))
 doAcquireInterruptibly(arg);
 }

 // ㈠ 可打断的获取锁流程
 private void doAcquireInterruptibly(int arg) throws InterruptedException {
 final Node node = addWaiter(Node.EXCLUSIVE);
 boolean failed = true;
 try {
 for (;;) {
 final Node p = node.predecessor();
 if (p == head && tryAcquire(arg)) {
 setHead(node);
 p.next = null; // help GC
 failed = false;
 return;
 }
 if (shouldParkAfterFailedAcquire(p, node) &&
 parkAndCheckInterrupt()) {
 // 在 park 过程中如果被 interrupt 会进入此
 // 这时候抛出异常, 而不会再次进入 for (;;)
 throw new InterruptedException();
 }
 }
 } finally {
 if (failed)
 cancelAcquire(node);
 }
 }
}
12.4公平锁实现原理
static final class FairSync extends Sync {
 private static final long serialVersionUID = -3000897897090466540L;
 final void lock() {
 acquire(1);
 }

 // AQS 继承过来的方法, 方便阅读, 放在此处
 public final void acquire(int arg) {
 if (
 !tryAcquire(arg) &&
 acquireQueued(addWaiter(Node.EXCLUSIVE), arg)
 ) {
 selfInterrupt();
 }
 }
 // 与非公平锁主要区别在于 tryAcquire 方法的实现
 protected final boolean tryAcquire(int acquires) {
 final Thread current = Thread.currentThread();
 int c = getState();
 if (c == 0) {
 // 先检查 AQS 队列中是否有前驱节点, 没有才去竞争
 if (!hasQueuedPredecessors() &&
 compareAndSetState(0, acquires)) {
 setExclusiveOwnerThread(current);
 return true;
 }
 }
 else if (current == getExclusiveOwnerThread()) {
 int nextc = c + acquires;
 if (nextc < 0)
 throw new Error("Maximum lock count exceeded");
 setState(nextc);
 return true;
 }
 return false;
 }

 // ㈠ AQS 继承过来的方法, 方便阅读, 放在此处
 public final boolean hasQueuedPredecessors() {
 Node t = tail;
 Node h = head;
 Node s;
 // h != t 时表示队列中有 Node
 return h != t &&
 (
 // (s = h.next) == null 表示队列中还有没有老二
 (s = h.next) == null ||
 // 或者队列中老二线程不是此线程
 s.thread != Thread.currentThread()
 );
 }
}
12.5 条件变量实现原理
每个条件变量其实就对应着一个等待队列,其实现类是 ConditionObject
await 流程
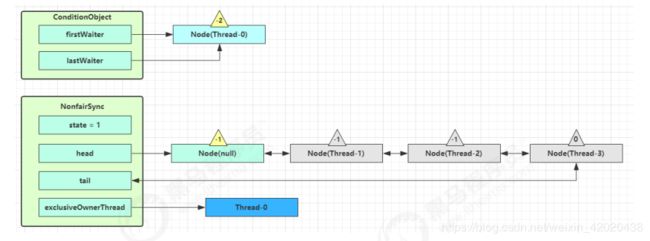
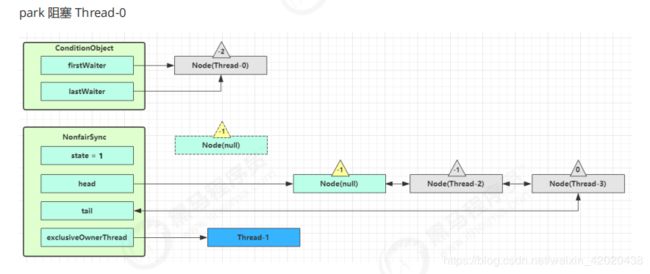
开始 Thread-0 持有锁,调用 await,进入 ConditionObject 的 addConditionWaiter 流程创建新的 Node 状态为 -2(Node.CONDITION),关联 Thread-0,加入等待队列尾部
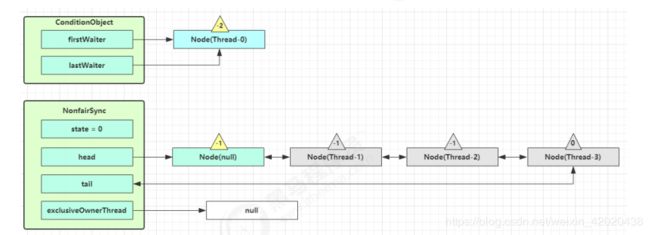
接下来进入 AQS 的 fullyRelease 流程,释放同步器上的锁
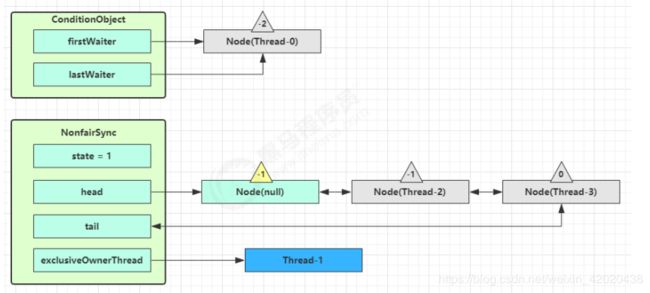
unpark AQS 队列中的下一个节点,竞争锁,假设没有其他竞争线程,那么 Thread-1 竞争成功
park 阻塞 Thread-0
signal 流程
假设 Thread-1 要来唤醒 Thread-0
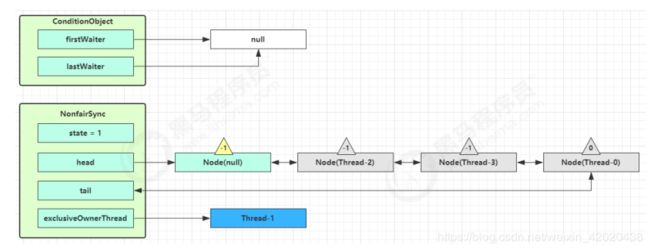
进入 ConditionObject 的 doSignal 流程,取得等待队列中第一个 Node,即 Thread-0 所在 Node
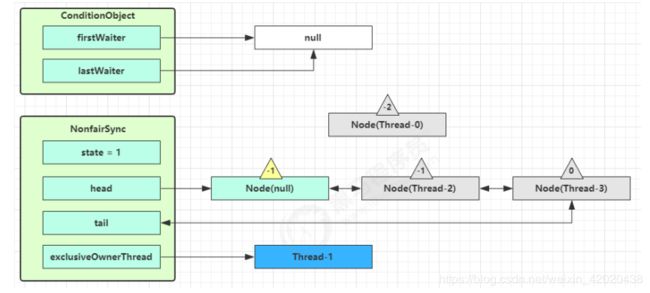
执行 transferForSignal 流程,将该 Node 加入 AQS 队列尾部,将 Thread-0 的 waitStatus 改为 0,Thread-3 的waitStatus 改为 -1
Thread-1 释放锁,进入 unlock 流程,略
源码
public class ConditionObject implements Condition, java.io.Serializable {
 private static final long serialVersionUID = 1173984872572414699L;

 // 第一个等待节点
 private transient Node firstWaiter;

 // 最后一个等待节点
 private transient Node lastWaiter;
 public ConditionObject() { }
 // ㈠ 添加一个 Node 至等待队列
 private Node addConditionWaiter() {
 Node t = lastWaiter;
 // 所有已取消的 Node 从队列链表删除, 见 ㈡
 if (t != null && t.waitStatus != Node.CONDITION) {
 unlinkCancelledWaiters();
 t = lastWaiter;
 }
 // 创建一个关联当前线程的新 Node, 添加至队列尾部
 Node node = new Node(Thread.currentThread(), Node.CONDITION);
 if (t == null)
 firstWaiter = node;
 else
 t.nextWaiter = node;
 lastWaiter = node;
 return node;
 }
 // 唤醒 - 将没取消的第一个节点转移至 AQS 队列
 private void doSignal(Node first) {
 do {
 // 已经是尾节点了
 if ( (firstWaiter = first.nextWaiter) == null) {
 lastWaiter = null;
 }
 first.nextWaiter = null;
 } while (
 // 将等待队列中的 Node 转移至 AQS 队列, 不成功且还有节点则继续循环 ㈢
 !transferForSignal(first) &&
 // 队列还有节点
 (first = firstWaiter) != null
 );
 }

 // 外部类方法, 方便阅读, 放在此处
 // ㈢ 如果节点状态是取消, 返回 false 表示转移失败, 否则转移成功
 final boolean transferForSignal(Node node) {
 // 如果状态已经不是 Node.CONDITION, 说明被取消了
 if (!compareAndSetWaitStatus(node, Node.CONDITION, 0))
 return false;
 // 加入 AQS 队列尾部
 Node p = enq(node);
 int ws = p.waitStatus;
 if (
 // 上一个节点被取消
 ws > 0 ||
 // 上一个节点不能设置状态为 Node.SIGNAL
 !compareAndSetWaitStatus(p, ws, Node.SIGNAL)
 ) {
 // unpark 取消阻塞, 让线程重新同步状态
 LockSupport.unpark(node.thread);
 }
 return true;
 }
 // 全部唤醒 - 等待队列的所有节点转移至 AQS 队列
  private void doSignalAll(Node first) {
 lastWaiter = firstWaiter = null;
 do {
 Node next = first.nextWaiter;
 first.nextWaiter = null;
 transferForSignal(first);
 first = next;
 } while (first != null);
 }

 // ㈡
 private void unlinkCancelledWaiters() {
 // ...
 }
 // 唤醒 - 必须持有锁才能唤醒, 因此 doSignal 内无需考虑加锁
 public final void signal() {
 if (!isHeldExclusively())
 throw new IllegalMonitorStateException();
 Node first = firstWaiter;
 if (first != null)
 doSignal(first);
 }
 // 全部唤醒 - 必须持有锁才能唤醒, 因此 doSignalAll 内无需考虑加锁
 public final void signalAll() {
 if (!isHeldExclusively())
 throw new IllegalMonitorStateException();
 Node first = firstWaiter;
 if (first != null)
 doSignalAll(first);
 }
 // 不可打断等待 - 直到被唤醒
 public final void awaitUninterruptibly() {
 // 添加一个 Node 至等待队列, 见 ㈠
 Node node = addConditionWaiter();
 // 释放节点持有的锁, 见 ㈣
 int savedState = fullyRelease(node);
 boolean interrupted = false;
 // 如果该节点还没有转移至 AQS 队列, 阻塞
 while (!isOnSyncQueue(node)) {
 // park 阻塞
 LockSupport.park(this);
 // 如果被打断, 仅设置打断状态
 if (Thread.interrupted())
 interrupted = true;
 }
 // 唤醒后, 尝试竞争锁, 如果失败进入 AQS 队列
 if (acquireQueued(node, savedState) || interrupted)
 selfInterrupt();
 }
 // 外部类方法, 方便阅读, 放在此处
 // ㈣ 因为某线程可能重入,需要将 state 全部释放
 final int fullyRelease(Node node) {
 boolean failed = true;
 try {
 int savedState = getState();
 if (release(savedState)) {
 failed = false;
 return savedState;
 } else {
 throw new IllegalMonitorStateException();
 }
 } finally {
 if (failed)
 node.waitStatus = Node.CANCELLED;
 }
 }
 // 打断模式 - 在退出等待时重新设置打断状态
 private static final int REINTERRUPT = 1;
 // 打断模式 - 在退出等待时抛出异常
 private static final int THROW_IE = -1;
 // 判断打断模式
 private int checkInterruptWhileWaiting(Node node) {
 return Thread.interrupted() ?
 (transferAfterCancelledWait(node) ? THROW_IE : REINTERRUPT) :
 0;
 }
 // ㈤ 应用打断模式
 private void reportInterruptAfterWait(int interruptMode)
 throws InterruptedException {
 if (interruptMode == THROW_IE)
 throw new InterruptedException();
 else if (interruptMode == REINTERRUPT)
 selfInterrupt();
 }
 // 等待 - 直到被唤醒或打断
 public final void await() throws InterruptedException {
 if (Thread.interrupted()) {
 throw new InterruptedException();
 }
 // 添加一个 Node 至等待队列, 见 ㈠
 Node node = addConditionWaiter();
 // 释放节点持有的锁
 int savedState = fullyRelease(node);
 int interruptMode = 0;
 // 如果该节点还没有转移至 AQS 队列, 阻塞
 while (!isOnSyncQueue(node)) {
 // park 阻塞
 LockSupport.park(this);
 // 如果被打断, 退出等待队列
 if ((interruptMode = checkInterruptWhileWaiting(node)) != 0)
 break;
 }
 // 退出等待队列后, 还需要获得 AQS 队列的锁
 if (acquireQueued(node, savedState) && interruptMode != THROW_IE)
 interruptMode = REINTERRUPT;
 // 所有已取消的 Node 从队列链表删除, 见 ㈡
 if (node.nextWaiter != null)
 unlinkCancelledWaiters();
 // 应用打断模式, 见 ㈤
 if (interruptMode != 0)
 reportInterruptAfterWait(interruptMode);
 }
 // 等待 - 直到被唤醒或打断或超时
 public final long awaitNanos(long nanosTimeout) throws InterruptedException {
 if (Thread.interrupted()) {
 throw new InterruptedException();
 }
 // 添加一个 Node 至等待队列, 见 ㈠
 Node node = addConditionWaiter();
 // 释放节点持有的锁
 int savedState = fullyRelease(node);
 // 获得最后期限
 final long deadline = System.nanoTime() + nanosTimeout;
 int interruptMode = 0;
 // 如果该节点还没有转移至 AQS 队列, 阻塞
 while (!isOnSyncQueue(node)) {
 // 已超时, 退出等待队列
 if (nanosTimeout <= 0L) {
 transferAfterCancelledWait(node);
 break;
 }
 // park 阻塞一定时间, spinForTimeoutThreshold 为 1000 ns
 if (nanosTimeout >= spinForTimeoutThreshold)
 LockSupport.parkNanos(this, nanosTimeout);
 // 如果被打断, 退出等待队列
 if ((interruptMode = checkInterruptWhileWaiting(node)) != 0)
 break;
 nanosTimeout = deadline - System.nanoTime();
 }
 // 退出等待队列后, 还需要获得 AQS 队列的锁
 if (acquireQueued(node, savedState) && interruptMode != THROW_IE)
 interruptMode = REINTERRUPT;
 // 所有已取消的 Node 从队列链表删除, 见 ㈡
 if (node.nextWaiter != null)
 unlinkCancelledWaiters();
 // 应用打断模式, 见 ㈤
 if (interruptMode != 0)
 reportInterruptAfterWait(interruptMode);
 return deadline - System.nanoTime();
 }
  // 等待 - 直到被唤醒或打断或超时, 逻辑类似于 awaitNanos
 public final boolean awaitUntil(Date deadline) throws InterruptedException {
 // ...
 }
 // 等待 - 直到被唤醒或打断或超时, 逻辑类似于 awaitNanos
 public final boolean await(long time, TimeUnit unit) throws InterruptedException {
 // ...
 }
 // 工具方法 省略 ...
}
