ganglia监控hadoop 容器节点
hadoop容器运行参考上篇博客 http://blog.csdn.net/wenwenxiong/article/details/78973755
参看网址: https://gist.github.com/ameizi/0c77e3dbb13ded779347
在namenode容器节点上安装ganglia-webfrontend和ganglia-monitor
sudo apt-get update
sudo apt-get install ganglia-webfrontend ganglia-monitor
在主节点上安装ganglia-webfrontend和ganglia-monitor。在其他监视节点上,只需要安装ganglia-monitor即可
将ganglia的文件链接到apache的默认目录下
sudo ln -s /usr/share/ganglia-webfrontend /var/www/html/ganglia在datanode1容器节点安装ganglia-monitor
在其他监视节点上,只需要安装ganglia-monitor
sudo apt-get install ganglia-monitorGanglia配置
gmond.conf
在每个节点上都需要配置/etc/ganglia/gmond.conf,配置相同如下所示
sudo vim /etc/ganglia/gmond.conf修改后的/etc/ganglia/gmond.conf
globals {
  daemonize = yes  ##以后台的方式运行
  setuid = yes
  user = ganglia     #运行Ganglia的用户
  debug_level = 0
  max_udp_msg_len = 1472
  mute = no
  deaf = no
  host_dmax = 0 /*secs */
  cleanup_threshold = 300 /*secs */
  gexec = no
  send_metadata_interval = 10     #发送数据的时间间隔
}

/* If a cluster attribute is specified, then all gmond hosts are wrapped inside
 * of a  tag.  If you do not specify a cluster tag, then all  will
 * NOT be wrapped inside of a  tag. */
cluster {
  name = "test"         #集群名称
  owner = "ganglia"               #运行Ganglia的用户
  latlong = "unspecified"
  url = "unspecified"
}

/* The host section describes attributes of the host, like the location */
host {
  location = "unspecified"
}

/* Feel free to specify as many udp_send_channels as you like.  Gmond
   used to only support having a single channel */
udp_send_channel {
  #mcast_join = 239.2.11.71     #注释掉组播
  host = namenode                 #发送给安装gmetad的机器
  port = 8649                   #监听端口
  ttl = 1
}

/* You can specify as many udp_recv_channels as you like as well. */
udp_recv_channel {
  #mcast_join = 239.2.11.71     #注释掉组播
  port = 8649
  #bind = 239.2.11.71
}

/* You can specify as many tcp_accept_channels as you like to share
   an xml description of the state of the cluster */
tcp_accept_channel {
  port = 8649
}
gmetad.conf
在主节点上还需要配置/etc/ganglia/gmetad.conf,这里面的名字hadoop-cluster和上面gmond.conf中name应该一致。
/etc/ganglia/gmetad.conf
sudo vim /etc/ganglia/gmetad.conf修改为以下内容
data_source "test" 10 namenode:8649 datanode1:8649
setuid_username "nobody"
rrd_rootdir "/var/lib/ganglia/rrds"
gridname "test"
注:namenode:8649 datanode1:8649为要监听的主机和端口,data_source中test与gmond.conf中name一致
启动Ganglia
在各个节点上启动gmond服务,主节点还需要启动gmetad服务。
使用apt-get方式安装的Ganglia,可以直接用service方式启动。
sudo service ganglia-monitor start(每台机器都需要启动)

sudo service gmetad start(在安装了ganglia-webfrontend的机器上启动)
检验
登录浏览器查看:http://namenode/ganglia,如果Hosts up为9即表示安装成功。
若出现url无法访问
确保apache2服务运行:service apache2 start 或/etc/init.d/apache2 start
若安装不成功,有几个很有用的调试命令:
以调试模式启动gmetad:gmetad -d 9
查看gmetad收集到的XML文件:telnet master 8649
ganglia主页面 
共6个节点,选择namenode节点查看 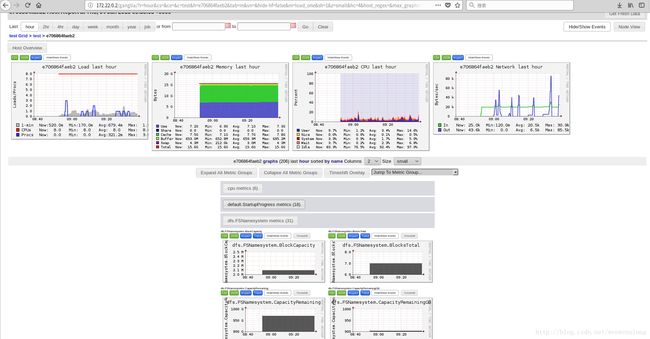
选择datanode1节点查看 