MySQL数据库事务、mybatis框架、spring框架、springmvc框架、永和大王门店管理系统(框架第二部分)
第十二章 MySQL数据库事务
一、 事务及四大特性
1.什么是事务
数据库事务(Database Transaction),是指作为单个逻辑工作单元执行的一系列操作,要么完全地执行,要么完全地不执行。
简单的说:事务就是将一堆的SQL语句(通常是增删改操作)绑定在一起执行,要么都执行成功,要么都执行失败,即都执行成功才算成功,否则就会恢复到这堆SQL执行之前的状态。
下面以银行转账为例,张三转100块到李四的账户,这至少需要两条SQL语句:
- 给张三的账户减去100元;
update 账户表 set money=money-100 where name='张三';
- 给李四的账户加上100元。
update 账户表 set money=money+100 where name='李四';
如果在第一条SQL语句执行成功后,在执行第二条SQL语句之前,程序被中断了(可能是抛出了某个异常,也可能是其他什么原因),那么李四的账户没有加上100元,而张三却减去了100元,在现实生活中这肯定是不允许的。
如果在转账过程中加入事务,则整个转账过程中执行的所有SQL语句会在一个事务中,而事务中的所有操作,要么全都成功,要么全都失败,不可能存在成功一半的情况。
也就是说给张三的账户减去100元如果成功了,那么给李四的账户加上100元的操作也必须是成功的;否则,给张三减去100元以及给李四加上100元都是失败的。
2.事务的四大特性
① 原子性(Atomicity)
事务中所有操作是不可再分割的原子单位。事务中所有操作要么全部执行成功,要么全部执行失败。
② 一致性(Consistency)
事务执行后,数据库状态与其它业务规则保持一致。如转账业务,无论事务执行成功与否,参与转账的两个账户金额之和在事务前后应该是保持不变的。
张三:1000	1000-500=500		1000
李四:1000	1000+500=1500 		1000
③ 隔离性(Isolation)
隔离性是指在并发操作中,不同事务之间应该隔离开来,使每个并发中的事务不会相互干扰。也就是说,在事中务查看数据更新时,数据所处的状态要么是另一事务修改它之前的状态,要么是另一事务修改它之后的状态,事务不会查看到中间状态的数据。例如:在A事务中,查看另一B事务(正在修改张三的账户金额)中张三的账户金额,要查看到B事务之前的张三的账户金额,要么查看到B事务之后张三的账户金额。
事务1: 查询A、B账户金额之和(1000+1000)
事务2: A转账给B 500元
		A - 500 = 500
		B + 500 = 1500
④ 持久性(Durability)
一旦事务提交成功,事务中所有的数据操作都必须被持久化到数据库中,即使提交事务后,数据库马上崩溃,在数据库重启时,也必须能保证通过某种机制恢复数据。
开启事务---A给B转账500元
A: 1000 - 500 = 500	(成功了)	在日志中记录,事务成功,A账户金额更新为500
B: 1000 + 500 = 1500 (成功了)	在日志中记录,事务成功,B账户金额更新为1500
结束事务---回滚/提交
二、 MySQL中的事务
在默认情况下,MySQL每执行一条SQL语句,都是一个单独的事务。因为底层在执行SQL语句之前会自动开启事务,在SQL语句执行完后,会立即结束事务!
如果需要在一个事务中包含多条SQL语句,那么需要手动开启事务和结束事务。
-
开启事务:start transaction;
-
结束事务:commit(提交事务)或 rollback(回滚事务)。
在执行SQL语句之前,先执行 strat transaction,这就开启了一个事务(事务的起点),然后可以去执行多条SQL语句,最后要结束事务,
commit表示提交,即事务中的多条SQL语句所做出的影响会持久化到数据库中。
rollback,表示回滚,即回滚到事务的起点,之前做的所有操作都被撤消了!
quit,表示中断事务,和rollback一样的效果
1.演示A账户给B账户转账的例子
① 准备数据
-- 1、创建数据库jt_db数据库(如果不存在才创建)
create database if not exists jt_db charset utf8;
use jt_db; -- 选择jt_db数据库
-- 2、在 jt_db 库中创建 acc 表(银行账户表),要求有id(主键),name(姓名),money(账户金额)
drop table if exists acc;
create table acc(
    id int primary key auto_increment,
    name varchar(50),
    money double
);
-- 3、往 acc 表中, 插入2条记录
insert into acc values(null,'A',1000);
insert into acc values(null,'B',1000);
-- 查询acc表中的所有记录
select * from acc;
下面分别演示事务开启及执行一系列SQL之后,回滚事务、提交事务及中断操作的效果。
② rollback(回滚事务)
-- 查询acc账户表中A和B的金额
select * from acc;
-- 开启事务
start transaction;
-- 开始转账,A账户减去100元
update acc set money=money-100 where name='A';
-- 查询acc账户表中A和B的金额
select * from acc;
-- B账户增加100元
update acc set money=money+100 where name='B';
-- 查询acc账户表中A和B的金额
select * from acc;
-- 回滚事务
rollback;
-- 再次查询acc账户表中A和B的金额
select * from acc;
③ commit(提交事务)
-- 查询acc账户表中A和B的金额
select * from acc;
-- 开启事务
start transaction;
-- 开始转账,A账户减去100元
update acc set money=money-100 where name='A';
-- 查询acc账户表中A和B的金额
select * from acc;
-- B账户增加100元
update acc set money=money+100 where name='B';
-- 查询acc账户表中A和B的金额
select * from acc;
-- 提交事务
commit;
-- 再次查询acc账户表中A和B的金额
select * from acc;
③ quit(中断事务)
-- 查询acc账户表中A和B的金额
select * from acc;
-- 开启事务
start transaction;
-- 开始转账,A账户减去100元
update acc set money=money-100 where name='A';
-- 查询acc账户表中A和B的金额
select * from acc;
-- B账户增加100元
update acc set money=money+100 where name='B';
-- 查询acc账户表中A和B的金额
select * from acc;
-- 中断事务
quit;
-- 再次查询acc账户表中A和B的金额
select * from acc;
三、 事务并发读问题
1.事务并发读问题
多个事务对相同的数据同时进行操作,这叫做事务并发。
在事务并发时,如果没有采取必要的隔离措施,可能会导致各种并发问题,破坏数据的完整性等。这些问题中,其中有三类是读问题,分别是:脏读、不可重复读、幻读。
① 脏读(dirty read)
在一个事务中,读取到另一个事务未提交更新的数据,即读取到了脏数据;
例如:A给B转账100元但未提交事务,在B查询后,A做了回滚操作,那么B查询到了A未提交的数据,就称之为脏读。
提示:需要将数据库的事务隔离级别设置为最低,才能够看到脏读现象
事务1:开启事务; A - 100 = 900; B + 100 = 1100; (没有提交事务)
事务2:开启事务; 查询B账户的金额 1100, 这个过程叫做脏读, 1100就是一个脏数据
② 不可重复读(unrepeatable read)
对同一记录的两次读取结果不一致,因为在两次查询期间,有另一事务对该记录做了修改(是针对修改操作)
例如:在事务1中,前后两次查询A账户的金额,在两次查询之间,另一事物2对A账户的金额做了修改(并且也提交了事务),此种情况可能会导致事务1中,前后两次查询的结果不一致。这就是不可重复读。
事务1:开启事务---
	第一次读取A账户的金额:1000
	第二次读取A账户的金额:900
事务2:开启事务---
	A账户 - 100 = 900;
	提交事务---
③ 幻读(虚读)(phantom read)
对同一张表的两次查询结果不一致,因为在两次查询期间,有另一事务进行了插入或者是删除操作(是针对插入或删除操作);
事务1:开启事务---
	select * from acc where id=3;//不存在id为3的记录
	insert into acc value(3,'C',2000);
	select * from acc where id=3;//存在id为3的记录
事务2:开启事务---
	insert into acc value(3,'C',2000);
	提交事务---
注意:mysql默认的是不允许出现脏读和不可重复读,所以在下面演示之前需要设置mysql允许出现脏读、不可重复读等。
set tx_isolation='read-uncommitted'; -- 设置mysql的事务隔离级别
④ 脏读示例
-- 在窗口1中,开启事务,执行A给B转账100元
set tx_isolation='read-uncommitted'; -- 允许脏读、不可重复读、幻读
use jt_db; -- 选择jt_db库
start transaction; -- 开启事务
update acc set money=money-100 where name='A';
update acc set money=money+100 where name='B';
-- 在窗口2中,开启事务,查询B的账户金额
set tx_isolation='read-uncommitted'; -- 允许脏读、不可重复读、幻读
use jt_db; -- 选择jt_db库
start transaction; -- 开启事务
select * from acc where name='B'; -- 出现脏数据
-- 切换到窗口1,回滚事务,撤销转账操作。
rollback; -- 回滚事务
-- 切换到窗口2,查询B的账户金额
select * from acc where name='B';
在窗口2中,B看到自己的账户增加了100元(此时的数据A操作事务并未提交),此种情况称之为"脏读"。
⑤ 不可重复读示例
-- 在窗口1中,开启事务,查询A账户的金额
set tx_isolation='read-uncommitted'; -- 允许脏读、不可重复读、幻读
use jt_db; -- 选择jt_db库
start transaction; -- 开启事务
select * from acc where name='A';
-- 在窗口2中,开启事务,查询A的账户金额减100
set tx_isolation='read-uncommitted'; -- 允许脏读、不可重复读、幻读
use jt_db; -- 选择jt_db库
start transaction; -- 开启事务
update acc set money=money-100 where name='A'; -- A账户减去100
select * from acc where name='A';
commit; -- 提交事务
-- 切换到窗口1,再次查询A账户的金额。
select * from acc where name='A'; -- 前后查询结果不一致
在窗口1中,前后两次对同一数据(账户A的金额)查询结果不一致,是因为在两次查询之间,另一事务对A账户的金额做了修改。此种情况就是"不可以重复读"
⑥ 幻读示例
-- 在窗口1中,开启事务,查询账户表中是否存在id=3的账户
set tx_isolation='read-uncommitted'; -- 允许脏读、不可重复读、幻读
use jt_db; -- 选择jt_db库
start transaction; -- 开启事务
select * from acc where id=3;
-- 在窗口2中,开启事务,往账户表中插入了一条id为3记录,并提交事务。
-- 设置mysql允许出现脏读、不可重复度、幻读
set tx_isolation='read-uncommitted';
use jt_db; -- 选择jt_db库
start transaction; -- 开启事务
insert into acc values(3, 'C', 1000);
commit; -- 提交事务
-- 切换到窗口1,由于上面窗口1中查询到没有id为3的记录,所以可以插入id为3的记录。
insert into acc values(3, 'C', 1000); -- 插入会失败!
在窗口1中,查询了不存在id为3的记录,所以接下来要执行插入id为3的记录,但是还未执行插入时,另一事务中插入了id为3的记录并提交了事务,所以接下来窗口1中执行插入操作会失败。
探究原因,发现账户表中又有了id为3的记录(感觉像是出现了幻觉)。这种情况称之为"幻读"
以上就是在事务并发时常见的三种并发读问题,那么如何防止这些问题的产生?
可以通过设置事务隔离级别进行预防。
2.事务隔离级别
事务隔离级别分四个等级,在相同数据环境下,对数据执行相同的操作,设置不同的隔离级别,可能导致不同的结果。不同事务隔离级别能够解决的数据并发问题的能力也是不同的。
set tx_isolation='read-uncommitted';
① READ UNCOMMITTED(读未提交数据)
安全性最差,可能出现任何事务并发问题(比如脏读、不可以重复读、幻读等)
但性能最好(不使用!!)
② READ COMMITTED(读已提交数据)(Oracle默认)
安全性较差
性能较好
可以防止脏读,但不能防止不可重复读,也不能防止幻读;
③ REPEATABLE READ(可重复读)(MySQL默认)
安全性较高
性能较差
可以防止脏读和不可重复读,但不能防止幻读问题;
④ SERIALIZABLE(串行化)
安全性最高,不会出现任何并发问题,因为它对同一数据的访问是串行的,非并发访问;
性能最差;(不使用!!)
MySQL的默认隔离级别为REPEATABLE READ,即可以防止脏读和不可重复读
3.设置隔离级别
① MySQL查询当前的事务隔离级别
select @@tx_isolation;
② MySQL设置事务隔离级别
(1) set tx_isolation=‘read-uncommitted’;
安全性最差,容易出现脏读、不可重复读、幻读,但性能最高
(2) set tx_isolation=‘read-committed’;
安全性一般,可防止脏读,不能防止不可重复读、幻读
(3) set tx_isolation=‘repeatable-read’;
安全性较好,可防止脏读、不可重复读,但不能防止幻读
(4) set tx_isolation=‘serialiable’;
安全性最好,可以防止一切事务并发问题,但是性能最差。
4.JDBC设置事务隔离界别
JDBC中通过Connection提供的方法设置事务隔离级别:
Connection.setTransactionIsolation(int level)
参数可选值如下:
Connection.TRANSACTION_READ_UNCOMMITTED 1(读未提交数据)
Connection.TRANSACTION_READ_COMMITTED 2(读已提交数据)
Connection.TRANSACTION_REPEATABLE_READ 4(可重复读)
Connection.TRANSACTION_SERIALIZABLE 8(串行化)
Connection.TRANSACTION_NONE 0(不使用事务)
提示:在开发中,一般情况下不需要修改事务隔离级别
5.JDBC中实现转账例子
提示:JDBC中默认是自动提交事务,所以需要关闭自动提交,改为手动提交事务
也就是说, 关闭了自动提交后, 事务就自动开启, 但是执行完后需要手动提交或者回滚!!
(1)执行下面的程序,程序执行没有异常,转账成功!A账户减去100元,B账户增加100元。
(2)将第4步、5步中间的代码放开,再次执行程序,在转账过程中抛异常,转账失败!由于事务回滚,所以A和B账户金额不变。
① JdbcUtil工具类代码
package com.tedu.util;

import java.sql.Connection;
import java.sql.DriverManager;
import java.sql.ResultSet;
import java.sql.SQLException;
import java.sql.Statement;

/** JDBC工具类 */
public class JdbcUtil {
	/**
	 * 获取数据库连接对象并返回
	 * @return Connection对象
	 * @throws Exception
	 */
	public static Connection getConn() throws Exception{
		//1.注册驱动
		Class.forName( "com.mysql.jdbc.Driver" );
		//2.获取连接
		Connection conn = DriverManager.getConnection(
				"jdbc:mysql:///jt_db?characterEncoding=utf-8",
				"root",
				"root");
		return conn;
	}

	/**
	 * 释放JDBC程序中的资源
	 * @param conn 连接对象
	 * @param stat 传输器对象
	 * @param rs 结果集对象
	 */
	public static void close(Connection conn,
			Statement stat, ResultSet rs){
		if(rs != null){
			try {
				rs.close();
			} catch (SQLException e) {
				e.printStackTrace();
			} finally{
				rs = null;
			}
		}
		if(stat != null){
			try {
				stat.close();
			} catch (SQLException e) {
				e.printStackTrace();
			} finally{
				stat = null;
			}
		}
		if(conn != null){
			try {
				conn.close();
			} catch (SQLException e) {
				e.printStackTrace();
			} finally{
				conn = null;
			}
		}
	}
}
② 实现转账代码
public static void main(String[] args) throws SQLException {
    Connection conn = null;
    Statement stat = null;
    ResultSet rs = null;
    try {
        //1.获取连接
        conn = JdbcUtil.getConn();
        //2.关闭JDBC自动提交事务(默认开启事务)
        conn.setAutoCommit(false);
        //3.获取传输器
        stat = conn.createStatement();
        /* ***** A给B转账100元 ***** */
        //4.A账户减去100元
        String sql = "update acc set money=money-100 where name='A'";
        stat.executeUpdate(sql);
        //int i = 1/0; // 让程序抛出异常,中断转账操作
        //5.B账户加上100元
        sql = "update acc set money=money+100 where name='B'";
        stat.executeUpdate(sql);
        //6.手动提交事务
        conn.commit();
        System.out.println("转账成功!提交事务...");
    } catch (Exception e) {
    	e.printStackTrace();
    	//一旦其中一个操作出错都将回滚,使两个操作都不成功
    	conn.rollback();
   		System.out.println("执行失败!回滚事务...");
    } finally{
    	JdbcUtil.close(conn, stat, rs);
    }
}
第十三章 mybatis框架
一、 MyBatis简介
1.什么是MyBatis
MyBatis 本是apache的一个开源项目iBatis,2010年这个项目由apache software foundation 迁移到了google code,并且改名为MyBatis 。2013年11月迁移到Github。
MyBatis是一个优秀的持久层框架,
它对jdbc的操作数据库的过程进行封装,使开发者只需要关注SQL本身,而不需要花费精力去处理例如注册驱动、创建connection、创建statement、手动设置参数、结果集检索等jdbc繁杂的过程代码。
Mybatis通过xml或注解的方式将要执行的各种statement(statement、preparedStatemnt)配置起来,并通过java对象和statement中的sql进行映射生成最终执行的sql语句,最后由mybatis框架执行sql并将结果映射成java对象并返回。
总之,Mybatis对JDBC访问数据库的过程进行了封装,简化了JDBC代码,解决JDBC将结果集封装为Java对象的麻烦。
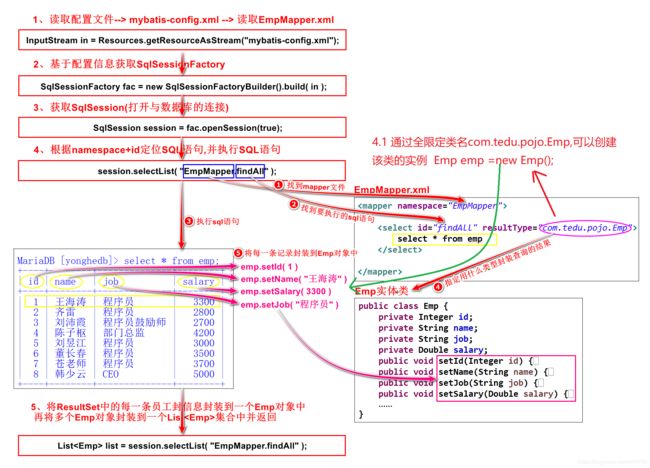
下图是MyBatis架构图:
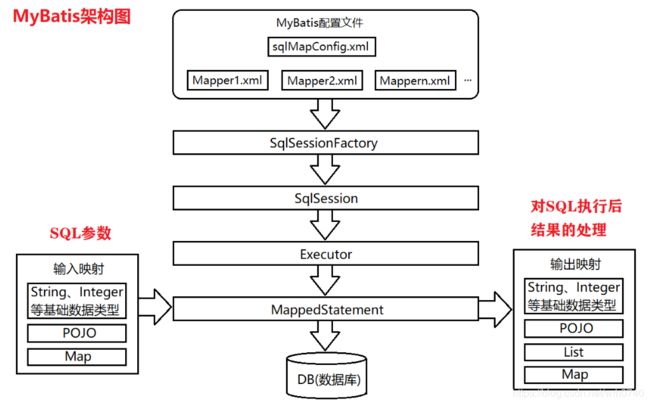
(1)mybatis-config.xml是Mybatis的核心配置文件,通过其中的配置可以生成SqlSessionFactory,也就是SqlSession工厂
(2)基于SqlSessionFactory可以生成SqlSession对象
(3)SqlSession是一个既可以发送SQL去执行,并返回结果,类似于JDBC中的Connection对象,也是Mybatis中至关重要的一个对象。
(4)Executor是SqlSession底层的对象,用于执行SQL语句
(5)MapperStatement对象也是SqlSession底层的对象,用于接收输入映射(SQL语句中的参数),以及做输出映射(即将SQL查询的结果映射成相应的结果)
2.为什么要使用MyBatis
思考:在开始之前,思考下如何通过JDBC查询Emp表中的所有记录,并封装到一个List集合中返回。(演示:准备数据、导包、导入JDBC程序)
① 使用传统方式JDBC访问数据库
(1)使用JDBC访问数据库有大量重复代码(比如注册驱动、获取连接、获取传输器、释放资源等);
(2)JDBC自身没有连接池,会频繁的创建连接和关闭连接,效率低;
(3)SQL是写死在程序中,一旦修改SQL,需要对类重新编译;
(4)对查询SQL执行后返回的ResultSet对象,需要手动处理,有时会特别麻烦;
…
② 使用mybatis框架访问数据库
(1)Mybatis对JDBC对了封装,可以简化JDBC代码;
(2)Mybatis自身支持连接池(也可以配置其他的连接池),因此可以提高程序的效率;
(3)Mybatis是将SQL配置在mapper文件中,修改SQL只是修改配置文件,类不需要重新编译。
(4)对查询SQL执行后返回的ResultSet对象,Mybatis会帮我们处理,转换成Java对象。
…
总之,JDBC中所有的问题(代码繁琐、有太多重复代码、需要操作太多对象、释放资源、对结果的处理太麻烦等),在Mybatis框架中几乎都得到了解决!!
二、 MyBatis快速入门
1.准备数据,创建库和表
① 1、创建数据库 yonghedb 数据库
-- 1、创建数据库 yonghedb 数据库
create database if not exists yonghedb charset utf8;
use yonghedb; -- 选择yonghedb数据库
-- 2、删除emp表(如果存在)
drop table if exists emp;
-- 3、在 yonghedb 库中创建 emp 表
create table emp(
	id int primary key auto_increment,
	name varchar(50),
	job varchar(50),
	salary double
);
-- 4、往 emp 表中, 插入若干条记录
insert into emp values(null, '王海涛', '程序员', 3300);
insert into emp values(null, '齐雷', '程序员', 2800);
insert into emp values(null, '刘沛霞', '程序员鼓励师', 2700);
insert into emp values(null, '陈子枢', '部门总监', 4200);
insert into emp values(null, '刘昱江', '程序员', 3000);
insert into emp values(null, '董长春', '程序员', 3500);
insert into emp values(null, '苍老师', '程序员', 3700);
insert into emp values(null, '韩少云', 'CEO', 5000);
2.创建工程,导入所需jar包、创建测试类
① 创建Maven的java工程
② 导入junit、mysql、mybaits、log4j等开发包
在pom.xml文件中引入相关依赖包即可
<dependencies>

    <dependency>
        <groupId>junitgroupId>
        <artifactId>junitartifactId>
        <version>4.9version>
    dependency>

    <dependency>
        <groupId>mysqlgroupId>
        <artifactId>mysql-connector-javaartifactId>
        <version>5.1.32version>
    dependency>

    <dependency>
        <groupId>org.mybatisgroupId>
        <artifactId>mybatisartifactId>
        <version>3.2.8version>
    dependency>

    <dependency>
        <groupId>org.slf4jgroupId>
        <artifactId>slf4j-log4j12artifactId>
        <version>1.6.4version>
    dependency>
dependencies>
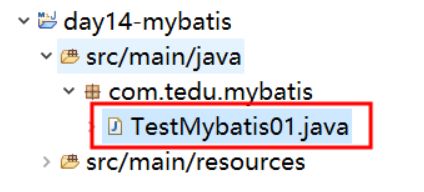
③ 创建com.tedu.mybatis.TestMybatis01测试类,并提供findAll方法(查询emp表中所有的员工信息),开发步骤如下:
package com.tedu.mybatis;

import java.io.File;
import java.io.IOException;
import java.io.InputStream;
import java.util.List;

import org.apache.ibatis.io.Resources;
import org.apache.ibatis.session.SqlSession;
import org.apache.ibatis.session.SqlSessionFactory;
import org.apache.ibatis.session.SqlSessionFactoryBuilder;
import org.apache.log4j.lf5.util.Resource;
import org.junit.Test;

import com.tedu.pojo.Emp;

/*
 * 实现mybatis的快速入门程序
 */
public class TestMybatis01 {
	/*
	 * 练习1:查询emp表中的所有员工信息
	 */
	@Test//测试类
	public void testFindAll() throws Exception {
		//1.读取mybatis的核心配置文件(mybatis-config.xml  配置文件)

			/*
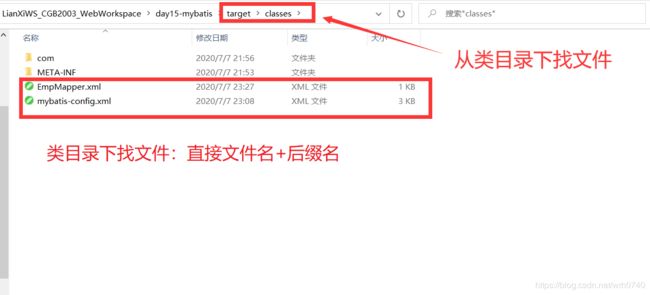
			 * java源文件编译后就在类目录下classes文件下
			 * target/classes(类目录):源码目录中的资源经过编译后,会输出到类目录下。
			 * mybatis-config.xml文件也是在classes文件下
			 * 所有类目录下面找文件,直接文件名+后缀名
			 */
		InputStream in = Resources.getResourceAsStream("mybatis-config.xml");

		//2.基于配置文件获取SqlSeesion工厂对象(需要创建SqlSeesion工厂对象)
		SqlSessionFactoryBuilder builder = new SqlSessionFactoryBuilder();
		SqlSessionFactory fac = builder.build(in);

		//3.通过工厂获取SqlSession对象(相当于JDBC中的Connection对象)
		//为session赋值(mybatis中的事务默认是手动提交,true表示设置事务自动提交SqlSession Session = fac.openSession(true);)
		SqlSession Session = fac.openSession();

		//4.执行SQL语句,返回执行结果(EmpMapper.xml配置问文件   存放执行的SQL语句)
		//参数是SQL语句的定位标识(namespace+id)
		List<Emp> selectList = Session.selectList("EmpMapper.findAll01");//查询多条信息,用集合selectList()这个方法

		//5.输出结果
		for (Emp emp : selectList) {
			System.out.println(emp);
		}
	}
}
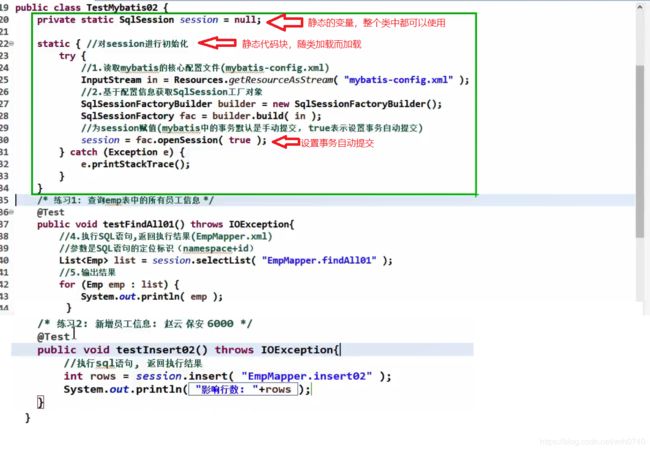
④ 测试类代码可以写成如下代码,方便增删改代码写在一个类里
⑤ 创建封装查询结果的Emp类
package com.tedu.pojo;
/*
 * POJO(Plain Old Java Object)简单Java对象
 * 用于封装信息的实体类,称之为简单java类,生成的对象叫做POJO(简单Java对象)
 *	类中的属性由封装的信息决定,属性名最好和emp表中的列名保持一致
 *
 *	这种情况下,属性名与列名不要保持一致:
 *	比如:door表中有:door_id列
 *		封装到Door类:private Integer doorId;
 *
 */
public class Emp {
	/*
	 * 这个类写什么?要根据封装的数据(信息)来决定
	 * 比如:目前封装的yonghedb库中emp表里的信息,里面有id、name、job、salary
	 */
	private Integer id;//数据类型要用包装类型
	private String name;
	private String job;
	private Double salary;//数据类型要用包装类型
	//提供对应的set和get方法
	public Integer getId() {
		return id;
	}
	public void setId(Integer id) {
		this.id = id;
	}
	public String getName() {
		return name;
	}
	public void setName(String name) {
		this.name = name;
	}
	public String getJob() {
		return job;
	}
	public void setJob(String job) {
		this.job = job;
	}
	public Double getSalary() {
		return salary;
	}
	public void setSalary(Double salary) {
		this.salary = salary;
	}
	//重新toString方法,如果重写,打印的是地址值,而不是属性值
	@Override
	public String toString() {
		return "Emp [id=" + id + ", name=" + name + ", job=" + job + ", salary=" + salary + "]";
	}
}
3.添加mybatis-config.xml文件
① 在src/main/resources目录下,创建mybatis-config.xml文件(MyBatis的核心配置文件)
② mybatis-config.xml文件配置如下
mybatis-config文件头信息如下:
<configuration >

configuration>
mybatis-config文件详细配置如下:
<configuration>


	<environments default="develop">

		<environment id="develop">

			<transactionManager type="JDBC" />


			<dataSource type="POOLED">


				<property name="driver" value="com.mysql.jdbc.Driver" />


				<property name="url" value="jdbc:mysql:///yonghedb?characterEncoding=utf-8" />


				<property name="username" value="root" />


				<property name="password" value="root" />
			dataSource>
		environment>
	environments>


	<mappers>

		<mapper resource="EmpMapper.xml" />
	mappers>
configuration>
4.添加EmpMapper.xml文件(存放SQL语句)
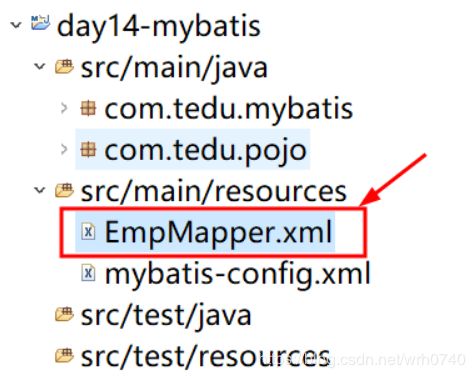
① 在src/main/resources目录下,创建EmpMapper.xml文件 (实体类的映射文件)
② EmpMapper.xml(存放程序中要执行的SQL语句)文件配置如下
EmpMapper文件头信息如下:
<mapper namespace="">


mapper>
EmpMapper文件详细配置如下:
<mapper namespace="EmpMapper">


	<select id="findAll01" resultType="com.tedu.pojo.Emp">
		select * from emp
	select>
mapper>
5.添加并编写Emp实体类(封装数据)
注意:在当前实例中,Emp类中的属性和数据库表的字段名称必须一致,否则将会无法将结果集封装到Java对象中。
在src/main/java目录下创建 com.tedu.pojo.Emp类,并编辑Emp类:提供私有属性以及对应的getter方法、setter方法,并重写toString方法
package com.tedu.pojo;
/**
 * 实体类,用于封装Emp表中的一条用户信息
 */
public class Emp {
	//1.声明实体类中的属性
	private Integer id;
	private String name;
	private String job;
	private Double salary;

	//2.提供对应的getter和setter方法
	public Integer getId() {
		return id;
	}
	public void setId(Integer id) {
		this.id = id;
	}
	public String getName() {
		return name;
	}
	public void setName(String name) {
		this.name = name;
	}
	public String getJob() {
		return job;
	}
	public void setJob(String job) {
		this.job = job;
	}
	public Double getSalary() {
		return salary;
	}
	public void setSalary(Double salary) {
		this.salary = salary;
	}

	//3.重写toString方法
	@Override
	public String toString() {
		return "Emp [id=" + id + ", name=" + name + ", job=" + job + ", salary=" + salary + "]";
	}
}
6.实现测试类,并测试
① 实现findAll方法,代码如下
//练习1(快速入门):  查询emp表中的所有员工, 返回一个List集合

package com.tedu.mybatis;

import java.io.File;
import java.io.IOException;
import java.io.InputStream;
import java.util.List;

import org.apache.ibatis.io.Resources;
import org.apache.ibatis.session.SqlSession;
import org.apache.ibatis.session.SqlSessionFactory;
import org.apache.ibatis.session.SqlSessionFactoryBuilder;
import org.apache.log4j.lf5.util.Resource;
import org.junit.Test;

import com.tedu.pojo.Emp;

/*
 * 实现mybatis的快速入门程序
 */
public class TestMybatis01 {
	/*
	 * 练习1:查询emp表中的所有员工信息
	 */
	@Test//测试类
	public void testFindAll() throws Exception {
		//1.读取mybatis的核心配置文件(mybatis-config.xml  配置文件)

			/*
			 * java源文件编译后就在类目录下classes文件下
			 * target/classes(类目录):源码目录中的资源经过编译后,会输出到类目录下。
			 * mybatis-config.xml文件也是在classes文件下
			 * 所有类目录下面找文件,直接文件名+后缀名
			 */
		InputStream in = Resources.getResourceAsStream("mybatis-config.xml");

		//2.基于配置文件获取SqlSeesion工厂对象(需要创建SqlSeesion工厂对象)
		SqlSessionFactoryBuilder builder = new SqlSessionFactoryBuilder();
		SqlSessionFactory fac = builder.build(in);

		//3.通过工厂获取SqlSession对象(相当于JDBC中的Connection对象)
		//为session赋值(mybatis中的事务默认是手动提交,true表示设置事务自动提交SqlSession Session = fac.openSession(true);)
		SqlSession Session = fac.openSession();

		//4.执行SQL语句,返回执行结果(EmpMapper.xml配置问文件   存放执行的SQL语句)
		//参数是SQL语句的定位标识(namespace+id)
		List<Emp> selectList = Session.selectList("EmpMapper.findAll01");//查询多条信息,用集合selectList()这个方法

		//5.输出结果
		for (Emp emp : selectList) {
			System.out.println(emp);
		}
	}
}
② 执行findAll方法,输出结果为
Emp [id=1, name=王海涛, job=程序员, salary=3300.0]
Emp [id=2, name=齐雷, job=程序员, salary=2800.0]
Emp [id=3, name=刘沛霞, job=程序员鼓励师, salary=2700.0]
Emp [id=4, name=陈子枢, job=部门总监, salary=4200.0]
Emp [id=5, name=刘昱江, job=程序员, salary=3000.0]
Emp [id=6, name=董长春, job=程序员, salary=3500.0]
Emp [id=7, name=苍老师, job=程序员, salary=3700.0]
Emp [id=8, name=韩少云, job=CEO, salary=5000.0]
三、 MyBatis入门细节
1.mybatis-config.xml配置文件
<configuration>


	<environments default="develop">

		<environment id="develop">

			<transactionManager type="JDBC" />


			<dataSource type="POOLED">


				<property name="driver" value="com.mysql.jdbc.Driver" />


				<property name="url" value="jdbc:mysql:///yonghedb?characterEncoding=utf-8" />


				<property name="username" value="root" />


				<property name="password" value="root" />
			dataSource>
		environment>
	environments>


	<mappers>

		<mapper resource="EmpMapper.xml" />
	mappers>
configuration>
2.EmpMapper.xml配置文件(存放SQL语句)
<mapper namespace="EmpMapper">


	<select id="findAll01" resultType="com.tedu.pojo.Emp">
		select * from emp
	select>
mapper>
3.解释说明
(1)第1行是xml的文档声明,用于声明xml的版本和编码
(2)第2、3、4行,引入了xml约束文档,当前xml文档将会按照mybatis-3-mapper.dtd文件所要求的规则进行书写。
(3)Mapper标签:根标签,其中namespace(名称空间,也叫命名空间),要求不能重复。在程序中通过【namespace + id 】定位到要执行哪一条SQL语句
(4)select标签:用于指定将来要执行的各种SQL语句。标签上可以声明属性,下面介绍常用的属性:id、resultType、resultMap
-
id属性:要求值不能重复。将来在执行SQL时,可以通过【namespace + id】找到指定SQL并执行。
-
resultType属性:从这条SQL语句中返回所期望类型的类的完全限定名称(包名+类名)。注意如果是集合情形,那应该是集合可以包含的类型,而不能是集合本身。
简而言之,resultType控制查询SQL执行后返回值的类型或集合中的泛型,例如查询emp表中的单条记录,返回值是一个Emp对象,因此,resultType=“com.tedu.pojo.Emp”;
如果查询emp表中的多条记录,返回值是一个List,此时resultType的值应该集合中的泛型,因此resultType=“com.tedu.pojo.Emp”;
-
resultMap属性:复杂对象结构(例如多表关联查询等)。 使用 resultType 或 resultMap,但不能同时使用。
四、 MyBatis增删改查
1.新增员工信息
① 编辑EmpMapper.xml文件, 添加新增员工对应的sql
<insert id="insert" >
	insert into emp value(null, '赵云', '保安', 6000)
insert>
② 编写TestMybatis类,添加testInsert方法,实现新增员工操作
(1、2、3)代码与本章节 第二 、MyBatis快速入门  测试类代码一样

/** 练习2: 新增员工信息: 赵云 保安 6000 */
@Test
public void testInsert() {
	//1.读取mybatis的核心配置文件(mybatis-config.xml  配置文件)
	//2.基于配置文件获取SqlSeesion工厂对象(需要创建SqlSeesion工厂对象)
	//3.通过工厂获取SqlSession对象(相当于JDBC中的Connection对象)

  	//4.执行sql语句, 返回执行结果
  int rows = session.update("EmpMapper.insert");
  //提交事务
  session.commit();
  System.out.println("影响的行数: "+rows);
}
2.修改员工
① 编辑EmpMapper.xml文件, 添加新增员工对应的sql
<update id="update">
	update emp set job='保镖', salary=20000 where name='赵云'
update>
② 编写TestMybatis类,添加testUpdate方法,实现修改员工信息
(1、2、3)代码与本章节 第二 、MyBatis快速入门  测试类代码一样

/** 练习3: 修改员工信息, 将赵云的job改为'保镖',salary改为20000 */
@Test
public void testUpdate() {
	//1.读取mybatis的核心配置文件(mybatis-config.xml  配置文件)
	//2.基于配置文件获取SqlSeesion工厂对象(需要创建SqlSeesion工厂对象)
	//3.通过工厂获取SqlSession对象(相当于JDBC中的Connection对象)

 	 //4.执行sql语句, 返回执行结果
  int rows = session.update("EmpMapper.update");
  //提交事务
  session.commit();
  System.out.println("影响行数:"+rows);
}
3.删除员工
① 编辑EmpMapper.xml文件, 添加新增员工对应的sql
<update id="delete">
	delete from emp where name='赵云'
update>
② 编写TestMybatis类,添加testDelete方法,实现删除员工
(1、2、3)代码与本章节 第二 、MyBatis快速入门  测试类代码一样

/** 练习4: 删除name为'赵云'的记录 */
@Test
public void testDelete() {
	//1.读取mybatis的核心配置文件(mybatis-config.xml  配置文件)
	//2.基于配置文件获取SqlSeesion工厂对象(需要创建SqlSeesion工厂对象)
	//3.通过工厂获取SqlSession对象(相当于JDBC中的Connection对象)

 	//4.执行sql语句, 返回执行结果
  int rows = session.update("EmpMapper.delete");
  //提交事务
  session.commit();
  System.out.println("影响行数:"+rows);
}
4 查询emp表中指定id的员工信息
① 在mapper文件中编写SQL语句
<select id="findById" resultType="com.tedu.pojo.Emp">
	select * from emp where id=#{id}
select>
② 编写TestMybatis类,添加testFindById方法,实现查询员工
/** 练习5: 查询emp表中指定id的员工信息 */
@Test
public void testFindById() {
  //执行sql语句, 返回执行结果
  //查询id为1的员工信息
  Emp emp = session.selectOne( "EmpMapper.findById", 1 );
  /* 	接收键盘输入的id查询员工信息
   *	Integer id=new Scanner(System.in).nextInt();
   *    Emp emp = session.selectOne( "EmpMapper.findById", id );
   * /
  System.out.println( emp );
}
练习6:新增员工信息: 张飞 Java开发工程师 15000
五、 mybatis中的占位符
1.#{}占位符
在上面的增删改查操作中,SQL语句中的值是写死在SQL语句中的,而在实际开发中,此处的值往往是用户提交过来的值,因此这里我们需要将SQL中写死的值替换为占位符。
在mybatis中占位符有两个,分别是 #{} 占位符 和 ${} 占位符:
-
#{}:相当于JDBC中的问号(?)占位符,是为SQL语句中的参数值进行占位,大部分情况下都是使用#{}占位符; 并且当#{}占位符是为字符串或者日期类型的值进行占位时,在参数值传过来替换占位符的同时,会进行转义处理(在字符串或日期类型的值的两边加上单引号) -
1.在mapper文件中 select *from emp where name=#{name} 2.在程序执行时: select *from emp where name=? 3.参数:孙悟空,将参数传入,替换占位符 select *from emp where name=孙悟空 --错误 select *from emp where name='孙悟空' --正确 -
${}:是为SQL片段进行占位,将传过来的SQL片段直接拼接在${}占位符所在的位置,不会进行任何的转义处理。(由于是直接将参数拼接在SQL语句中,因此可能会引发SQL注入攻击问题) -
需要注意的是:${}占位符在为参数进行占位时,即使只有一个参数,也是先封装,再传递
查询emp表中指定id的员工信息
① 在mapper文件中编写SQL语句
<select id="findById" resultType="com.tedu.pojo.Emp">
	select * from emp where id=#{id}
select>
② 编写TestMybatis类,添加testFindById方法,实现查询员工
/** 练习5: 查询emp表中指定id的员工信息 */
@Test
public void testFindById() {
  //执行sql语句, 返回执行结果
  //查询id为1的员工信息
  Emp emp = session.selectOne( "EmpMapper.findById", 1 );
  /* 	接收键盘输入的id查询员工信息
   *	Integer id=new Scanner(System.in).nextInt();
   *    Emp emp = session.selectOne( "EmpMapper.findById", id );
   * /
  System.out.println( emp );
}
新增员工信息: 张飞 Java开发工程师 15000
① 在mapper文件中编写SQL语句:
<update id="insert2">
	insert into emp values (null, #{name}, #{job}, #{salary})
update>
② 编写TestMybatis类,添加testFindById方法,实现新增员工
/** 练习6: 新增员工信息: 张飞 Java开发工程师 15000 */
@Test
public void testInsert2() {
  //需要传多个参数,可以将要传输的参数封装到map集合中,再将map集合传过去
  //Map map = new HashMap();
  //map.put("name", "张飞");
  //map.put("job", "Java开发工程师");
  //map.put("salary", 15000);
  //intsession rows = session.update("EmpMapper.insert2", map );
  //也可以将要传输的参数封装到Emp对象中
  Emp emp = new Emp();
  emp.setName("关羽123");
  emp.setJob("保安");
  emp.setSalary(8000.0);
  //执行sql语句
  intsession rows = session.update("EmpMapper.insert2", emp);
  //提交事务
  session.commit();
  System.out.println( "影响的行数: "+rows );
}
修改员工信息: 张飞 架构师 25000
① 在mapper文件中编写SQL语句
<update id="update2">
  update emp set job=#{job}, salary=#{salary}
  where name=#{name}
update>
② 编写TestMybatis类方式一,添加testUpdate2方法,实现修改员工
/** 练习7: 修改员工信息: 张飞 架构师 25000 */
@Test
public void testUpdate2() {
  //将SQL语句中的参数封装到POJO对象中(Emp)
  Emp emp = new Emp();
  emp.setName("张飞");
  emp.setJob("架构师");
  emp.setSalary(25000.0);
  //执行sql语句
  intsession rows = session.update("EmpMapper.update2", emp);
  //提交事务
  session.commit();
  System.out.println("影响的行数: "+rows);
}
③ 编写TestMybatis类方式二
/** 练习7: 修改员工信息: 张飞 架构师 25000 */
@Test
public void testUpdate2() {
  //将SQL语句中的参数封装到POJO对象中(Emp)
  //用含参创建对象(需要在Emp这个类中加上无参和含参构造方法)
  Emp emp = new Emp(null,"张飞","架构师","25000.0");
  //执行sql语句
  intsession rows = session.update("EmpMapper.update2", emp);
  //提交事务
  session.commit();
  System.out.println("影响的行数: "+rows);
}
动态指定要查询的列
① 在mapper文件中编写SQL语句
<select id="findAll2" resultType="com.tedu.pojo.Emp">
	:select ${cols} from emp
select>
② java代码示例
/** 练习9: 动态指定要查询的列 */
@Test
public void testFindAll2() {
    /** ① ${}占位符在为参数进行占位时,即使只有一个参数,也是先封装,再传递	*
    *	② map集合中的key要与占位符保持一致
    */

  Map map = new HashMap();
  //map.put("cols", "id, name");
  //map.put("cols", "id, name, salary");
  map.put("cols", "id,name,job,salary");
  //执行sql语句, 返回结果
  List<Emp> list = session.selectList("EmpMapper.findAll2", map);
  //输出结果
  for ( Emp e : list ) {
  	System.out.println( e );
  }
}
根据name模糊查询emp表
① 在mapper文件中编写SQL语句(使用#{}占位符实现)
<select id="findAll4" resultType="com.tedu.pojo.Emp">
  select * from emp
  where name like #{name}
select>
② Java代码实现(使用#{}占位符实现)
/**
 * 根据name模糊查询emp表(使用#{}占位符实现)
 * '%刘%'
 */
@Test
public void testFindAll4() {
 //如果使用#{}占位符只有一个,参数只有一个,可以直接传,不用封装,如果有多个,就需要先封装再传递
  //执行sql, 返回结果
  List<Emp> list = session.selectList("EmpMapper.findAll4", map);
  //输出结果
  for (Emp emp : list) {
  	System.out.println( emp );
  }
}
③ 在mapper文件中编写SQL语句(使用${}占位符实现)
<select id="findAll3" resultType="com.tedu.pojo.Emp">
  select * from emp where name like '%${name}%'
select>
④ Java代码实现(使用${}占位符实现)
/**
 * 根据name模糊查询emp表(使用${}占位符实现)
 * '%刘%'
 */
@Test
public void testFindAll3() {
  //如果使用#{}占位符只有一个,参数只有一个,也必须先将参数封装到map中
  Map map = new HashMap();
  map.put("name", "刘");
  //执行sql, 返回结果
  List<Emp> list = session.selectList("EmpMapper.findAll3", map);
  //输出结果
  for (Emp emp : list) {
  	System.out.println( emp );
  }
}
六、 动态SQL标签
1.if、where标签
-
test属性中的布尔表达式的值,从而决定是否执行包含在其中的SQL片段。如果判断结果为true,则执行其中的SQL片段;如果结果为false,则不执行其中的SQL片段 -

根据薪资查询员工信息(if标签)
test属性中的布尔表达式的值,从而决定是否执行包含在其中的SQL片段。如果判断结果为true,则执行其中的SQL片段;如果结果为false,则不执行其中的SQL片段
① 在mapper文件中编写SQL语句
<select id="findAllBySal" resultType="com.tedu.pojo.Emp">
  select * from emp
  where 1=1
  <if test="minSal != null">
  	and salary>#{minSal}
  if>
  <if test="maxSal != null">
  	and salary <= #{maxSal}
  if>
select>
② Java代码实现
/* 练习12: 根据薪资查询员工信息
* 如果没有参数, 则不执行where子句, 默认查询所有员工:
* 	select * from emp
* 如果参数中只有minSal(即minSal不为null), 则:
* 	... where salary > minSal
* 如果参数中只有maxSal(即maxSal不为null), 则:
* 	... where salary < maxSal
* 如果参数有 minSal、maxSal(即minSal、maxSal不为null), 则:
*	... where salary > minSal and salary < maxSal  */
@Test
public void testFindBySal() {
	Map<String, Object> map = new HashMap<String, Object>();
	map.put( "minSal" , 3000 );
	map.put( "maxSal", 4000 );
	List<Emp> list = session.selectList( "EmpMapper.findBySal", map );
	for (Emp emp : list) {
		System.out.println( emp );
	}
}
2.根据薪资查询员工信息(where标签)
① 在mapper文件中编写SQL语句
<select id="findAllBySal2" resultType="com.tedu.pojo.Emp">
  select * from emp
  <where>
    <if test="minSal != null">
    	and salary>#{minSal}
    if>
    <if test="maxSal != null">
    	and salary <= #{maxSal}
    if>
  where>
select>
② Java代码实现
/**
*       根据薪资查询员工信息
* 如果没有参数, 则不执行where子句, 默认查询所有员工:
* 	select * from emp
* 如果参数中只有minSal(即minSal不为null), 则:
* 	... where salary > minSal
* 如果参数中只有maxSal(即maxSal不为null), 则:
* 	... where salary < maxSal
* 如果参数有 minSal、maxSal(即minSal、maxSal不为null), 则:
*	... where salary > minSal and salary < maxSal  */
@Test
public void testFindAllBySal() {
  //封装参数到map集合中
  Map map = new HashMap();
  map.put("minSal", 3000);
  map.put("maxSal", 4000.0);
  List<Emp> list = session.selectList("EmpMapper.findAllBySal2", map);
  for (Emp emp : list) {
  	System.out.println( emp );
  }
}
3.foreach元素
foreach标签:可以对传过来的参数数组或集合进行遍历,以下是foreach标签上的各个属性介绍:
| 属性 | 属性描述 |
|---|---|
| collection | 必需,值为遍历的集合类型,例如:如果参数只是一个数组或List集合,则collection的值为array或list;如果传的是多个参数,用map封装,collection则指定为map中的key。 |
| item | 必需,若collection为数组或List集合时,item表示其中的元素,若collection为map中的key,item表示map中value(集合或数组)中的元素 |
| open | 可选,表示遍历生成的SQL片段以什么开始,最常用的是左括号’(’ |
| close | 可选,表示遍历生成的SQL片段以什么结束,最常用的是右括号’)’ |
| separator | 可选,每次遍历后给生成的SQL片段后面指定间隔符 |
练习14: 根据员工的id批量删除员工信息
根据员工的id批量删除员工信息
① 在mapper文件中编写SQL语句
<delete id="deleteByIds">
	delete from emp where id in
	<foreach collection="array" open="(" item="id" separator="," close=")">
		#{id}
	foreach>
delete>
② Java代码实现
/*   根据员工的id批量删除员工信息 */
@Test
public void testDeleteByIds() {
	//获取所要删除的员工的id数组
	Integer[] ids = {1,3,5,7};
	int rows = session.delete( "EmpMapper.deleteByIds", ids );
	System.out.println( "影响行数: "+rows );
}
根据员工的id批量更新员工信息
① 在mapper文件中编写SQL语句
<update id="updateByIds">
	update emp set salary=salary + #{sal}
	where id in
	<foreach collection="arrIds" open="(" item="id" separator="," close=")">
		#{id}
	foreach>
update>
② Java代码实现
/*   根据员工的id批量更新员工信息
 * 将id为 2、4、6、8的员工的薪资在原有基础上增加1000
 */
@Test
public void testUpdateByIds() {
	Integer[] ids = {2,4,6,8}; //获取所要更新的员工的id数组
	Double sal = 1000.0; //要涨的薪资
	//传递的参数超过1个, 将参数封装到map集合中再传递
	Map<String, Object> map = new HashMap<String, Object>();
	map.put( "arrIds" , ids );
	map.put( "sal", sal );
	int rows = session.update( "EmpMapper.updateByIds", map );
	System.out.println( "影响行数: "+rows );
}
七、 Mapper接口开发
1.Mapper接口开发介绍
在上面的Mybatis案例中, 通过SqlSession对象调用方法进行增删改查操作时,方法中需要传入的第一个参数是一个字符串值,该值对应的内容为: (Mapper文件中的)namespace + id, 通过这种方式,找到Mapper文件中映射的SQL语句并执行!!
这种方式由于传入的是字符串值, 很容易发生字符串拼写错误且编译时期不会提示。
这里我们将会讲解比上面更加简单的方式,也是我们企业开发中最常用的方式,即使用mapper接口开发。使用mapper接口开发需要注意以下几点:
1、创建一个接口,接口的全限定类名和mapper文件的namespace值要相同

2、mapper文件中每条要执行的SQL语句,在接口中要添加一个对应的方法,并且接口中的方法名和SQL标签上的id值相同

3、Mapper接口中方法接收的参数类型(SQL语句中有占位符就需要传参数,并要写参数类型,反之),和mapper.xml中定义的sql的接收的参数类型要相同

4、接口中方法的返回值类型和SQL标签上的resultType即返回值类型相同(如果方法返回值是集合,resultType只需要指定集合中的泛型)
2.Mapper接口开发实现
下面将使用mapper接口开发的方式,实现根据id查询指定的员工信息
① 创建com.tedu.dao.EmpMapper接口
注意:方法的名字要和映射的sql标签的id值保持一致
方法的返回值类型和resultType的类型要一致
package com.tedu.dao;

import java.util.List;
import java.util.Map;

import com.tedu.pojo.Emp;

/*	全限定接口名
 * com.tedu.dao.EmpMapper
 */
public interface EmpMapper {
	//练习1:查询所有员工 (SQL语句没有占位符,所以不写参数类型)
	public List<Emp> findAll();

	//练习2:新增员工新 (SQL语句有占位符,所以需要写参数类型)
	//可以用Emp封装传递,也可以用Map集合封装传递
	public int	insert(Emp emp);

	//练习3:更新员工信息:小乔,辅助,11000
	public int update(Map map);

	//练习4:删除指定id的员工信息
	public int delete(int id);
}
② 在mapper文件中编写SQL语句
由于接口的全路径名(com.tedu.dao.EmpMapper)要和EmpMapper.xml的namespace值保持一致,因此, 这里将namespace的值改为com.tedu.dao.EmpMapper:
<mapper namespace="com.tedu.dao.EmpMapper">


	<select id="findAll" resultType="com.tedu.pojo.Emp">
		select * from emp
	select>


	<insert id="insert">
		insert into emp value(null,#{name},#{job},#{salary})
	insert>


	<update id="update">
		update emp set job=#{job},salary=#{salary}
		where name=#{name}
	update>


	<delete id="delete">
		delete from emp where id=#{id}
	delete>

mapper>
③ 提供实现类,测试EmpMapper接口中查询员工信息的方法
package com.tedu.mybatis;

import java.io.InputStream;
import java.util.HashMap;
import java.util.List;
import java.util.Map;

import org.apache.ibatis.io.Resources;
import org.apache.ibatis.session.SqlSession;
import org.apache.ibatis.session.SqlSessionFactory;
import org.apache.ibatis.session.SqlSessionFactoryBuilder;
import org.junit.Test;

import com.tedu.dao.EmpMapper;
import com.tedu.pojo.Emp;

public class TestMybatis03 {
	private static SqlSession session = null;

	static {
		try {
			// 1.读取mybatis核心配置文件(mybatis-config.xml)
			InputStream in = Resources.getResourceAsStream("mybatis-config.xml");
			// 2.基于配置信息获取SqlSession工厂对象
			SqlSessionFactoryBuilder builder = new SqlSessionFactoryBuilder();
			SqlSessionFactory fac = builder.build(in);
			// 为session赋值(mybatis中的事务默认是手动提交,true表示设置事务自动提交)
			session = fac.openSession(true);
		} catch (Exception e) {
			e.printStackTrace();
		}
	}

	// 练习1:查询员工表中的所有员工信息
	@Test
	public void testFindAll() {
		// 获取EmpMapper接口的子类实例(传入接口的字节码对象)
		EmpMapper mapper = session.getMapper(EmpMapper.class);// 可以提到内类,方法外,整个类就可以使用,减少代码量
		// 调用子类实例的findAll方法,查询所有员工信息
		List<Emp> list = mapper.findAll();
		for (Emp emp : list) {
			System.out.println(emp);
		}
	}

	// 练习2:新增员工信息:小乔,法师,15000 (参数时传过来,不要写死)
	@Test
	public void testInsert() {
		// 获取EmpMapper接口的子类实例(传入接口的字节码对象)
		EmpMapper mapper = session.getMapper(EmpMapper.class);
		// 调用子类实例的insert方法,新增员工信息
		Emp emp = new Emp(null, "小乔", "法师", 15000.0);

		int rows = mapper.insert(emp);
		System.out.println(rows);

	}

	// 练习3:更新员工信息:小乔,辅助,11000
	@Test
	public void testUpdate() {
		// 获取EmpMapper接口的子类实例(传入接口的字节码对象)
		EmpMapper mapper = session.getMapper(EmpMapper.class);

		// 调用子类实例的update()方法,更新员工信息
		Map map = new HashMap();
		map.put("name", "小乔");
		map.put("job", "辅助");
		map.put("salary", 11000.0);
		int rows = mapper.update(map);
		System.out.println(rows);
	}

	// 练习4:删除指定id的员工信息
	@Test
	public void testDelete() {
		// 获取EmpMapper接口的子类实例(传入接口的字节码对象)
		EmpMapper mapper = session.getMapper(EmpMapper.class);

		// 调用子类实例的delete()方法,删除员工信息
		int rows = mapper.delete(13);
		System.out.println(rows);
	}

}
//思考1:没有传入namespace+id,在执行时,是如何定位到SQL语句?
/*
 * 框架底层会根据传入的字节码对象,为借口提供一个实现类(即为接口提供子类) 并根据实现类(子类)创建接口的子类的实例
 * (namespace+id=接口的全限定类名+方法名) 再调用子类实例的findAll()方法,该方法执行时,会获取接口的全限定类名,再获取当前
 * 方法名,根据 接口的全限定类名+方法名,定位SQL并执行SQL
 *
 */
八、 几个可以优化的地方
1.加入log4j日志框架
在项目中加入log4j的配置文件,用于打印日志信息,便于开发调试。
在src(或相似的目录)下创建log4j.properties如下:
# Global logging configuration
log4j.rootLogger=DEBUG, stdout
# Console output...
log4j.appender.stdout=org.apache.log4j.ConsoleAppender
log4j.appender.stdout.layout=org.apache.log4j.PatternLayout
log4j.appender.stdout.layout.ConversionPattern=%5p [%t] - %m%n
mybatis默认使用log4j作为输出日志信息。
只要将该文件放在指定的位置,log4j工具会自动到指定位置加载上述文件,读取文件中的配置信息并使用!
2.SQL语句中的特殊符号
示例:添加一个查询功能:查询薪资小于3500的所有员工。
1、编辑EmpMapper.xml文件, 添加查询对应的sql.
<select id="findBySal" resultType="com.tedu.pojo.Emp">
	select * from emp
	where 2=2
	<if test="minSal != null">
		and salary >= #{minSal}
	if>
	<if test="maxSal != null">
		and salary <= #{maxSal}
	if>
select>
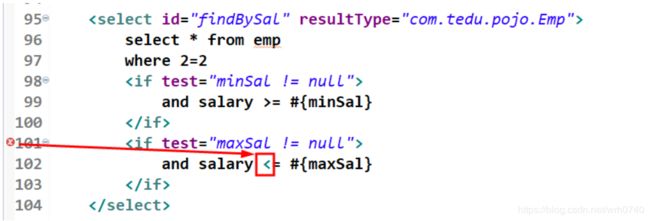
2、但在书写完后,xml文件提示有错误:
原来,小于号(<)在xml文件中是特殊字符,被xml文件当成了标签的开始符号。
3、解决方法:可以使用 <代替 <,例如:
<select id="findBySal" resultType="com.tedu.pojo.Emp">
	select * from emp
	where 2=2
	<if test="minSal != null">
		and salary >= #{minSal}
	if>
	<if test="maxSal != null">
		and salary <= #{maxSal}
	if>
select>
或者是将特殊符号包含在CDATA区( )中,这是因为放在CDATA区中的内容,只会被xml解析器当作普通文本来处理。而不是被当成标签的一部分处理。
<select id="findBySal" resultType="com.tedu.pojo.Emp">
	select * from emp
	where 2=2
	<if test="minSal != null">
		and salary >= #{minSal}
	if>
	<if test="maxSal != null">
		and salary  #{maxSal}
	if>
select>
3.jdbc.properties文件
在开发中,通常我们会将连接数据库的配置信息单独放在一个properties文件中(方便管理和维护),
然后在MyBatis的mapper文件中引入properties文件的配置信息即可!

2、jdbc.properties文件内容如下:
jdbc.driver=com.mysql.jdbc.Driver
jdbc.url=jdbc:mysql://localhost:3306/yonghedb?characterEncoding=utf-8
jdbc.username=root
jdbc.password=root
3、在mybatis-config.xml文件中引入jdbc.properties文件
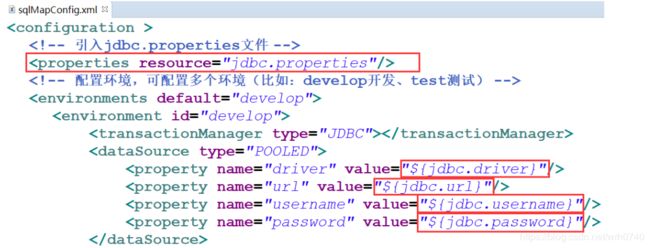
1、其中
2、properties标签上value属性中配置的 ${jdbc.xxx}:
${jdbc.driver}:其实就是jdbc.properties文件中的 jdbc.driver的值,即:
com.mysql.jdbc.Driver
${jdbc.url}:其实就是jdbc.properties文件中的 jdbc.url的值,即:
jdbc:mysql://localhost:3306/mybatisdb?characterEncoding=utf-8
${jdbc.username}:其实就是jdbc.properties文件中的 jdbc.username的值,即:
root
${jdbc.password}:其实就是jdbc.properties文件中的 jdbc.password的值,即:
root
九、 扩展内容
1.Jdbc回顾
通过JDBC查询Emp表中的所有记录,并封装到一个List集合中返回
① 创建TestJdbc类,完成查询所有员工
package com.tedu.jdbc;

import java.sql.Connection;
import java.sql.DriverManager;
import java.sql.ResultSet;
import java.sql.SQLException;
import java.sql.Statement;
import java.util.ArrayList;
import java.util.List;
import com.tedu.pojo.Emp;
/** Jdbc回顾 */
public class TestJdbc {
	public static void main(String[] args) {
		/* 查询emp表中的所有员工信息,将每个员工信息的封装到一个
		 * Emp对象中,再将封装了员工信息所有Emp对象存入List集合
		 * 中,并遍历输出所有的员工信息
		 */
		List<Emp> empList = findAll();
		for(Emp emp : empList){
			System.out.println(emp);
		}
	}

	/**
	 * 查询emp表中的所有员工信息,封装到List集合并返回
	 */
	private static List<Emp> findAll() {
		Connection conn = null;
		Statement stat = null;
		ResultSet rs = null;
		try {
			//1.注册数据库驱动
			Class.forName("com.mysql.jdbc.Driver");
			//2.获取数据库连接(Connection)
			conn = DriverManager.getConnection(
					"jdbc:mysql:///yonghedb",
					"root", "root");
			//3.获取传输器
			stat = conn.createStatement();
			//4.利用传输器发送sql到数据库执行,并返回执行结果
			String sql = "select * from emp";
			rs = stat.executeQuery(sql);
			//5.处理结果
			//5.1.声明List集合,用于封装所有的员工信息
			List<Emp> empList = new ArrayList();
			//5.2.遍历ResultSet结果集
			while(rs.next()) {
				//5.3.获取结果集中的每一条员工信息
				int id = rs.getInt("id");
				String name = rs.getString("name");
				String job = rs.getString("job");
				double salary = rs.getDouble("salary");
				//5.4.将每一条员工信息封装到一个Emp对象中
				Emp emp = new Emp();
				emp.setId(id);
				emp.setName(name);
				emp.setJob(job);
				emp.setSalary(salary);
				//5.5.将Emp对象存入List集合中
				empList.add(emp);
			}
			return empList;
		} catch (Exception e) {
			e.printStackTrace();
			System.out.println("查询失败!");
		} finally{
			//6.释放资源
			if(rs != null){
				try {
					rs.close();
				} catch (SQLException e) {
					e.printStackTrace();
				}finally{
					rs = null;
				}
			}
			if(stat != null){
				try {
					stat.close();
				} catch (SQLException e) {
					e.printStackTrace();
				}finally{
					stat = null;
				}
			}
			if(conn != null){
				try {
					conn.close();
				} catch (SQLException e) {
					e.printStackTrace();
				}finally{
					conn = null;
				}
			}
		}
		return null;
	}
}
② 声明Emp实体类,用于封装员工信息
package com.tedu.pojo;
/**
 * 实体类,用于封装Emp表中的一条用户信息
 */
public class Emp {
	//1.声明实体类中的属性
	private Integer id;
	private String name;
	private String job;
	private Double salary;

	//2.提供对应的getter和setter方法
	public Integer getId() {
		return id;
	}
	public void setId(Integer id) {
		this.id = id;
	}
	public String getName() {
		return name;
	}
	public void setName(String name) {
		this.name = name;
	}
	public String getJob() {
		return job;
	}
	public void setJob(String job) {
		this.job = job;
	}
	public Double getSalary() {
		return salary;
	}
	public void setSalary(Double salary) {
		this.salary = salary;
	}

	//3.重写toString方法
	@Override
	public String toString() {
		return "Emp [id=" + id + ", name=" + name + ", job=" + job + ", salary=" + salary + "]";
	}
}
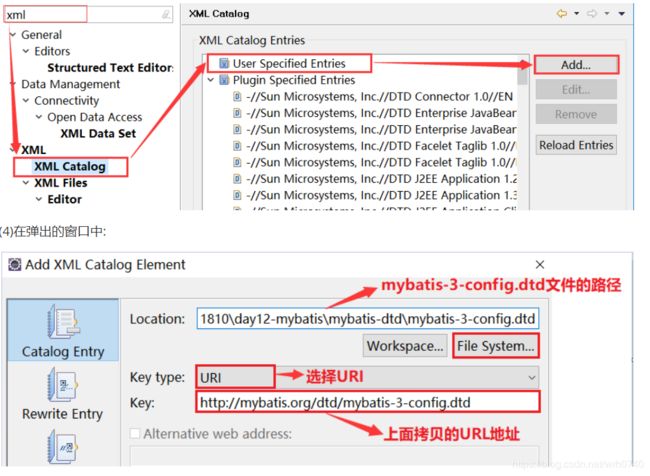
2.mybatis-config文件没有提示的解决办法
如果在没有网络(外网)的情况下,编写mybatis-config.xml文件没有提示,可以按照下面的步骤进行配置:
(1)找到mybatis-3-config.dtd的文件的位置,例如:

(2)复制下面的url地址:
http://mybatis.org/dtd/mybatis-3-config.dtd
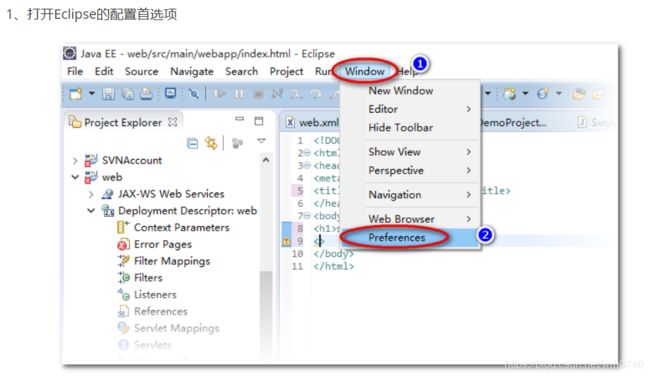
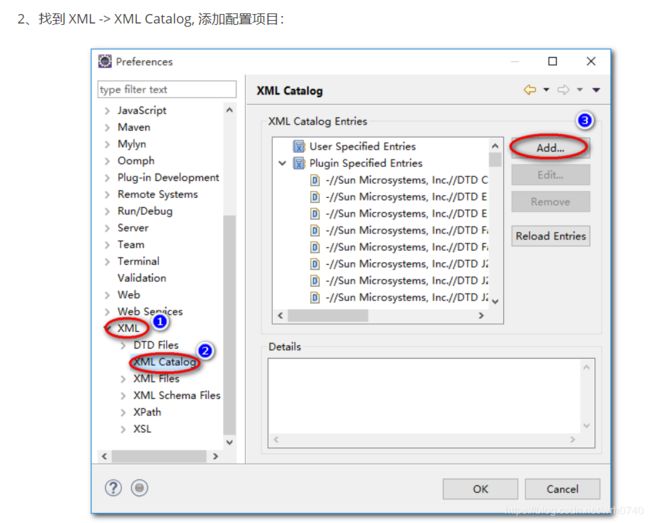
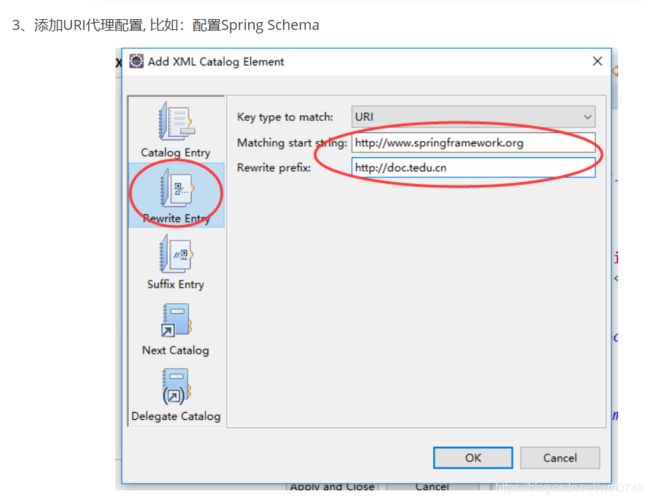
(3)在eclipse菜单栏中: window --> Preferences --> 在搜索框中搜索 [ xml ] XML --> XML Catalog --> User Specified Entries --> Add…
3.Mapper文件没有提示的解决办法
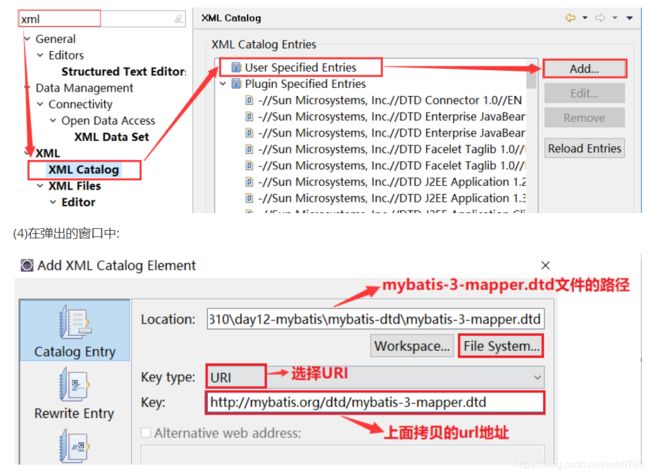
如果在没有网络(外网)的情况下,编写XxxMapper.xml文件没有提示,可以按照下面的步骤进行配置:
(1)找到mybatis-3-mapper.dtd的文件的位置,例如:
http://mybatis.org/dtd/mybatis-3-mapper.dtd
(3)在eclipse菜单栏中: window --> Preferences --> 在搜索框中搜索 [ xml ] XML --> XML Catalog --> User Specified Entries --> Add…
4.配置达内XML Schema代理服务器
第十四章 spring框架
一、 spring简介
1.什么是Spring?
spring是分层的JavaSE及JavaEE应用于全栈的轻量级开源框架,以IoC(Inverse Of Control:控制反转/反转控制)和AOP(Aspact Oriented Programming:面向切面编程)为核心,提供了表现层SpringMVC和持久层Spring
JDBC以及业务层事务管理等众多模块的企业级应用技术,还能整合开源世界中众多著名的第三方框架和类库,逐渐成为使用最多的JavaEE企业应用开源框架。
SSH(struts2 spring hibernate)
SSM(springmvc spring mybatis)
Spring的本质是管理软件中的对象,即创建对象和维护对象之间的关系
2.Spring的发展历程
1997 年 IBM提出了EJB 的思想
1998 年,SUN制定开发标准规范 EJB1.0
1999 年,EJB1.1 发布
2001 年,EJB2.0 发布
2003 年,EJB2.1 发布
2006 年,EJB3.0 发布
Rod Johnson (罗德·约翰逊,spring 之父)
Expert One-to-One J2EE Development without EJB(2004)
阐述了 J2EE 开发不使用 EJB的解决方式(Spring 雏形)
2017年9月份发布了spring的最新版本spring 5.0通用版
3.Spring的优势
① 方便解耦,简化开发
通过 Spring提供的 IoC容器,可以将对象间的依赖关系交由Spring进行控制,避免硬编码所造成的过度程序耦合。用户也不必再为较为底层的需求编写代码,可以更专注于上层的应用。
② AOP 编程的支持
通过 Spring的 AOP 功能,方便进行面向切面的编程,许多不容易用传统OOP(Object Oriented Programming:面向对象编程) 实现的功能可以通过 AOP 轻松应付。
③ 声明式事务的支持
可以将我们从单调烦闷的事务管理代码中解脱出来,通过声明式方式灵活的进行事务的管理,提高开发效率和质量。
④ 方便程序的测试
可以用非容器依赖的编程方式进行几乎所有的测试工作,测试不再是昂贵的操作,而是随手可做的事情。
⑤ 方便集成各种优秀框架
Spring可以降低各种框架的使用难度,提供了对各种优秀框架(Struts、Hibernate、Hessian、Quartz等)的直接支持。
⑥ 降低 JavaEE API 的使用难度。
Spring对 JavaEE API(如 JDBC、JavaMail、远程调用等)进行了薄薄的封装层,使这些API 的使用难度大为降低。
⑦ Spring框架源码是经典学习范例
Spring的源代码设计精妙、结构清晰、匠心独用,处处体现着大师对Java设计模式灵活运用以及对 Java技术的高深造诣。它的源代码无疑是Java技术的最佳实践的范例。
4.spring的架构
Spring 最初的目标就是要整合一切优秀资源,然后对外提供一个统一的服务。Spring 模块构建在核心容器之上,核心容器定义了创建、配置和管理 bean 的方式,如下图所示:
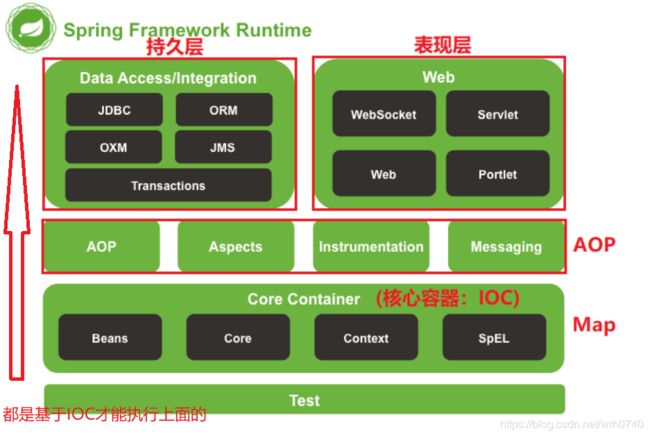
组成 Spring 框架的每个模块(或组件)都可以单独存在,或者与其他一个或多个模块联合实现。每个模块的功能如下:
| 模块 | 说明 | |
|---|---|---|
| 核心容器Spring Core | 核心容器,提供Spring框架的基本功能。核心容器的主要组件是BeanFactory,它是工厂模式的实现。BeanFactory 使用控制反转(IOC)模式,将应用程序的配置和依赖性规范与实际的应用程序代码分开。 | |
| Spring Context | Spring上下文,是一个配置文件,向 Spring 框架提供上下文信息。Spring 上下文包括企业服务,例如 JNDI、EJB、电子邮件、国际化、校验和调度功能。 | |
| Spring AOP | 通过配置管理特性,Spring AOP 模块直接将面向切面的编程功能集成到了 Spring 框架中。可以很容易地使 Spring框架管理的任何对象支持AOP。Spring AOP模块为基于 Spring 的应用程序中的对象提供了事务管理服务。通过使用 Spring AOP,就可以将声明性事务管理集成到应用程序中。 | |
| Spring DAO | JDBC DAO 抽象层提供了有意义的异常层次结构,可用该结构来管理异常处理和不同数据库供应商抛出的错误消息。异常层次结构简化了错误处理,并且极大地降低了需要编写的异常代码数量(例如打开和关闭连接)。Spring DAO 的面向 JDBC 的异常遵从通用的 DAO 异常层次结构。 | |
| Spring ORM | Spring 框架插入了若干个 ORM 框架,从而提供了 ORM 的对象关系工具,其中包括JDO、Hibernate和iBatis SQL Map。所有这些都遵从 Spring 的通用事务和 DAO 异常层次结构。 | |
| Spring Web | Web上下文模块建立在应用程序上下文模块之上,为基于 Web 的应用程序提供了上下文。所以Spring 框架支持与 Jakarta Struts的集成。Web模块还简化了处理多部分请求以及将请求参数绑定到域对象的工作。 | |
| Spring MVC框架 | MVC 框架是一个全功能的构建 Web 应用程序的 MVC 实现。通过策略接口,MVC 框架变成为高度可配置的,MVC 容纳了大量视图技术,其中包括 JSP、Velocity、Tiles、iText 和 POI。 |
二、 程序中的耦合和解耦
1.什么是程序的耦合
耦合性(Coupling),也叫耦合度,是对模块间关联程度的度量。耦合的强弱取决于模块间接口的复杂性、调用模块的方式以及通过界面传送数据的多少。模块间的耦合度是指模块之间的依赖关系,包括控制关系、调用关系、数据传递关系。模块间联系越多,其耦合性越强,同时表明其独立性越差(降低耦合性,可以提高其独立性)。耦合性存在于各个领域,而非软件设计中独有的,但是我们只讨论软件工程中的耦合。
总结:在软件工程中,耦合指的就是指对象之间的依赖关系。对象之间的依赖程度越高,耦合度就越高。对象之间的耦合越高,维护成本越高。因此对象的设计应使类和构件之间的耦合最小。
降低程序之间的依赖程度,即降低程序之间的耦合度的过程就叫做解耦。
例如:早期的Jdbc操作中,在注册数据库驱动时,为什么采用的是Class.forName的方式,而不是采用DriverManager.registerDriver的方式?
public class TestJdbc {
  public static void main(String[] args) throws Exception {
    //1.注册数据库驱动
    // DriverManager.registerDriver( new Driver() );
    Class.forName("com.mysql.jdbc.Driver");
    //2.获取数据库连接
    //3.获取传输器
    //4.发送sql到服务器执行并返回执行结果
    //5.处理结果
    //6.释放资源
  }
}
除了DriverManager.registerDriver会导致驱动注册两次外,更重要的是,如果使用这种方式,JDBC程序就会依赖于数据库的驱动类(MySQL的Driver类),如果后期程序因数据量和性能原因升级到Oracle数据库,就需要修改程序源代码——重新导入新的驱动类,这会增加很多不必要的麻烦!
而是用Class.forName方式注册驱动,这样的好处是Jdbc程序不再依赖具体的驱动类,即使删除(或不导入)mysql驱动包,程序依然可以编译(当然不可能运行,因为运行时肯定需要依赖驱动)。
此时类中仅仅是将mysql驱动类的全限定类名写死在程序中(只是一个字符串),可以将这个字符串提取到配置文件中,后期可以通过修改配置文件(而不用修改程序代码)轻松的替换数据库产品。
2.工厂模式解耦介绍
在实际开发中可以将三层(表现层、业务层、持久层)的对象都使用配置文件配置起来,当启动服务器加载应用时,可以通过工厂读取配置文件,根据配置文件中的配置将这些对象创建出来,在接下来使用的时候,直接拿过来使用即可。
那么,这个负责读取配置文件,根据配置文件创建并返回这些对象的类就是工厂。
在一个类中创建另一个类的实例(new 对象),会增加程序的耦合性
可以通过【工厂+接口+配置文件】的方式解除程序中的耦合。
3.工厂模式解耦示例
① 解耦程序编写步骤
a. 创建一个Maven的Java工程(day16-spring)
b. 创建持久层接口和接口实现类
com.tedu.dao.EmpDao (接口)
com.tedu.dao.EmpDaoImpl (实现类)
c. 创建业务层接口和接口实现类
com.tedu.service.EmpService (接口)
com.tedu.service.EmpServiceImpl (实现类)
d. 创建表现层测试程序(com.tedu.controller.EmpController)并运行测试程序
e. 通过工程+配置文件+接口(已有)方式解耦
(1)创建工厂类(com.tedu.factory.BeanFactory)并实现
(2)提供配置文件,将service接口和dao接口的实现类的全限定类名编写到配置文件中。
f. 使用工厂获取service接口和dao接口的实例,替换使用new的方式获取接口的实例。
② 代码如下
a. 表现层:测试程序并运行测试程序
package com.tedu.controller;

import org.junit.Test;
import com.tedu.factory.BeanFactory;
import com.tedu.service.EmpService;
/**
 * 模拟表现层 测试程序并运行测试程序
 * controller --> service --> dao
 */
public class EmpController {
	/* 获取Service接口的子类实例
	 * ——这里使用new对象的方式造成了程序之间的耦合性提升 */
	//private EmpService service = new EmpServiceImpl();没有解耦的代码
	//基于反射,通过该类的全限定类名(包名+类名 ;通过Key(EmpService),获取value(com.tedu.service.EmpServiceImpl)),获取该类的实例
	private EmpService service = (EmpService)BeanFactory.getBean("EmpService");//解耦代码,父类引用指向子类

	@Test
	public void testAddEmp() {
		System.out.println("调用service层的方法添加员工信息...");
		service.addEmp();
	}
}
b-1. 业务层: 员工模块的service(业务层)接口
package com.tedu.service;

/**
 * 员工模块的service(业务层)接口
 */
public interface EmpService {
	/** 添加员工信息 */
	public void addEmp();
}
b-2. 业务层:员工模块的service(业务层)接口实现类
package com.tedu.service;

import com.tedu.dao.EmpDao;
import com.tedu.factory.BeanFactory;
/**
 * 员工模块的service(业务层)接口实现类
 * service层 ---> dao层
 */
public class EmpServiceImpl implements EmpService {
	/* 获取Dao接口的子类实例
	 * ——这里使用new对象的方式造成了程序之间的耦合性提升 */
	//private EmpDao dao = new EmpDaoImpl();没有解耦代码
	//基于反射,通过该类的全限定类名(包名+类名 ;通过Key(EmpDao),获取value(com.tedu.dao.EmpDaoImpl)),获取该类的实例
	private EmpDao dao = (EmpDao)BeanFactory.getBean( "EmpDao" );//解耦代码,父类引用指向子类

	@Override
	public void addEmp() {
		System.out.println("调用dao层的方法添加员工信息...");
		dao.addEmp();
	}
}
c-1. 持久层:员工模块的Dao(持久层)接口
package com.tedu.dao;

/**
 * 员工模块的Dao(持久层)接口
 */
public interface EmpDao {
	/** 添加员工信息 */
	public void addEmp();
}
c-2. 持久层:员工模块的Dao(持久层)接口实现类
package com.tedu.dao;
/**
 * 员工模块的Dao(持久层)接口实现类
 */
public class EmpDaoImpl implements EmpDao {

	@Override
	public void addEmp() {
		System.out.println(
			"dao层的addEmp()方法执行了..成功保存了一条员工信息.."
		);
	}
}
d. 工厂类:负责创建各种类的实例
package com.tedu.factory;

import java.io.InputStream;
import java.util.Properties;

/**
 * --------------------------------------------------------- Bean: 可重用组件(计算机英语)
 * JavaBean:使用Java语言编写的可重用组件,例如:service层、dao层等 JavaBean:通常分为业务Bean和实体Bean
 * 业务Bean:处理业务逻辑,service层、dao层 实体Bean:封装数据,例如,为了封装员工信息而编写的Emp实体类.
 * --------------------------------------------------------- 解除耦合:
 * 基于工厂(BeanFactory)+接口(EmpService、EmpDao )+配置文件 方式来降低程序之间的耦合度(解耦)
 * (1)提供BeanFactory类 (1)提供config.properties配置文件,在配置文件中配置service和dao的实现类
 * 配置内容为:唯一标识=实现类的全限定类名(key=value结构) key = value
 * EmpService=com.tedu.service.EmpServiceImpl EmpDao=com.tedu.dao.EmpDaoImpl
 *
 * (2)通过工厂读取配置文件中配置的全限定类名,利用反射创建对象。 xml配置文件、properties配置文件
 */
public class BeanFactory {
	// 声明一个Properties对象,在静态代码块中对其进行初始化
	private static Properties prop = null;// 声明一个Properties对象
	static {
		try {
			// 为prop进行实例化
			prop = new Properties();
			// 获取配置文件config.properties的输入流,基于类目录去加载(类加载器)
			/*
			 * BeanFactory.class.getClassLoader()获取当前这个类的类加载器
			 */
			InputStream in = BeanFactory.class.getClassLoader().getResourceAsStream("config.properties");
			// 将配置文件config.properties中的内容读取到Properties对象中的prop
			prop.load(in);
		} catch (Exception e) {
			e.printStackTrace();

		}
	}

	/**
	 * 负责创建各种类的实例,需要哪个接口的实例就告诉工厂(通过传参的形式String key) 基于反射,通过该类的全限定类名(包名+类名),获取该类的实例
	 * 根据config.xml文件中的key获取对应class类的实例
	 *
	 * @param key
	 * @return
	 */
	// 静态方法可以通过类名.方法名直接调用,不用创建实例
	public static Object getBean(String key) {//key时接口名
		// 根据接口名称(即config文件中的key)读取该接口对应的实现类的全限定类名
		String className = prop.getProperty(key);// 通过key获取value的值

		try {
			// 根据类的全限定类名,获取该类的字节码对象
			Class clz = Class.forName(className);
			// 基于类的字节码对象,获取该类的实例(通过反射)
			Object obj = clz.newInstance();
			return obj;//谁调用就返回给谁
		} catch (Exception e) {
			e.printStackTrace();
		}
		return null;//获取对象失败了就返回null
	}
}
e.配置文件:负责创建各种类的实例(key=value结构)
放在java配置目录下(src/main/resources)
EmpService=com.tedu.service.EmpServiceImpl
EmpDao=com.tedu.dao.EmpDaoImpl
三、 Spring IOC控制反转
1.什么是控制反转
IOC(Inverse Of Control)控制反转,即,把创建对象的权利交给框架。
也就是指将对象的创建、对象的存储、对象的管理交给了spring容器。
(spring容器是spring中的一个核心模块,用于管理对象,底层可以理解为是一个map集合)
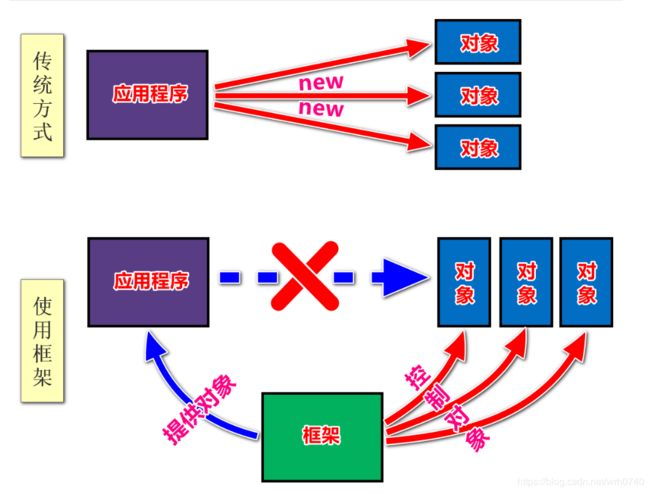
在此之前,当需要对象时,通常是利用new关键字创建一个对象:
/* 获取Service接口的子类实例
 * ——这里使用new对象的方式造成了程序之间的耦合性提升 */
private EmpService service = new EmpServiceImpl();
//private EmpService service = (EmpService)BeanFactory.getBean("EmpService");
但由于new对象,会提高类和类之间的依赖关系,即代码之间的耦合性。
而现在我们可以将对象的创建交给框架来做:
/* 获取Service接口的子类实例
 * ——这里使用new对象的方式造成了程序之间的耦合性提升 */
//private EmpService service = new EmpServiceImpl();
private EmpService service = (EmpService)BeanFactory.getBean("EmpService");
只需要将类提前配置在配置文件中,就可以将对象的创建交给框架来做。当需要对象时,不需要自己创建,而是通过框架直接获取即可,省去了new对象的过程,自然就降低类和类之间的依赖关系,也就是耦合性。
2.IOC入门案例
下面将使用spring的IOC解决程序间的耦合
① 建工程,引入jar包
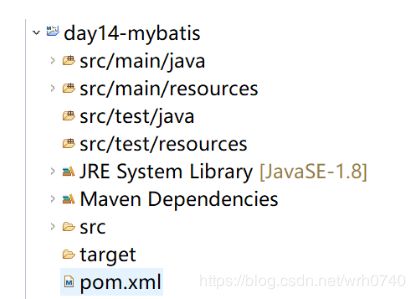
创建Maven工程,引入spring相关依赖包
1、创建Maven—Java工程
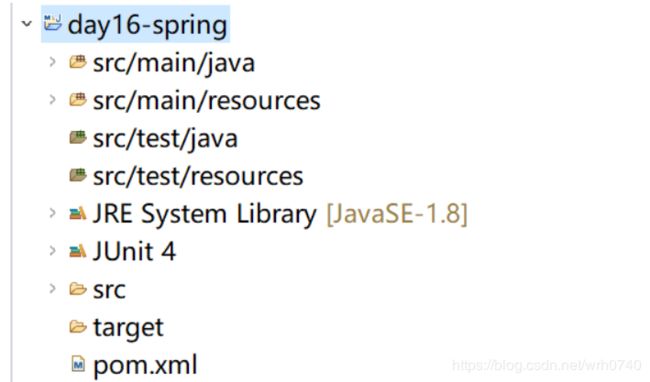
2、引入junit、spring的jar包:在maven工程的pom.xml文件的根标签(project)内添加如下配置:
<dependencies>

	<dependency>
		<groupId>junitgroupId>
		<artifactId>junitartifactId>
		<version>4.10version>
	dependency>

	<dependency>
		<groupId>org.springframeworkgroupId>
		<artifactId>spring-contextartifactId>
		<version>4.1.3.RELEASEversion>
	dependency>
dependencies>
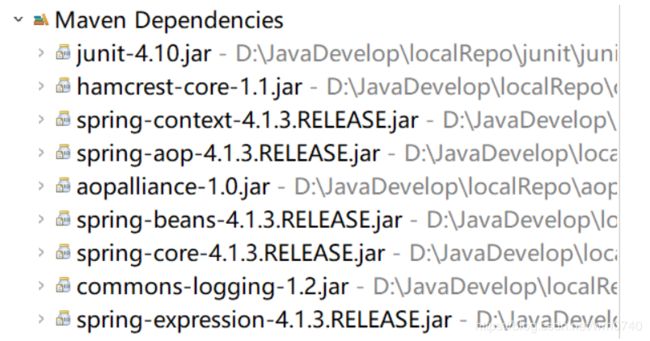
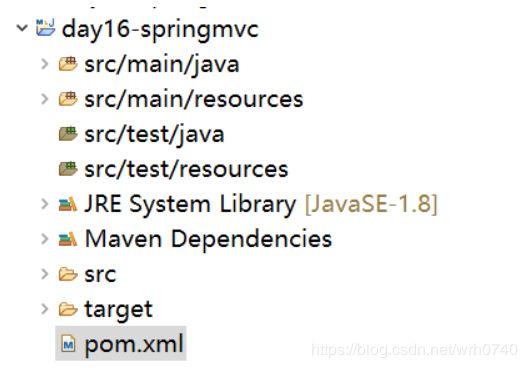
导入后保存pom文件,项目如图所示:
② 创建spring配置文件
创建spring核心配置文件—applicationContext.xml
1、在工程的src/main/resources源码目录下,创建applicationContext.xml文件:
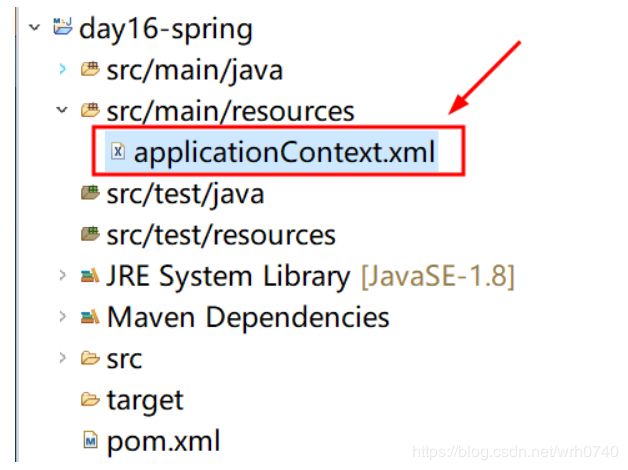
2、在applicationContext.xml中添加文件头信息:
<beans xmlns="http://www.springframework.org/schema/beans"
    xmlns:xsi="http://www.w3.org/2001/XMLSchema-instance"
    xsi:schemaLocation="http://www.springframework.org/schema/beans
        http://www.springframework.org/schema/beans/spring-beans.xsd">


beans>
3、将EmpService接口的实现类的实例
以及EmpDao接口的实现类的实例交给Spring容器创建,在核心配置文件中添加如下配置:
<beans xmlns="http://www.springframework.org/schema/beans"
    xmlns:xsi="http://www.w3.org/2001/XMLSchema-instance"
    xsi:schemaLocation="http://www.springframework.org/schema/beans
        http://www.springframework.org/schema/beans/spring-beans.xsd">


	 <bean id="empService" class="com.tedu.service.EmpServiceImpl">bean>


	<bean id="empDao" class="com.tedu.dao.EmpDaoImpl">bean>
beans>
③ 创建测试类进行解耦
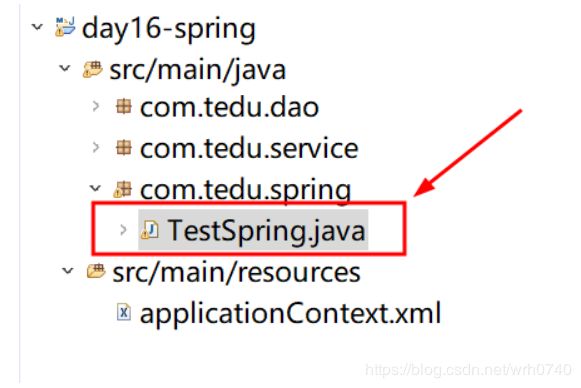
创建测试类—TestSpring,通过spring的IOC解决程序中的耦合问题
a. 创建测试类
package com.tedu.spring;

import org.junit.Test;
import org.springframework.context.support.ClassPathXmlApplicationContext;

import com.tedu.dao.EmpDao;
import com.tedu.service.EmpService;

public class TestSpring {
	/*
	 * 1.测试spring的IOC
	 */
	@SuppressWarnings("resource")
	@Test
	public void testIOC() {
		/*
		 * 1.获取spring的容器对象(读取applicationContext.xml文件,来获取spring的容器对象)
		 * ,源码文件编译后保存在类目录,基于类目录找applicationContext.xml 直接写文件名+后缀名即可
		 */
		ClassPathXmlApplicationContext ac = new ClassPathXmlApplicationContext("applicationContext.xml");
		// 2.通过spring容器获取Empservice层的实例(不通过new的形式)
		EmpService service = (EmpService) ac.getBean("empService");// 通过applicationContext.xml中的id值获取class的值,根据反射创建EmpServiceImpl类的实例,父类引用指向子类
		// 3.通过spring容器获取EmpDao层实例
		EmpDao dao = (EmpDao) ac.getBean("empDao");

	}
}
b-1. 业务层: 员工模块的service(业务层)接口
package com.tedu.service;

/**
 * 员工模块的service(业务层)接口
 */
public interface EmpService {
	/** 添加员工信息 */
	public void addEmp();
}
b-2. 业务层:员工模块的service(业务层)接口实现类
package com.tedu.service;

import com.tedu.dao.EmpDao;
import com.tedu.dao.EmpDaoImpl;

/**
 * 员工模块的service(业务层)接口实现类
 * service层 ---> dao层
 */
public class EmpServiceImpl implements EmpService {
	/* 获取Dao接口的子类实例
	 * ——这里使用new对象的方式造成了程序之间的耦合性提升 */
	private EmpDao dao = new EmpDaoImpl();
	//基于反射,通过该类的全限定类名(包名+类名 ;通过Key(EmpDao),获取value(com.tedu.dao.EmpDaoImpl)),获取该类的实例
	//private EmpDao dao = (EmpDao)BeanFactory.getBean( "EmpDao" );

	@Override
	public void addEmp() {
		System.out.println("调用dao层的方法添加员工信息...");
		dao.addEmp();
	}
}
c-1. 持久层:员工模块的Dao(持久层)接口
package com.tedu.dao;

/**
 * 员工模块的Dao(持久层)接口
 */
public interface EmpDao {
	/** 添加员工信息 */
	public void addEmp();
}
c-2. 持久层:员工模块的Dao(持久层)接口实现类
package com.tedu.dao;
/**
 * 员工模块的Dao(持久层)接口实现类
 */
public class EmpDaoImpl implements EmpDao {

	@Override
	public void addEmp() {
		System.out.println(
			"dao层的addEmp()方法执行了..成功保存了一条员工信息.."
		);
	}
}
d. 配置文件:负责创建各种类的实例(key=value结构)
放在java配置目录下(src/main/resources)
<beans xmlns="http://www.springframework.org/schema/beans"
    xmlns:xsi="http://www.w3.org/2001/XMLSchema-instance"
    xsi:schemaLocation="http://www.springframework.org/schema/beans
        http://www.springframework.org/schema/beans/spring-beans.xsd">


	 <bean id="empService" class="com.tedu.service.EmpServiceImpl">bean>


	<bean id="empDao" class="com.tedu.dao.EmpDaoImpl">bean>
beans>
四、 Bean对象的单例和多例
1.Bean对象的单例和多例概述
在Spring容器中管理的Bean对象的作用域,可以通过scope属性或用相关注解指定其作用域。
最常用是singleton(单例)或prototype(多例)。其含义如下:
① singleton:单实例,是默认值。这个作用域标识的对象具备全局唯一性。
当把一个 bean 定义设置scope为singleton作用域时,那么Spring IOC容器只会创建该bean定义的唯一实例。也就是说,整个Spring IOC容器中只会创建当前类的唯一一个对象。
这个单一实例会被存储到单例缓存(singleton cache)中,并且所有针对该bean的后续请求和引用都 将返回被缓存的、唯一的这个对象实例。
singleton负责对象的创建、初始化、销毁。
② prototype:多实例。这个作用域标识的对象每次获取都会创建新的对象。
当把一个 bean 定义设置scope为singleton作用域时,Spring IOC容器会在每一次获取当前Bean时,都会产生一个新的Bean实例(相当于new的操作)
prototype只负责对象的创建和初始化,不负责销毁。
2.为什么用单实例或多实例?
之所以用单实例,在没有线程安全问题的前提下,没必要每个请求都创建一个对象,这样子既浪费CPU又浪费内存;
之所以用多例,是为了防止并发问题;即一个请求改变了对象的状态(例如,可改变的成员变量),此时对象又处理另一个请求,而之前请求对对象状态的改变导致了对象对另一个请求做了错误的处理;
用单例和多例的标准只有一个:当对象含有可改变的状态时(更精确的说就是在实际应用中该状态会改变),使用多实例,否则单实例;
① 使用单实例的情况
如果一个类中没有成员变量,通过这个类创建的实例只有一份,所以人都获取这一个实例去使用,也不会出现线程安全问题,这样话可以使用单实例,也推荐单实例
② 使用多实例的情况
如果一个类中有成员变量,为了避免线程安全问题,最好使用多实例
3.测试spring的单实例和多实例
① 创建User类
package com.tedu.pojo;
//创建User类,里面可以不用写什么
public class User {

}
② 创建TestSpring2类,测试代码如下
package com.tedu.spring;

import org.junit.Test;
import org.springframework.context.support.ClassPathXmlApplicationContext;

import com.tedu.dao.EmpDao;
import com.tedu.pojo.User;
import com.tedu.service.EmpService;

public class TestSpring2 {
	/*
	 * 1.测试Bean对象的单实例和多实例
	 */

	@Test
	public void testBean() {
		/*
		 * 1.获取spring的容器对象(读取applicationContext.xml文件,来获取spring的容器对象)
		 * ,源码文件编译后保存在类目录,基于类目录找applicationContext.xml 直接写文件名+后缀名即可
		 */
		ClassPathXmlApplicationContext ac = new ClassPathXmlApplicationContext("applicationContext.xml");
		// 2.通过spring容器获取User类的实例(不通过new的形式)
		User u1=(User) ac.getBean("user");
		User u2=(User) ac.getBean("user");
		// 3.通过spring容器获取EmpDao层实例
		if (u1==u2) {
			System.out.println("当前类的实例是单实例");
		}else {
			System.out.println("当前类的实例是多实例");
		}

	}
}
③ 将applicationContext.xml中,User类bean标签的scope值设置为singleton:
<bean id="user" scope="singleton" class="com.tedu.spring.User">bean>
④ 将applicationContext.xml中,User类bean标签的scope值修改为prototype
<bean id="user" scope="prototype" class="com.tedu.spring.User">bean>
五、 Spring DI依赖注入
1.两种注入方式介绍
DI(Dependency Injection)依赖注入:为对象的属性赋值 。
依赖注入,即组件之间的依赖关系由容器在应用系统运行期来决定,也就是由容器动态地将某种依赖关系的目标对象实例注入到应用系统中的各个关联的组件之中。
简单来说,所谓的依赖注入其实就是,在创建对象的同时或之后,如何给对象的属性赋值。
如果对象由我们自己创建,这一切都变得很简单,例如:
User user = new User();
user.setName("韩少云");
user.setAge(18);
或者:
User user = new User("韩少云", 18);
如果对象由spring创建,那么spring是怎么给属性赋值的?spring提供两种方式为属性赋值:
① Set方式注入(调用对象的setXxx方法为xxx属性赋值)
② 构造方法注入(在创建对象时,用有参构造函数为属性赋值)
2.set方式注入
① 普通属性注入
需求:通过Spring创建User实例,并为User实例的name和age属性(普通属性)赋值
1、创建User类,声明name和age属性,并添加对应的setter和getter方法,以及toString方法
package com.tedu.pojo;

public class User {
	private String name;
	private Integer age;

	// 提供set和get方法
	public String getName() {
		return name;
	}

	public void setName(String name) {
		this.name = name;
	}

	public Integer getAge() {
		return age;
	}

	public void setAge(Integer age) {
		this.age = age;
	}

	// toString方法
	@Override
	public String toString() {
		return "User [name=" + name + ", age=" + age + "]";
	}
}
2、在applicationContext.xml中声明User类的bean实例
<beans xmlns="http://www.springframework.org/schema/beans"
    xmlns:xsi="http://www.w3.org/2001/XMLSchema-instance"
    xsi:schemaLocation="http://www.springframework.org/schema/beans
        http://www.springframework.org/schema/beans/spring-beans.xsd">


	<bean id="user" scope="prototype" class="com.tedu.pojo.User">bean>

beans>
3、创建测试类—TestDI
package com.tedu.spring;

import org.junit.Test;
import org.springframework.context.support.ClassPathXmlApplicationContext;

import com.tedu.dao.EmpDao;
import com.tedu.pojo.User;
import com.tedu.service.EmpService;

public class TestDI {
	/*
	 * 	测试Spring的DI(依赖注入)
	 * 	依赖注入:为对象的属性赋值
	 * 	(1)set方法:调用对象的setXxx方法为xxx属性赋值
	 * 	(2)构造方法注入:在创建对象时,用有参构造函数为属性赋值
	 */
	@Test
	public void testDI() {
		/*
		 * 1.获取spring的容器对象(读取applicationContext.xml文件,来获取spring的容器对象)
		 * ,源码文件编译后保存在类目录,基于类目录找applicationContext.xml 直接写文件名+后缀名即可
		 */
		ClassPathXmlApplicationContext ac = new ClassPathXmlApplicationContext("applicationContext.xml");
		//通过spring容器对象,创建User的实例
		User user=(User) ac.getBean("user");
		System.out.println(user);
	}
}
由于这里没有为User对象的属性赋值,所以此时运行测试,结果为:

4、修改applicationContext.xml中User实例的声明,为User实例注入属性(给属性赋值)
<beans xmlns="http://www.springframework.org/schema/beans"
    xmlns:xsi="http://www.w3.org/2001/XMLSchema-instance"
    xsi:schemaLocation="http://www.springframework.org/schema/beans
        http://www.springframework.org/schema/beans/spring-beans.xsd">


	<bean id="user" scope="prototype" class="com.tedu.pojo.User">

		<property name="name" value="韩少云"/>
		<property name="age" value="20"/>
	bean>
beans>
其中name属性指定的值(name、age、info),必须要和User类中所注入属性对应的get方法的名字去掉get后首字母变为小写的名字相同
5、运行测试类TestDI,结果为:
上面通过spring提供的set方式对User对象的属性进行了赋值赋值,所以此时运行测试,结果为:

② 对象属性注入
需求:通过Spring创建User实例,并为User对象的userInfo属性(对象属性)赋值
1、创建UserInfo类
package com.tedu.spring;
public class UserInfo {

}
2、在applicationContext.xml中,声明UserInfo类的bean实例(将UserInfo对象作为值,赋值给User对象的userInfo属性)
<beans xmlns="http://www.springframework.org/schema/beans"
    xmlns:xsi="http://www.w3.org/2001/XMLSchema-instance"
    xsi:schemaLocation="http://www.springframework.org/schema/beans
        http://www.springframework.org/schema/beans/spring-beans.xsd">


	<bean id="user" scope="prototype" class="com.tedu.pojo.User">

		<property name="name" value="韩少云"/>
		<property name="age" value="20"/>

		<property name="info" ref="userInfo"/>
	bean>

	<bean id="userInfo" class="com.tedu.pojo.UserInfo">bean>
beans>
3、修改User类,声明userInfo属性,添加对应的setter和getter方法,并重新生成toString方法
package com.tedu.pojo;

//创建User类,里面可以不用写什么
//UserInfo表示一个类
public class User {
	private String name;
	private Integer age;
	private UserInfo info;

	// 提供set和get方法
	public String getName() {
		return name;
	}

	public void setName(String name) {
		this.name = name;
	}

	public Integer getAge() {
		return age;
	}

	public void setAge(Integer age) {
		this.age = age;
	}

	public UserInfo getInfo() {
		return info;
	}

	public void setInfo(UserInfo info) {
		this.info = info;
	}
	//toString方法
	@Override
	public String toString() {
		return "User [name=" + name + ", age=" + age + ", info=" + info + "]";
	}
}
由于此处是将UserInfo对象作为值赋值给另一个对象的属性,因此ref属性的值,为UserInfo对象bean标签的id值。
对象属性通过ref属性注入。
3.构造方法注入
需求:通过Spring创建User对象,并为User对象的属性(name、age、UserInfo属性)赋值
1、为User类声明构造函数
package com.tedu.pojo;

//创建User类,里面可以不用写什么
//UserInfo表示一个类
public class User {
	private String name;
	private Integer age;
	private UserInfo info;
	//在添加有参构造函数的同时,记得将无参构造函数也加上
	public User() {}

	public User(String name, Integer age, UserInfo info) {
		super();
		this.name = name;
		this.age = age;
		this.info = info;
	}

	// 提供set和get方法
	public String getName() {
		return name;
	}


	public void setName(String name) {
		this.name = name;
	}

	public Integer getAge() {
		return age;
	}

	public void setAge(Integer age) {
		this.age = age;
	}

	public UserInfo getInfo() {
		return info;
	}

	public void setInfo(UserInfo info) {
		this.info = info;
	}
	//toString方法
	@Override
	public String toString() {
		return "User [name=" + name + ", age=" + age + ", info=" + info + "]";
	}
}
2、修改applicationContext.xml文件,将set方式修改为构造方法注入。
<bean id="user" class="com.tedu.spring.User">


	<constructor-arg name="name" value="马云">constructor-arg>
	<constructor-arg name="age" value="35">constructor-arg>
	<constructor-arg name="userInfo" ref="userInfo">constructor-arg>
bean>


<bean id="userInfo" class="com.tedu.spring.UserInfo">bean>
其中,constructor-arg标签name属性的值必须和构造函数中参数的名字相同!
同样的,普通属性直接通过value注入即可;
六、 扩展内容
1.applicationContext.xml没有提示的解决办法
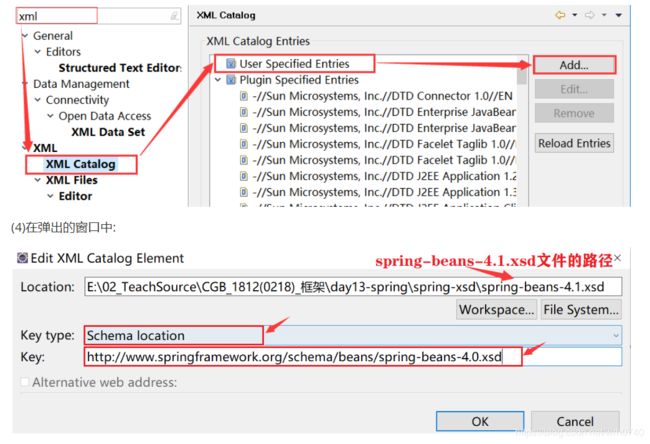
① 配置spring-beans-4.1.xsd文件
(1)找到spring-beans-4.1.xsd的文件的位置,例如:

(2)复制下面的url地址:
http://www.springframework.org/schema/beans/spring-beans-4.0.xsd
(3)在eclipse菜单栏中: window --> Preferences --> 在搜索框中搜索 [ xml ]
XML --> XML Catalog --> User Specified Entries --> Add…
② 配置spring-context-4.1.xsd文件
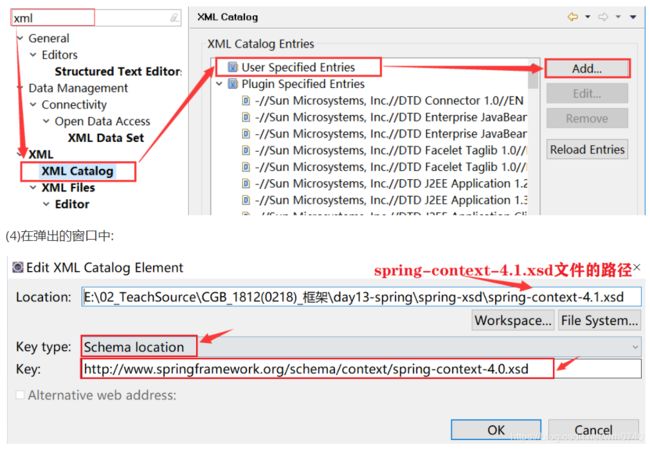
(1)找到spring-context-4.1.xsd的文件的位置,例如:

(2)复制下面的url地址:
http://www.springframework.org/schema/context/spring-context-4.0.xsd
(3)在eclipse菜单栏中: window --> Preferences --> 在搜索框中搜索 [ xml ] XML --> XML Catalog --> User Specified Entries --> Add…
第十五章 springmvc框架
一、 MVC设计模式
1.什么是设计模式
设计模式(Design Pattern)是一套被反复使用、多数人知晓的、经过分类的、代码设计经验的总结。
使用设计模式的目的:为了代码可重用性、让代码更容易被他人理解、保证代码可靠性。
设计模式使代码编写真正工程化;
设计模式是软件工程的基石脉络,如同大厦的结构一样。
设计模式就是一种模子,经过多年实践锤炼形成一套行之有效的完成某个特定任务的步骤和方式。
例如:西凤酒的酿造过程,酿造工序,前后不能变,温差不能变,这样做就是好喝,稍微改动就变味道了。
再如,北京烤鸭,就是那样做,就是那些调料腌制,变量配比,味道口感就是不如人家。
2.MVC设计模式
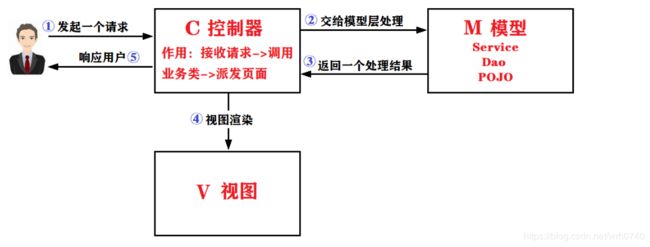
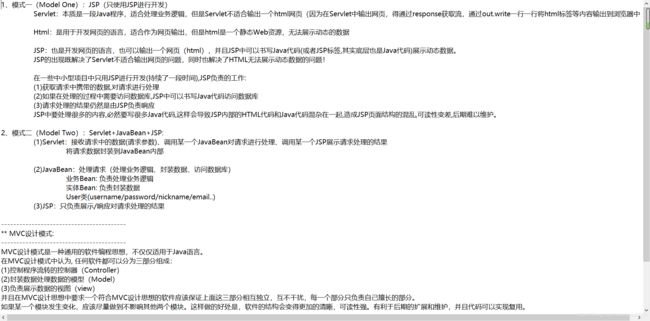
MVC设计模式是一种通用的软件编程思想
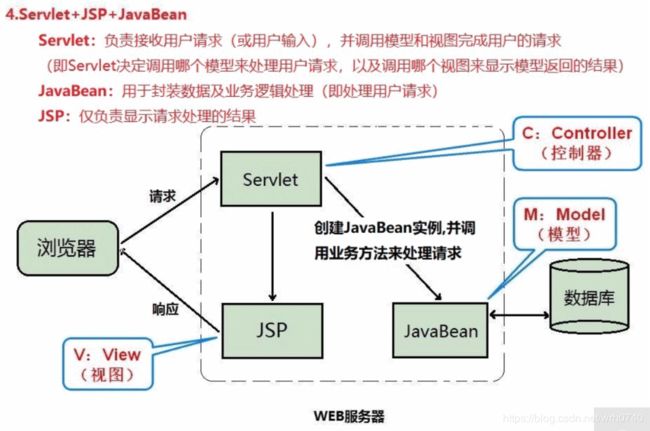
在MVC设计模式中认为, 任何软件都可以分为三部分组成:
(1)控制程序流转的控制器(Controller)
(2)封装数据处理数据的模型(Model)
(3)负责展示数据的视图(view)
并且在MVC设计思想中要求一个符合MVC设计思想的软件应该保证上面这三部分相互独立,互不干扰,每一个部分只负责自己擅长的部分。
如果某一个模块发生变化,应该尽量做到不影响其他两个模块。这样做的好处是,软件的结构会变得更加的清晰,可读性强。有利于后期的扩展和维护,并且代码可以实现复用。
二、 初识SpringMVC
1.Servlet的缺点
1、通常情况下,一个Servlet类只负责处理一个请求,若项目中有成百上千个请求需要处理,就需要有成百上千个Servlet类,这样会使得项目中Servlet类的个数暴增;
2、在Servlet3.0版本之前,每一个Servlet都需要在web.xml文件中至少做八行配置信息,配置内容多且繁琐。当Servlet特别多时,web.xml配置量太多,不利于团队开发;
3、当通过客户端提交参数到服务器,通过Servlet进行接收时,无论数据本身是什么格式,在Servlet中一律按照字符串进行接收,后期需要进行类型转换,复杂类型还需要特殊处理,特别麻烦!
String value = request.getParameter(String name);
String[] vs = request.getParameterValues(String name);
4、servlet具有容器依赖性,必须放在服务器中运行,不利于单元测试;
…
2.SpringMVC简介
Springmvc是spring框架的一个模块,spring和springmvc无需中间整合层整合
3.spring执行原理

(1).用户发送请求 至 前端控制器(DispatcherServlet);
提示:DispatcherServlet的作用:接收请求,调用其它组件处理请求,响应结果,相当于转发器、中央处理器,是整个流程控制的中心
(2).前端控制器(DispatcherServlet)收到请求后调用处理器映射器(HandlerMapping)
处理器映射器(HandlerMapping)找到具体的Controller(可以根据xml配置、注解进行查找),并将Controller返回给DispatcherServlet;
(3).前端控制器(DispatcherServlet)调用处理器适配器(HandlerAdapter)。处理器适配器经过适配调用具体的Controller;(Controller–> service --> Dao --> 数据库)
Controller执行完成后返回ModelAndView,
提示:Model(模型数据,即Controller处理的结果,Map) View(逻辑视图名,即负责展示结果的JSP页面的名字)
处理器适配器(HandlerAdapter)将controller执行的结果(ModelAndView)返回给前端控制器(DispatcherServlet);
(4).前端控制器(DispatcherServlet)将执行的结果(ModelAndView)传给视图解析器(ViewReslover)
视图解析器(ViewReslover)根据View(逻辑视图名)解析后返回具体JSP页面
(5).前端控制器(DispatcherServlet)根据Model对View进行渲染(即将模型数据填充至视图中);
前端控制器(DispatcherServlet)将填充了数据的网页响应给用户。
其中整个过程中需要开发人员编写的部分有Controller、Service、Dao、View;
三、 springmvc入门案例
需求:
(1)通过浏览器访问 http://localhost/项目名称/hello 地址,在控制台输出 “hello springmvc”
(2)将请求转向(跳转到) /WEB-INF/pages/home.jsp 页面
1.创建Maven—web工程
① 通过Maven创建web工程
② 在pom.xml中引入springmvc所需jar包
将下面的配置直接拷贝到pom.xml中的根标签内
<dependencies>

	<dependency>
		<groupId>junitgroupId>
		<artifactId>junitartifactId>
		<version>4.10version>
		<scope>testscope>
	dependency>


	<dependency>
		<groupId>org.springframeworkgroupId>
		<artifactId>spring-webmvcartifactId>
		<version>4.1.3.RELEASEversion>
	dependency>


  <dependency>
    <groupId>javax.servletgroupId>
    <artifactId>servlet-apiartifactId>
    <version>2.5version>
    <scope>providedscope>
  dependency>
  <dependency>
    <groupId>javax.servletgroupId>
    <artifactId>jsp-apiartifactId>
    <version>2.0version>
    <scope>providedscope>
  dependency>


	<dependency>
		<groupId>com.fasterxml.jackson.coregroupId>
		<artifactId>jackson-databindartifactId>
		<version>2.5.1version>
	dependency>
dependencies>
2. 在web.xml中配置前端控制器
<web-app xmlns:xsi="http://www.w3.org/2001/XMLSchema-instance"
	xmlns="http://java.sun.com/xml/ns/javaee"
	xsi:schemaLocation="http://java.sun.com/xml/ns/javaee http://java.sun.com/xml/ns/javaee/web-app_2_5.xsd"
	id="WebApp_ID" version="2.5">


	<servlet>

		<servlet-name>springmvcservlet-name>

		<servlet-class>org.springframework.web.servlet.DispatcherServletservlet-class>


		<init-param>

			<param-name>contextConfigLocationparam-name>

			<param-value>classpath:springmvc-config.xmlparam-value>
		init-param>
	servlet>

	<servlet-mapping>
		<servlet-name>springmvcservlet-name>
		<url-pattern>/url-pattern>
	servlet-mapping>

web-app>
3.创建并配置springmvc-config.xml
直接复制下面配置文件的内容即可!
<beans xmlns="http://www.springframework.org/schema/beans"
	xmlns:xsi="http://www.w3.org/2001/XMLSchema-instance" xmlns:mvc="http://www.springframework.org/schema/mvc"
	xmlns:context="http://www.springframework.org/schema/context"
	xsi:schemaLocation="http://www.springframework.org/schema/mvc
						http://www.springframework.org/schema/mvc/spring-mvc-4.0.xsd
						http://www.springframework.org/schema/beans
						http://www.springframework.org/schema/beans/spring-beans-4.0.xsd
						http://www.springframework.org/schema/context
          				http://www.springframework.org/schema/context/spring-context-4.0.xsd">


	<mvc:default-servlet-handler/>


	<mvc:annotation-driven>mvc:annotation-driven>


	<context:component-scan base-package="com.tedu.controller">
	context:component-scan>


	<bean class="org.springframework.web.servlet.view.InternalResourceViewResolver">
		<property name="prefix" value="/WEB-INF/pages/"/>
		<property name="suffix" value=".jsp"/>
	bean>


beans>
4.创建并实现HelloController类
① 创建com.tedu.controller.HelloController类
② 实现HelloController类
package com.tedu.controller;
import org.springframework.stereotype.Controller;
import org.springframework.web.bind.annotation.RequestMapping;

/* @Controller作用: 表示当前类属于controller层
 * 	同时标识将当前类的对象的创建交给spring容器负责
 * 	http://localhost/day16-springmvc/hello
 */
@Controller
public class HelloController {
	/* @RequestMapping("/hello") 用于配置当前方法的访问路径,不能省略,且不能重复!
	 * @RequestMapping注解在当前方法上声明的访问路径, 在当前controller类中不能重复!
	 * 如果controller类上没有访问路径,当前方法上的访问路径在所有controller类中都不能重复!
	 */
	@RequestMapping("/hello")
	public String testHello() {
		System.out.println( "hello springmvc...." );
		//跳转到哪一个路径	/WEB-INF/pages/home.jsp
		return "home";
	}
}
5.创建并实现home.jsp
在WEB-INF/pages/目录下,创建home.jsp页面。
WEB-INF/pages/home.jsp
<%@ page pageEncoding="UTF-8"%>

<html>
	<head>
	<meta charset="UTF-8">
head>
<body>
	<h1>day16-springmvc...home.jsp....h1>
body>
html>
6.访问测试
打开浏览器,输入url地址:http://localhost/day16-springmv/hello 地址,访问结果如下:

四、 springmvc参数绑定
当项目中引入springmvc框架后,所有的请求流转将由springmvc进行控制,当客户端发送的请求中包含数据(也就是请求参数)时,那么该如何在controller层获取这些参数呢?
springmvc会自动的将请求中包含的参数和方法的参数进行匹配,也就是说只要保证,请求中的参数名称和方法中的参数名称相对应(另,参数的格式也要正确),在方法中就可以使用这些参数—即请求中的参数。
1.基本类型参数绑定
当需要获取客户端发送过来的少量数据时,可以在Controller中声明的方法上,通过声明方法参数对这些参数一个一个进行接收,具体示例如下:
需求:通过浏览器发请求访问Controller,并在请求中携带name、age数据访问服务器,在服务器端Controller中获取这些数据。
① 在HelloController类中添加testParam1方法
用于接收基本类型的参数,代码实现如下:
package com.tedu.controller;

import org.springframework.stereotype.Controller;
import org.springframework.web.bind.annotation.RequestMapping;

/* @Controller作用: 表示当前类属于controller层
 * 	同时标识将当前类的对象的创建交给spring容器负责
 * 	http://localhost/day16-springmvc/testParam1
 */
@Controller
public class HelloController {
	/*
	 * 1.测试springmvc的参数绑定-基本类型参数绑定
	 *	http://localhost/day16-springmvc
	 *	/testParam1?name=张飞&age=20&addr=河北
	 *	如何接收name、age、addr参数值?
	 *	在方法上添加三个形参,分别是name、age、addr,要求:形参的名字必须和
	 *			请求参数的名字相同,其次,类型也要相同
	 *
	 */
	@RequestMapping("/testParam1")
	public String testParam1(String name,Integer age,String addr) {
		System.out.println("name="+name);
		System.out.println("age="+age);
		System.out.println("addr="+addr);
		//跳转到home.jsp
		return "home";

	}

}
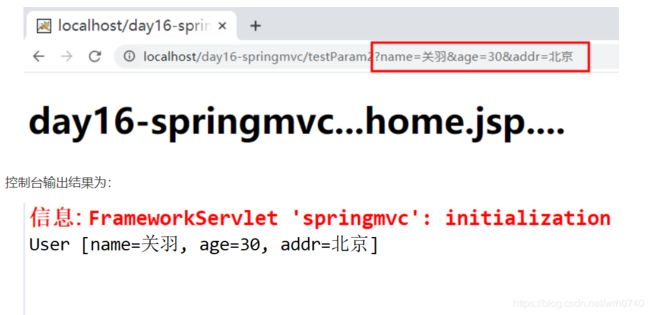
② 访问HelloController中的testParam1方法,在访问时,注意将name、age、addr参数一起发送给服务器:
2.包装类型参数绑定
当需要获取客户端发送过来的多个数据时,可以在Controller中声明的方法上,通过声明方法参数对这些数据一个一个进行接收较麻烦,可以在方法上声明对象类型的参数,通过对这些数据统一进行接受,springmvc会自动将接收过来的参数封装在对象中,具体示例如下:
① 在HelloController类中添加param2方法
用于接收对象类型的参数,代码实现如下:
package com.tedu.controller;
import org.springframework.stereotype.Controller;
import org.springframework.web.bind.annotation.RequestMapping;

@Controller /* 这个注解表示当前类是属于控制层 */
public class HelloController {
	/* 2、测试springmvc的包装类型参数绑定
	 * 	http://localhost/day16-springmvc
	 * /testParam2?name=关羽&age=30&addr=北京
	 * 如何获取请求中name、age、addr的参数值?
	 * 提供一个User类,在类中添加和请求参数同名的属性
	 * 底层通过调用setName、setAge、setAddr方法将参数值封装到User对象中 */
	@RequestMapping("/testParam2")
	public String testParam2(User user) {
		System.out.println(user);
		return "home";
	}
}
② 创建User类,声明name、age、addr属性,提供对应的set和get方法
package com.tedu.pojo;
//封装封装用户信息
public class User {
	private String name;
	private Integer age;
	private String addr;

	//提供set和get方法
	public String getName() {
		return name;
	}
	public void setName(String name) {
		this.name = name;
	}
	public Integer getAge() {
		return age;
	}
	public void setAge(Integer age) {
		this.age = age;
	}
	public String getAddr() {
		return addr;
	}
	public void setAddr(String addr) {
		this.addr = addr;
	}
	@Override
	public String toString() {
		return "User [name=" + name + ", age=" + age + ", addr=" + addr + "]";
	}

}
③ 访问HelloController中的param2方法,在访问时,注意将name和age参数一起发送给服务器:
3.日期类型参数绑定
① 1、在HelloController类中添加testParam3方法
代码实现如下:
package com.tedu.controller;

import java.text.SimpleDateFormat;
import java.util.Arrays;
import java.util.Date;

import org.springframework.beans.propertyeditors.CustomDateEditor;
import org.springframework.stereotype.Controller;
import org.springframework.web.bind.ServletRequestDataBinder;
import org.springframework.web.bind.annotation.InitBinder;
import org.springframework.web.bind.annotation.RequestMapping;

import com.tedu.pojo.User;

/* @Controller作用: 表示当前类属于controller层
 * 	同时标识将当前类的对象的创建交给spring容器负责
 * 	http://localhost/day16-springmvc/testParam3
 */
@Controller
public class HelloController {

	/*
	 * 3、测试springmvc的参数绑定-日期类型参数绑定
	 * http://localhost/day16-springmvc/testParam3?date=2020/7/11 23:18:21&like=篮球&like=足球
	 * 	由于springmvc默认的日期是以斜杠(/)分隔,所有提交以斜杠分隔的日期,springmvc接收没有问题
	 * 	但如果,提交以其他符号分隔日期(比如,以横杠分隔),就会出现400错误,意思是参数类型不匹配!
	 *
	 * 解决方法1:以后再提交日期类型参数时,以斜杠来分隔年月日
	 * 解决方法2:可以添加日期格式转换器,通知springmvc日期参数格式时以什么来分隔
	 *
	 *	如果一个参数有多个参数值,在方法上声明一个对应类型的数组
	 *	同样要求:请求参数的名字和方法上形参的名字保持一致!!
	 */

	@RequestMapping("/testParam3")
	public String testParam3(Date date,String[] like) {
		System.out.println("date="+date);
		System.out.println("like="+Arrays.toString(like));
		//跳转到home.jsp
		return "home";
	}
	/* 自定义日期格式转换器
	 * 将springmvc默认以斜杠(/)分隔日期改为以横杠分隔(-)
	 *	导包快捷键:Ctrl+Shift+O
	 */
//	@InitBinder
//	public void InitBinder (ServletRequestDataBinder binder){
//		binder.registerCustomEditor(java.util.Date.class,
//			new CustomDateEditor(new SimpleDateFormat("yyyy-MM-dd HH:mm:ss"), true)
//		);
//	}

}
② 访问HelloController中的testParam3方法,在访问时,注意将date参数一起发送给服务器:
4.常见问题
1、当访问HelloController中的testParam3方法,如果传递给服务器的日期数据是如下格式:

从图中可以看出,如果日期参数是 yyyy-MM-dd格式(以横杠分隔)就会出现400错误,其实是因为参数格式匹配错误,由于springmvc默认的日期格式是yyyy/MM/dd(以斜杠分隔),因此如果日期参数不是yyyy/MM/dd 格式,就会出现400错误!!
2、解决方案:
在springmvc中,提供了@InitBinder注解,用于指定自定义的日期转换格式,因此,我们只需要在Controller类中添加下面的代码即可,在接受日期类型的参数时,会自动按照自定义的日期格式进行转换。
	/* 自定义日期格式转换器
	 * 将springmvc默认以斜杠(/)分隔日期改为以横杠分隔(-)
	 */
	@InitBinder
	public void InitBinder (ServletRequestDataBinder binder){
		binder.registerCustomEditor(java.util.Date.class,
			new CustomDateEditor(new SimpleDateFormat("yyyy-MM-dd HH:mm:ss"), true)
		);
	}
五、 跳转和乱码处理
1.实现转发(forward)
在前面request对象的学习中,通过request对象可以实现请求转发(即资源的跳转)。同样的,springmvc也提供了请求转发的方式,具体实现如下:
需求:通过浏览器访问 testForward方法,执行testForward方法后,将请求转发到(HelloController)hello, 也就是home.jsp页面。
1、在HelloController中,提供testForward方法,代码实现如下:
/* 测试请求转发(forward) */
@RequestMapping("testForward")
public String testForward(){
	System.out.println("测试请求转发(forward)...");
	return "forward:hello";
}
2、打开浏览器,在浏览器中输入:http://localhost/day16-springmvc/testForward地址,访问效果如下:

forward方式相当于:
request.getRequestDispatcher("url").forward(request,response);
转发是一次请求,一次响应;
转发后地址栏地址没有发生变化(还是访问testForward的地址);
转发前后的request和response对象也是同一个。
2.实现重定向(redirect)
在前面response对象的学习中,通过response对象可以实现请求重定向(即资源的跳转)。
同样的,springmvc也提供了请求重定向的方式,具体实现如下:
需求:通过浏览器访问 testRedirect方法,执行testRedirect方法后,将请求重定向到
(HelloController)hello, 也就是home.jsp页面。
1、在HelloController中,提供testRedirect方法,代码实现如下:
/* 测试请求重定向(redirect) */
@RequestMapping("testRedirect")
public String testRedirect(){
	System.out.println("测试请求重定向(redirect)...");
	return "redirect:hello";
}
2、打开浏览器,在浏览器中输入:http://localhost/day16-springmvc/testRedirect地址,访问效果如下:
response.sendRedirect(url);
重定向是两次请求,两次响应;
重定向后地址栏地址发生了变化(变为转发后的地址);
并且在重定向前后,request和response对象不是同一个。
3.乱码处理
在前面的Servlet学习中,我们学习了GET和POST请求参数乱码如何解决。
springmvc也提供了解决请求参数乱码的方案,就是在web.xml中加入如下代码(配置请求参数乱码过滤器),可以解决POST提交的中文参数乱码问题!
<filter>
	<filter-name>encodingFilterfilter-name>
	<filter-class>org.springframework.web.filter.CharacterEncodingFilterfilter-class>
	<init-param>
		<param-name>encodingparam-name>
		<param-value>UTF8param-value>
	init-param>
filter>
<filter-mapping>
	<filter-name>encodingFilterfilter-name>
	<url-pattern>/*url-pattern>
filter-mapping>
Servlet中,两种请求方式乱码解决方案回顾:
(1)如果请求方式为POST提交,必然会出现乱码,解决方式是在任何获取参数的代码之前,添加如下代码:
request.setCharacterEncoding("utf-8");
(2)如果请求方式为GET提交,tomcat8及之后的版本已经解决了GET提交的中文参数乱码问题,因此不需要处理;在 tomcat7 及之前的版本中,获取GET提交的中文参数仍有乱码,解决方法是:只需要在[tomcat]/conf/server.xml中添加如下配置也可以解决乱码问题。

六、 springmvc响应数据
1.Model的使用
当请求发起访问Controller中的方法时,可以通过参数声明,在方法内使用Model。
@RequestMapping("/doorList")
public String doorList(Model model){}
Model对象实际上是一个Map集合,例如:往model中添加一个属性
model.addAttribute(String name, Object value);
其中,addAttribute方法会将属性保存到request域中,再通过转发将属性数据带到相应的JSP中,通过${}取出并显示。
示例,往Model中添加属性:
@RequestMapping("/testModel")
public String testModel(Model model){
	/* 往Model添加属性 */
	model.addAttribute("name", "马云");
	model.addAttribute("age", 20);
	return "home";
}
在home.jsp中取出属性并显示:
<body>
	<h1>hello springmvc~~~h1>
	${ name } <br/>
	${ age }
body>
2.Model案例代码以及test.jsp文件
package com.tedu.controller;

import java.awt.List;
import java.text.SimpleDateFormat;
import java.util.ArrayList;
import java.util.Arrays;
import java.util.Date;

import org.springframework.beans.propertyeditors.CustomDateEditor;
import org.springframework.stereotype.Controller;
import org.springframework.ui.Model;
import org.springframework.web.bind.ServletRequestDataBinder;
import org.springframework.web.bind.annotation.InitBinder;
import org.springframework.web.bind.annotation.RequestMapping;

import com.tedu.pojo.User;

/* @Controller作用: 表示当前类属于controller层
 * 	同时标识将当前类的对象的创建交给spring容器负责
 * 	http://localhost/day16-springmvc/hello
 */
@Controller
public class HelloController {
	/*
	 * 1.测试springmvc的参数绑定-基本类型参数绑定
	 *	http://localhost/day16-springmvc
	 *	/testParam1?name=张飞&age=20&addr=河北
	 *	如何接收name、age、addr参数值?
	 *	在方法上添加三个形参,分别是name、age、addr,要求:形参的名字必须和
	 *			请求参数的名字相同,其次,类型也要相同
	 *
	 */
	@RequestMapping("/testParam1")
	public String testParam1(String name,Integer age,String addr) {
		System.out.println("name="+name);
		System.out.println("age="+age);
		System.out.println("addr="+addr);
		//跳转到home.jsp
		return "home";

	}

	/*	2、测试springmvc的参数绑定-包装类型参数绑定
	 * http://localhost/day16-springmvc
	 *	/testParam2?name=赵云&age=26&addr=北京
	 *
	 */
	@RequestMapping("/testParam2")
	public String testParam2(User user) {
		System.out.println(user);
		//跳转到home.jsp
		return "home";
	}
	/*
	 * 3、测试springmvc的参数绑定-日期类型参数绑定
	 * http://localhost/day16-springmvc/testParam3?date=2020/7/11 23:18:21&liek=篮球&like=足球
	 * 	由于springmvc默认的日期是以斜杠(/)分隔,所有提交以斜杠分隔的日期,springmvc接收没有问题
	 * 	但如果,提交以其他符号分隔日期(比如,以横杠分隔),就会出现400错误,意思是参数类型不匹配!
	 *
	 * 解决方法1:以后再提交日期类型参数时,以斜杠来分隔年月日
	 * 解决方法2:可以添加日期格式转换器,通知springmvc日期参数格式时以什么来分隔
	 *
	 *	如果一个参数有多个参数值,在方法上声明一个对应类型的数组
	 *	同样要求:请求参数的名字和方法上形参的名字保持一致!!
	 */

	@RequestMapping("/testParam3")
	public String testParam3(Date date,String[] like) {
		System.out.println("date="+date);
		System.out.println("like="+Arrays.toString(like));
		//跳转到home.jsp
		return "home";
	}

	/*
	 * 4.参数Model的使用
	 * 在需要时可以在方法上进行声明Model
	 * 通过model.addAttribute(String Name,Object attrValue)
	 * 方法将属性添加到域中(request域,  map)
	 * return "jsp名字",默认就是转发到这个JSP文件
	 */
	@RequestMapping("/testModel01")
	public String testModel01(Model modle) {
		//模拟处理请求后换回的结果是一个User对象
		User user=new User("孙悟空",35,"花果山");
		//将数据存到Model中,并转发带到test.jsp
		Model m = modle.addAttribute("user", user);

		//跳转到test.jsp(这里直接return jsp的名字,就是转发到这个jsp)
		return "test";
	}

	@RequestMapping("/testModel02")
	public String testModel02(Model model) {
		//模拟:处理请求后返回的结果是一个List集合
		User u1=new User("孙悟空11",35,"花果山11");
		User u2=new User("孙悟空11",35,"花果山22");
		User u3=new User("孙悟空33",35,"花果山33");
		ArrayList<User> list = new ArrayList();
		list.add(u1);
		list.add(u2);
		list.add(u3);

		//将数据存到Model中,并转发带到test.jsp
		model.addAttribute("ulist", list);

		//跳转到test.jsp(这里直接return jsp的名字,就是转发到这个jsp)
		return "test";
	}

	// 请求的路径为http://localhost/day16-springmvc/hello
	/*
	 * @RequestMapping("/hello") 用于配置当前方法的访问路径,不能省略,且不能重复!
	 *
	 * @RequestMapping注解在当前方法上声明的访问路径, 在当前controller类中不能重复!
	 * 如果controller类上没有访问路径,当前方法上的访问路径在所有controller类中都不能重复!
	 */
	@RequestMapping("/hello")
	public String testHello() {
		System.out.println("testHello方法执行了");
		// 跳转到home.jsp
		return "home";
	}
	/* 自定义日期格式转换器
	 * 将springmvc默认以斜杠(/)分隔日期改为以横杠分隔(-)
	 *	导包快捷键:Ctrl+Shift+O
	 */
//	@InitBinder
//	public void InitBinder (ServletRequestDataBinder binder){
//		binder.registerCustomEditor(java.util.Date.class,
//			new CustomDateEditor(new SimpleDateFormat("yyyy-MM-dd HH:mm:ss"), true)
//		);
//	}

}
<%@ page language="java" pageEncoding="UTF-8"%>
<!DOCTYPE html>
<html>
<head>
<meta charset="utf-8"/>
<title></title>
</head>
<body>
	<h1>day16-springmvc...test.jsp</h1>
	<hr>
	<%--
		${}就是用来从域对象中获取数据,获取数据的顺序是
		pageContext >> request >> session >>application
	 --%>
	<%--  ${ user.getName }:${ user.getAge }:${ user.getAddr } 可以简写成下面代码--%>
	 ${ user.name }:${ user.age }:${ user.addr }

	 <hr>
	 <%--
	 	通过${}从域中取出List<User>集合
	  --%>
	  ${ ulist[0] }<br>
	  ${ ulist[1] }<br>
	  ${ ulist[2] }<br>
</body>
</html>
本章节所有测试类代码
package com.tedu.controller;

import java.awt.List;
import java.text.SimpleDateFormat;
import java.util.ArrayList;
import java.util.Arrays;
import java.util.Date;

import org.springframework.beans.propertyeditors.CustomDateEditor;
import org.springframework.stereotype.Controller;
import org.springframework.ui.Model;
import org.springframework.web.bind.ServletRequestDataBinder;
import org.springframework.web.bind.annotation.InitBinder;
import org.springframework.web.bind.annotation.RequestMapping;

import com.tedu.pojo.User;

/* @Controller作用: 表示当前类属于controller层
 * 	同时标识将当前类的对象的创建交给spring容器负责
 * 	http://localhost/day16-springmvc/hello
 */
@Controller
public class HelloController {
	/*
	 * 1.测试springmvc的参数绑定-基本类型参数绑定
	 *	http://localhost/day16-springmvc
	 *	/testParam1?name=张飞&age=20&addr=河北
	 *	如何接收name、age、addr参数值?
	 *	在方法上添加三个形参,分别是name、age、addr,要求:形参的名字必须和
	 *			请求参数的名字相同,其次,类型也要相同
	 *
	 */
	@RequestMapping("/testParam1")
	public String testParam1(String name,Integer age,String addr) {
		System.out.println("name="+name);
		System.out.println("age="+age);
		System.out.println("addr="+addr);
		//跳转到home.jsp
		return "home";

	}

	/*	2、测试springmvc的参数绑定-包装类型参数绑定
	 * http://localhost/day16-springmvc
	 *	/testParam2?name=赵云&age=26&addr=北京
	 *
	 */
	@RequestMapping("/testParam2")
	public String testParam2(User user) {
		System.out.println(user);
		//跳转到home.jsp
		return "home";
	}
	/*
	 * 3、测试springmvc的参数绑定-日期类型参数绑定
	 * http://localhost/day16-springmvc/testParam3?date=2020/7/11 23:18:21&liek=篮球&like=足球
	 * 	由于springmvc默认的日期是以斜杠(/)分隔,所有提交以斜杠分隔的日期,springmvc接收没有问题
	 * 	但如果,提交以其他符号分隔日期(比如,以横杠分隔),就会出现400错误,意思是参数类型不匹配!
	 *
	 * 解决方法1:以后再提交日期类型参数时,以斜杠来分隔年月日
	 * 解决方法2:可以添加日期格式转换器,通知springmvc日期参数格式时以什么来分隔
	 *
	 *	如果一个参数有多个参数值,在方法上声明一个对应类型的数组
	 *	同样要求:请求参数的名字和方法上形参的名字保持一致!!
	 */

	@RequestMapping("/testParam3")
	public String testParam3(Date date,String[] like) {
		System.out.println("date="+date);
		System.out.println("like="+Arrays.toString(like));
		//跳转到home.jsp
		return "home";
	}

	/*
	 * 4.参数Model的使用
	 * 在需要时可以在方法上进行声明Model
	 * 通过model.addAttribute(String Name,Object attrValue)
	 * 方法将属性添加到域中(request域,  map)
	 * return "jsp名字",默认就是转发到这个JSP文件
	 */
	@RequestMapping("/testModel01")
	public String testModel01(Model modle) {
		//模拟处理请求后换回的结果是一个User对象
		User user=new User("孙悟空",35,"花果山");
		//将数据存到Model中,并转发带到test.jsp
		Model m = modle.addAttribute("user", user);

		//跳转到test.jsp(这里直接return jsp的名字,就是转发到这个jsp)
		return "test";
	}

	@RequestMapping("/testModel02")
	public String testModel02(Model model) {
		//模拟:处理请求后返回的结果是一个List集合
		User u1=new User("孙悟空11",35,"花果山11");
		User u2=new User("孙悟空11",35,"花果山22");
		User u3=new User("孙悟空33",35,"花果山33");
		ArrayList<User> list = new ArrayList();
		list.add(u1);
		list.add(u2);
		list.add(u3);

		//将数据存到Model中,并转发带到test.jsp
		model.addAttribute("ulist", list);

		//跳转到test.jsp(这里直接return jsp的名字,就是转发到这个jsp)
		return "test";
	}

	// 请求的路径为http://localhost/day16-springmvc/hello
	/*
	 * @RequestMapping("/hello") 用于配置当前方法的访问路径,不能省略,且不能重复!
	 *
	 * @RequestMapping注解在当前方法上声明的访问路径, 在当前controller类中不能重复!
	 * 如果controller类上没有访问路径,当前方法上的访问路径在所有controller类中都不能重复!
	 */

	/*
	 * 5.测试请求转发
	 * 转发是一次请求一次响应,转发前后地址栏不会发生变化、转发只能在同一个应用内部进行
	 * (1)如果是从controller中的方法转发到jsp,直接通过return "jsp名字" 即可
	 * (2)如果是从controller中的方法 转到 另一个方法,转发时通过:
	 * 		return "forward:/路径"
	 * 访问"/testForward",执行testForward()方法--转发到-->"/hello",
	 * 执行testHello()方法,但地址栏地址仍然指向/testForward
	 */
	@RequestMapping("/testForward")
	public String testForward() {
		System.out.println("为了证明testForward()方法执行了...");

		//从当前方法转发到/hello 对应的方法
		return "forward:/hello";
	}

	/*
	 * 6.测试重定向
	 * 重定向是两次请求两次响应,重定向前后地址栏会发生变化、重定向可以跳转到任意的资源
	 *
	 * 访问"/testRedirect",执行testRedirect()方法--重定向到-->"/hello",
	 * 执行testHello()方法,但地址栏地址仍然指向/hello
	 */
	@RequestMapping("/testRedirect")
	public String testRedirect() {
		System.out.println("为了证明testRedirect()方法执行了...");

		//将请求重定向到/hello 对应的方法
		//return "redirect:/hello";
		//从当前方法重定向到/day11-jsp/index.jsp
		//return "redirect:http://localhost/day11-jsp/index.jsp";
		//从当前方法重定向到百度首页
		return "redirect:http://www.baidu.com";
	}


	@RequestMapping("/hello")
	public String testHello() {
		System.out.println("testHello方法执行了");
		// 跳转到home.jsp
		return "home";
	}
	/* 自定义日期格式转换器
	 * 将springmvc默认以斜杠(/)分隔日期改为以横杠分隔(-)
	 *	导包快捷键:Ctrl+Shift+O
	 */
//	@InitBinder
//	public void InitBinder (ServletRequestDataBinder binder){
//		binder.registerCustomEditor(java.util.Date.class,
//			new CustomDateEditor(new SimpleDateFormat("yyyy-MM-dd HH:mm:ss"), true)
//		);
//	}

}
七、 扩展内容
1.springmvc前端控制器放行静态资源的解决办法
在配置SpringMVC开发环境时,会在web.xml文件中配置SpringMVC的前端控制器,将所有请求交给前端控制器处理,因此在url-pattern中配置了斜杠(/):
<servlet>
	<servlet-name>springmvcservlet-name>
	<servlet-class>org.springframework.web.servlet.DispatcherServletservlet-class>

	<init-param>
		<param-name>contextConfigLocationparam-name>
		<param-value>classpath:springmvc-config.xmlparam-value>
	init-param>

servlet>
<servlet-mapping>
	<servlet-name>springmvcservlet-name>

	<url-pattern>/url-pattern>
servlet-mapping>
url-pattern中配置的斜杠(/)表示将除了JSP以外的其他请求都拦截下来,交给spring的前端控制器来处理。
但是这样配置,会将对静态资源的访问也拦截下来,导致访问静态资源时,出现404(资源找不到),因为spring的前端控制器将对静态资源的访问也当成了一个controller请求,去配置对应的映射路径,这当然找不到。
比如访问:http://localhost/day15-springmvc/home.html,由于配置的是斜杠(/),所以此时会拦截静态资源,到controller中匹配路径为/home.html的方法,此时自然是匹配不到的。
如果需要访问到静态资源,让前端控制器对静态资源的请求放行。此时可以在springmvc-config.xml文件中添加放行静态资源的配置:
<mvc:default-servlet-handler/>
第十六章 永和大王门店管理系统
一、 项目开发背景
永和大王是全国连锁快餐企业,自1995年12月在上海市开设第一家餐厅以来,经过24年的发展,已经在中国大陆开设了近300家直营连锁餐厅,所经营的品均是符合中国人的口味的豆浆、油条、各种稀饭、面食以及中式点心,并坚持以直营方式扩张获得了稳定、标准、一致的发展,深受大众喜爱。
这里利用之前学过的MySQL、JSP、JSTL、html、css等技术,以及目前市面上最流行的企业级Java开发框架SSM实现一个《永和大王门店管理系统》,其中包括门店管理模块和订单管理模块,两个模块中,实现了对门店和订单信息的增删改查功能。
二、 数据库及表设计
1.门店表结构:
2.订单表结构:
3.执行SQL脚本文件,创建库和所需表
-- --------------------------------------------
-- 创建yonghedb库、tb_door、tb_order表并插入记录
-- --------------------------------------------
-- 删除yonghedb库(如果存在)
-- drop database if exists yonghedb;
-- 重新创建yonghedb库
create database if not exists yonghedb charset utf8;
-- 选择yonghedb库
use yonghedb;
-- 删除门店表(需要先删除订单表)
drop table if exists tb_order;
drop table if exists tb_door;
-- 创建门店表
create table tb_door(
	id int primary key auto_increment,	-- 门店id
	name varchar(100),					-- 门店名称
	tel varchar(100),					-- 联系电话
	addr varchar(255)					-- 门店地址
);
-- 往门店表中插入记录
insert into tb_door values ('1', '永和大王(北三环西路店)', '010-62112313', '北三环西路甲18号院-1号大钟寺中坤广场d座');
insert into tb_door values ('2', '永和大王(知春路店)', '010-82356537', '知春路29号大运金都');
insert into tb_door values ('3', '永和大王(东直门)', '010-84477746', '东直门外大街48号东方银座b2-08');
insert into tb_door values ('4', '永和大王(北京站)', '010-65286602', '毛家湾胡同甲13号北京站候车大厅2层');
insert into tb_door values ('5', '永和大王(学院路店)', '010-62152539', '学院南路37号超市发四道口店四道口西北角');

-- 删除订单表(如果存在)
drop table if exists tb_order;
-- 创建订单表
create table tb_order(
	id int(11) primary key AUTO_INCREMENT,	-- 订单id
	door_id int(11),							-- 门店id
	order_no varchar(50),						-- 订单编号
	order_type varchar(50),					-- 订单类型(堂食/打包/外卖..)
	pnum int,									-- 用餐人数
	cashier varchar(50),						-- 收银员
	order_time timestamp NOT NULL DEFAULT '0000-00-00 00:00:00', -- 下单时间
	pay_time timestamp NOT NULL DEFAULT '0000-00-00 00:00:00',	 -- 支付时间
	pay_type varchar(50),						-- 支付类型(微信支付/支付宝支付)
	price double,								-- 支付金额
	foreign key(door_id) REFERENCES tb_door(id)	-- 关联外键
);
-- 往订单表中插入记录
INSERT INTO tb_order VALUES ('1', '1', 'P001', '堂食', '1', '张三', '2018-04-26 14:49:07', '2018-04-26 14:50:38', '微支付', '16.00');
INSERT INTO tb_order VALUES ('2', '1', 'P003', '外卖', '3', '张三', '2018-04-27 13:34:07', '2018-04-27 13:34:38', '微支付', '20.00');
INSERT INTO tb_order VALUES ('3', '1', 'P005', '打包', '1', '张三', '2019-01-22 11:59:22', '2019-01-22 11:59:22', '微支付', '28.00');
INSERT INTO tb_order VALUES ('4', '1', 'P007', '堂食', '1', '李四', '2019-01-23 13:01:26', '2019-01-23 13:01:26', '微支付', '49.00');
三、 项目环境搭建(SSM整合)
1.项目环境搭建
① 创建Maven的简单web工程
② 补全WEB-INF目录和web.xml文件
③ 创建包和目录
![]()
④ 在pom.xml文件中,引入junit、log4j、servlet等依赖包
<dependencies>

	<dependency>
		<groupId>junitgroupId>
		<artifactId>junitartifactId>
		<version>4.10version>
		<scope>testscope>
	dependency>

	<dependency>
			<groupId>org.slf4jgroupId>
			<artifactId>slf4j-log4j12artifactId>
			<version>1.6.4version>
	dependency>

	<dependency>
		<groupId>com.fasterxml.jackson.coregroupId>
		<artifactId>jackson-databindartifactId>
		<version>2.4.2version>
	dependency>

	<dependency>
		<groupId>javax.servletgroupId>
		<artifactId>servlet-apiartifactId>
		<version>2.5version>
		<scope>providedscope>
	dependency>
	<dependency>
		<groupId>javax.servletgroupId>
		<artifactId>jsp-apiartifactId>
		<version>2.0version>
		<scope>providedscope>
	dependency>
	<dependency>
		<groupId>jstlgroupId>
		<artifactId>jstlartifactId>
		<version>1.2version>
	dependency>

dependencies>
⑤ 在resources目录下创建log4j.properties文件,配置内容如下:
# Global logging configuration
log4j.rootLogger=DEBUG, stdout
# Console output...
log4j.appender.stdout=org.apache.log4j.ConsoleAppender
log4j.appender.stdout.layout=org.apache.log4j.PatternLayout
log4j.appender.stdout.layout.ConversionPattern=%5p [%t]  %m%n
⑥ 在resources目录下创建jdbc.properties文件,配置内容如下:
db.driverClassName=com.mysql.jdbc.Driver
db.url=jdbc:mysql:///yonghedb?characterEncoding=utf-8
db.username=root
db.password=root
2.整合spring框架
① 在pom.xml文件中,引入spring的依赖包
<dependency>
	<groupId>org.springframeworkgroupId>
	<artifactId>spring-webmvcartifactId>
	<version>4.1.3.RELEASEversion>
dependency>

<dependency>
	<groupId>org.springframeworkgroupId>
	<artifactId>spring-jdbcartifactId>
	<version>4.1.3.RELEASEversion>
dependency>
<dependency>
	<groupId>org.springframeworkgroupId>
	<artifactId>spring-aspectsartifactId>
	<version>4.1.3.RELEASEversion>
dependency>
② 在src/main/resources/spring目录下,创建spring的核心配置文件:applicationContext.xml
<beans xmlns="http://www.springframework.org/schema/beans"
	xmlns:context="http://www.springframework.org/schema/context" xmlns:p="http://www.springframework.org/schema/p"
	xmlns:aop="http://www.springframework.org/schema/aop" xmlns:tx="http://www.springframework.org/schema/tx"
	xmlns:xsi="http://www.w3.org/2001/XMLSchema-instance"
	xsi:schemaLocation="http://www.springframework.org/schema/beans http://www.springframework.org/schema/beans/spring-beans-4.0.xsd
	http://www.springframework.org/schema/context http://www.springframework.org/schema/context/spring-context-4.0.xsd
	http://www.springframework.org/schema/aop http://www.springframework.org/schema/aop/spring-aop-4.0.xsd http://www.springframework.org/schema/tx http://www.springframework.org/schema/tx/spring-tx-4.0.xsd
	http://www.springframework.org/schema/util http://www.springframework.org/schema/util/spring-util-4.0.xsd">

beans>
3.整合springmvc框架
前面在添加spring的jar包同时,将springmvc的jar包也引入了,因此这里不再引入springmvc的jar包
① 在resources/spring目录下,创建springmvc的核心配置文件:
springmvc-config.xml,内容配置如下
<beans xmlns="http://www.springframework.org/schema/beans"
	xmlns:xsi="http://www.w3.org/2001/XMLSchema-instance" xmlns:mvc="http://www.springframework.org/schema/mvc"
	xmlns:context="http://www.springframework.org/schema/context"
	xsi:schemaLocation="http://www.springframework.org/schema/mvc
						http://www.springframework.org/schema/mvc/spring-mvc-4.0.xsd
						http://www.springframework.org/schema/beans
						http://www.springframework.org/schema/beans/spring-beans-4.0.xsd
						http://www.springframework.org/schema/context
          				http://www.springframework.org/schema/context/spring-context-4.0.xsd">


	<mvc:default-servlet-handler/>


	<mvc:annotation-driven>mvc:annotation-driven>


	<context:component-scan base-package="com.tedu.controller">
	context:component-scan>


	<bean class="org.springframework.web.servlet.view.InternalResourceViewResolver">
		<property name="prefix" value="/WEB-INF/pages/"/>
		<property name="suffix" value=".jsp"/>
	bean>


beans>
② 在web.xml中配置springmvc
<servlet>
	<servlet-name>springmvcservlet-name>
	<servlet-class>org.springframework.web.servlet.DispatcherServletservlet-class>

	<init-param>
		<param-name>contextConfigLocationparam-name>
		<param-value>classpath:spring/*.xmlparam-value>
	init-param>
servlet>

<servlet-mapping>
	<servlet-name>springmvcservlet-name>
	<url-pattern>/url-pattern>
servlet-mapping>
③ 配置springmvc乱码处理过滤器
<filter>
	<filter-name>encodingFilterfilter-name>
	<filter-class>org.springframework.web.filter.CharacterEncodingFilterfilter-class>

	<init-param>
		<param-name>encodingparam-name>
		<param-value>utf-8param-value>
	init-param>
filter>
<filter-mapping>
	<filter-name>encodingFilterfilter-name>

	<url-pattern>/*url-pattern>
filter-mapping>
④ 测试springmvc框架
(1)创建test.jsp页面
在WEB-INF/pages/目录下,创建test.jsp页面。
<%@ page pageEncoding="utf-8"%>

<html>
<head>
	<meta charset="utf-8"/>
head>
<body>
	<h1>yonghe-ssm test.jsp~~~h1>
body>
html>
(2)创建测试Controller: DoorController
/** 测试类:测试springmvc开发环境 */
@Controller
public class DoorController {
	@RequestMapping("/testmvc")
	public String testmvc(){
		return "test";
	}
}
4.整合mybatis框架
① 在pom.xml文件中,引入mybatis及相关依赖包
<dependency>
	<groupId>org.mybatisgroupId>
	<artifactId>mybatisartifactId>
	<version>3.2.8version>
dependency>
<dependency>
	<groupId>org.mybatisgroupId>
	<artifactId>mybatis-springartifactId>
	<version>1.2.2version>
dependency>

<dependency>
	<groupId>mysqlgroupId>
	<artifactId>mysql-connector-javaartifactId>
	<version>5.1.32version>
dependency>

<dependency>
	<groupId>com.alibabagroupId>
	<artifactId>druidartifactId>
	<version>1.1.6version>
dependency>
② 在resources/mybatis目录下,创建mybatis的核心配置文件:mybatis-config.xml
<configuration >

	<environments default="develop">

		<environment id="develop">

			<transactionManager type="JDBC">transactionManager>

			<dataSource type="POOLED">
				<property name="driver" value="com.mysql.jdbc.Driver"/>
				<property name="url" value="jdbc:mysql://localhost:3306/yonghedb?characterEncoding=utf-8"/>
				<property name="username" value="root"/>
				<property name="password" value="root"/>
			dataSource>
		environment>
	environments>


	<mappers>
		<mapper resource="mybatis/mapper/DoorMapper.xml"/>
	mappers>
configuration>
③ 在src/main/resources/mybatis/mapper目录下,创建Door实体类的映射文件:DoorMapper.xml
<mapper namespace="com.tedu.dao.DoorMapper">

	<select id="findAll" resultType="com.tedu.pojo.Door">
		select * from tb_door
	select>
mapper>
④ 在mybatis的全局配置文件中引入DoorMapper.xml映射文件
<configuration >

	...


	<mappers>
		<mapper resource="mybatis/mapper/DoorMapper.xml"/>
	mappers>

configuration>
⑤ 创建com.tedu.dao.DoorMapper接口,并根据EmpMapper.xml文件中的sql语句,提供findAll方法
package com.tedu.dao;
import java.util.List;
import com.tedu.pojo.Door;
/**
 * DoorMapper接口
 * 声明增删改查方法,对门店信息进行操作
 */
public interface DoorMapper {
	/**
	 * 1.查询所有门店信息
	 */
	public List<Door> findAll();

}
⑥ 创建实体类Door,用于封装所有的门店信息
package com.tedu.pojo;
public class Door {
	private Integer id;	//门店编号
	private String name;	//门店名称
	private String tel;	//门店电话
	private String addr;	//门店地址

	//getter和setter方法
	public Integer getId() {
		return id;
	}
	public void setId(Integer id) {
		this.id = id;
	}
	public String getName() {
		return name;
	}
	public void setName(String name) {
		this.name = name;
	}
	public String getTel() {
		return tel;
	}
	public void setTel(String tel) {
		this.tel = tel;
	}
	public String getAddr() {
		return addr;
	}
	public void setAddr(String addr) {
		this.addr = addr;
	}
	//重写toString方法
	@Override
	public String toString() {
		return "Door [id=" + id + ", name=" + name + ", tel=" + tel + ", addr=" + addr + "]";
	}
}
⑦ 创建测试com.tedu.controller.TestMybatis类,对mybatis开发环境进行测试
package com.tedu;

import java.io.InputStream;
import java.util.List;

import org.apache.ibatis.io.Resources;
import org.apache.ibatis.session.SqlSession;
import org.apache.ibatis.session.SqlSessionFactory;
import org.apache.ibatis.session.SqlSessionFactoryBuilder;
import org.junit.Test;

import com.tedu.dao.DoorMapper;
import com.tedu.pojo.Door;

public class TestMybatis {
	private static SqlSession session = null;

	static {
		try {
			// 1.读取mybatis核心配置文件(mybatis-config.xml)
			InputStream in = Resources.getResourceAsStream("mybatis/mybatis-config.xml");
			// 2.基于配置信息获取SqlSession工厂对象
			SqlSessionFactoryBuilder builder = new SqlSessionFactoryBuilder();
			SqlSessionFactory fac = builder.build(in);
			// 为session赋值(mybatis中的事务默认是手动提交,true表示设置事务自动提交)
			session = fac.openSession(true);
		} catch (Exception e) {
			e.printStackTrace();
		}
	}
	@Test
	public void testFindAll() {
		//获取DoorMapper接口的子类实例
		DoorMapper mapper = session.getMapper(DoorMapper.class);
		List<Door> list = mapper.findAll();
		for (Door door : list) {
			System.out.println("door="+door);
		}
	}
}
5.整合spring和mybatis
① 修改mybatis-config.xml文件,将数据源等配置移除,在spring的配置文件中配置
<configuration >


configuration>
② 在applicationContext.xml中配置 druid连接池、SqlSession工厂等
<beans xmlns="http://www.springframework.org/schema/beans"
	xmlns:context="http://www.springframework.org/schema/context" xmlns:p="http://www.springframework.org/schema/p"
	xmlns:aop="http://www.springframework.org/schema/aop" xmlns:tx="http://www.springframework.org/schema/tx"
	xmlns:xsi="http://www.w3.org/2001/XMLSchema-instance"
	xsi:schemaLocation="http://www.springframework.org/schema/beans http://www.springframework.org/schema/beans/spring-beans-4.0.xsd
	http://www.springframework.org/schema/context http://www.springframework.org/schema/context/spring-context-4.0.xsd
	http://www.springframework.org/schema/aop http://www.springframework.org/schema/aop/spring-aop-4.0.xsd http://www.springframework.org/schema/tx http://www.springframework.org/schema/tx/spring-tx-4.0.xsd
	http://www.springframework.org/schema/util http://www.springframework.org/schema/util/spring-util-4.0.xsd">


	<context:property-placeholder location="classpath:jdbc.properties"/>


	<bean id="dataSource" class="com.alibaba.druid.pool.DruidDataSource">

		<property name="driverClassName" value="${db.driverClassName}">property>
		<property name="url" value="${db.url}">property>
		<property name="username" value="${db.username}">property>
		<property name="password" value="${db.password}">property>
	bean>


	<bean id="sqlSessionFactory"
		class="org.mybatis.spring.SqlSessionFactoryBean">

		<property name="configLocation"
				value="classpath:mybatis/mybatis-config.xml">property>

		<property name="dataSource" ref="dataSource">property>

		<property name="mapperLocations" value="classpath:mybatis/mapper/*.xml"/>
	bean>


	<bean class="org.mybatis.spring.mapper.MapperScannerConfigurer">

		<property name="basePackage"
			value="com.tedu.dao"/>
	bean>


beans>
③ 在resources目录下创建jdbc.properties文件,将连接数据库的基本信息提取到文件中
db.driverClassName=com.mysql.jdbc.Driver
db.url=jdbc:mysql:///yonghedb?characterEncoding=utf-8
db.username=root
db.password=root
④ 复制TestController类,改名为TestSSM
package com.tedu.controller;
import java.util.List;
import org.springframework.beans.factory.annotation.Autowired;
import org.springframework.stereotype.Controller;
import org.springframework.web.bind.annotation.RequestMapping;
import com.tedu.dao.DoorMapper;
import com.tedu.pojo.Door;

/** 测试类:测试SSM开发环境 */
@Controller /* 这个注解表示当前类属于Controller层代码 */
public class TestSSM {

	/** 自动装配:由spring自动为属性赋值(对象)  */
	@Autowired
	DoorMapper mapper;

	@RequestMapping("/testssm")
	public String testSSM(){
		//1.调用findAll方法查询所有门店信息
		List<Door> list = mapper.findAll();
		//2.遍历所有门店信息
		for(Door door : list){
			System.out.println(door);
		}
		return "test";
	}
}
四、 查询所有门店
查询所有门店开发步骤:
1、点击【门店管理】,访问DoorController中的查询所有门店信息的方法【doorList】
2、在【doorList】方法中调用service层,service层再调用dao层查询所有门店信息,返回所有门店信息的List集合
3、在【doorList】方法中,将返回的所有门店信息集合(List)存入Model中,并转向door_list.jsp(即
return “door_list”),将所有门店信息带到jsp页面进行显示
1.准备工作
① 创建Door实体类,用于封装所有的门店信息(若上面已创建,直接跳过即可!)
package com.tedu.pojo;
/** 门店实体类 */
public class Door {
	private Integer id;	//门店编号
	private String name;	//门店名称
	private String tel;	//门店电话
	private String addr;	//门店地址

	//getter和setter方法
	public Integer getId() {
		return id;
	}
	public void setId(Integer id) {
		this.id = id;
	}
	public String getName() {
		return name;
	}
	public void setName(String name) {
		this.name = name;
	}
	public String getTel() {
		return tel;
	}
	public void setTel(String tel) {
		this.tel = tel;
	}
	public String getAddr() {
		return addr;
	}
	public void setAddr(String addr) {
		this.addr = addr;
	}
	//重写toString方法
	@Override
	public String toString() {
		return "Door [id=" + id + ", name=" + name + ", tel=" + tel + ", addr=" + addr + "]";
	}
}
② 创建Door实体类的映射文件—DoorMapper.xml(若上面已创建,直接跳过即可!)
<mapper namespace="com.tedu.dao.DoorMapper">

mapper>
2.dao层代码实现
① 更新resources/mybatis/mapper/DoorMapper.xml文件,添加“查询所有门店信息”SQL(若上面已创建,直接跳过即可!)
	<select id="findAll" resultType="com.tedu.pojo.Door">
		select * from tb_door
	select>
② 创建DoorMapper接口, 添加查询所有门店方法(若上面已创建,直接跳过即可!)
package com.tedu.dao;
import java.util.List;
import com.tedu.pojo.Door;

public interface DoorMapper {
	/**
	 * 查询所有门店信息
	 * @return List
	 */
	public List<Door> findAll();


}
3. service层代码实现
① 创建DoorService接口,并添加查询所有门店信息的方法
package com.tedu.service;
import java.util.List;
import org.springframework.stereotype.Service;
import com.tedu.pojo.Door;

public interface DoorService {
	/**
	 * 1.查询所有门店信息
	 * @return List
	 */
	public List<Door> findAll();
}
② 创建DoorService接口的实现类—DoorServiceImpl,实现父接口中的findAll方法:调用dao层的findAll方法查询所有门店信息
package com.tedu.service;
import java.util.List;
import org.springframework.beans.factory.annotation.Autowired;
import com.tedu.dao.DoorMapper;
import com.tedu.pojo.Door;
/* @Service作用1: 将当前对象的创建交给spring管理
 * 作用2:作为业务层代码的标识
 */
@Service
public class DoorServiceImpl implements DoorService {
	@Autowired //自动注入(由spring创建mapper对象并为属性赋值)
	private DoorMapper mapper;

	@Override
	public List<Door> findAll() {
		//1.调用DoorMapper的findAll方法,查询所有门店信息
		List<Door> list = doorMapper.findAll();
		//2.将所有门店信息的List集合返回
		return list;
	}
}
4.controller层代码实现
① 创建DoorController类,提供doorList方法:调用service层的findAll方法,查询所有门店信息。
package com.tedu.controller;
import java.util.List;
import org.springframework.beans.factory.annotation.Autowired;
import org.springframework.stereotype.Controller;
import org.springframework.web.bind.annotation.RequestMapping;
import com.tedu.pojo.Door;
import com.tedu.service.DoorService;

@Controller
/* @Controller作用1: 将当前对象的创建交给spring管理
 * 作用2:作为控制层代码的标识
 */
public class DoorController {

	@Autowired	//自动注入(由spring创建当前对象并为属性赋值)
	private DoorService doorService;

	@RequestMapping("/doorList")
	public String doorList(){
		//调用service层的findAll方法,查询所有的门店信息
		List<Door> list = doorService.findAll();
		for (Door d:list) {
			System.out.println(d);
		}

		return "door_list";
	}
}
5.在页面上显示所有门店列表
① 导入页面(JSP)
② 创建通用的页面跳转方法
@PathVariable 映射 URL 绑定的占位符
URL 中的 {xxx} 占位符可以通过@PathVariable(“xxx“) 绑定到操作方法的入参中。
举例:现在要访问/WEB-INF/pages/index.jsp页面,按照之前的讲解,我们会在Controller中添加一个方法,例如:
@RequestMapping("/index")
public String xxx(){
	return "index";
}
如果有很多这样的jsp页面需要我们访问呢?每访问一个jsp都要在Controller中添加一个方法吗?毫无疑问,这样做太繁琐了。
通过上面的观察,我们可以发现,@RequestMapping("/index") 中的"/" index" 和return "index"中的"index"名称是相同的,按照此规律,我们可以提供一个通用的页面跳转方法,访问路径中的名字是什么,就回/WEBINF/pages/下的什么JSP页面。
因此,创建PageController类,代码实现如下:
@Controller
public class PageController {
	/** 通用的页面跳转方法
	 * 例如:访问路径为 "/index",则方法最后返回的值为:"index"
	 * 即最终返回 /WEB-INF/pages/index.jsp
	 */
	@RequestMapping("/{page}")
    public String page(@PathVariable String page){
        return page;
    }
}
③ 更新DoorController代码,将门店list集合存入model带到JSP显示
@RequestMapping("/doorList")
public String doorList(Model model){
	//调用service层的findAll方法,查询所有的门店信息
	List<Door> list = doorService.findAll();

	//将所有门店信息的list集合存入model中,带到JSP显示
	model.addAttribute("list", list);

	return "door_list";
}
④ 实现door_list.jsp
<%@ page pageEncoding="utf-8"%>
<%-- 引入JSTL标签库 --%>
<%@ taglib prefix="c" uri="http://java.sun.com/jsp/jstl/core" %>
...

	...
	...


			${ status.count }
			${ door.name }
			${ door.tel }
			${ door.addr }

				删除
				 |
				修改
五、 新增门店信息
新增门店信息开发步骤:
1、在门店信息列表页面中,点击【新增门店】,跳转到门店新增页面【door_add.jsp】
2、用户在【door_add.jsp】中输入新增的门店信息,点击【提交】将门店信息提交给DoorController的【doorAdd】方法
3、在【doorAdd】方法中,通过参数接收浏览器提交过来的门店信息,调用service层,service层再调用dao层将门店信息保存到数据库中,
4、新增成功后,重定向到门店列表页面,显示所有门店(即重定向到DoorController的【doorList】方法,先查询所有门店,再将所有门店信息带到JSP显示)
1.dao层代码实现
① 更新resources/mybatis/mapper/DoorMapper.xml文件,添加“新增门店信息”SQL。
<insert id="add">
	insert into tb_door
	values(#{id}, #{name}, #{tel}, #{addr})
insert>
② 更新com.tedu.dao.DoorMapper接口,添加 add方法,新增门店信息。
/**
 * 2.新增门店信息
 * @param door
 */
public void add(Door door);
2.Controller层代码实现
1、更新com.tedu.controller.DoorController类,添加并实现doorAdd方法:调用service层的addDoor方法新增门店信息
/** 2.新增门店信息 */
	@RequestMapping("/doorAdd")
	public String doorAdd(Door door){
		//1.调用service层的addDoor方法,新增门店信息
		doorService.addDoor(door);
		//2.重定向到门店列表页面, 显示所有门店信息
		return "redirect:/doorList";
	}
六、 删除门店信息
删除门店信息开发步骤:
1、在门店信息列表页面中,点击门店信息后的【删除】按钮,访问DoorController中的【doorDelete】方法,访问的同时将所要删除的门店id一同提交给服务器。
2、在【doorDelete】方法中,通过参数接收门店id,调用service层,service层再调用dao层通过id删除指定的门店信息。
3、删除成功后,重定向到门店列表页面,显示所有门店(即重定向到DoorController的【doorList】方法,先查询所有门店,再将所有门店信息带到JSP显示)。
1.dao层代码实现
① 更新resources/mybatis/mapper/DoorMapper.xml文件,添加“删除门店信息”SQL。
	<delete id="deleteById">
		delete from tb_door where id=#{id}
	delete>
② 更新com.tedu.dao.DoorMapper接口,添加 deleteById方法,根据id删除门店信息。
	<delete id="deleteById">
		delete from tb_door where id=#{id}
	delete>
2.service层代码实现
① 更新com.tedu.service.DoorService接口,添加 deleteById方法,根据id删除门店信息
/**
	 * 3.根据id删除指定的门店信息
	 * @param id
	 */
	public void deleteById(Integer id);
② 更新com.tedu.service.DoorServiceImpl类,实现父接口中的deleteById方法:调用dao层的deleteById方法,根据id删除门店信息
@Override
	public void deleteById(Integer id) {
		//调用DoorMapper的deleteById方法,根据id删除指定的门店信息
		doorMapper.deleteById(id);
	}
3.Controller层代码实现
① 更新com.tedu.controller.DoorController类,添加并实现doorDelete方法:调用service层的deleteById方法删除门店信息
/** 3.删除ete")
	public String doorDelete(Integer id){
		//1.调用service层的deleteById方法,删除指定id的门店信息
		doorService.deleteById(id);
		//2.重定向到门店列表页面, 显示所有门店信息
		return "redirect:/doorList";
	}
七、 更新门店信息
更新门店信息开发步骤:
1、在门店信息列表页面中,点击门店信息后的【修改】按钮,访问DoorController中的【doorInfo】方法,访问的同时将所要查询的门店id一同提交给服务器。
2、在【doorInfo】方法中,通过参数接收门店id,调用service层,service层再调用dao层通过id查询指定的门店信息(Door)并返回
3、在【doorInfo】方法中,将返回的门店信息(Door)存入Model中,并转向door_update.jsp(即
return “door_update”),将门店信息带到jsp页面进行回显
4、在原有门店信息的基础上,对门店信息进行修改,点击【提交】将修改后的门店信息提交给DoorController的【doorUpdate】方法
5、在【doorUpdate】方法中,通过参数接收浏览器提交过来的门店信息,调用service层,service层再调用dao层根据id修改门店信息。
6、修改成功后,重定向到门店列表页面,显示所有门店(即重定向到DoorController的【doorList】方法,先查询所有门店,再将所有门店信息带到JSP显示)
1.dao层代码实现(查询门店)
修改门店信息需要在原有门店信息的基础上进行修改,因此在修改之前,需要先查询出原有门店信息,在原有门店信息的基础上修改后,再将修改后的门店信息提交给服务器端,服务器端将修改后的门店信息更新到数据库中
① 更新resources/mybatis/mapper/DoorMapper.xml文件,添加“根据id查询门店信息”SQL。
	<select id="findById" resultType="com.tedu.pojo.Door">
		select * from tb_door where id=#{id}
	select>
② 更新com.tedu.dao.DoorMapper接口,添加 findById方法,根据id查询门店信息。
/**
	 * 4.根据id查询门店信息
	 * @param id
	 */
	public Door findById(Integer id);
2. service层代码实现(查询门店)
① 更新com.tedu.service.DoorService接口,添加 findById方法,根据id查询门店信息
/**
	 * 4.根据id查询指定的门店信息
	 * @param id
	 * @return
	 */
	public Door findById(Integer id);
② 更新com.tedu.service.DoorServiceImpl类,实现父接口中的findById方法:调用dao层的findById方法,根据id查询门店信息
@Override
	public Door findById(Integer id) {
		//调用DoorMapper的findById方法,根据id查询门店信息
		Door door = doorMapper.findById(id);
		return door;
	}
3.Controller层代码实现(查询门店)
① 更新com.tedu.controller.DoorController类,添加并实现doorInfo方法:调用service层的findById方法根据id查询门店信息
/** 4.根据id查询门店信息 */
	@RequesMapping("/doorInfo")
	public String doorInfo(Integer id, Model model){
		//1.调用service层的findById方法,根据id查询门店信息
		Door door = doorService.findById(id);
		//2.将门店信息保存到Model中
		model.addAttribute("door", door);
		//3.将门店信息带到door_update.jsp进行回显
		return "door_update";
	}
4.数据回显
① 在door_update.jsp中显示将要修改的门店信息:
修改门店
将要修改的门店信息回显至修改页面后,下面实现修改门店信息
5.dao层代码实现(更新门店)
① 更新resources/mybatis/mapper/DoorMapper.xml文件,添加“根据id更新门店信息”SQL:
	<update id="updateById">
		update tb_door set name=#{name},tel=#{tel},addr=#{addr}
		where id=#{id}
	update>
② 更新com.tedu.dao.DoorMapper接口,添加 updateById方法,根据id更新门店信息
	/**
	 * 5.根据id更新门店信息
	 * @param door
	 */
	public void updateById(Door door);
6.service层代码实现(更新门店)
① 更新com.tedu.service.DoorService接口,添加 updateById方法,根据id更新门店信息
/**
	 * 5.根据id更新指定门店信息
	 * @param door
	 */
	public void updateById(Door door);
② 更新com.tedu.service.DoorServiceImpl类,实现父接口中的updateById方法:调用dao层的updateById方法,根据id更新门店信息
@Override
	public void updateById(Door door) {
		//调用DoorMapper的updateById方法,根据id更新门店信息
		doorMapper.updateById(door);
	}
7.Controller层代码实现(更新门店)
① 更新com.tedu.controller.DoorController类,添加并实现doorUpdate方法:调用service层的updaeById方法删除门店信息
	/** 5.根据id更新门店信息 */
	@RequestMapping("/doorUpdate")
	public String doorUpdate(Door door){
		//1.调用service层的updateById方法,根据id跟新门店信息
		doorService.updateById(door);
		//2.重定向到门店列表页面, 显示所有门店信息
		return "redirect:/doorList";
	}
八、永和大王增删改查所有代码和配置文件
1.在com.tedu包下创建测试类TestMybatis(测试mybatis整合)
① mybatis-config.xml文件中配置如下
(后面将这里的配置文件移除,到spring的配置文件中进行设置)
<configuration >

	<environments default="develop">

		<environment id="develop">

			<transactionManager type="JDBC">transactionManager>

			<dataSource type="POOLED">
				<property name="driver" value="com.mysql.jdbc.Driver"/>
				<property name="url" value="jdbc:mysql://localhost:3306/yonghedb?characterEncoding=utf-8"/>
				<property name="username" value="root"/>
				<property name="password" value="root"/>
			dataSource>
		environment>
	environments>


	<mappers>
		<mapper resource="mybatis/mapper/DoorMapper.xml"/>
	mappers>
configuration>
② TestMybatis测试代码(测试成功后可以删除这个类)
package com.tedu;

import java.io.InputStream;
import java.util.List;

import org.apache.ibatis.io.Resources;
import org.apache.ibatis.session.SqlSession;
import org.apache.ibatis.session.SqlSessionFactory;
import org.apache.ibatis.session.SqlSessionFactoryBuilder;
import org.junit.Test;

import com.tedu.dao.DoorMapper;
import com.tedu.pojo.Door;

public class TestMybatis {
	private static SqlSession session = null;

	static {
		try {
			// 1.读取mybatis核心配置文件(mybatis-config.xml)
			InputStream in = Resources.getResourceAsStream("mybatis/mybatis-config.xml");
			// 2.基于配置信息获取SqlSession工厂对象
			SqlSessionFactoryBuilder builder = new SqlSessionFactoryBuilder();
			SqlSessionFactory fac = builder.build(in);
			// 为session赋值(mybatis中的事务默认是手动提交,true表示设置事务自动提交)
			session = fac.openSession(true);
		} catch (Exception e) {
			e.printStackTrace();
		}
	}
	@Test
	public void testFindAll() {
		//获取DoorMapper接口的子类实例
		DoorMapper mapper = session.getMapper(DoorMapper.class);
		List<Door> list = mapper.findAll();
		for (Door door : list) {
			System.out.println("door="+door);
		}
	}
}
运行出现这样的结果,说明mybatis整合成功
2.在com.tedu.controller包下创建测试类TestController(测试springmvc整合)
package com.tedu.controller;
//测试类代码,可以删除
import java.util.List;

import org.springframework.beans.factory.annotation.Autowired;
//测试类可以去掉
import org.springframework.stereotype.Controller;
import org.springframework.web.bind.annotation.RequestMapping;

import com.tedu.dao.DoorMapper;
import com.tedu.pojo.Door;
@Controller
public class TestController {
	/*
	 * 测试环境2:测试ssm(spring+springmvc+mybatis)的开发环境
	 *	如何获取DoorMapper接口的子类实例?
	 *		由于我们在applicationContext.xml
	 *	文件中定义了mapper接口扫描器,由框架负责扫描dao包下是所有mapper接口,由框架
	 *	负责提供接口子类,由框架负责创建接口的子类实例(其中就包括DoorMapper接口)
	 *
	 *	@Autowired注解会根据当前dao的类型,到spring容器中寻找该接口对应的子类实例,在赋值给dao
	 */
	@Autowired
	DoorMapper dao;
	@RequestMapping("/testssm")
	public String testssm() {
		//查询所有门店信息
		List<Door> list = dao.findAll();
		for (Door door : list) {
			System.out.println("door="+door);
		}
		return "test";
	}

	/*
	 * 环境测试1:测试springmvc的运行环境
	 */
	@RequestMapping("/testmvc")
	public String testmvc() {
		System.out.println("testmvc()方法执行了");
		return "test";
	}
}
访问:http://localhost/yonghe/testmvc路径出现以下内容,说明springmvc整合成功
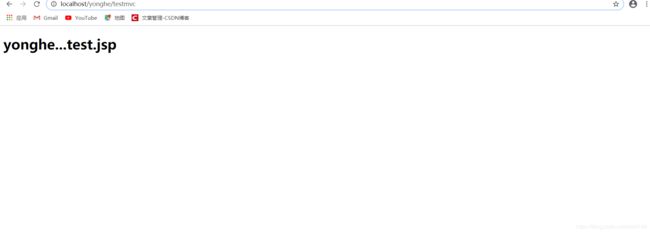
3.所有代码以及配置文件
① 所有的包下类的代码
⑴ com.tedu包:
TestMybatis类(测试mybatis是否整合成功,前面已经讲了)
package com.tedu;

import java.io.InputStream;
import java.util.List;

import org.apache.ibatis.io.Resources;
import org.apache.ibatis.session.SqlSession;
import org.apache.ibatis.session.SqlSessionFactory;
import org.apache.ibatis.session.SqlSessionFactoryBuilder;
import org.junit.Test;

import com.tedu.dao.DoorMapper;
import com.tedu.pojo.Door;

public class TestMybatis {
	private static SqlSession session = null;

	static {
		try {
			// 1.读取mybatis核心配置文件(mybatis-config.xml)
			InputStream in = Resources.getResourceAsStream("mybatis/mybatis-config.xml");
			// 2.基于配置信息获取SqlSession工厂对象
			SqlSessionFactoryBuilder builder = new SqlSessionFactoryBuilder();
			SqlSessionFactory fac = builder.build(in);
			// 为session赋值(mybatis中的事务默认是手动提交,true表示设置事务自动提交)
			session = fac.openSession(true);
		} catch (Exception e) {
			e.printStackTrace();
		}
	}
	@Test
	public void testFindAll() {
		//获取DoorMapper接口的子类实例
		DoorMapper mapper = session.getMapper(DoorMapper.class);
		List<Door> list = mapper.findAll();
		for (Door door : list) {
			System.out.println("door="+door);
		}
	}
}
⑵ com.tedu.controller包
DoorController类(表现层和jsp一起用)
package com.tedu.controller;

import java.util.List;

import org.springframework.beans.factory.annotation.Autowired;
import org.springframework.stereotype.Controller;
import org.springframework.ui.Model;
import org.springframework.web.bind.annotation.PathVariable;
/*
 * 负责处理门店门店模块的所有请求
 */
import org.springframework.web.bind.annotation.RequestMapping;

import com.tedu.dao.DoorMapper;
import com.tedu.pojo.Door;

@Controller
public class DoorController {
	// 获取DoorMapper接口的子类实例
	@Autowired
	DoorMapper doorMapper;

	/* 1.查询所有门店信息 */
	@RequestMapping("/doorList")
	public String doorList(Model model) {
		List<Door> list = doorMapper.findAll();
		// 将门店信息的集合存入model中,再转发带到jsp
		model.addAttribute("list", list);

		// 跳转(转发)到door_list.jsp,显示所有门店信息
		return "door_list";
	}

	/* 2.根据id删除门店信息 */
	@RequestMapping("/doorDelete")
	public String doorDelete(Integer id) {
		// 调用doorMapper的deleteById方法,根据id删除门店信息
		doorMapper.deleteById(id);
		// 跳转到查询所有门店列表页面,查询最新门店信息
		// return "door_list";//直接跳转到门店列表页面,不会显示门店信息
		return "forward:/doorList";
	}

	/* 3.新增门店信息 */
	@RequestMapping("/doorAdd")
	public String doorAdd(Door door) {
		// 调用doorMapper的add方法,根据id删除门店信息
		doorMapper.add(door);

		// 跳转到查询所有门店列表页面,查询最新门店信息
		return "forward:/doorList";
	}

	/* 4.根据id查询门店信息 */
	@RequestMapping("/doorInfo")
	public String doorInfo(Integer id, Model model) {
		// 调用doorMapper的findById方法,根据id查询门店信息
		Door door = doorMapper.findById(id);
		// 将门店对象存入Model中,再带到门店修改页面
		model.addAttribute("door", door);
		// 将查询到的门店信息带到门店修改页面,进行数据回显
		return "door_update";
	}

	/* 5.根据id修改门店信息 */
	@RequestMapping("/doorUpdate")
	public String doorUpdate(Door door) {
		// 调用doorMapper的updateById方法,根据id修改门店信息
		doorMapper.updateById(door);

		// 跳转到查询所有门店列表页面,查询最新门店信息
		return "forward:/doorList";
	}

	/*
	 * 通用的页面跳转方法:根据jsp的名字跳转到指定名称的jsp页面(只能跳转jsp才能这样写)
	 *
	 * {japName}中的japName用于接收 访问的路径名称 例如:访问路径为:http://localhost/yonghe/index
	 * 那么jspName的值就是:"index",再将{}中jspName的值 传给形参上的jspName,最后作为返回值返回,表示跳转到这个名称
	 * 对应jsp页面
	 *
	 * @PathVariable注解作用:将请求路径中的jspName的值接过来负责给形参上的jspName
	 */
	@RequestMapping("/{japName}")
	public String index(@PathVariable String japName) {
		return japName;// 跳转到index.jsp
	}
}
TestController类(测试springmvc整合是否成功,前面已经讲了)
package com.tedu.controller;
//测试类代码,可以删除
import java.util.List;

import org.springframework.beans.factory.annotation.Autowired;
//测试类可以去掉
import org.springframework.stereotype.Controller;
import org.springframework.web.bind.annotation.RequestMapping;

import com.tedu.dao.DoorMapper;
import com.tedu.pojo.Door;
@Controller
public class TestController {
	/*
	 * 测试环境2:测试ssm(spring+springmvc+mybatis)的开发环境
	 *	如何获取DoorMapper接口的子类实例?
	 *		由于我们在applicationContext.xml
	 *	文件中定义了mapper接口扫描器,由框架负责扫描dao包下是所有mapper接口,由框架
	 *	负责提供接口子类,由框架负责创建接口的子类实例(其中就包括DoorMapper接口)
	 *
	 *	@Autowired注解会根据当前dao的类型,到spring容器中寻找该接口对应的子类实例,在赋值给dao
	 */
	@Autowired
	DoorMapper dao;
	@RequestMapping("/testssm")
	public String testssm() {
		//查询所有门店信息
		List<Door> list = dao.findAll();
		for (Door door : list) {
			System.out.println("door="+door);
		}
		return "test";
	}

	/*
	 * 环境测试1:测试springmvc的运行环境
	 */
	@RequestMapping("/testmvc")
	public String testmvc() {
		System.out.println("testmvc()方法执行了");
		return "test";
	}
}
⑶ com.tedu.dao包:
DoorMapper类
package com.tedu.dao;

import java.util.List;

import com.tedu.pojo.Door;

public interface DoorMapper {
	/* 1.查询所有的门店信息,返回所有门店信息集合 */
	public List<Door> findAll();

	/* 2.根据id删除门店信息(id是传过来的) */
	public void deleteById(Integer id);

	/* 3.新增门店信息(name、tel、addr都是传过来的) */
	public void add(Door door);

	/* 4.根据id查询门店信息(id是传过来的)  */
	public Door findById(Integer id);

	/* 5.根据id修改门店信息(name、tel、addr都是传过来的) */
	public void updateById(Door door);

}
⑷ com.tedu.pojo包:
Door类
package com.tedu.pojo;

//用于封装门店信息
public class Door {
	private Integer id;
	private String name;
	private String tel;
	private String addr;

	// 提供get和set方法
	public Integer getId() {
		return id;
	}

	public void setId(Integer id) {
		this.id = id;
	}

	public String getName() {
		return name;
	}

	public void setName(String name) {
		this.name = name;
	}

	public String getTel() {
		return tel;
	}

	public void setTel(String tel) {
		this.tel = tel;
	}

	public String getAddr() {
		return addr;
	}

	public void setAddr(String addr) {
		this.addr = addr;
	}

	// 提供toString方法
	@Override
	public String toString() {
		return "Door [id=" + id + ", name=" + name + ", tel=" + tel + ", addr=" + addr + "]";
	}

}
② 所有配置文件
⑴ DoorMapper.xml:
<mapper namespace="com.tedu.dao.DoorMapper">

	<select id="findAll" resultType="com.tedu.pojo.Door">
		select * from tb_door
	select>


	<delete id="deleteById">
		delete from tb_door where id=#{id}
	delete>


	<insert id="add">
		insert into tb_door value(null,#{name},#{tel},#{addr})
	insert>


	<select id="findById" resultType="com.tedu.pojo.Door">
		select * from tb_door where id=#{id}
	select>


	<update id="updateById">
		update tb_door set name=#{name},tel=#{tel},addr=#{addr}
		where id=#{id}
	update>
mapper>
⑵ mybatis-config.xml:
<configuration>

configuration>
⑶ applicationContext.xml:
<beans xmlns="http://www.springframework.org/schema/beans"
	xmlns:context="http://www.springframework.org/schema/context" xmlns:p="http://www.springframework.org/schema/p"
	xmlns:aop="http://www.springframework.org/schema/aop" xmlns:tx="http://www.springframework.org/schema/tx"
	xmlns:xsi="http://www.w3.org/2001/XMLSchema-instance"
	xsi:schemaLocation="http://www.springframework.org/schema/beans http://www.springframework.org/schema/beans/spring-beans-4.0.xsd
	http://www.springframework.org/schema/context http://www.springframework.org/schema/context/spring-context-4.0.xsd
	http://www.springframework.org/schema/aop http://www.springframework.org/schema/aop/spring-aop-4.0.xsd http://www.springframework.org/schema/tx http://www.springframework.org/schema/tx/spring-tx-4.0.xsd
	http://www.springframework.org/schema/util http://www.springframework.org/schema/util/spring-util-4.0.xsd">


	<context:property-placeholder location="classpath:jdbc.properties"/>


	<bean id="dataSource" class="com.alibaba.druid.pool.DruidDataSource">

		<property name="driverClassName" value="${db.driverClassName}">property>
		<property name="url" value="${db.url}">property>
		<property name="username" value="${db.username}">property>
		<property name="password" value="${db.password}">property>
	bean>


	<bean id="sqlSessionFactory"
		class="org.mybatis.spring.SqlSessionFactoryBean">

		<property name="configLocation"
				value="classpath:mybatis/mybatis-config.xml">property>

		<property name="dataSource" ref="dataSource">property>

		<property name="mapperLocations" value="classpath:mybatis/mapper/*.xml"/>
	bean>


	<bean class="org.mybatis.spring.mapper.MapperScannerConfigurer">

		<property name="basePackage"
			value="com.tedu.dao"/>
	bean>


beans>
⑷ springmvc-config.xml:
<beans xmlns="http://www.springframework.org/schema/beans"
	xmlns:xsi="http://www.w3.org/2001/XMLSchema-instance" xmlns:mvc="http://www.springframework.org/schema/mvc"
	xmlns:context="http://www.springframework.org/schema/context"
	xsi:schemaLocation="http://www.springframework.org/schema/mvc
						http://www.springframework.org/schema/mvc/spring-mvc-4.0.xsd
						http://www.springframework.org/schema/beans
						http://www.springframework.org/schema/beans/spring-beans-4.0.xsd
						http://www.springframework.org/schema/context
          				http://www.springframework.org/schema/context/spring-context-4.0.xsd">


	<mvc:default-servlet-handler/>


	<mvc:annotation-driven>mvc:annotation-driven>


	<context:component-scan base-package="com.tedu.controller">
	context:component-scan>


	<bean class="org.springframework.web.servlet.view.InternalResourceViewResolver">
		<property name="prefix" value="/WEB-INF/pages/"/>
		<property name="suffix" value=".jsp"/>
	bean>


beans>
⑸ jdbc.properties:
db.driverClassName=com.mysql.jdbc.Driver
db.url=jdbc:mysql:///yonghedb?characterEncoding=utf-8
db.username=root
db.password=root
⑹ log4j.properties(日志打印信息):
# Global logging configuration
log4j.rootLogger=DEBUG, stdout
# Console output...
log4j.appender.stdout=org.apache.log4j.ConsoleAppender
log4j.appender.stdout.layout=org.apache.log4j.PatternLayout
log4j.appender.stdout.layout.ConversionPattern=%5p [%t] - %m%n
③ 所有的jsp文件
⑴_left.jsp:
<%@ page pageEncoding="utf-8"%>

<html>
<head>
<meta charset="utf-8"/>
<style>
	body{ background:#222D32;margin:0px; }
	.menu-bar a{ color:#fff;text-decoration:none; }
	.menu-bar{ font-size:22px;border-bottom:1px solid #fff;height:40px;line-height:40px;text-indent:18px;letter-spacing:5px; }
	.menu-bar:first-child{border-top:1px solid #fff;}
	.menu-bar:hover{background:#797979;}
style>
head>
<body>
	<div class="menu-bar">
		<a href="doorList" target="rightFrame">› 门店管理a>
	div>
	<div class="menu-bar">
		<a href="orderList" target="rightFrame">› 订单管理a>
	div>
body>
html>
⑵ _right.jsp:
<%@ page pageEncoding="utf-8"%>

<html>
<head>
<meta charset="utf-8"/>
<style>
	body{ background:#ffffff; }
	#welcome{font-size:36px;color:#686868;text-align:center;text-shadow:5px 5px 5px #444;margin-top:180px;}
style>
head>
<body>
	<div id="welcome">
		欢迎访问永和大王门店管理系统...
	div>
body>
html>
⑶ _top.jsp:
<%@ page pageEncoding="utf-8"%>

<html>
<head>
<meta charset="utf-8"/>
<style>
	body{background:#3C8DBC;}
	h1{color:#fff;text-indent:20px;letter-spacing:5px;text-shadow:5px 5px 5px #000;}
style>
head>
<body>
	<h1>永和大王门店管理系统h1>
body>
html>
⑷ door_add.jsp:
<%@ page pageEncoding="utf-8"%>

<html>
<head>
<title>新增门店title>
<meta http-equiv="content-type" content="text/html; charset=UTF-8">
<style type="text/css">
	body{ font-family: "微软雅黑"; background-color: #EDEDED; }
	h2{ text-align: center;font-size:26px; }
	table{ margin: 30px auto; text-align: center; border-collapse:collapse; width:50%; }
	td, th{ padding: 7px;font-size:18px;}
	hr{ margin-bottom:20px; border:1px solid #aaa; }
	input,select,textarea{ width:284px; height:30px; background:#EDEDED; border:1px solid #999; text-indent:5px; font-size:18px; }
	input[type='submit']{ width:130px; height:36px; cursor:pointer; border-radius:5px 5px 5px 5px; background:#ddd; }
	select{text-indent:0px;}
	textarea{height:100px;font-size:22px;}
style>
head>
<body>

<h2>新增门店h2>
<hr/>
<form action="doorAdd" method="POST">
	<table border="1">
		<tr>
			<td width="30%">门店名称td>
			<td>
				<input type="text" name="name"/>
			td>
		tr>
		<tr>
			<td>联系电话td>
			<td>
				<input type="text" name="tel"/>
			td>
		tr>
		<tr>
			<td>门店地址td>
			<td>
				<input type="text" name="addr"/>
			td>
		tr>

		<tr>
			<td colspan="2">
				<input type="submit" value="提 	交"/>
			td>
		tr>
	table>
form>

body>
html>
⑸ door_list.jsp:
<%@ page pageEncoding="utf-8"%>
<%-- 引入JSTL标签库 --%>
<%@ taglib prefix="c" uri="http://java.sun.com/jsp/jstl/core" %>

<html>
<head>
<title>门店管理title>
<meta http-equiv="content-type" content="text/html; charset=UTF-8">
<style type="text/css">
	body{ font-family: "微软雅黑"; background-color: #EDEDED; }
	h2{ text-align: center;}
	table{ width:96%; margin: 0 auto; text-align: center; border-collapse:collapse; font-size:16px;}
	td, th{ padding: 5px;}
	th{ background-color: #DCDCDC; width:120px; }
	th.width-40{ width: 40px; }
	th.width-70{ width: 70px; }
	th.width-80{ width: 80px; }
	hr{ margin-bottom:20px; border:1px solid #aaa; }
	#add-door{text-align:center;font-size:20px;}
style>
head>
<body>

<h2>门店管理h2>
<div id="add-door">
	<a href="door_add" target="rightFrame">新增门店a>
div>
<hr/>
<table border="1">
	<tr>
		<th class="width-40">序号th>
		<th>门店名称th>
		<th class="width-80">联系电话th>
		<th>门店地址th>
		<th class="width-80">操 作th>
	tr>


	<c:forEach items="${ list }" var="door" varStatus="sta">
	<tr>
		<td>${ sta.count }td>
		<td>${ door.getName() }td>
		<td>${ door.getName() }td>
		<td>${ door.getAddr() } td>
		<td>
			<a href="doorDelete?id=${ door.getId() }">删除a>
			 |
			<a href="doorInfo?id=${ door.getId() }">修改a>
		td>
	tr>
	c:forEach>


table>
body>
html>
⑹ door_update.jsp:
<%@ page pageEncoding="utf-8"%>

<html>
<head>
<title>修改门店title>
<meta http-equiv="content-type" content="text/html; charset=UTF-8">
<style type="text/css">
	body{ font-family: "微软雅黑"; background-color: #EDEDED; }
	h2{ text-align: center;font-size:26px; }
	table{ margin: 30px auto; text-align: center; border-collapse:collapse; width:50%; }
	td, th{ padding: 7px;font-size:18px;}
	hr{ margin-bottom:20px; border:1px solid #aaa; }
	input,select,textarea{ width:284px; height:30px; background:#EDEDED; border:1px solid #999; text-indent:5px; font-size:18px; }
	input[type='submit']{ width:130px; height:36px; cursor:pointer; border-radius:5px 5px 5px 5px; background:#ddd; }
	select{text-indent:0px;}
	textarea{height:100px;font-size:22px;}
style>
head>
<body>

<h2>修改门店h2>
<hr/>
<form action="doorUpdate" method="POST">


	<input type="hidden" name="id" value="${ door.getId() }"/>
	<table border="1">
		<tr>
			<td width="30%">门店名称td>
			<td>
				<input type="text" name="name" value="${ door.getName() }"/>
			td>
		tr>
		<tr>
			<td>联系电话td>
			<td>
				<input type="text" name="tel" value="${ door.getTel() }"/>
			td>
		tr>
		<tr>
			<td>门店地址td>
			<td>
				<input type="text" name="addr" value="${ door.getAddr() }"/>
			td>
		tr>

		<tr>
			<td colspan="2">
				<input type="submit" value="提	交" />
			td>
		tr>
	table>
form>

body>
html>
⑺ index.jsp:
<%@ page pageEncoding="utf-8"%>

<html>
<head>
<meta charset="utf-8"/>
head>

	<frameset rows="14%,86%" frameborder="0">
		<frame src="_top" />
		<frameset cols="180px,*">
			<frame src="_left" />
			<frame src="_right" name="rightFrame"/>
		frameset>
	frameset>

<body>

body>
html>
⑻ order_add.jsp:
<%@ page pageEncoding="utf-8"%>

<%@ taglib prefix="c"
	uri="http://java.sun.com/jsp/jstl/core" %>

<html>
<head>
<title>新增订单title>
<meta http-equiv="content-type" content="text/html; charset=UTF-8">
<style type="text/css">
	body{ font-family: "微软雅黑"; background-color: #EDEDED; }
	h2{ text-align: center;font-size:26px; }
	table{ margin: 30px auto; text-align: center; border-collapse:collapse; width:50%; }
	td, th{ padding: 5px;font-size:18px;}
	hr{ margin-bottom:20px; border:1px solid #aaa; }
	input,select,textarea{ width:284px; height:30px; background:#EDEDED; border:1px solid #999; text-indent:5px; font-size:18px; }
	input[type='submit']{ width:130px; height:36px; cursor:pointer; border-radius:5px 5px 5px 5px; background:#ddd; }
	select{text-indent:0px;}
	textarea{height:100px;font-size:22px;}
style>
head>
<body>

<h2>新增订单h2>
<hr/>
<form action="orderAdd" method="POST">
	<table border="1">
		<tr>
			<td width="30%">所属门店td>
			<td>
				<select name="doorId">
					<option value="">永和大王(北三环西路店)option>
				select>
			td>
		tr>
		<tr>
			<td>订单编号td>
			<td>
				<input type="text" name="orderNo"/>
			td>
		tr>
		<tr>
			<td>订单类型td>
			<td>
				<input type="text" name="orderType"
						value="堂食"/>
			td>
		tr>
		<tr>
			<td>用餐人数td>
			<td>
				<input type="text" name="pnum"
						value="1"/>
			td>
		tr>
		<tr>
			<td>收银员td>
			<td>
				<input type="text" name="cashier"/>
			td>
		tr>
		<tr>
			<td>支付方式td>
			<td>
				<input type="text" name="payType"
						value="微支付"/>

			td>
		tr>
		<tr>
			<td>支付金额td>
			<td>
				<input type="text" name="price"/>

			td>
		tr>
		<tr>
			<td colspan="2">
				<input type="submit" value="提 	交"/>
			td>
		tr>
	table>
form>

body>
html>
⑼ order_list.jsp:
<%@ page pageEncoding="utf-8"%>
<%-- 引入JSTL标签库 --%>
<%@ taglib prefix="c"
	uri="http://java.sun.com/jsp/jstl/core" %>
<%@ taglib prefix="fmt"
	uri="http://java.sun.com/jsp/jstl/fmt" %>

<html>
<head>
<title>订单管理title>
<meta http-equiv="content-type" content="text/html; charset=UTF-8">
<style type="text/css">
	body{ font-family: "微软雅黑"; background-color: #EDEDED; }
	h2{ text-align: center;}
	table{ width:96%; margin: 0 auto; text-align: center; border-collapse:collapse; font-size:16px;}
	td, th{ padding: 5px;}
	th{ background-color: #DCDCDC; width:120px; }
	th.width-40{ width: 40px; }
	th.width-50{ width: 50px; }
	th.width-64{ width: 64px; }
	th.width-80{ width: 80px; }
	th.width-120{ width: 100px; }
	hr{ margin-bottom:20px; border:1px solid #aaa; }
	#add-order{text-align:center;font-size:20px;}
style>

<script type="text/javascript">

script>
head>
<body>
<h2>订单管理h2>
<div id="add-order">

	<a href="toOrderAdd" target="rightFrame">新增订单a>
div>
<hr/>
<table border="1">
	<tr>
		<th class="width-40">序号th>
		<th class="width-120">所属门店th>
		<th class="width-50">订单号th>
		<th class="width-40">类型th>
		<th class="width-40">人数th>
		<th class="width-50">收银员th>
		<th class="width-120">下单时间th>
		<th class="width-120">结账时间th>
		<th class="width-50">支付方式th>
		<th class="width-50">金额th>
		<th class="width-80">操 作th>
	tr>


	<tr>
		<td>1td>
		<td>永和大王(西直门店)td>
		<td>P001td>
		<td>堂食td>
		<td>1td>
		<td>张三td>
		<td>
			2018-04-26 14:49:07
			<%--
			<fmt:formatDate value="${order.orderTime}"
						pattern="yyyy-MM-dd HH:mm:ss" />
			 --%>
		td>
		<td>
			2018-04-26 14:49:07
		td>
		<td>微支付td>
		<td>16.0td>
		<td>
			<a href="orderDelete?id=">删除a>
			 |
			<a href="orderInfo?id=">修改a>
		td>
	tr>
table>

body>
html>
⑽ order_update.jsp:
<%@ page pageEncoding="utf-8"%>
<%-- 引入JSTL标签库 --%>
<%@ taglib prefix="c" uri="http://java.sun.com/jsp/jstl/core" %>
<%@ taglib prefix="fmt" uri="http://java.sun.com/jsp/jstl/fmt" %>

<html>
<head>
<title>修改订单title>
<meta http-equiv="content-type" content="text/html; charset=UTF-8">
<style type="text/css">
	body{ font-family: "微软雅黑"; background-color: #EDEDED; }
	h2{ text-align: center;font-size:26px; }
	table{ margin: 30px auto; text-align: center; border-collapse:collapse; width:50%; }
	td, th{ padding: 5px;font-size:18px;}
	hr{ margin-bottom:20px; border:1px solid #aaa; }
	input,select,textarea{ width:284px; height:30px; background:#EDEDED; border:1px solid #999; text-indent:5px; font-size:18px; }
	input[type='submit']{ width:130px; height:36px; cursor:pointer; border-radius:5px 5px 5px 5px; background:#ddd; }
	select{text-indent:0px;}
	textarea{height:100px;font-size:22px;}
style>
head>
<body>

<h2>修改订单h2>
<hr/>
<form action="orderUpdate" method="POST">

	<input type="hidden" name="id" value=""/>
	<table border="1">
		<tr>
			<td width="30%">所属门店td>
			<td>
				<select id="doorId" name="doorId">
					<option value="">永和大王(北三环西路店)option>
				select>
			td>
		tr>
		<tr>
			<td>订单编号td>
			<td>
				<input type="text" name="orderNo" value=""/>
			td>
		tr>
		<tr>
			<td>订单类型td>
			<td>
				<input type="text" name="orderType" value=""/>
			td>
		tr>
		<tr>
			<td>用餐人数td>
			<td>
				<input type="text" name="pnum" value=""/>
			td>
		tr>
		<tr>
			<td>收银员td>
			<td>
				<input type="text" name="cashier" value=""/>
			td>
		tr>
		<tr>
			<td>下单时间td>
			<td>
				<input type="text" name="orderTime" value=''/>

			td>
		tr>
		<tr>
			<td>结账时间td>
			<td>
				<input type="text" name="payTime" value=''/>

			td>
		tr>
		<tr>
			<td>支付方式td>
			<td>
				<input type="text" name="payType" value=""/>

			td>
		tr>
		<tr>
			<td>支付金额td>
			<td>
				<input type="text" name="price" value=""/>
			td>
		tr>
		<tr>
			<td colspan="2">
				<input type="submit" value="提 	交"/>
			td>
		tr>
	table>
form>

body>
html>
⑾ test.jsp:
<%@ page language="java" pageEncoding="UTF-8"%>

<html>
<head>
<meta charset="utf-8"/>
<title>title>
head>
<body>
	<h1>yonghe...test.jsph1>
body>
html>
④ web.xml文件配置
<web-app xmlns:xsi="http://www.w3.org/2001/XMLSchema-instance"
xmlns="http://java.sun.com/xml/ns/javaee"
xsi:schemaLocation="http://java.sun.com/xml/ns/javaee http://java.sun.com/xml/ns/javaee/web-app_2_5.xsd"
version="2.5">
<welcome-file-list>
<welcome-file>index.htmlwelcome-file>
<welcome-file>index.htmwelcome-file>
<welcome-file>index.jspwelcome-file>
<welcome-file>default.htmlwelcome-file>
<welcome-file>default.htmwelcome-file>
<welcome-file>default.jspwelcome-file>
welcome-file-list>
<servlet>
<servlet-name>springmvcservlet-name>
<servlet-class>org.springframework.web.servlet.DispatcherServletservlet-class>
<init-param>
<param-name>contextConfigLocationparam-name>
<param-value>classpath:spring/*.xmlparam-value>
init-param>
servlet>
<servlet-mapping>
<servlet-name>springmvcservlet-name>
<url-pattern>/url-pattern>
servlet-mapping>
<filter>
<filter-name>encodingFilterfilter-name>
<filter-class>org.springframework.web.filter.CharacterEncodingFilterfilter-class>
<init-param>
<param-name>encodingparam-name>
<param-value>UTF8param-value>
init-param>
filter>
<filter-mapping>
<filter-name>encodingFilterfilter-name>
<url-pattern>/*url-pattern>
filter-mapping>
web-app>
⑤ pom.xml文件配置
<project xmlns="http://maven.apache.org/POM/4.0.0"
xmlns:xsi="http://www.w3.org/2001/XMLSchema-instance"
xsi:schemaLocation="http://maven.apache.org/POM/4.0.0 http://maven.apache.org/xsd/maven-4.0.0.xsd">
<modelVersion>4.0.0modelVersion>
<groupId>com.tedugroupId>
<artifactId>yongheartifactId>
<version>0.0.1-SNAPSHOTversion>
<packaging>warpackaging>
<dependencies>
<dependency>
<groupId>junitgroupId>
<artifactId>junitartifactId>
<version>4.10version>
<scope>testscope>
dependency>
<dependency>
<groupId>org.slf4jgroupId>
<artifactId>slf4j-log4j12artifactId>
<version>1.6.4version>
dependency>
<dependency>
<groupId>com.fasterxml.jackson.coregroupId>
<artifactId>jackson-databindartifactId>
<version>2.4.2version>
dependency>
<dependency>
<groupId>javax.servletgroupId>
<artifactId>servlet-apiartifactId>
<version>2.5version>
<scope>providedscope>
dependency>
<dependency>
<groupId>javax.servletgroupId>
<artifactId>jsp-apiartifactId>
<version>2.0version>
<scope>providedscope>
dependency>
<dependency>
<groupId>jstlgroupId>
<artifactId>jstlartifactId>
<version>1.2version>
dependency>
<dependency>
<groupId>org.springframeworkgroupId>
<artifactId>spring-webmvcartifactId>
<version>4.1.3.RELEASEversion>
dependency>
<dependency>
<groupId>org.springframeworkgroupId>
<artifactId>spring-jdbcartifactId>
<version>4.1.3.RELEASEversion>
dependency>
<dependency>
<groupId>org.springframeworkgroupId>
<artifactId>spring-aspectsartifactId>
<version>4.1.3.RELEASEversion>
dependency>
<dependency>
<groupId>org.mybatisgroupId>
<artifactId>mybatisartifactId>
<version>3.2.8version>
dependency>
<dependency>
<groupId>org.mybatisgroupId>
<artifactId>mybatis-springartifactId>
<version>1.2.2version>
dependency>
<dependency>
<groupId>mysqlgroupId>
<artifactId>mysql-connector-javaartifactId>
<version>5.1.32version>
dependency>
<dependency>
<groupId>com.alibabagroupId>
<artifactId>druidartifactId>
<version>1.1.6version>
dependency>
dependencies>
project>
4.永和项目订单管理链接
永和项目订单管理链接
