corosync+pacemaker实现集群管理
又是一个高可用!!!
啊啊啊啊啊啊啊啊啊啊啊啊啊啊啊啊啊啊,拖了这么长时间才整理原理和细节,在作这节过程中,我感觉最难的不是corosync搭建高可用,而是在配置节点时使用crm命令的一些使用方法,刚好找了一篇总结的比较好的文挡,放在上面了,现在来看原理:
先理解几个名词:
API:
(Application Programming Interface,应用程序编程接口)是一些预先定义的函数,目的是提供应用程序与开发人员基于某软件或硬件得以访问一组例程的能力,而又无需访问源码,或理解内部工作机制的细节。
linux API
在linux中,用户编程接口API遵循了UNIX中最流行的应用编程界面标准—POSIX标准。POSIX标准是由IEEE和ISO/IEC共同开发的标准系统。该标准基于当时现有的UNIX实践和经验,描述了操作系统的系统调用编程接口API,用于保证应用程序可以在源程序一级上在多种操作系统上移植运行。这些系统调用编程接口主要是通过C库(LIBC)来实现的。
AIS和OpenAIS简介
AIS应用接口规范,是用来定义应用程序接口(API)的开放性规范的集合,这些应用程序作为中间件为应用服务提供一种开放、高移植性的程序接口。是在实现高可用应用过程中是亟需的。服务可用性论坛(SA Forum)是一个开放性论坛,它开发并发布这些免费规范。使用AIS规范的应用程序接口(API),可以减少应用程序的复杂性和缩短应用程序的开发时间,这些规范的主要目的就是为了提高中间组件可移植性和应用程序的高可用性。
OpenAIS是基于SA Forum 标准的集群框架的应用程序接口规范。OpenAIS提供一种集群模式,这个模式包括集群框架,集群成员管理,通信方式,集群监测等,能够为集群软件或工具提供满足 AIS标准的集群接口,但是它没有集群资源管理功能,不能独立形成一个集群。
CoroSync
corosync最初只是用来演示OpenAIS集群框架接口规范的一个应用,可以说corosync是OpenAIS的一部分,然而后面的发展超越了官方最初的设想,越来越多的厂商尝试使用corosync作为集群解决方案。如Redhat的RHCS集群套件就是基于corosync实现。
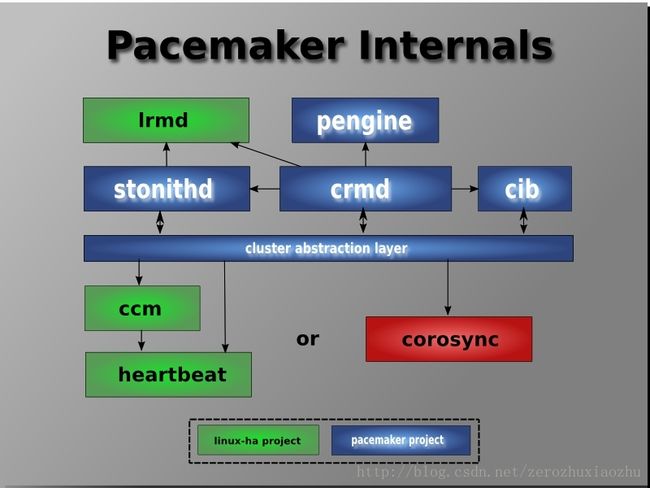
corosync只提供了message layer(即实现HeartBeat + CCM),而没有直接提供CRM,一般使用Pacemaker进行资源管理。###所以,下面这幅图的or那里的意思懂了吧:

注:图上蓝色部分为pacemaker的模块
OpenAIS是基于SA Forum 标准的集群框架的应用程序接口规范。OpenAIS提供一种集群模式,这个模式包括集群框架,集群成员管理,通信方式,集群监测等,能够为集群软件或工具提供满足AIS标准的集群接口,但是它没有集群资源管理功能,所以需要和集群资源管理器搭配使用,不能独立形成一个集群。
服务可用性论坛(SA Forum)是一个开放性论坛,它开发并发布AIS规范。AIS是应用接口规范,是用来定义应用程序接口(API)的开放性规范的集合,应用程序作为中间件为应用服务提供一种开放、高移植性的程序接口,是在实现高可用应用过程中是亟需的。使用AIS规范的应用程序接口(API),可以减少应用程序的复杂性和缩短应用程序的开发时间,这些规范的主要目的就是为了提高中间组件可移植性和应用程序的高可用性。
Pacemaker
Pacemaker是由Linux-HA工程的Heartbeat项目中的CRM组件发展而来。 Heartbeat 3开始,Heartbeat 3 按模块把的原来Heartbeat拆分为多个子项目。CRM组件单独由另一独立项目Pacemaker 负责。单独成一个项目之后,Pacemaker以做一个可扩展性高可用集群资源管理器(A scalable High-Availability cluster resource manager)为目标,并同时支持Corosync和Heartbeat 。
1.群集组件说明:
stonithd:心跳系统。
lrmd:本地资源管理守护进程。它提供了一个通用的接口支持的资源类型。直接调用资源代理(脚本)。
pengine:政策引擎。根据当前状态和配置集群计算的下一个状态。产生一个过渡图,包含行动和依赖关系的列表。
CIB:群集信息库。包含所有群集选项,节点,资源,他们彼此之间的关系和现状的定义。同步更新到所有群集节点。
CRMD:集群资源管理守护进程。主要是消息代理的PEngine和LRM,还选举一个领导者(DC)统筹活动(包括启动/停止资源)的集群。
OpenAIS:OpenAIS的消息和成员层。
Heartbeat:心跳消息层,OpenAIS的一种替代。
CCM:共识群集成员,心跳成员层。
2.功能概述
CIB使用XML表示集群的集群中的所有资源的配置和当前状态。CIB的内容会被自动在整个集群中同步,使用PEngine计算集群的理想状态,生成指令列表,然后输送到DC(指定协调员)。Pacemaker 集群中所有节点选举的DC节点作为主决策节点。如果当选DC节点宕机,它会在所有的节点上, 迅速建立一个新的DC。DC将PEngine生成的策略,传递给其他节点上的LRMd(本地资源管理守护程序)或CRMD通过集群消息传递基础结构。当集群中有节点宕机,PEngine重新计算的理想策略。在某些情况下,可能有必要关闭节点,以保护共享数据或完整的资源回收。为此,Pacemaker配备了stonithd设备。STONITH可以将其它节点“爆头”,通常是实现与远程电源开关。Pacemaker会将STONITH设备,配置为资源保存在CIB中,使他们可以更容易地监测资源失败或宕机。
脑裂
当群集发生裂脑的状况时候,因为无法进行任何沟通而误会对方无法运作,所以主与备份服务器都会启动浮动IP和相关服务,此时若两部服务器对外连线亦未短线,那么势必导致有些使用者存取的是主要服务器,另外一些则存取备份服务器的情形。此外,如果两部服务器共享一个存储装置,发生裂脑时两部服务器会同时挂载该存储装置,亦同时存取相同的档案,因此若共享存储装备缺乏良好的锁定机制,更可能使得存储装置上的档案因同时读写而损坏。更有可能导致硬盘中写入不一致的信息,导致后期数据错误,甚至整个数据库损坏,后果不堪设想。
避免裂脑的方法有两个:第一个方法是在服务器间使用多重连线;第二个则是使用heartbeat的STONITH功能。
Stonith概述
stonith是“shoot the other node in the head”的首字母简写,它是Heartbeat软件包的一个组件,它允许使用一个远程或“智能的”连接到健康服务器的电源设备自动重启失效服务器的电源,stonith设备可以关闭电源并响应软件命令,运行Heartbeat的服务器可以通过串口线或网线向stonith设备发送命令,它控制高可用服务器对中其他服务器的电力供应,换句话说,主服务器可以复位备用服务器的电源,备用服务器也可以复位主服务器的电源。
注意:尽管理论上连接到远程或“智能的”循环电源系统的电力设备的数量是没有限制的,但大多数stonith实现只使用两台服务器,因为双服务器stonith配置是最简单的,最容易理解,它能够长时间运行且不会降低系统的可靠性和高可用性。
环境:
node1:172.25.67.1 server1
node2:172.25.67.2 server2
vip 172.25.67.100
一:安装配置 corosync 、pacemaker
两个节点上都安装:
[root@server1 ~]# yum -y install corosync pacemaker
[root@server2 ~]# yum -y install corosync pacemaker
查看生成文件
[root@server1 ~]# rpm -ql corosync
/etc/corosync
/etc/corosync/corosync.conf.example
/etc/corosync/corosync.conf.example.udpu
/etc/corosync/service.d
/etc/corosync/uidgid.d
/etc/dbus-1/system.d/corosync-signals.conf
/etc/rc.d/init.d/corosync
/etc/rc.d/init.d/corosync-notifyd
/etc/sysconfig/corosync-notifyd
更改配置文件名
[root@server1 ~]# mv /etc/corosync/corosync.conf.example /etc/corosync/corosync.conf编辑配置文件:
[root@server1 ~]# vim /etc/corosync/corosync.conf
[root@server1 ~]# cat /etc/corosync/corosync.conf
# Please read the corosync.conf.5 manual page
compatibility: whitetank

totem {
    version: 2
    secauth: on       #开启安全认证
    threads: 0        #线程数 0 表示不基于线程模式工作而是进程
    interface {
        ringnumber: 0 #环数目   一般保持为0
        bindnetaddr: 172.25.67.0   #网络地址     更改为主机所在网络的网络地址
        mcastaddr: 226.94.1.1  #多播地址ip addr 可查看
        mcastport: 5405   #多播地址监听端口
        ttl: 1
    }
}

logging {
    fileline: off
    to_stderr: no
    to_logfile: yes   #是否记录日志
    to_syslog: yes
    logfile: /var/log/cluster/corosync.log
    debug: off
    timestamp: on
    logger_subsys {
        subsys: AMF
        debug: off
    }
}


amf {
    mode: disabled
}
###添加如下行 使pacemaker 以corosync插件方式运行
service {
  ver:  0
  name: pacemaker
  use_mgmtd: yes
   }
生成corosync的密钥文件
查看 # corosync-keygen使用方法:
corosync-keygen是从/dev/random中读取随机数,如果此熵池中随机数过少,可能导致无法生成密钥,所以打开图形化界面敲键盘随即录入。如果不想等待时间长或者敲键盘录入随机数,最好的办法是制作软链接将/dev/urandom—>/dev/random上
[root@server1 ~]# corosync-keygen  -l
Corosync Cluster Engine Authentication key generator.
Gathering 1024 bits for key from /dev/random.
Press keys on your keyboard to generate entropy.
Press keys on your keyboard to generate entropy (bits = 512).
Press keys on your keyboard to generate entropy (bits = 576).
Press keys on your keyboard to generate entropy (bits = 640).
Press keys on your keyboard to generate entropy (bits = 704).
Press keys on your keyboard to generate entropy (bits = 768).
Press keys on your keyboard to generate entropy (bits = 832).
Press keys on your keyboard to generate entropy (bits = 896).
Press keys on your keyboard to generate entropy (bits = 960).
Writing corosync key to /etc/corosync/authkey.
将corosync.conf 和authkey复制到server2中
[root@server1 corosync]# scp -p authkey corosync.conf [email protected]:/etc/corosync/
The authenticity of host '172.25.67.2 (172.25.67.2)' can't be established.
RSA key fingerprint is 16:be:c2:78:6a:87:18:10:9f:f1:a2:37:f2:21:14:5f.
Are you sure you want to continue connecting (yes/no)? yes
Warning: Permanently added '172.25.67.2' (RSA) to the list of known hosts.
root@172.25.67.2's password:
authkey                                       100%  128     0.1KB/s   00:00
corosync.conf                                 100%  634     0.6KB/s   00:00
安装crmsh
[root@server1 ~]# yum localinstall crmsh-1.2.6-0.rc2.2.1.x86_64.rpm pssh-2.3.1-2.1.x86_64.rpm RHEL自6.4起不再提供集群的命令行配置工具crmsh,转而使用pcs;所以如果想使用crmsh可以自行安
启动服务
[root@server1 ~]# service corosync start
Starting Corosync Cluster Engine (corosync):               [  OK  ]
过滤端口
[root@server1 ~]# ss -tunl | grep :5405
udp    UNCONN     0      0            172.25.67.1:5405                  *:*
udp    UNCONN     0      0             226.94.1.1:5405                  *:*
[root@server1 ~]# grep -e "Corosync Cluster Engine" -e "configuration file" /var/log/cluster/corosync.log
Sep 28 19:49:09 corosync [MAIN  ] Corosync Cluster Engine ('1.4.1'): started and ready to provide service.
Sep 28 19:49:09 corosync [MAIN  ] Successfully read main configuration file '/etc/corosync/corosync.conf'.
[root@server1 ~]# grep pcmk_startup /var/log/cluster/corosync.log
Sep 28 19:49:09 corosync [pcmk  ] info: pcmk_startup: CRM: Initialized
Sep 28 19:49:09 corosync [pcmk  ] Logging: Initialized pcmk_startup
Sep 28 19:49:09 corosync [pcmk  ] info: pcmk_startup: Maximum core file size is: 18446744073709551615
Sep 28 19:49:09 corosync [pcmk  ] info: pcmk_startup: Service: 9
Sep 28 19:49:09 corosync [pcmk  ] info: pcmk_startup: Local hostname: serve
ssh 连接server2启动server2 corosync
[root@server1 ~]# ssh server2 -- /etc/init.d/corosync start
The authenticity of host 'server2 (172.25.67.2)' can't be established.
RSA key fingerprint is 16:be:c2:78:6a:87:18:10:9f:f1:a2:37:f2:21:14:5f.
Are you sure you want to continue connecting (yes/no)? yes
Warning: Permanently added 'server2' (RSA) to the list of known hosts.
root@server2's password:
Starting Corosync Cluster Engine (corosync): [确定]
使用crmsh命令查看集群节点的启动状态
[root@server1 ~]# crm status
Last updated: Thu Sep 28 19:52:00 2017
Last change: Thu Sep 28 19:51:37 2017 via crmd on server1
Stack: classic openais (with plugin)
Current DC: server1 - partition with quorum
Version: 1.1.10-14.el6-368c726
2 Nodes configured, 2 expected votes
0 Resources configured


Online: [ server1 server2 ]  ##表示启动成功
配置集群
1、corosync默认启用了stonith,而当前集群并没有相应的stonith设备,因此此默认配置目前尚不可用,这可以通过如下命令验正:
[root@server1 ~]# crm_verify -L -V
   error: unpack_resources:     Resource start-up disabled since no STONITH resources have been defined
   error: unpack_resources:     Either configure some or disable STONITH with the stonith-enabled option
   error: unpack_resources:     NOTE: Clusters with shared data need STONITH to ensure data integrity
Errors found during check: config not valid
[root@server1 ~]# crm configure property stonith-enabled=false
[root@server1 ~]# crm_verify -L -V
[root@server1 ~]# crm configure show  #使用crmsh命令查看当前的配置信息
node server1
node server2
property $id="cib-bootstrap-options" \
    dc-version="1.1.10-14.el6-368c726" \
    cluster-infrastructure="classic openais (with plugin)" \
    expected-quorum-votes="2" \
    stonith-enabled="false"   #stonith  已被禁用
将no-quorum-policy 设置为ignore ,在两个节点中,当节点达不到法定票数时,即两个节点一个坏了,没法投票,正常的节点达不到法定票数,此时如果是默认参数,即正常的机器不能工作,所以需要该为ignore,使正常机器接管
[root@server1 ~]# crm

crm(live)# configure
crm(live)configure#  property no-quorum-policy=ignore
crm(live)configure# show
node server1
node server2
property $id="cib-bootstrap-options" \
    dc-version="1.1.10-14.el6-368c726" \
    cluster-infrastructure="classic openais (with plugin)" \
    expected-quorum-votes="2" \
    stonith-enabled="false" \
    no-quorum-policy="ignore"
crm(live)configure# verify
crm(live)configure# commit  #保存提交
为集群添加集群资源
此处涉及crm模块命令的用法,所以我们可以参考上面那篇:
corosync支持heartbeat,LSB和ocf等类型的资源代理,目前较为常用的类型为LSB和OCF两类,stonith类专为配置stonith设备而用;
可以通过如下命令查看当前heartbeat集群系统所支持的类型:
[root@server1 ~]# crm ra list ocf heartbeat
CTDB           Dummy          Filesystem     IPaddr         IPaddr2        IPsrcaddr
LVM            MailTo         Route          SendArp        Squid          VirtualDomain
Xinetd         apache         conntrackd     dhcpd          ethmonitor     exportfs
mysql          mysql-proxy    named          nfsserver      nginx          pgsql
postfix        rsyncd         rsyslog        slapd          symlink        tomcat
添加vip
crm(live)configure# primitive zpyweb ocf:heartbeat:IPaddr params ip=172.25.67.100 nic=eth0 cidr_netmask=24 op monitor interval=10 timeout=20s #zpyweb为IP地址资源名
crm(live)configure# verify
crm(live)configure# commit
查看
[root@server1 ~]# ip a
1: lo:  mtu 16436 qdisc noqueue state UNKNOWN
    link/loopback 00:00:00:00:00:00 brd 00:00:00:00:00:00
    inet 127.0.0.1/8 scope host lo
    inet6 ::1/128 scope host
       valid_lft forever preferred_lft forever
2: eth0:  mtu 1500 qdisc pfifo_fast state UP qlen 1000
    link/ether 52:54:00:8d:90:b5 brd ff:ff:ff:ff:ff:ff
    inet 172.25.67.1/24 brd 172.25.67.255 scope global eth0
    inet 172.25.67.100/24 scope global eth0
    inet6 fe80::5054:ff:fe8d:90b5/64 scope link
安装apache
在两个节点server1 server2上都安装。。。
[root@server1 ~]# yum install -y httpd
[root@server1 ~]# echo "server1" >/var/www/html/index.html
[root@server1 ~]# /etc/init.d/httpd start
正在启动 httpd:httpd: Could not reliably determine the server's fully qualified domain name, using 172.25.67.1 for ServerName
                                                           [确定]
[root@server2 ~]# yum install -y httpd
[root@server2 ~]# echo "server2" >/var/www/html/index.html
[root@server2 ~]# /etc/init.d/httpd start
正在启动 httpd:httpd: Could not reliably determine the server's fully qualified domain name, using 172.25.67.2 for ServerName
                                                           [确定]
在集群上加入apache
只在一端加入即可
[root@server1 ~]# crm
crm(live)# configure
crm(live)configure# primitive webserver lsb:httpd  op monitor interval=10 timeout=20  #添加httpd服务
crm(live)configure# verify
crm(live)configure# commit
建立集群服务组
[root@server1 ~]# crm
crm(live)# configure
crm(live)configure# group ipgroup zpyweb webserver
crm(live)configure# verify
crm(live)configure# commit
查看状态
crm(live)configure# show
node server1
node server2
primitive webserver lsb:httpd \
    op monitor interval="10" timeout="20"
primitive zpyweb ocf:heartbeat:IPaddr \
    params ip="172.25.67.100" nic="eth0" cidr_netmask="24" \
    op monitor interval="10" timeout="20s"
group ipgroup zpyweb webserver
property $id="cib-bootstrap-options" \
    dc-version="1.1.10-14.el6-368c726" \
    cluster-infrastructure="classic openais (with plugin)" \
    expected-quorum-votes="2" \
    stonith-enabled="false" \
    no-quorum-policy="ignore"
测试:

当执行在server1上执行:
service corosync stop
Signaling Corosync Cluster Engine (corosync) to terminate: [ OK ]
Waiting for corosync services to unload:. [ OK ]
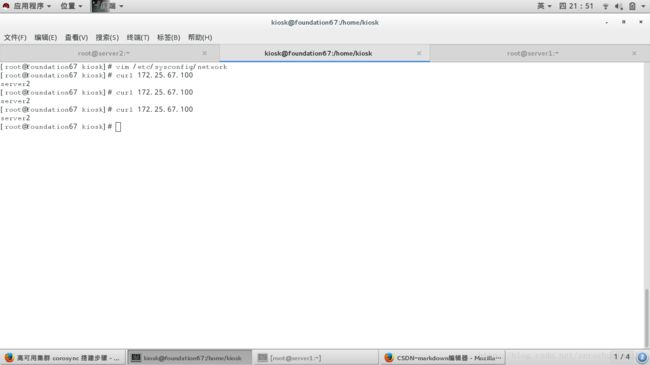
页面跳转到server2的发布页面