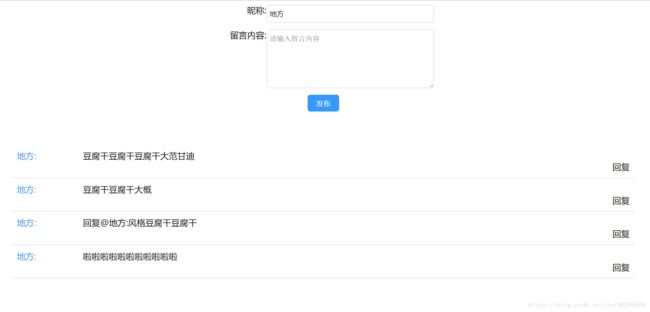
使用Vue开发留言列表
通过学习《Vue.js实战》的留言板demo更好地掌握vue的相关知识,大部分代码都和书上的一致,我做了修改使用vue模板而不是html。
源代码:https://github.com/zndada/learnVue
效果图
项目整体结构
├── src  项目代码
│ ├── common 公共js库
│ ├── components 组件
│ │ ├── vInput.vue 昵称输入框组件
│ │ ├── vList.vue 留言列表组件
│ │ ├── vTextarea.vue 留言内容组件
| ├── page 页面
| | ├── message.vue 留言列表主页
| ├── router 路由
| | ├── index.js 路由相关操作
| ├── App.vue 入口页
| ├── main.js !Webpack配置约定的js入口,不要修改名称和路径
main.js
入口文件,主要作用是初始化vue实例并使用需要的插件
import Vue from 'vue'
import App from './App'
import router from './router'
Vue.config.productionTip = false
/* eslint-disable no-new */
new Vue({
el: '#app',
router,
components: { App },
template: 'App.vue
主组件,所有页面都是在App.vue下进行切换的。所有的路由也是App.vue的子组件
<template>
  <div id="app">
    <router-view/>
  </div>
</template>

<script>
export default {
  name: 'App'
}
</script>
router/index.js
// import引入路由组件
import Vue from 'vue'
import Router from 'vue-router'
import message from '../page/message.vue'
Vue.use(Router)
// 然后定义路由(routes),并创建路由实例
export default new Router({
  routes: [
    {
      path: '/message',
      name: 'message',
      component: message
    }
  ]
})
components/vInput.vue
<template>
  <div class="input-con">
    <span>昵称:</span>
    <input type="text" :value="value" @input="updateValue"/>
  </div>
</template>
<script>
export default {
  // 接收父组件传过来的value
  props: {
    value: {
      type: [String, Number],
      default: ''
    }
  },
  methods: {
    // 监听input输入事件
    updateValue: function (event) {
      // 触发父组件的自定义事件
      // target 事件属性可返回事件的目标节点(触发该事件的节点),如生成事件的元素、文档或窗口。
      // 将input的value值传给父组件
      this.$emit('input', event.target.value)
    }
  }
}
</script>

<style scoped>
.input-con{
  display: flex;
  flex-direction: row;
  justify-content: center;
}
span{
  width: 100px;
  display: inline-block;
  text-align: right;
  vertical-align: middle;
}
input{
  border: 1px solid #e6e6ee;
  padding: 4px 5px;
  line-height: 24px;
  height: 24px;
  border-radius: 5px;
  width: 300px;
}
</style>
这边额外谈谈监听input事件,在大部分使用过jQuery的前端来说,对于oninput事件都不陌生,也因此会在vue框架中直接使用oninput监听input输入框,而实际上这是毫无作用,没有生效的。在vue中正确使用的是:
components/vTextarea.vue
<template>
  <div class="input-con">
    <span>留言内容:</span>
    <!--ref 被用来给元素或子组件注册引用信息。
    引用信息将会注册在父组件的 $refs 对象上。
    如果在普通的 DOM 元素上使用,引用指向的就是 DOM 元素;
    如果用在子组件上,引用就指向组件实例:  -->
    <textarea
    :ref="message"
    type="text"
    :value="value"
    @input="updateValue"
    placeholder="请输入留言内容"></textarea>
  </div>
</template>
<script>
  // 接收父组件传入的value
  props: {
    value: {
      type: String,
      default: ''
    }
  },
  methods: {
    // 监听input值
    updateValue: function (event) {
      this.$emit('input', event.target.value)
    },
    focus: function () {
      // 一个对象,持有注册过ref特性的所有DOM元素和组件实例。
      this.$refs.message.focus()
    }
  }
}
</script>
<style scoped>
.input-con{
  display: flex;
  flex-direction: row;
  justify-content: center;
}
span{
  width: 100px;
  display: inline-block;
  text-align: right;
  vertical-align: top;
}
textarea{
  border: 1px solid #e6e6ee;
  padding: 4px 5px;
  line-height: 24px;
  border-radius: 5px;
  width: 300px;
  height: 100px;
}
</style>
components/vList.vue
<template>
  <div class="list">
    <div  v-if="this.list.length">
      <div v-for="(item, index) in list"
      :key="index"
      class="list-item">
          <div class="span-con">
            <span>{{item.name}}:</span>
          </div>
          <div class="list-msg">
            <div>{{item.message}}</div>
            <div class="list-reply">
              <a @click="listChange(index)">回复</a>
            </div>
          </div>
      </div>
    </div>
    <div v-if="!this.list.length"
    class="list-nothing">
      留言列表为空
    </div>
  </div>
</template>
<script>
export default {
  props: {
    list: {
      type: Array,
      default: function () {
        return []
      }
    }
  },
  methods: {
    listChange: function (index) {
      this.handleReply(index)
    },
    handleReply: function (index) {
      this.$emit('reply', index)
    }
  }
}
</script>
<style scoped>
.list{
  margin: 50px 20px 0 20px;
}
.list-item{
  display: flex;
  flex-direction: row;
  padding: 10px;
  border-bottom: 1px solid #e3e8ee;
  overflow: hidden;
  flex: 5;
}
.span-con{
  flex: 1;
  margin-right: 10px;
  color: #39f;
}
.list-msg{
  flex: 9;
  text-align: justify;
}
.list-msg .list-reply{
  text-align: right
}
.list-msg a:hover{
  color: #39f
}
.list-nothing{
  text-align: center;
  color: #9ea7b4;
  padding: 20px;
}
</style>
page/message.vue
<template>
  <div>
    <div class="message">
      <v-input v-model="username"></v-input>
      <v-textarea v-model="message" ref="message"></v-textarea>
      <div class="btn-con">
        <input @click="handleSend" type="button" class="btn" value="发布"/>
      </div>
    </div>
    <v-list :list="list" @reply="handleReply"></v-list>
  </div>
</template>
<script>
import vInput from '../components/vInput.vue'
import vTextarea from '../components/vTextarea.vue'
import vList from '../components/vList.vue'
export default {
  data () {
    return {
      username: '',
      message: '',
      list: []
    }
  },
  components: {
    vInput,
    vTextarea,
    vList
  },
  methods: {
    handleSend: function () {
      if (this.username === '') {
        window.alert('请输入昵称')
        return
      }
      if (this.message === '') {
        window.alert('请输入留言内容')
        return
      }
      // 数组list存储了所有的留言内容,通过函数给list添加一项留言数据,添加成功后把文本框置空
      this.list.push({
        name: this.username,
        message: this.message
      })
      this.message = ''
    },
    handleReply: function (index) {
      var name = this.list[index].name
      this.message = '回复@' + name + ':'
      this.$refs.message.focus()
    }
  }
}
</script>

<style scoped>
.message {
  display: flex;
  flex-direction: column;
}
.message div{
  margin-bottom: 12px;
  flex-direction: row;
}
.message input:focus,
.message textarea:focus{
  border: 1px solid #3399ff;
  border-radius: 5px;
}
.message .btn-con{
  text-align: center;
  display: inline-block;
}
.message .btn{
  padding: 6px 15px;
  border: 1px solid #39f;
  border-radius: 4px;
  color: #fff;
  background-color: #39f;
  cursor: pointer;
  outline: none;
}
</style>

