LVS+Keepalived实现高可用负载均衡(Web群集)
一、Keepalived概述
keepalived是一个类似于layer3,4,5交换机制的软件,也就是我们平时说的第3层、第4层和第5层交换。Keepalived的作用是检测web服务器的状态,如果有一台web服务器死机,或工作出现故障,Keepalived将检测到,并将有故障的web服务器从系统中剔除,当web服务器工作正常后Keepalived自动将web服务器加入到服务器群中,这些工作全部自动完成,不需要人工干涉,需要人工做的只是修复故障的web服务器。
Layer3,4&5工作在IP/TCP协议栈的IP层,TCP层,及应用层,原理分别如下:
- Layer3:Keepalived使用Layer3的方式工作式时,Keepalived会定期向服务器群中的服务器发送一个ICMP的数据包(既我们平时用的Ping程序),如果发现某台服务的IP地址没有激活,Keepalived便报告这台服务器失效,并将它从服务器群中剔除,这种情况的典型例子是某台服务器被非法关机。Layer3的方式是以服务器的IP地址是否有效作为服务器工作正常与否的标准;
- Layer4主要以TCP端口的状态来决定服务器工作正常与否。 如webserver的服务端口一般是80,如果Keepalived检测到80端口没有启动,则Keepalived将把这台服务器从服务器群中剔除;
- Layer5:Layer5就是工作在具体的应用层了,比Layer3,Layer4要复杂一点,在网络上占用的带宽也要大一些。Keepalived将根据用户的设定检查服务器程序的运行是否正常,如果与用户的设定不相符,则Keepalived将把服务器从服务器群中剔除。
二、LVS概述
LVS集群采用IP负载均衡技术,属于IP层的交换(L4)具有很好的吞吐率。调度器分析客户端到服务器的IP报头信息,将请求均衡地转移到不同的服务器上执行,且调度器自动屏蔽掉服务器的故障,从而将一组服务器构成一个高性能的、高可用的虚拟服务器。主要包含四大部分:
-
负载调度器(loadbalancer),它是整个集群对外面的前端机,负责将客户的请求发送到一组服务器上执行,而客户认为服务是来自一个IP地址上的。当客户请求到达时,调度器只根据负载情况从服务器池中选出一个服务器,将该请求转发到选出的服务器,并记录这个调度;
-
服务器池(serverpool),是一组真正执行客户请求的服务器,执行的任务有WEB、MAIL、FTP和DNS等。服务器池的结点数目是可变的,当整个系统收到的负载超过目前所有结点的处理能力时,可以在服务器池中增加服务器来满足不断增长的请求负载;
-
后端存储(backend storage),它为服务器池提供一个共享的存储区,这样很容易使得服务器池拥有相同的内容,提供相同的服务。
Graphic Monitor是为系统管理员提供整个集群系统的监视器,它可以监视系统中每个结点的状况。
三、LVS+keepalived架构图
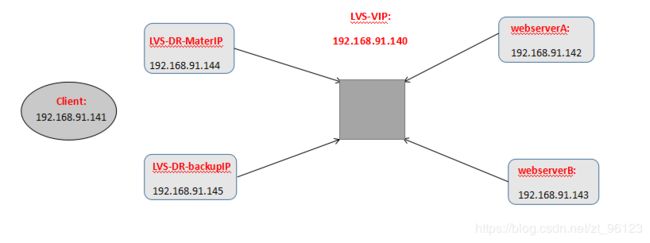
| 名称 | IP地址 |
|---|---|
| Client | 192.168.91.141 |
| LVS-Master | 192.168.91.144 |
| LVS-Backup | 192.168.91.145 |
| WebserverA | 192.168.91.142 |
| WebserverB | 192.168.91.143 |
四、编译安装keepalived
1、安装所需的软件 (以下是Master操作)
[root@localhost ~]# yum install -y openssl-devel popt-devel
Loaded plugins: fastestmirror, langpacks
dvd                                                                       | 3.6 kB  00:00:00
Determining fastest mirrors
Resolving Dependencies
......(省略)
Installed:
  openssl-devel.x86_64 1:1.0.2k-8.el7                 popt-devel.x86_64 0:1.13-16.el7

Dependency Installed:
  keyutils-libs-devel.x86_64 0:1.5.8-3.el7             krb5-devel.x86_64 0:1.15.1-8.el7
  libcom_err-devel.x86_64 0:1.42.9-10.el7              libkadm5.x86_64 0:1.15.1-8.el7
  libselinux-devel.x86_64 0:2.5-11.el7                 libsepol-devel.x86_64 0:2.5-6.el7
  libverto-devel.x86_64 0:0.2.5-4.el7                  pcre-devel.x86_64 0:8.32-17.el7
  zlib-devel.x86_64 0:1.2.7-17.el7

Complete!
[root@localhost ~]#
2、在LVS集群环境中应用时,也需要用到ipvsadm管理工具
[root@localhost ~]# yum install -y ipvsadm
Loaded plugins: fastestmirror, langpacks
Loading mirror speeds from cached hostfile
Resolving Dependencies
--> Running transaction check
......(省略)
Running transaction
  Installing : ipvsadm-1.27-7.el7.x86_64                                                         1/1
  Verifying  : ipvsadm-1.27-7.el7.x86_64                                                         1/1

Installed:
  ipvsadm.x86_64 0:1.27-7.el7

Complete!
[root@localhost ~]#
[root@localhost keepalived-2.0.10]# yum install libnl-devel.x86_64 -y
Loaded plugins: fastestmirror, langpacks
Loading mirror speeds from cached hostfile
Resolving Dependencies
--> Running transaction check
---> Package libnl-devel.x86_64 0:1.1.4-3.el7 will be installed
--> Finished Dependency Resolution
......(省略)
Running transaction
  Installing : libnl-devel-1.1.4-3.el7.x86_64                               1/1
  Verifying  : libnl-devel-1.1.4-3.el7.x86_64                               1/1

Installed:
  libnl-devel.x86_64 0:1.1.4-3.el7

Complete!
[root@localhost keepalived-2.0.10]#
3、编译安装keepalived
[root@localhost ~]# wget https://keepalived.org/software/keepalived-2.0.10.tar.gz
--2019-05-10 10:53:09--  https://keepalived.org/software/keepalived-2.0.10.tar.gz
Resolving keepalived.org (keepalived.org)... 37.59.63.157, 2001:41d0:8:7a9d::1
Connecting to keepalived.org (keepalived.org)|37.59.63.157|:443... connected.
HTTP request sent, awaiting response... 200 OK
Length: 927631 (906K) [application/x-gzip]
Saving to: ‘keepalived-2.0.10.tar.gz’

100%[===========================================================>] 927,631      285KB/s   in 3.2s

2019-05-10 10:53:14 (285 KB/s) - ‘keepalived-2.0.10.tar.gz’ saved [927631/927631]

[root@localhost ~]#
[root@localhost ~]# tar -xzf keepalived-2.0.10.tar.gz -C /usr/local/src/
[root@localhost ~]# cd /usr/local/src/keepalived-2.0.10/
[root@localhost keepalived-2.0.10]# mkdir /data
[root@localhost keepalived-2.0.10]#
[root@localhost keepalived-2.0.10]# ./configure --prefix=/data/kepalived
checking for a BSD-compatible install... /usr/bin/install -c
checking whether build environment is sane... yes
checking for a thread-safe mkdir -p... /usr/bin/mkdir -p
checking for gawk... gawk
checking whether make sets $(MAKE)... yes
checking whether make supports nested variables... yes
checking whether make supports nested variables... (cached) yes
checking for pkg-config... /usr/bin/pkg-config
checking pkg-config is at least version 0.9.0... yes
checking for gcc... gcc

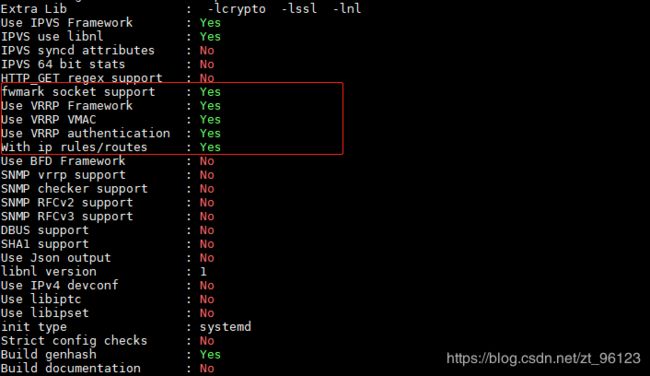
Extra Lib                :  -lcrypto  -lssl  -lnl
Use IPVS Framework       : Yes
IPVS use libnl           : Yes
IPVS syncd attributes    : No
IPVS 64 bit stats        : No
HTTP_GET regex support   : No
fwmark socket support    : Yes
Use VRRP Framework       : Yes
Use VRRP VMAC            : Yes
Use VRRP authentication  : Yes
With ip rules/routes     : Yes
Use BFD Framework        : No
SNMP vrrp support        : No
SNMP checker support     : No
SNMP RFCv2 support       : No
SNMP RFCv3 support       : No
DBUS support             : No
SHA1 support             : No
Use Json output          : No
libnl version            : 1
Use IPv4 devconf         : No
Use libiptc              : No
Use libipset             : No
init type                : systemd
Strict config checks     : No
Build genhash            : Yes
Build documentation      : No
[root@localhost keepalived-2.0.10]#
[root@localhost keepalived-2.0.10]# make
Making all in lib
make[1]: Entering directory `/usr/local/src/keepalived-2.0.10/lib'
make  all-am
make[2]: Entering directory `/usr/local/src/keepalived-2.0.10/lib'
  CC       memory.o
  CC       utils.o
  ......(省略)
  make[1]: Leaving directory `/usr/local/src/keepalived-2.0.10/genhash'
Making all in bin_install
make[1]: Entering directory `/usr/local/src/keepalived-2.0.10/bin_install'
make[1]: Leaving directory `/usr/local/src/keepalived-2.0.10/bin_install'
make[1]: Entering directory `/usr/local/src/keepalived-2.0.10'
  EDIT     README
make[1]: Leaving directory `/usr/local/src/keepalived-2.0.10'
[root@localhost keepalived-2.0.10]#
[root@localhost keepalived-2.0.10]# make install
Making install in lib
make[1]: Entering directory `/usr/local/src/keepalived-2.0.10/lib'
make  install-am
make[2]: Entering directory `/usr/local/src/keepalived-2.0.10/lib'
make[3]: Entering directory `/usr/local/src/keepalived-2.0.10/lib'
make[3]: Nothing to be done for `install-exec-am'.
......(省略)
make[2]: Nothing to be done for `install-exec-am'.
 /usr/bin/mkdir -p '/data/kepalived/share/doc/keepalived'
 /usr/bin/install -c -m 644 README '/data/kepalived/share/doc/keepalived'
make[2]: Leaving directory `/usr/local/src/keepalived-2.0.10'
make[1]: Leaving directory `/usr/local/src/keepalived-2.0.10'
You have new mail in /var/spool/mail/root
[root@localhost keepalived-2.0.10]#
4、执行完make install之后会自动生成/etc/init.d/keepalived脚本文件,但是需要手动添加为系统服务,如下:
[root@localhost keepalived-2.0.10]#cp /data/kepalived/etc/init.d/keepalived /etc/init.d/
[root@localhost keepalived-2.0.10]#cp /data/kepalived/etc/sysconfig/keepalived /etc/sysconfig/
[root@localhost keepalived-2.0.10]#mkdir /etc/keepalived
[root@localhost keepalived-2.0.10]#cp /data/kepalived/etc/keepalived/keepalived.conf /etc/keepalived/

