Qt学习总结——飞机大战小游戏制作

Qt学习总结——飞机大战小游戏制作

1. 需求分析

这篇文章写于2020年暑假,完成学校实训项目之后,对自己的项目实践做了一个总结,回顾整个项目的制作过程,同时也复习一下Qt的相关知识,总结项目制作过程中出现的不足之处。

如果有同学想尝试使用Qt制作飞机大战的小游戏,这里推荐两个教程(https://www.write-bug.com/article/1451.html)(https://baijiahao.baidu.com/s?id=1658135336435450610)。

第一个教程使用的是QGraphicsScene作为窗体制作,但是我对QWidget更加熟悉,所以只借用了其中的图片素材,如果有机会我还是愿意尝试用QGraphicsScene写这个程序,一些界面美化方面可能能做得更好

接下来开始对项目进行分析,飞机大战需要做到的基本要求有以下几点:
1.我方飞机和敌方飞机的显示和移动
2.我方飞机和敌方飞机可以发射子弹
3.子弹与飞机,飞机与飞机发生碰撞,飞机要受到伤害

以上是飞机大战的基本要求,而我在设计项目的时候再添加了几点特点。
1.游戏可以选择关卡和难度
2.我方飞机可以释放技能
3.随机掉落资源包
4.使用数据库制作排行榜供记录得分。

2. 类的设计

我们先实现飞机大战的基本需求,再去考虑后继增加的特殊需求。

1.子弹类Bullet

#ifndef BULLET_H
#define BULLET_H
#include 
#include 
class Bullet
{
public:
    Bullet();							//构造函数
    QPixmap bullet;						//我方飞机子弹图片
    QPixmap EnemyBullet					//敌方普通飞机子弹图片
    QPixmap EnemyBullet2;				//敌方Boss飞机子弹图片
    int speed;							//子弹运动速度
    int x;				
    int y;
    void updatePosition();				//我方飞机子弹运动函数
    void EnemyUpdatePosition();			//敌方飞机子弹运动函数
    void EnemyUpdatePositionLeft();
    void EnemyUpdatePositionRight();
    bool isFree;						//子弹是否在游戏界面中(空闲)
};

#endif // BULLET_H

在设计子弹类时,我觉得无论是敌机子弹还是我方飞机子弹,其共性是较多的,所以我就直接将两者合为一个类,如果以后需要添加其他种类飞机子弹,同样可以写进这个类中。因为只有子弹的图片和运动方向不同,所以我写了不同的update函数表示不同子弹的运动。isFree作为一个标志判断子弹是否空闲,即子弹是否在界面中,根据这个标志判断飞机发射哪颗子弹。

类的具体实现如下:`

Bullet::Bullet()
{
    bullet.load(":/image/images/mybullet.png");			//子弹图片加载
    EnemyBullet.load(":/image/images/enemybullet.png");
    EnemyBullet2.load(":/image/images/bossbullet.png");
    speed = 10;											//设置子弹速度
    isFree = true;										//设置状态为空闲
}

void Bullet::updatePosition(){	//我方飞机子弹更新函数
    if(isFree)
           return;			//如果子弹为空闲,直接返回,否则向上运动
    y-=5;
    if(y<0)
        isFree = true;		//子弹超出游戏界面,返回空闲状态
}

void Bullet::EnemyUpdatePosition(){		//敌方飞机子弹更新函数
    if(isFree)
        return;
    y+=5;
}

void Bullet::EnemyUpdatePositionLeft(){ //子弹偏左运动
    if(isFree)
        return;
    x-=2;
    y+=5;
}

void Bullet::EnemyUpdatePositionRight(){	//子弹偏右运动
    if(isFree)
        return;
    x+=2;
    y+=5;
}

2.我方飞机类Plane

#ifndef PLANE_H
#define PLANE_H
#include 
#include 
#include 
class Plane
{
public:
    Bullet myBullet[30];		//我方飞机子弹弹匣
    Plane();					
    void shoot();				//飞机射击函数
    QPixmap myplane;			//我方飞机图片
    int x;
    int y;
    int recored;				//飞机射击时间标记
    int interval;				//飞机射击间隔
    int life;					//生命值
    double skill;				//技能值
};
#endif // PLANE_H

我方飞机类的设计中,interval是飞机射击的间隔,recored是标记射击时间,比如初始recored=0;当recored = interval时才可以发射子弹,发射之后recored又要归零,重新叠加。并且interval是我方飞机独有的,为之后的技能设计做铺垫。飞机的弹匣myBullet[30]是一个子弹类的数组,每次发射子弹都是从数组中进行选择

类的具体实现如下

#include "plane.h"
#include 
#include 
#include 
Plane::Plane()
{
    myplane.load(":/image/images/myplane.png");
    x = (500-myplane.width())*0.5;		//设置飞机初始化位置
    y = 600-myplane.height();			
    recored = 0;
    life = 10;
    isPlayed = false;
    skill = 20;
    interval = 30;
}

void Plane::shoot(){			//飞机射击函数
    recored++;
    if(recored<interval)		//如果标记时间小于间隔,直接返回
        return;
    recored = 0;				//否则重置标记时间,并发射一颗子弹
    for(int i = 0;i<30;i++){	//选择空闲子弹进行发射
        if(myBullet[i].isFree){
            myBullet[i].x = x+40;	//设定子弹发射的位置
            myBullet[i].y = y-10;
            myBullet[i].isFree = false;		//改变子弹空闲状态
            break;
        }
    }
}

关于子弹位置的初始化不是直接在飞机的x,y位置下进行发射,因为飞机图片由长度宽度,对象坐标点并不在图片中心,所以需要调整使得子弹在我们需要的位置射出。

3.敌方普通飞机EnemyPlane1

#ifndef ENEMYPLANE1_H
#define ENEMYPLANE1_H
#include 
#include 
#include 
class EnemyPlane1
{
public:
    Bomb bomb;					//飞机爆炸效果
    EnemyPlane1();			
    int x;
    int y;
    int speed;					//飞机运动速度
    bool isFree;				//飞机是否在游戏界面中(空闲)
    bool isDestroyed;			//飞机是否被摧毁
    QPixmap enemy1;				//普通飞机图片
    int recored;				//射击时间间隔标志
    Bullet enemy1Bullet[30]; 	//子弹数组
    void shoot();				//射击函数
    void updatePosition();		//位置更新函数
};

#endif // ENEMYPLANE1_H

普通敌机类的设计基本思路跟我方飞机大致相同,但是我方飞机的移动是由玩家操控,而敌方飞机是自己运动,所以需要设置updatePosition函数,同时由于设计关卡的原因,飞机被摧毁后不可再生并且需要产生爆炸效果,所以添加了isDerstroyed标志判断是否被摧毁。

类的具体实现如下:

#include "enemyplane1.h"

EnemyPlane1::EnemyPlane1()
{
    enemy1.load(":/image/images/enemyplane.png");
    x = 0;
    y = 0;
    isFree = true;
    isDestroyed = false;
    speed = 1.5;
    recored = 0;
}

void EnemyPlane1::updatePosition(){ 	//敌方飞机运动函数
    if(isFree)					//如果为空闲飞机直接返回
        return;
    y+=speed;					//否则向下运动
    if(y>600)
        isDestroyed = true;		//超出游戏界面设为摧毁
}

void EnemyPlane1::shoot(){
    recored++;
    if(recored<50)
        return;
    recored = 0;
    for(int i=0;i<30;i++){
        if(enemy1Bullet[i].isFree){
            enemy1Bullet[i].x = x+20;
            enemy1Bullet[i].y = y+40;
            enemy1Bullet[i].isFree = false;
            break;
        }
    }
}

4.敌方Boss飞机EnemyPlane2

#ifndef ENEMYPLANE2_H
#define ENEMYPLANE2_H
#include 
#include 
#include 
class EnemyPlane2
{
public:
    EnemyPlane2();
    Bomb bomb;
    int x;
    int y;
    int speed;
    bool isDestroyed;
    bool isFree;
    int life;						//Boss类飞机的生命值
    QPixmap enemy2;					//Boss类飞机图片
    int recored1;				   //射击时间间隔
    Bullet enemy2Bullet1[30];
    Bullet enemy2Bullet2[30];
    Bullet enemy2Bullet3[30];		//Boss类飞机弹匣
    void shoot();					//射击函数
    void updatePosition();			//位置更新函数
};

Boss类飞机相对于普通飞机而言更复杂,首先是设定了生命值为10,普通飞机的生命值默认为1,即被子弹打中就摧毁,而Boss可以抗十下。其次就在于Boss飞机的射击分为左中右三条线,所以设定了三个弹匣,在子弹类中我设计了三个敌机子弹位置的更新函数。

类的具体实现如下:

#include "enemyplane2.h"
#include 
#include 
EnemyPlane2::EnemyPlane2()
{
    enemy2.load(":/image/images/boss.png");
    x = 0;
    y = 0;
    isFree = true;
    isDestroyed = false;
    speed = 1;
    life = 10;
    recored1 = 0;
}

void EnemyPlane2::updatePosition(){
    if(isFree)
        return;
    y+=speed;
    if(y>600)
        isDestroyed = true;
}

void EnemyPlane2::shoot(){			//Boss飞机射击函数
    recored1++;					
    if(recored1<20)
        return;
    recored1 = 0;
    for(int i=0;i<30;i++){
        if(enemy2Bullet1[i].isFree){
            enemy2Bullet1[i].x = x+30;
            enemy2Bullet1[i].y = y+20;
            enemy2Bullet1[i].isFree = false;
            break;
        }
    }
    for(int i=0;i<30;i++){
        if(enemy2Bullet2[i].isFree){
            enemy2Bullet2[i].x = x+80;
            enemy2Bullet2[i].y = y+20;
            enemy2Bullet2[i].isFree = false;
            break;
        }
    }
    for(int i=0;i<30;i++){
        if(enemy2Bullet3[i].isFree){
            enemy2Bullet3[i].x = x+130;
            enemy2Bullet3[i].y = y+20;
            enemy2Bullet3[i].isFree = false;
            break;
        }
    }
}

Boss飞机的射击函数与其他两个是差不多的,不过Boss飞机有三个弹匣,所以三个弹匣的循环都需要执行一遍。

5.爆炸效果类Bomb

#ifndef BOMB_H
#define BOMB_H
#define BOMB_PATH ":/image/images/bomb-%1.png" //设置图片路径
#include 							  //1%为可代替部分
#include 
#include 
class Bomb
{
public:
    Bomb();
    void updateInfo();				//爆炸图片更新
    int x;
    int y;
    QVector<QPixmap> bombPix;		//爆炸图片数组
    int recored;					//爆炸时间标志
    int index;						//图片下标
    bool isPlayde;					//爆炸效果是否播放过
};
#endif // BOMB_H

实现爆炸效果动画实际上是用的七张图片在短时间内轮流播放而成的,所有爆炸图片存储在向量中,由updateInfo决定播放那张图片,当所有图片都播放完后,改变isPlayde的值(这里有拼写错误,我也是在总结的时候才发现的,所以后面的代码中这里都是isPlayde)。在updateInfo中,会对isPlayde进行判断,如果为false则播放,毕竟飞机只要炸一次就够了。

类的具体实现如下

#include "bomb.h"

Bomb::Bomb()
{
    for(int i=0;i<7;i++){
        QString str = QString(BOMB_PATH).arg(i);
        bombPix.push_back(str);
    }					//初始化将所有图片添加值向量中
    recored = 0;
    index = 0;
    x = 0;
    y = 0;
    isPlayde = false;
}
void Bomb::updateInfo(){		
    recored++;				//设置播放间隔
    if(recored<20)
        return;
    recored = 0;
    index++;				//设置播放图片位置
    if(index>6)
        isPlayde = true;		//全部播放完毕改变状态
}

6.游戏界面设计(Easy)

做完了上述准备工作,我们可以进行游戏界面的设计了,我给这个界面命名为Easy,主要是我设置了几个关卡界面,这是其中之一,以这个为例来进行我们的游戏设计。

#ifndef EASY_H
#define EASY_H

#include 
#include 
#include 
#include 
#include 
#include 
#include 
#include 
#include 
#include 
#define SCORE "Score: %1"		//预定义得分字符串
#define LIFE  "Life:  %1"		//预定义生命值字符串
class Easy : public QWidget
{
    Q_OBJECT
public:
	QLabel life;							
	QLabel score;
	int Score;									
    Plane MyPlane;
    EnemyPlane1 Enemy1[10];						//敌机数组
    EnemyPlane2 Enemy2[2];						//Boss敌机数组
    int EnemyRecored1;							//敌机出场间隔
    int EnemyRecored2;							//Boss出场间隔
    QTimer Timer;								//设置QTimer定时器
    void initial();								//游戏初始化
    void startGame();							//游戏开始
    void updatePositino();						//游戏信息更新函数
    void paintEvent(QPaintEvent *E);			//绘图事件
    void mouseMoveEvent(QMouseEvent *E);		//鼠标移动事件
    void BossShow();							//Boss出场函数
    void EnemyShow();							//敌机出场函数
    void collisionDetetion();					//碰撞检测函数
    int getDistanceBAE(Bullet b,EnemyPlane1 E); //子弹与敌机距离
    int getDistanceBAB(Bullet b,EnemyPlane2 B); //子弹与Boss距离
    int getDistanceBAM(Bullet b,Plane M);		//子弹与我方飞机距离
    int getDistanceEAM(EnemyPlane1 E,Plane M);	//敌机与我方飞机距离
    explicit Easy(QWidget *parent = 0);
    ~Easy();
};
#endif // EASY_H

以上这些是我们在游戏界面设计中可能要用到的函数,当然现在还只是为了实现初级目标,有些东西还可以后续添加,最后四个int型函数检测距离的,实际编写的时候可以删去,这几个函数返回值都是两点之间的距离,但是之后有了一种更直观的判断两个对象是否接触的方法,待会可以再看。以上这些函数我将拆开一个个进行分析。

Easy::Easy(QWidget *parent) :			//构造函数
    QWidget(parent)

{
	//设置属性::当窗口关闭时,窗口对象将被销毁,内存得以释放
    setAttribute(Qt::WA_DeleteOnClose,true);
    //设置游戏界面500宽,600高
    resize(500,600);
	//为游戏窗口设置背景
    setAutoFillBackground(true);
    QPalette pal;
    QPixmap pixmap(":/image/images/background.png");
    pal.setBrush(QPalette::Background, QBrush(pixmap));
    setPalette(pal);
    
    life = new QLabel(this);
    score = new QLabel(this);
    //设定标签样式
    life->setFont(QFont("Algerian",16));
    life->setStyleSheet(
    "QLabel{background:transparent;color:white;}");
    score->setFont(QFont("Algerian",16));
    score->setStyleSheet(
   "QLabel{background:transparent;color:white;}");
    
    initial();
}
void Easy::initial(){			//游戏初始化
     Timer.setInterval(10);		//设置定时器间隔,每10ms刷新一次
     startGame();				//开始游戏
     EnemyRecored1 = 0;			//设置出场间隔初始值
     EnemyRecored2 = 0;
     srand((unsigned int)time(NULL));	//设置随机数种子
}
void Easy::startGame(){
    Timer.start();
    connect(&Timer , &QTimer::timeout,[=](){
        EnemyShow();
        BossShow();
        updatePositino();
        collisionDetetion();
        update();
    }); 	//connect开始计时刷新
}
void Easy::EnemyShow(){				//敌机出场函数
    EnemyRecored1++;
    if(EnemyRecored1<150)
        return;
    EnemyRecored1=0;
    for(int i=0;i<10;i++)
        if(Enemy1[i].isFree&&!Enemy1[i].isDestroyed){
            Enemy1[i].isFree = false;
            Enemy1[i].x = rand()%(500-Enemy1[i].enemy1.width());
            Enemy1[i].y = 0;
            break;
        }
}
void Easy::BossShow(){			//Boss出场函数
    EnemyRecored2++;
    if(EnemyRecored2<500)
        return;
    EnemyRecored2=0;
    for(int i=0;i<2;i++)
        if(Enemy2[i].isFree){
            Enemy2[i].isFree = false;
            Enemy2[i].x = rand()%(500-Enemy2[i].enemy2.width());
            Enemy2[i].y = 0;
            break;
        }
}

这两个的出场函数是不是很眼熟?与飞机发射子弹的shoot函数几乎一模一样,你可以理解为敌机就是游戏界面的子弹,这是游戏界面在发射敌机。不过子弹的生成位置必须在飞机上,而敌机的生成位置必须是x轴上的随机位置,并且由于图片的原因,还要保证生成的敌机不会跑到游戏界面之外。

void Easy::collisionDetetion(){
                                                        //遍历敌机
    for(int i=0;i<10;i++){
        if(!Enemy1[i].isFree){							//如果敌机非空闲
            if(getDistanceEAM(Enemy1[i],MyPlane)<30)	//如果我机与敌机距离小于30
            {   
            	MyPlane.life--;							//我机生命值减一
            	Score+=10;
                Enemy1[i].isDestroyed = true;			//设定敌机被摧毁
            }
            for(int j=0;j<30;j++){                      //遍历我机子弹
                if(MyPlane.myBullet[j].isFree)			//子弹空闲则跳过
                    continue//检测子弹与敌机距离并要求敌机未被摧毁
                if(getDistanceBAE(MyPlane.myBullet[j],Enemy1[i])<30&&!Enemy1[i].isDestroyed){
                    MyPlane.myBullet[j].isFree = true;		//子弹消失,直接设定为空闲状态	
                    Score+=10;
                    Enemy1[i].isDestroyed = true;			//敌机摧毁
                }
            }
        }
	        for(int j=0;j<30;j++){                          //遍历敌机子弹
	            if(Enemy1[i].enemy1Bullet[j].isFree)
	                continue;
	            if(getDistanceBAM(Enemy1[i].enemy1Bullet[j],MyPlane)<30){
	                MyPlane.life--;
	                Enemy1[i].enemy1Bullet[j].isFree = true;
	            }
	        }
    }
                                                            //遍历Boss
    for(int i=0;i<2;i++){
        if(!Enemy2[i].isFree&&!Enemy2[i].isDestroyed){
            for(int j=0;j<30;j++){                          //遍历我机子弹
                if(MyPlane.myBullet[j].isFree)
                    continue;
                if(MyPlane.myBullet[j].x<Enemy2[i].x+Enemy2[i].enemy2.width()&&MyPlane.myBullet[j].x>Enemy2[i].x&&
                   MyPlane.myBullet[j].y<Enemy2[i].y){		//这里的检测碰撞的方法是子弹的x坐标在Boss图片的宽度之间,y坐标小于敌机y
                    Enemy2[i].life--;						//Boss生命值减一
                    MyPlane.myBullet[j].isFree = true;		//我机子弹消失
                    if(Enemy2[i].life<=0){					//当Boss生命值归零时
                        Score+=20;
                        Enemy2[i].isDestroyed = true;		//Boss被摧毁
                    }
                }
            }
        }
        for(int j=0;j<30;j++){											//遍历敌机子弹
            if(Enemy2[i].enemy2Bullet1[j].isFree)						//遍历第一个弹匣
                continue;
            if(getDistanceBAM(Enemy2[i].enemy2Bullet1[j],MyPlane)<30){	//子弹与我机距离小于30
                MyPlane.life--;											//我机生命值减一
                Enemy2[i].enemy2Bullet1[j].isFree = true;
            }
            if(Enemy2[i].enemy2Bullet2[j].isFree)						//遍历第二个弹匣
                continue;
            if(getDistanceBAM(Enemy2[i].enemy2Bullet2[j],MyPlane)<30){
                MyPlane.life--;
                Enemy2[i].enemy2Bullet2[j].isFree = true;
            }
            if(Enemy2[i].enemy2Bullet3[j].isFree)						//遍历第三个弹匣
                continue;
            if(getDistanceBAM(Enemy2[i].enemy2Bullet3[j],MyPlane)<30){
                MyPlane.life--;
                Enemy2[i].enemy2Bullet3[j].isFree = true;
            }
        }
    }
}

之后我们需要编写一个地图更新函数updatePosition来不断刷新游戏中的元素

void Easy::updatePositino(){
    MyPlane.shoot();
    for(int i=0;i<30;i++)
        MyPlane.myBullet[i].updatePosition();
    for(int i=0;i<5;i++)
        MyPlane.BigBullet[i].updatePosition();
                                                            //敌机射击与运动
    for(int i=0;i<10;i++){
        if(!Enemy1[i].isFree&&!Enemy1[i].isDestroyed){
            Enemy1[i].shoot();
            Enemy1[i].updatePosition();
        }
        if(Enemy1[i].isDestroyed&&!Enemy1[i].isFree){
            Enemy1[i].bomb.updateInfo();
        }
        for(int j=0;j<30;j++)
            Enemy1[i].enemy1Bullet[j].EnemyUpdatePosition();
     }
                                                            
    life->setText(QString(LIFE).arg(MyPlane.life));	//随时更新相关信息
    score->setText(QString(SCORE).arg(Score));
                                                            //Boss射击与运动
    for(int i=0;i<2;i++){
        if(!Enemy2[i].isFree&&!Enemy2[i].isDestroyed){
            Enemy2[i].shoot();
            Enemy2[i].updatePosition();
        }
        if(Enemy2[i].isDestroyed&&!Enemy2[i].isFree)
            Enemy2[i].bomb.updateInfo();
        for(int j=0;j<30;j++){
            Enemy2[i].enemy2Bullet1[j].EnemyUpdatePositionLeft();
            Enemy2[i].enemy2Bullet2[j].EnemyUpdatePosition();
            Enemy2[i].enemy2Bullet3[j].EnemyUpdatePositionRight();
        }
    }
}

到这里为止,基本功能都已经实现了,我们接下来就是把游戏中的所有元素在界面中用paintEvent显示出来了。同时使用mouseMoveEvent实现鼠标拖拽飞机移动。

void Easy::paintEvent(QPaintEvent *){
    QPainter painter(this);
                                                                        //我机及其子弹动画
    painter.drawPixmap(MyPlane.x,MyPlane.y,MyPlane.myplane);
    for(int i=0;i<30;i++)
        if(!MyPlane.myBullet[i].isFree)//如果子弹不空闲,画出子弹
            painter.drawPixmap(MyPlane.myBullet[i].x,MyPlane.myBullet[i].y,MyPlane.myBullet[i].bullet);                                                                                                                                       //敌机及其子弹动画
    for(int i=0;i<10;i++){
        if(!Enemy1[i].isFree){		//敌机不空闲
            if(!Enemy1[i].isDestroyed)		//敌机未被摧毁
                painter.drawPixmap(Enemy1[i].x,Enemy1[i].y,Enemy1[i].enemy1);	//画出敌机
            else							//若敌机被摧毁
                if(!Enemy1[i].bomb.isPlayde)	//没有播放过爆炸动画
                    painter.drawPixmap(Enemy1[i].x,Enemy1[i].y,Enemy1[i].bomb.bombPix[Enemy1[i].bomb.index]);	//画出爆炸动画中的图片
        }
        for(int j=0;j<30;j++){		//敌机子弹非空闲,画出子弹
            if(!Enemy1[i].enemy1Bullet[j].isFree)
                painter.drawPixmap(Enemy1[i].enemy1Bullet[j].x,Enemy1[i].enemy1Bullet[j].y,
                                   Enemy1[i].enemy1Bullet[j].EnemyBullet);
        }
    }                                                                     
    for(int i=0;i<2;i++)	//Boos与画图事件与敌机基本相同
        if(!Enemy2[i].isFree){
            if(!Enemy2[i].isDestroyed)
                painter.drawPixmap(Enemy2[i].x,Enemy2[i].y,Enemy2[i].enemy2);
            else
                if(!Enemy2[i].bomb.isPlayde)
                    painter.drawPixmap(Enemy2[i].x+50,Enemy2[i].y,Enemy2[i].bomb.bombPix[Enemy2[i].bomb.index]);
            for(int j=0;j<30;j++){
                if(!Enemy2[i].enemy2Bullet1[j].isFree)
                    painter.drawPixmap(Enemy2[i].enemy2Bullet1[j].x,Enemy2[i].enemy2Bullet1[j].y,
                                       Enemy2[i].enemy2Bullet1[j].EnemyBullet2);
            }
            for(int j=0;j<30;j++){
                if(!Enemy2[i].enemy2Bullet2[j].isFree)
                    painter.drawPixmap(Enemy2[i].enemy2Bullet2[j].x,Enemy2[i].enemy2Bullet2[j].y,
                                       Enemy2[i].enemy2Bullet2[j].EnemyBullet2);
            }
            for(int j=0;j<30;j++){
                if(!Enemy2[i].enemy2Bullet3[j].isFree)
                    painter.drawPixmap(Enemy2[i].enemy2Bullet3[j].x,Enemy2[i].enemy2Bullet3[j].y,
                                       Enemy2[i].enemy2Bullet3[j].EnemyBullet2);
            }
        }
}
void Easy::mouseMoveEvent(QMouseEvent *E){
    int x = E->x()-35;
    int y = E->y()-40;
    if(x>0&&x<415)					//飞机不能出游戏界面
        MyPlane.x = x;
    if(y>0&&y<505)
        MyPlane.y = y;
    update();
}

完成这些之后,飞机大战就已经基本做出来了,我们可以看一下效果图。Qt学习总结——飞机大战小游戏制作_第1张图片
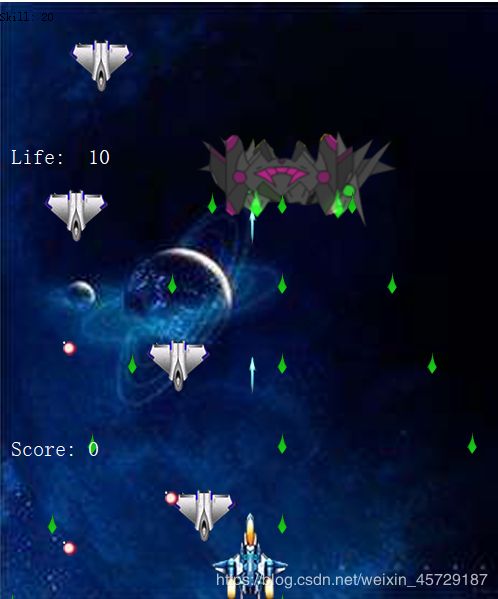
可以看出,我们所需要的基本元素都已经在图中显示出来了,包括我机和子弹,敌机Boss以及子弹,还有生命值和分数,爆炸效果没有在子弹击中效果虽然没有显示,但同样已经实现了,可以自己尝试。

3.添加其他元素

基本操作都已经实现了,现在我们尝试添加一些创新型的内容

1.添加资源包(血包)

这个设计是游戏屏幕中随机掉落血包,如果飞机捡到就可以恢复一点血量,对于资源包,它所具备的性质和子弹或者飞机都是差不多的–从屏幕中随机出现,能和飞机发生碰撞。所以在设计的时候我是直接使用的子弹类来实现资源包的。具体做法如下:
在子弹类的头文件bullet.h中添加一个QPixmap变量

QPixmap lifesupply;

在Bullet的构造函数中添加图片加载

lifesupply.load(":/image/images/lifesupply.png");

在关卡界面Easy.h中添加资源包声明,为子弹数组,并添加资源包的出场函数

Bullet lifesupply[20];
void SupplyShow();

接下来就是像实现敌机一样,来实现资源包的添加。
资源包的出场函数

void Easy::SupplyShow(){
    supplyRecored++;
    if(supplyRecored<200)
        return;
    supplyRecored = 0;
    for(int i=0;i<20;i++)
        if(lifesupply[i].isFree){
            lifesupply[i].isFree = false;
            lifesupply[i].x = rand()%(500-lifesupply[i].lifesupply.width());
            lifesupply[i].y = 0;
            break;
        }
}

将资源包的出场添加到与敌机出场同样的位置

void Easy::startGame(){
    Timer.start();
    connect(&Timer , &QTimer::timeout,[=](){
        EnemyShow();
        BossShow();
        SupplyShow();		//资源出场
        updatePositino();
        collisionDetetion();
        update();
    }); 	//connect开始计时刷新
}

接下来实现资源包的运动,在地图信息更新函数里,添加资源包的运动相关代码

void Easy::updatePosition(){
	......
	for(int i=0;i<20;i++)			//资源运动函数
       lifesupply[i].EnemyUpdatePosition();
	......
}

然后就可以将它画出来了,在paintEvent函数中添加

for(int i=0;i<20;i++)
        if(!lifesupply[i].isFree)
            painter.drawPixmap(lifesupply[i].x,lifesupply[i].y,lifesupply[i].lifesupply);

接下来只要实现资源包和我机发生碰撞的事件就好了,可以参考敌机和我机碰撞函数情况,先对所有资源包进行遍历,判断是否空闲,如果不空闲则判断是否相撞,相撞则生命值回复一点,资源包空闲。

void Easy::colliecollisionDetetion(){
......
for(int i=0;i<20;i++){
        if(!lifesupply[i].isFree)
            if(getDistanceBAM(lifesupply[i],MyPlane)<30){
                if(MyPlane.life==10){
                    lifesupply[i].isFree = true;
                    continue;
                }
                else{
                    lifesupply[i].isFree = true;
                    MyPlane.life++;
                }

            }
    }
......
}

到此为止,资源包功能就完成实现了。

2. 技能的添加

在飞机大战游戏中,我为自己的飞机简单添加了四个技能,Q技能是发射一枚导弹,W是回复一点生命值,E技能是增加攻速,R技能是造成全屏伤害。
既然设计了技能,那么就必须设置技能点,使用技能时消耗技能点,这样防止玩家无限使用技能。所以我们需要像设置生命值一样设置技能值,具体做法可以参考生命栏的设定。
这里需要注意一个地方,在updatePosition函数中,有两个语句设定了生命值和得分的修改`

	life->setText(QString(LIFE).arg(MyPlane.life));	//随时更新相关信息
    score->setText(QString(SCORE).arg(Score));	

技能点的修改使用同样的方法。

接下来设定技能。
使用技能是通过键盘操作的,所以我们需要一个keyEvent函数对键盘操作做出响应。
在关卡Easy的头文件里,添加keyEvent()函数声明。
cpp文件中进行实现

void Easy::keyPressEvent(QKeyEvent *E){
    if(E->key()==Qt::Key_Q){                                    //Q技能
        if(MyPlane.skill>=3)
            for(int i = 0;i<5;i++)
                if(MyPlane.BigBullet[i].isFree){
                    MyPlane.skill-=3;
                    MyPlane.BigBullet[i].x = MyPlane.x+40;
                    MyPlane.BigBullet[i].y = MyPlane.y-10;
                    MyPlane.BigBullet[i].isFree = false;
                    break;
                }
    }
    if(E->key()==Qt::Key_W){                                    //W技能
        if(MyPlane.life==10)
            return;
        else
            if(MyPlane.skill>=3){
                MyPlane.skill-=3;
                MyPlane.life++;
        }
    }
    if(E->key()==Qt::Key_E){                                    //E技能
            if(Epressed){
                Epressed = false;
                MyPlane.interval = 30;
            }
            else{
                Epressed = true;
                if(MyPlane.skill>0)
                    MyPlane.interval = 15;
            }
    }
    if(E->key()==Qt::Key_R)                                      //R技能
        if(MyPlane.skill>=10){
            for(int i=0;i<10;i++){
                if(!Enemy1[i].isFree&&!Enemy1[i].isDestroyed){
                    MyPlane.skill+=1;
                    Score+=10;
                    Enemy1[i].isDestroyed = true;
                }
            }
            for(int i=0;i<2;i++){
                if(!Enemy2[i].isDestroyed&&!Enemy2[i].isFree){
                    MyPlane.skill+=1;
                    Score+=20;
                    Enemy2[i].isDestroyed = true;
                }
            }
            MyPlane.skill-=10;
        }
    update();
}

这段代码中我把四个技能直接添加进来了,接下来我再对每个具体的技能的实现思路进行以下说明。
Q技能,发射一枚导弹。其实所谓导弹与子弹性质是一样的,只不过与敌机碰撞时产生的效果不一样,并且导弹的发射是可控的。所以需要在飞机类中添加成员

Bullet BigBullet[5];

而与普通子弹不同,BigBullet需要通过Q来释放,所以就在上面的代码中,按Q生成一个空闲的BigBullet。
但是,其他地方与普通子弹相同,BigBullet也需要通过paintEvent进行绘图,需要在updatePosition中进行运动的更新,以及colliecollisionDetetion中添加BigBullet与敌机发生碰撞时的事件,这些代码可以参考普通子弹,在这就不一一赘述了。

W技能,回复血量,技能值减少。这个技能实现比较简单,就不做说明了。

E技能是改变子弹的发射速度,也就是改变子弹的发射间隔,所以在之前我将子弹的发射间隔设置为一个变量interval。当我们按下E时,interval的值也会随之改变。但是,E技能是个状态类技能,所以有开有关,我们需要设置一个标志判断E技能处于何种状态,interval该怎么改变,在上面代码中,设置的标志就是Epressed,初始值为false。
而E技能同样需要消耗技能值,这个技能值的减少方式我设置的是随时间减少,所以在飞机的shoot函数中,需要根据interval判定是否需要减少技能值,当技能值为0的时候,即使处于增加攻速的状态,也应该改变为原来的攻速。
所以我们将Plane中的shoot()函数做如下修改:

void Plane::shoot(){
    recored++;
    if(recored<interval)
        return;
    if(interval==15)
        skill-=0.1;
    if(skill==0)
        interval = 30;
    recored = 0;
    for(int i = 0;i<30;i++){
        if(myBullet[i].isFree){
            myBullet[i].x = x+40;
            myBullet[i].y = y-10;
            myBullet[i].isFree = false;
            break;
        }
    }
}

R技能时造成清屏伤害,也就是让场中的飞机全部变为isDestroyed状态,所以代码也比较简单,直接修改敌机状态并增加分数。

考虑到技能点用完可能难以通关,为了增加游戏平衡性,我在每次飞机被摧毁时都添加了一行增加技能点的代码。

MyPlane.skill+=1;//每次敌机摧毁技能点加一

3.增加其他关卡

添加关卡是比较机械的一个事情,调整关卡的难度就是改变敌机的出场频率和敌机的数量,在做这件事情的时候有点后悔最开始没有把这些参数用宏定义,这样修改参数的时候就不用到处找,也不用担心漏掉一些地方没改。

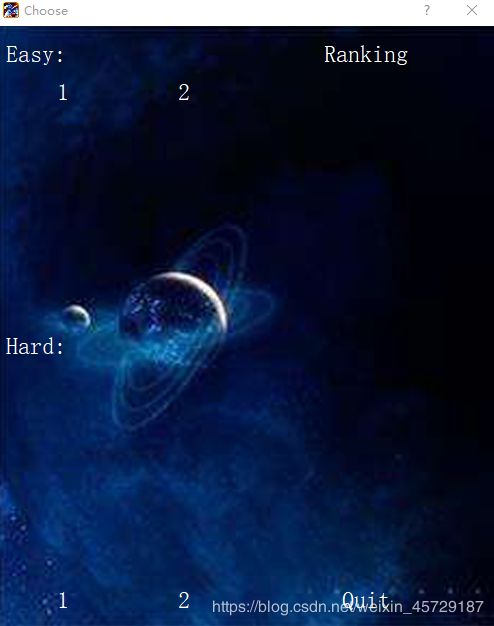
多添加几个相似的类之后,再添加一个QWidget窗口作为关卡选择界面,并添加按钮,通过按钮打开不同的游戏界面,我的关卡选择界效果如下:
Qt学习总结——飞机大战小游戏制作_第2张图片
这个排版有点丑,1,2都是按钮,点击后打开一个游戏窗口,右上角的Ranking是排行榜按钮,关卡选择界面的代码如下:

#ifndef CHOOSE_H
#define CHOOSE_H
#include 
#include 
#include 
#include "widget.h"
#include "easy.h"
#include "easy2.h"
#include "hard.h"
#include "hard2.h"
#include 
#define BOMB_SOUND ":/image/images/bomb.wav"
class Choose: public QDialog
{
public:
    Choose();
    QPushButton* RankButton;
    QPushButton* easy2;
    QPushButton* easy;
    QPushButton* hard;
    QPushButton* hard2;
    QLabel *label1;
    QLabel *label2;
    QPushButton *Quit;
    ~Choose();
public slots:
    void easyClicked();
    void easy2Clicked();
    void hardClicked();
    void hard2Clicked();
    void RankClicked();
    void QuitClicked();
};

#endif // CHOOSE_H

#include "choose.h"
#include 
#include 
#include 
Choose::Choose()
{
    setAttribute(Qt::WA_DeleteOnClose,true);
    resize(500,600);
    setWindowTitle("Choose");
    easy = new QPushButton("1");
    hard = new QPushButton("1");
    easy2 = new QPushButton("2");
    hard2 = new QPushButton("2");
    RankButton = new QPushButton("Ranking");
    Quit = new QPushButton("Quit");

    Quit->setFont(QFont("Algerian",18));
    Quit->setStyleSheet("QPushButton{background: transparent; color:white; }"
                                "QPushButton:hover{color:red;}");

    RankButton->setFont(QFont("Algerian",18));
    RankButton->setStyleSheet("QPushButton{background: transparent; color:white; }"
                                "QPushButton:hover{color:red;}");
    easy->setFont(QFont("Algerian",18));
    easy->setStyleSheet("QPushButton{background: transparent; color:white; }"
                                "QPushButton:hover{color:red;}");  
    easy2->setFont(QFont("Algerian",18));
    easy2->setStyleSheet("QPushButton{background: transparent; color:white; }"
                                "QPushButton:hover{color:red;}");
    hard->setFont(QFont("Algerian",18));
    hard->setStyleSheet("QPushButton{background: transparent; color:white; }"
                                "QPushButton:hover{color:red;}");
    hard2->setFont(QFont("Algerian",18));
    hard2->setStyleSheet("QPushButton{background: transparent; color:white; }"
                                "QPushButton:hover{color:red;}");
    label1 = new QLabel(this);
    label2 = new QLabel(this);

    label1->setFont(QFont("Algerian",18));
    label1->setStyleSheet("QLabel{background: transparent; color:white; }"
                                );
    label2->setFont(QFont("Algerian",18));
    label2->setStyleSheet("QLabel{background: transparent; color:white; }"
                                );

    label1->setText("Easy:");
    label2->setText("Hard:");

    Recored = new QPushButton("Recored");
    Recored->setGeometry(20,20,450,100);
    QHBoxLayout* lay1 = new QHBoxLayout;
    lay1->addWidget(easy);
    lay1->addWidget(easy2);

    QHBoxLayout* lay2 = new QHBoxLayout;
    lay2->addWidget(hard);
    lay2->addWidget(hard2);

    QGridLayout *mainlay = new QGridLayout;
    mainlay->addWidget(label1,0,0);
    mainlay->addWidget(RankButton,0,1);
    mainlay->addLayout(lay1,1,0);
    mainlay->addWidget(label2,2,0);
    mainlay->addLayout(lay2,3,0);
    mainlay->addWidget(Quit,3,1);

    setLayout(mainlay);

    setAutoFillBackground(true);
    QPalette pal;
    QPixmap pixmap(":/image/images/background.png");
    pal.setBrush(QPalette::Background, QBrush(pixmap));;
    setPalette(pal);


    connect(easy,&QPushButton::clicked,this,&Choose::easyClicked);
    connect(hard,&QPushButton::clicked,this,&Choose::hardClicked);
    connect(easy2,&QPushButton::clicked,this,&Choose::easy2Clicked);
    connect(hard2,&QPushButton::clicked,this,&Choose::hard2Clicked);
    connect(RankButton,&QPushButton::clicked,this,&Choose::RankClicked);
    connect(Quit,&QPushButton::clicked,this,&Choose::QuitClicked);
}

void Choose::easyClicked(){
    Easy *e = new Easy;
    e->show();
    this->close();
}


void Choose::easy2Clicked(){
    Easy2 *e = new Easy2;
    e->show();
    this->close();
}

void Choose::hardClicked(){
    Hard *h = new Hard;
    h->show();
    this->close();
}

void Choose::hard2Clicked(){
    Hard2 *h = new Hard2;
    h->show();
    this->close();
}

void Choose::RankClicked(){
    Ranking *r = new Ranking;
    r->show();
    this->close();
}

void Choose::QuitClicked(){
    this->close();
}

Choose::~Choose(){
}

4.排行榜系统

先看一下排行榜的效果
Qt学习总结——飞机大战小游戏制作_第3张图片

排行榜有很多种方式进行实现,但是我们老师要求我们使用到数据库,所以我才不得已用的数据库来存储数据,如果没有特殊要求,使用本地文件存储数据也是可以的。这里使用的数据库是Qt自带的SQLite

排行榜的基本实现思路如下:在头文件中定义QSqlDatabase database;,之后建表都是关联这个datebase。在构造函数中,关联数据库并打开,新建一个表并初始化所有的值为0,再设定一个updateRanking函数用于更新排行榜中的数据,updateRanking是在游戏通关时才调用。
而updateRanking中,需要先连接表,再根据接收到的参数决定将分数插到哪个位置,排行榜的排序是通过插入实现的,我的方法是先将指定关卡的那一列数据拿出来存到一个数组中,再将新的数据插入到数组中,最后将这个数组中的数据出插入到表中。

直接上代码:

#ifndef RANKING_H
#define RANKING_H

#include 
#include 
#include 
#include 
#include 
#include 
#include 
#include 
class Ranking : public QWidget
{
    Q_OBJECT

public:
    QSqlDatabase database;
    QLabel* Label1;
    QLabel* Label2;
    QLabel* Label3;
    QLabel* Label4;
    QLabel* Label5;
    QLabel* Label6;
    QPushButton* Return;
    explicit Ranking(QWidget *parent = 0);
    void updateRanking(QString s,int Score);
    ~Ranking();
public slots:
    void ReturnClicked();
};

#endif // RANKING_H

我的代码中标签的命名有点问题,太简单并且看不出作用,当时就是图个方便(千万不要学我)

#include "ranking.h"
#include 
#include 
#include 
#include 
#include 
Ranking::Ranking(QWidget *parent) :
    QWidget(parent)
{
    setAutoFillBackground(true);
    QPalette pal;
    QPixmap pixmap(":/image/images/background.png");
    pal.setBrush(QPalette::Background, QBrush(pixmap));;
    setPalette(pal);

    QString string[5];

    Return = new QPushButton("Return");
    Return->setFont(QFont("Algerian",16));
    Return->setStyleSheet("QLabel{background:transparent;color:white;}");

    Label1 = new QLabel(this);
    Label1->setText("Ranking    Easy1   Easy2   Hard1   Hard2");
    Label1->setFont(QFont("Algerian",16));
    Label1->setStyleSheet("QLabel{background:transparent;color:white;}");

    Label2 = new QLabel(this);
    Label2->setFont(QFont("Algerian",16));
    Label2->setStyleSheet("QLabel{background:transparent;color:white;}");

    Label3 = new QLabel(this);
    Label3->setFont(QFont("Algerian",16));
    Label3->setStyleSheet("QLabel{background:transparent;color:white;}");

    Label4 = new QLabel(this);
    Label4->setFont(QFont("Algerian",16));
    Label4->setStyleSheet("QLabel{background:transparent;color:white;}");

    Label5 = new QLabel(this);
    Label5->setFont(QFont("Algerian",16));
    Label5->setStyleSheet("QLabel{background:transparent;color:white;}");

    Label6 = new QLabel(this);
    Label6->setFont(QFont("Algerian",16));
    Label6->setStyleSheet("QLabel{background:transparent;color:white;}");

    if(QSqlDatabase::contains("qt_sql_default_connection"))
        database = QSqlDatabase::database("qt_sql_default_connection");
    else{
        database = QSqlDatabase::addDatabase("QSQLITE");
        database.setDatabaseName("Rank.db");
    }
    if (!database.open())
        qDebug() << "Error: Failed to connect database." << database.lastError();
    else{
        QSqlQuery sql_query(database);
        QString create_sql = "create table Score (Ranking int primary key, Easy1 int, Easy2 int, Hard1 int, Hard2 int)";
        sql_query.prepare(create_sql);
        if(!sql_query.exec())
            qDebug() << "Error: Fail to create table." << sql_query.lastError();
        else
            qDebug() << "Table created!";
        sql_query.exec("INSERT INTO Score VALUES(1, 0, 0, 0, 0)");
        sql_query.exec("INSERT INTO Score VALUES(2, 0, 0, 0, 0)");
        sql_query.exec("INSERT INTO Score VALUES(3, 0, 0, 0, 0)");
        sql_query.exec("INSERT INTO Score VALUES(4, 0, 0, 0, 0)");
        sql_query.exec("INSERT INTO Score VALUES(5, 0, 0, 0, 0)");
        QString select_all_sql = "select * from Score";
        sql_query.prepare(select_all_sql);
        if(!sql_query.exec())
        {
            qDebug()<<sql_query.lastError();
        }
        else
        {
            for(int i=0;sql_query.next();i++)
            {
                int Rank = sql_query.value(0).toInt();
                int Easy1 = sql_query.value(1).toInt();
                int Easy2 = sql_query.value(2).toInt();
                int Hard1 = sql_query.value(3).toInt();
                int Hard2 = sql_query.value(4).toInt();
                string[i]=QString("%1           %2      %3      %4      %5").arg(Rank).arg(Easy1).arg(Easy2).arg(Hard1).arg(Hard2);
            }
        }
        Label2->setText(string[0]);
        Label3->setText(string[1]);
        Label4->setText(string[2]);
        Label5->setText(string[3]);
        Label6->setText(string[4]);
        QVBoxLayout *lay = new QVBoxLayout;
        lay->addWidget(Label1);
        lay->addWidget(Label2);
        lay->addWidget(Label3);
        lay->addWidget(Label4);
        lay->addWidget(Label5);
        lay->addWidget(Label6);
        lay->addWidget(Return);

        setLayout(lay);
    }

    connect(Return,&QPushButton::clicked,this,&Ranking::ReturnClicked);
}


void Ranking::ReturnClicked(){
    Choose *c = new Choose;
    c->show();
    this->close();
}


Ranking::~Ranking()
{
}

void Ranking::updateRanking(QString s, int Score){
    if(QSqlDatabase::contains("qt_sql_default_connection"))
        database = QSqlDatabase::database("qt_sql_default_connection");
    else{
        database = QSqlDatabase::addDatabase("QSQLITE");
        database.setDatabaseName("Rank.db");
    }
    if (!database.open())
        qDebug() << "Error: Failed to connect database." << database.lastError();
    else{
        QSqlQuery sql_query(database);	//建表
        if(s=="Easy1"){
            int rank;
            int scores[5];
            for(int i=0;i<5;i++)
                scores[i]=0;
            QString select_sql = "select Ranking, Easy1 from Score";//查询表中数据
            if(!sql_query.exec(select_sql))
            {
                qDebug()<<sql_query.lastError();
            }
            else{
                while(sql_query.next()){
                    rank = sql_query.value(0).toInt();
                    scores[rank-1] = sql_query.value(1).toInt();
                }
            }
            for(int i=0;i<5;i++){
                if(scores[i]>=Score)
                    continue;
                else{
                    for(int j=4;j>i;j--)
                        scores[j] = scores[j-1];
                    scores[i] = Score;
                    break;
                }
            }
            for(int i=0;i<5;i++){
                QString update_sql = "update Score set Easy1 = :Easy1 where Ranking = :Ranking";	//将数据插入表中
                sql_query.prepare(update_sql);
                sql_query.bindValue(":Easy1", scores[i]);
                sql_query.bindValue(":Ranking", i+1);
                if(!sql_query.exec())
                {
                    qDebug() << sql_query.lastError();
                }
                else
                {
                    qDebug() << "updated!";
                }
            }
        }
       if(s=="Easy")
       ......
    }
}

4.游戏优化

游戏中有关卡的选择,那么就需要有通关界面和失败界面,在排行榜中有提到,只有通过关卡时才会将分数存入排行榜中。设计通关和失败,就需要对通关或者失败的条件做出判定。如果我方飞机生命值小于等于0,则判定为失败;当所有飞机出场且被摧毁时,则判定通关。
关于通关与否的判定应该设计在关卡中,而通关界面与失败界面需要在项目中添加两个新的类:endGame和winGame,具体代码就不贴了,无非就是几个功能按钮。
在游戏关卡类中,我添加了两个函数来调用这两个类

void Easy::endGame(){
    if(MyPlane.life==0&&!MyPlane.isPlayed){
        MyPlane.isPlayed = true;
        EndGame *e = new EndGame(Score);
        e->show();
        this->close();
    }
}
void Easy::GameWin(){
    if(win){
        if(MyPlane.life>0)
            if(!MyPlane.isPlayed){
	            winPlayed = true;
	            WinGame *w = new WinGame(Score,2);
	            w->show();
	            Ranking *r = new Ranking;
	            r->updateRanking("Easy1",Score);
	            this->close();
       }
    }
}

GameWin函数中,除了生成一个界面,同时需要将关卡信息和分数传递到排行榜类中,供记录数据。而其中的win标志表示游戏是否通关,在构造函数中初始化win为false,在碰撞检测函数的最后一部分中添加改变win值得代码。

void Easy::collisionDetetion(){
	......
	for(int i=0;i<10;i++)
        if(!Enemy1[i].isDestroyed)
            return;
    for(int i=0;i<2;i++)
        if(!Enemy2[i].isDestroyed)
            return;
    win = true;
}

同样的,这两个函数应该时刻处于检测状态,所以将其放到startGame的connect中。

除了这些,我还添加了游戏初始界面,其中有三个按钮:开始游戏,游戏帮助和退出游戏,点击开始游戏即进入关卡选择界面;并且为游戏添加了开场动画,代码比较简单
游戏初始界面代码:

#include "widget.h"
#include 
#include 
#include 
#include 
Widget::Widget(QWidget *parent)
    : QWidget(parent)
{
    resize(500,600);
    startGame = new QPushButton("Start Game");
    startGame->setFont(QFont("Algerian",18));
    startGame->setStyleSheet("QPushButton{background: transparent; color:white; }"
                                "QPushButton:hover{color:red;}");

    Help = new QPushButton("Help");
    Help->setFont(QFont("Algerian",18));
    Help->setStyleSheet("QPushButton{background: transparent; color:white; }"
                                "QPushButton:hover{color:red;}");

    quit = new QPushButton("Quit");
    quit->setFont(QFont("Algerian",18));
    quit->setStyleSheet("QPushButton{background: transparent; color:white; }"
                                "QPushButton:hover{color:red;}");

    label = new QLabel(this);
    label->setText("Plane Wars");
    label->setFont(QFont("Algerian",18));
    label->setStyleSheet("QLabel{background:transparent;color:white;}");

    QVBoxLayout* lay = new QVBoxLayout;
    lay->addWidget(label);
    lay->addWidget(startGame);
    lay->addWidget(Help);
    lay->addWidget(quit);
    setLayout(lay);

    setAutoFillBackground(true);
    QPalette pal;
    QPixmap pixmap(":/image/images/background.png");
    pal.setBrush(QPalette::Background, QBrush(pixmap));;
    setPalette(pal);

    connect(startGame,&QPushButton::clicked,this,&Widget::startClick);
    connect(quit,&QPushButton::clicked,this,&Widget::quitClick);
    connect(Help,&QPushButton::clicked,this,&Widget::HelpClick);

}

Widget::~Widget()
{

}

void Widget::startClick(){
    Choose *ch = new Choose();
    ch->show();
    this->close();
}
void Widget::quitClick(){
    this->close();
}

void Widget::HelpClick(){
    HelpWidget *h = new HelpWidget;
    h->show();
}

效果图:
Qt学习总结——飞机大战小游戏制作_第4张图片

//主函数
#include "widget.h"
#include 
#include 
#include 
int main(int argc, char *argv[])
{
    QApplication a(argc, argv);
	//添加游戏开场动画
    QSplashScreen *Splash = new QSplashScreen;
    Splash->setPixmap(QPixmap(":/image/images/welcome.png"));
    Splash->show();
    for(int i=0;i<3000;i++)
        Splash->repaint();
    Widget w;
    w.show();
    return a.exec();
}

改变应用程序图标得方法是将ico文件放到和代码同一目录,然后在项目的pro文件中添加

RC_ICONS = warofplanesicon.ico

=后面的即ico文件名称。

到这里我的项目就已经全部完成了,完整的代码以及图片资源在这:
飞机大战项目完整代码及资源

你可能感兴趣的:(qt,游戏,c++)