Spring Boot知识点总结
Spring Boot
一、Spring Boot简介
Spring Boot 是由 Pivotal 团队提供的全新框架。Spring Boot 是所有基于 Spring Framework 5.0 开发的项目的起点。Spring Boot 的设计是为了让你尽可能快的跑起来 Spring 应用程序并且尽可能减少你的配置文件。
设计目的:用来简化新 Spring 应用的初始搭建以及开发过程。
发现pom.xml中多了
        org.springframework.boot
        spring-boot-starter-parent
        2.2.0.RELEASE
有了这个,当前的项目才是 Spring Boot 项目,spring-boot-starter-parent 是一个特殊的 starter ,它用来提供相关的 Maven 默认依赖,使用它之后,常用的包依赖就可以省去 version 标签。(必须,该parent包含了大量默认的配置,大大简化了我们的开发。)
关于具体 Spring Boot 提供了哪些 jar 包的依赖,我们可以查看本地 Maven 仓库下:\repository\org\springframework\boot\spring-boot-dependencies\2.1.0.RELEASE\spring-boot-dependencies-2.1.0.RELEASE.pom 文件来查看,挺长的…
从jdk1.5支持注解以来开始,Spring boot 渐渐开始推荐使用Java配置方式来取代xml配置,
到Spring4.x,java配置方式已经可以完全替代xml配置
二、初识注解
核心注解@Configuration和 @Bean
Spring的Java配置方式是通过 @Configuration 和 @Bean 这两个注解实现的:
1、@Configuration 作用于类上,使用该注解的类相当于一个xml配置文件;
2、@Bean 作用于方法上,使用该注解的方法相当于xml配置中的;
@Configuration //通过该注解来表明该类是一个Spring的配置,相当于一个xml文件
@ComponentScan(basePackages = "com.xxx.xxx") //配置扫描包
public class SpringConfig {

    @Bean // 通过该注解来表明是一个Bean对象,相当于xml中的
    public UserDAO getUserDAO(){
        return new UserDAO(); // 直接new对象做演示,对象被注入到ioc容器中
    }
}
通过@PropertySource可以指定读取的配置文件,通过@Value注解获取值,具体用法:
@PropertySource(value = { "classpath:database.properties" })
多个注解用,号隔开例如:
@PropertySource(value={"classpath:database.properties", "classpath:database.properties"})
如果没有找到配置文件会怎样?
可通过这个参数忽略没有找到的配置文件
@PropertySource(value = { "classpath:database.properties" },ignoreResourceNotFound = true)
配置数据源:
@Value(value = "jdbc.mysql.url")
	private String jdbcUrl;
	@Value("${jdbc.mysql.driver}")
	private String jdbcDriver;
	@Value(value = "jdbc.mysql.username")
	private String jdbcUserName;
	@Value("${jdbc.mysql.password}")
	private String jdbcPassword;

	@Bean // 配置数据源(bean的名字会默认是方法名,可通过name属性设置)
	public DataSource dataSource() {
		BoneCPDataSource dataSource = new BoneCPDataSource();
		dataSource.setJdbcUrl(jdbcUrl);
		dataSource.setDriverClass(jdbcDriver);
		dataSource.setUsername(jdbcUserName);
		dataSource.setPassword(jdbcUserName);
		return dataSource;
	}
代码说明:
1、@SpringBootApplication:Spring Boot项目的核心注解,主要目的是开启自动配置。;
2、@Configuration:这是一个配置Spring的配置类;
3、@Controller:标明这是一个SpringMVC的Controller控制器;
4、main方法:在main方法中启动一个应用,即:这个应用的入口;
三、开始Spring Boot的学习
3.1 Spring Boot搭建
3.1.1、设置spring boot的parent
		org.springframework.boot
		spring-boot-starter-parent
		1.5.2.RELEASE
说明:Spring boot的项目必须要将parent设置为spring boot的parent,该parent包含了大量默认的配置,大大简化了我们的开发。
3.1.2、导入spring boot的web支持
	org.springframework.boot
	spring-boot-starter-web
3.1.3、添加Spring boot的插件
	org.springframework.boot
	spring-boot-maven-plugin
3.1.4、编写第一个Spring Boot的应用
@Controller
@SpringBootApplication
@Configuration
public class HelloApplication {
    @RequestMapping("hello")
    @ResponseBody
    public String hello(){
        return "hello world!";
    }
    public static void main(String[] args) {
        SpringApplication.run(HelloApplication.class, args);
    }
}
- 2、入口类和@SpringBootApplication
Spring Boot的项目一般都会有*Application的入口类,入口类中会有main方法,这是一个标准的Java应用程序的入口方法。
@SpringBootApplication注解是Spring Boot的核心注解,它其实是一个组合注解:
@Target(ElementType.TYPE)
@Retention(RetentionPolicy.RUNTIME)
@Documented
@Inherited
@SpringBootConfiguration
@EnableAutoConfiguration
@ComponentScan(excludeFilters = { @Filter(type = FilterType.CUSTOM, classes = TypeExcludeFilter.class),
		@Filter(type = FilterType.CUSTOM, classes = AutoConfigurationExcludeFilter.class) })
@ConfigurationPropertiesScan
public @interface SpringBootApplication
对上面注解的介绍:
a、@SpringBootConfiguration注解(该注解也是个组合注解)
@Target(ElementType.TYPE)
@Retention(RetentionPolicy.RUNTIME)
@Documented
@Configuration(proxyBeanMethods = false)
public @interface SpringBootConfiguration
推荐使用该注解替代@Configuration注解
b、@EnableAutoConfiguration:启动注解该注解会使Spring Boot根据项目中依赖的jar包自动配置项目的配置项:
c、@ComponentScan:默认扫描@SpringBootApplication所在类的同级目录以及它的子目录。
3.3、关闭自动配置
Spring boot会根据项目中的jar包依赖,自动做出配置,Spring boot支持的自动配置在
spring-boot-autoconfigure-2.2.0.RELEASE.jar下可查看(非常多)
如果我们不需要Spring Boot自动配置,想要关闭某一项自动配置,该如何设置呢?
比如:不想自动配置redis,想手动配置。
只需要在启动类上的@SpringBootApplication注解加上属性
exclude = {RedisAutoConfiguration.class}即可
3.4、自定义banner
- 拷贝生成的字符到一个文本文件中,并且将该文件命名为banner.txt
- 将banner.txt拷贝到项目的resources目录中:
如果不想看到任何的banner,也是可以将其关闭的:
public static void main(String[] args) {
		SpringApplication app = new SpringApplication(HelloApplication.class);
		app.setBannerMode(Banner.Mode.OFF);
		app.run(args);
		/* SpringApplication.run(HelloApplication.class, args); */
}
3.5、全局配置文件
Spring Boot项目使用一个全局的配置文件application.properties或者是application.yml,在resources目录下或者类路径下的/config下,一般我们放到resources下。
例如:
1、修改tomcat的端口为9900
server.port=9900
2、修改进入DispatcherServlet的规则为:.html
server.servlet-path=.html
更多的配置:可百度查询文档
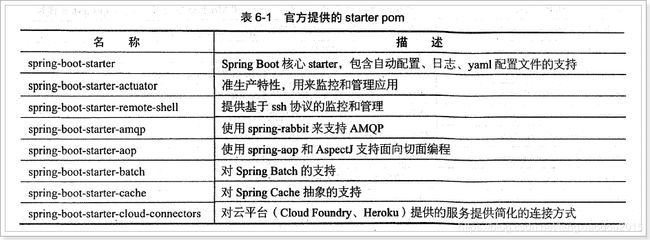
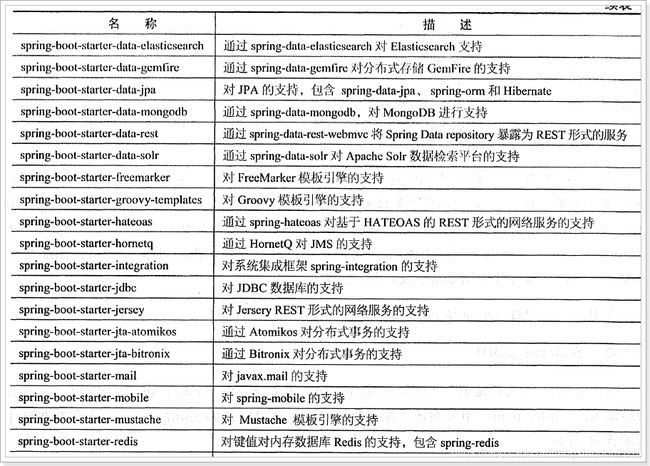
3.6、Starter pom
3.7日志(在全局配置文件配置)
Spring Boot对各种日志框架都做了支持,我们可以通过配置来修改默认的日志的配置:
#设置日志级别
logging.level.org.springframework=DEBUG
格式:
logging.level.*= # Log levels severity mapping. For instance `logging.level.org.springframework=DEBUG`
四、Spring Boot的自动配置的原理
Spring Boot在进行SpringApplication对象实例化时会加载META-INF/spring.factories文件,将该配置文件中的配置载入到Spring容器。
该文件在: pring-boot-2.2.0.RELEASE.jar下META-INF/中
在org.springframework.boot.autoconfigure.web.servlet包中有个类WebMvcAutoConfiguration配置了自动配置WebMvc不同版本可能有所不同,可能在其他包中自行研究。
说明该过滤器不存在时自动创建
@Bean
@ConditionalOnMissingBean(HiddenHttpMethodFilter.class)
@ConditionalOnProperty(prefix = "spring.mvc.hiddenmethod.filter", name = "enabled", matchIfMissing = false)
public OrderedHiddenHttpMethodFilter hiddenHttpMethodFilter() {
	return new OrderedHiddenHttpMethodFilter();
}
配置视图解析器
@Bean
@ConditionalOnMissingBean //默认以方法名为bean的名字
public InternalResourceViewResolver defaultViewResolver() {
InternalResourceViewResolver resolver = new InternalResourceViewResolver();
	resolver.setPrefix(this.mvcProperties.getView().getPrefix());
	resolver.setSuffix(this.mvcProperties.getView().getSuffix());
	return resolver;
}
org.springframework.boot.autoconfigure.web.servlet.WebMvcProperties.class 在该类中定义了一个内部类View
源码如下:
public static class View {
		/**
		 * Spring MVC view prefix.
		 */
		private String prefix;
		/**
		 * Spring MVC view suffix.
		 */
		private String suffix;
		public String getPrefix() {
			return this.prefix;
		}
		public void setPrefix(String prefix) {
			this.prefix = prefix;
		}
		public String getSuffix() {
			return this.suffix;
		}
		public void setSuffix(String suffix) {
			this.suffix = suffix;
		}
	}
并没有给默认值,可在全局配置中配置
spring.mvc.view.prefix= # Spring MVC view prefix.
spring.mvc.view.suffix= # Spring MVC view suffix.
4.1、静态资源配置
如果进入SpringMVC的规则为/时,Spring Boot的默认静态资源的路径为:
spring.resources.static-locations=classpath:/META-INF/resources/,classpath:/resources/,classpath:/static/,classpath:/public/
但是不配置也可以直接访问,如果配置了,则根据配置的为准,未配置的目录下的静态资源不可以访问
4.2、自定义消息转化器
以前的配置方式:
                    text/html;charset=UTF-8
                    application/json;charset=UTF-8
现在只需要在被标记为配置文件的类中定义一个方法,并且用@Bean注解标识
也可以加上注解@ConditionalOnMissingBean,标识如果有设置,则不加载成bean
@Bean
public StringHttpMessageConverter stringHttpMessageConverter() {
	StringHttpMessageConverter converter = new StringHttpMessageConverter(Charset.forName("UTF-8"));
		return converter;
}
4.3、自定义Spring mvc拦截器
第一种方式:通过继承WebMvcConfigurerAdapter然后重写父类中的方法进行扩展。(该类已被标记为过时的)
import java.nio.charset.Charset;
import java.util.List;
import javax.servlet.http.HttpServletRequest;
import javax.servlet.http.HttpServletResponse;
import org.springframework.context.annotation.Configuration;
import org.springframework.http.converter.HttpMessageConverter;
import org.springframework.http.converter.StringHttpMessageConverter;
import org.springframework.web.servlet.HandlerInterceptor;
import org.springframework.web.servlet.ModelAndView;
import org.springframework.web.servlet.config.annotation.InterceptorRegistry;
import org.springframework.web.servlet.config.annotation.WebMvcConfigurerAdapter;
@Configuration // 申明这是一个配置
public class MySrpingMVCConfig extends WebMvcConfigurerAdapter {
	// 自定义拦截器
	@Override
	public void addInterceptors(InterceptorRegistry registry) {
		HandlerInterceptor handlerInterceptor = new HandlerInterceptor() {
			@Override
			public boolean preHandle(HttpServletRequest request, HttpServletResponse response, Object handler)
					throws Exception {
				System.out.println("自定义拦截器............");
				return true;
			}
			@Override
			public void postHandle(HttpServletRequest request, HttpServletResponse response, Object handler,
					ModelAndView modelAndView) throws Exception {
			}
			@Override
			public void afterCompletion(HttpServletRequest request, HttpServletResponse response, Object handler,
					Exception ex) throws Exception {
			}
		};
		registry.addInterceptor(handlerInterceptor).addPathPatterns("/**");
	}
	// 自定义消息转化器的第二种方法
	@Override
	public void configureMessageConverters(List> converters) {
		StringHttpMessageConverter converter = new StringHttpMessageConverter(Charset.forName("UTF-8"));
		converters.add(converter);
	}
}
第二种方式:实现HandlerInterceptor接口
@Configuration // 申明这是一个配置
public class TestInterceptor implements HandlerInterceptor {
    //目标方法执行之前
    @Override
    public boolean preHandle(HttpServletRequest request, HttpServletResponse response,
                             Object handler) throws Exception {
        if(true){
            System.out.println("已经进行拦截了。。。。。。。。");
            return false;
        }
        return true;
    }
    @Override
    public void postHandle(HttpServletRequest request, HttpServletResponse response, Object
            handler, ModelAndView modelAndView) throws Exception {
    }
    @Override
    public void afterCompletion(HttpServletRequest request, HttpServletResponse response,
                                Object handler, Exception ex) throws Exception {
    }
}
4.4 Spring boot + mybatis 整合
Mybatis和Spring Boot的整合有两种方式:
第一种:使用mybatis官方提供的Spring Boot整合包实现,地址:https://github.com/mybatis/spring-boot-starter
第二种:使用mybatis-spring整合的方式,也就是我们传统的方式
这里我们推荐使用第二种,因为这样我们可以很方便的控制Mybatis的各种配置。
首先,创建一个Mybatis的配置类:
import javax.sql.DataSource;
import org.mybatis.spring.SqlSessionFactoryBean;
import org.springframework.boot.autoconfigure.condition.ConditionalOnMissingBean;
import org.springframework.context.annotation.Bean;
import org.springframework.context.annotation.Configuration;
import org.springframework.core.io.Resource;
import org.springframework.core.io.support.PathMatchingResourcePatternResolver;
import org.springframework.core.io.support.ResourcePatternResolver;

@Configuration // 申明这是个配置类
public class MyBatisConfig {
	@Bean
	@ConditionalOnMissingBean // 当容器里没有指定的Bean的情况下创建该对象
	public SqlSessionFactoryBean sqlSessionFactory(DataSource dataSource) {
		SqlSessionFactoryBean sqlSessionFactoryBean = new SqlSessionFactoryBean();
		// 设置数据源
		sqlSessionFactoryBean.setDataSource(dataSource);
		// 设置mybatis的主配置文件
		ResourcePatternResolver resolver = new PathMatchingResourcePatternResolver();
		Resource mybatisConfigXml = resolver.getResource("classpath:mybatis/mybatis-config.xml");
		sqlSessionFactoryBean.setConfigLocation(mybatisConfigXml);
		// 设置别名包
		sqlSessionFactoryBean.setTypeAliasesPackage("com.taotao.cart.pojo");
		return sqlSessionFactoryBean;
	}
}
然后,创建Mapper接口的扫描类MapperScannerConfig:
import org.mybatis.spring.mapper.MapperScannerConfigurer;
import org.springframework.boot.autoconfigure.AutoConfigureAfter;
import org.springframework.context.annotation.Bean;
import org.springframework.context.annotation.Configuration;
@Configuration
@AutoConfigureAfter(MyBatisConfig.class) // 保证在MyBatisConfig实例化之后再实例化该类
public class MapperScannerConfig {
	// mapper接口的扫描器
	@Bean
	public MapperScannerConfigurer mapperScannerConfigurer() {
		MapperScannerConfigurer mapperScannerConfigurer = new MapperScannerConfigurer();
		mapperScannerConfigurer.setBasePackage("com.taotao.cart.mapper");
		return mapperScannerConfigurer;
	}
}
4.5、设置事务管理
在Spring Boot中推荐使用@Transactional注解来申明事务。
首先需要导入依赖:
			org.springframework.boot
			spring-boot-starter-jdbc
当引入jdbc依赖之后,Spring Boot会自动默认分别注入DataSourceTransactionManager或JpaTransactionManager,所以我们不需要任何额外配置就可以用@Transactional注解进行事务的使用。
4.6、设置Redis和Spring的整合
在Spring Boot中提供了RedisTempplate的操作,我们暂时不做学习,先按照我们之前的实现来完成。
代码:
import java.util.ArrayList;
import java.util.List;
import org.springframework.beans.factory.annotation.Value;
import org.springframework.context.annotation.Bean;
import org.springframework.context.annotation.Configuration;
import org.springframework.context.annotation.PropertySource;
import redis.clients.jedis.JedisPoolConfig;
import redis.clients.jedis.JedisShardInfo;
import redis.clients.jedis.ShardedJedisPool;

@Configuration
@PropertySource(value = "classpath:redis.properties")
public class RedisSpringConfig {
	@Value("${redis.maxTotal}")
	private Integer redisMaxTotal;

	@Value("${redis.node1.host}")
	private String redisNode1Host;

	@Value("${redis.node1.port}")
	private Integer redisNode1Port;

	private JedisPoolConfig jedisPoolConfig() {
		JedisPoolConfig jedisPoolConfig = new JedisPoolConfig();
		jedisPoolConfig.setMaxTotal(redisMaxTotal);
		return jedisPoolConfig;
	}

	@Bean
	public ShardedJedisPool shardedJedisPool() {
		List jedisShardInfos = new ArrayList();
		jedisShardInfos.add(new JedisShardInfo(redisNode1Host, redisNode1Port));
		return new ShardedJedisPool(jedisPoolConfig(), jedisShardInfos);
	}
}


