Android之对话框AlertDialog源码浅析
一、前述
我们在应用app开发中经常会使用对话框,基本都是使用AlertDialog来构建,使用方式如下:
AlertDialog.Builder builder = new AlertDialog.Builder(this);
builder.setTitle("Title").setMessage("Message").create().show();
用法很简单并且是链式调用,非常美观,接下我们进入源码来分析下AlertDialog的实现原理。
二、AlertDialog源码分析
带着这句代码我们进入AlertDialog类:
AlertDialog.Builder builder = new AlertDialog.Builder(this);会发现AlertDialog有个内部类Build,我们贴出它的代码,代码如下:
public static class Builder {
        private final AlertController.AlertParams P;
        private final int mTheme;

        /**
         * Creates a builder for an alert dialog that uses the default alert
         * dialog theme.
         *
         * The default alert dialog theme is defined by
         * {@link android.R.attr#alertDialogTheme} within the parent
         * {@code context}'s theme.
         *
         * @param context the parent context
         */
        public Builder(@NonNull Context context) {
            this(context, resolveDialogTheme(context, 0));
        }

        /**
         * Creates a builder for an alert dialog that uses an explicit theme
         * resource.
         *
         * The specified theme resource ({@code themeResId}) is applied on top
         * of the parent {@code context}'s theme. It may be specified as a
         * style resource containing a fully-populated theme, such as
         * {@link R.style#Theme_AppCompat_Dialog}, to replace all
         * attributes in the parent {@code context}'s theme including primary
         * and accent colors.
         *
         * To preserve attributes such as primary and accent colors, the
         * {@code themeResId} may instead be specified as an overlay theme such
         * as {@link R.style#ThemeOverlay_AppCompat_Dialog}. This will
         * override only the window attributes necessary to style the alert
         * window as a dialog.
         *
         * Alternatively, the {@code themeResId} may be specified as {@code 0}
         * to use the parent {@code context}'s resolved value for
         * {@link android.R.attr#alertDialogTheme}.
         *
         * @param context the parent context
         * @param themeResId the resource ID of the theme against which to inflate
         *                   this dialog, or {@code 0} to use the parent
         *                   {@code context}'s default alert dialog theme
         */
        public Builder(@NonNull Context context, @StyleRes int themeResId) {
            P = new AlertController.AlertParams(new ContextThemeWrapper(
                    context, resolveDialogTheme(context, themeResId)));
            mTheme = themeResId;
        }

        /**
         * Returns a {@link Context} with the appropriate theme for dialogs created by this Builder.
         * Applications should use this Context for obtaining LayoutInflaters for inflating views
         * that will be used in the resulting dialogs, as it will cause views to be inflated with
         * the correct theme.
         *
         * @return A Context for built Dialogs.
         */
        @NonNull
        public Context getContext() {
            return P.mContext;
        }

        /**
         * Set the title using the given resource id.
         *
         * @return This Builder object to allow for chaining of calls to set methods
         */
        public Builder setTitle(@StringRes int titleId) {
            P.mTitle = P.mContext.getText(titleId);
            return this;
        }

        /**
         * Set the title displayed in the {@link Dialog}.
         *
         * @return This Builder object to allow for chaining of calls to set methods
         */
        public Builder setTitle(@Nullable CharSequence title) {
            P.mTitle = title;
            return this;
        }

        /**
         * Set the title using the custom view {@code customTitleView}.
         *
         * The methods {@link #setTitle(int)} and {@link #setIcon(int)} should
         * be sufficient for most titles, but this is provided if the title
         * needs more customization. Using this will replace the title and icon
         * set via the other methods.
         *
         * Note: To ensure consistent styling, the custom view
         * should be inflated or constructed using the alert dialog's themed
         * context obtained via {@link #getContext()}.
         *
         * @param customTitleView the custom view to use as the title
         * @return this Builder object to allow for chaining of calls to set
         *         methods
         */
        public Builder setCustomTitle(@Nullable View customTitleView) {
            P.mCustomTitleView = customTitleView;
            return this;
        }

        /**
         * Set the message to display using the given resource id.
         *
         * @return This Builder object to allow for chaining of calls to set methods
         */
        public Builder setMessage(@StringRes int messageId) {
            P.mMessage = P.mContext.getText(messageId);
            return this;
        }

        /**
         * Set the message to display.
         *
         * @return This Builder object to allow for chaining of calls to set methods
         */
        public Builder setMessage(@Nullable CharSequence message) {
            P.mMessage = message;
            return this;
        }

        /**
         * Set the resource id of the {@link Drawable} to be used in the title.
         *
         * Takes precedence over values set using {@link #setIcon(Drawable)}.
         *
         * @return This Builder object to allow for chaining of calls to set methods
         */
        public Builder setIcon(@DrawableRes int iconId) {
            P.mIconId = iconId;
            return this;
        }

        ............
        /**
         * Creates an {@link AlertDialog} with the arguments supplied to this
         * builder.
         *
         * Calling this method does not display the dialog. If no additional
         * processing is needed, {@link #show()} may be called instead to both
         * create and display the dialog.
         */
        public AlertDialog create() {
            // We can't use Dialog's 3-arg constructor with the createThemeContextWrapper param,
            // so we always have to re-set the theme
            final AlertDialog dialog = new AlertDialog(P.mContext, mTheme);
            P.apply(dialog.mAlert);
            dialog.setCancelable(P.mCancelable);
            if (P.mCancelable) {
                dialog.setCanceledOnTouchOutside(true);
            }
            dialog.setOnCancelListener(P.mOnCancelListener);
            dialog.setOnDismissListener(P.mOnDismissListener);
            if (P.mOnKeyListener != null) {
                dialog.setOnKeyListener(P.mOnKeyListener);
            }
            return dialog;
        }

        /**
         * Creates an {@link AlertDialog} with the arguments supplied to this
         * builder and immediately displays the dialog.
         *
         * Calling this method is functionally identical to:
         *
         *     AlertDialog dialog = builder.create();
         *     dialog.show();
         *
         */
        public AlertDialog show() {
            final AlertDialog dialog = create();
            dialog.show();
            return dialog;
        }
}public Builder(@NonNull Context context) {
this(context, resolveDialogTheme(context, 0));
}this(context,resolveDialogTheme(context,0))又调用了内部另外一个构造函数:
public Builder(@NonNull Context context, @StyleRes int themeResId) {
            P = new AlertController.AlertParams(new ContextThemeWrapper(
                    context, resolveDialogTheme(context, themeResId)));
            mTheme = themeResId;
        }
从构造函数中,有个变量P,追踪代码一看,它是Builder的一个成员变量,类型是AlertController.AlertParams。AlertParams也是AlertContoller的一个内部类,其代码如下:
public static class AlertParams {
        public final Context mContext;
        public final LayoutInflater mInflater;

        public int mIconId = 0;
        public Drawable mIcon;
        public int mIconAttrId = 0;
        public CharSequence mTitle;
        public View mCustomTitleView;
        public CharSequence mMessage;
        public CharSequence mPositiveButtonText;
        public DialogInterface.OnClickListener mPositiveButtonListener;
        public CharSequence mNegativeButtonText;
        public DialogInterface.OnClickListener mNegativeButtonListener;
        public CharSequence mNeutralButtonText;
        public DialogInterface.OnClickListener mNeutralButtonListener;
        public boolean mCancelable;
        public DialogInterface.OnCancelListener mOnCancelListener;
        public DialogInterface.OnDismissListener mOnDismissListener;
        public DialogInterface.OnKeyListener mOnKeyListener;
        public CharSequence[] mItems;
        public ListAdapter mAdapter;
        public DialogInterface.OnClickListener mOnClickListener;
        public int mViewLayoutResId;
        public View mView;
        public int mViewSpacingLeft;
        public int mViewSpacingTop;
        public int mViewSpacingRight;
        public int mViewSpacingBottom;
        public boolean mViewSpacingSpecified = false;
        public boolean[] mCheckedItems;
        public boolean mIsMultiChoice;
        public boolean mIsSingleChoice;
        public int mCheckedItem = -1;
        public DialogInterface.OnMultiChoiceClickListener mOnCheckboxClickListener;
        public Cursor mCursor;
        public String mLabelColumn;
        public String mIsCheckedColumn;
        public boolean mForceInverseBackground;
        public AdapterView.OnItemSelectedListener mOnItemSelectedListener;
        public OnPrepareListViewListener mOnPrepareListViewListener;
        public boolean mRecycleOnMeasure = true;

        /**
         * Interface definition for a callback to be invoked before the ListView
         * will be bound to an adapter.
         */
        public interface OnPrepareListViewListener {

            /**
             * Called before the ListView is bound to an adapter.
             * @param listView The ListView that will be shown in the dialog.
             */
            void onPrepareListView(ListView listView);
        }

        public AlertParams(Context context) {
            mContext = context;
            mCancelable = true;
            mInflater = (LayoutInflater) context.getSystemService(Context.LAYOUT_INFLATER_SERVICE);
        }

        public void apply(AlertController dialog) {
            if (mCustomTitleView != null) {
                dialog.setCustomTitle(mCustomTitleView);
            } else {
                if (mTitle != null) {
                    dialog.setTitle(mTitle);
                }
                if (mIcon != null) {
                    dialog.setIcon(mIcon);
                }
                if (mIconId != 0) {
                    dialog.setIcon(mIconId);
                }
                if (mIconAttrId != 0) {
                    dialog.setIcon(dialog.getIconAttributeResId(mIconAttrId));
                }
            }
            if (mMessage != null) {
                dialog.setMessage(mMessage);
            }
            if (mPositiveButtonText != null) {
                dialog.setButton(DialogInterface.BUTTON_POSITIVE, mPositiveButtonText,
                        mPositiveButtonListener, null);
            }
            if (mNegativeButtonText != null) {
                dialog.setButton(DialogInterface.BUTTON_NEGATIVE, mNegativeButtonText,
                        mNegativeButtonListener, null);
            }
            if (mNeutralButtonText != null) {
                dialog.setButton(DialogInterface.BUTTON_NEUTRAL, mNeutralButtonText,
                        mNeutralButtonListener, null);
            }
            // For a list, the client can either supply an array of items or an
            // adapter or a cursor
            if ((mItems != null) || (mCursor != null) || (mAdapter != null)) {
                createListView(dialog);
            }
            if (mView != null) {
                if (mViewSpacingSpecified) {
                    dialog.setView(mView, mViewSpacingLeft, mViewSpacingTop, mViewSpacingRight,
                            mViewSpacingBottom);
                } else {
                    dialog.setView(mView);
                }
            } else if (mViewLayoutResId != 0) {
                dialog.setView(mViewLayoutResId);
            }

            /*
            dialog.setCancelable(mCancelable);
            dialog.setOnCancelListener(mOnCancelListener);
            if (mOnKeyListener != null) {
                dialog.setOnKeyListener(mOnKeyListener);
            }
            */
        }

        ............
}我们先回到Builder类的代码,它也有很多方法,诸如:setTitle()、setMessage()、setIcon()等,关键来看它的create()方法:
public AlertDialog create() {
            // We can't use Dialog's 3-arg constructor with the createThemeContextWrapper param,
            // so we always have to re-set the theme
            final AlertDialog dialog = new AlertDialog(P.mContext, mTheme);
            P.apply(dialog.mAlert);
            dialog.setCancelable(P.mCancelable);
            if (P.mCancelable) {
                dialog.setCanceledOnTouchOutside(true);
            }
            dialog.setOnCancelListener(P.mOnCancelListener);
            dialog.setOnDismissListener(P.mOnDismissListener);
            if (P.mOnKeyListener != null) {
                dialog.setOnKeyListener(P.mOnKeyListener);
            }
            return dialog;
}
第4行代码new了一个AlertDialog对象,第5行调用P,也即是AlertController.AlertParams的apply方法,我们继续跟踪:
public void apply(AlertController dialog) {
            if (mCustomTitleView != null) {
                dialog.setCustomTitle(mCustomTitleView);
            } else {
                if (mTitle != null) {
                    dialog.setTitle(mTitle);
                }
                if (mIcon != null) {
                    dialog.setIcon(mIcon);
                }
                if (mIconId != 0) {
                    dialog.setIcon(mIconId);
                }
                if (mIconAttrId != 0) {
                    dialog.setIcon(dialog.getIconAttributeResId(mIconAttrId));
                }
            }
            if (mMessage != null) {
                dialog.setMessage(mMessage);
            }
            if (mPositiveButtonText != null) {
                dialog.setButton(DialogInterface.BUTTON_POSITIVE, mPositiveButtonText,
                        mPositiveButtonListener, null);
            }
            if (mNegativeButtonText != null) {
                dialog.setButton(DialogInterface.BUTTON_NEGATIVE, mNegativeButtonText,
                        mNegativeButtonListener, null);
            }
            if (mNeutralButtonText != null) {
                dialog.setButton(DialogInterface.BUTTON_NEUTRAL, mNeutralButtonText,
                        mNeutralButtonListener, null);
            }
            // For a list, the client can either supply an array of items or an
            // adapter or a cursor
            if ((mItems != null) || (mCursor != null) || (mAdapter != null)) {
                createListView(dialog);
            }
            if (mView != null) {
                if (mViewSpacingSpecified) {
                    dialog.setView(mView, mViewSpacingLeft, mViewSpacingTop, mViewSpacingRight,
                            mViewSpacingBottom);
                } else {
                    dialog.setView(mView);
                }
            } else if (mViewLayoutResId != 0) {
                dialog.setView(mViewLayoutResId);
            }

            /*
            dialog.setCancelable(mCancelable);
            dialog.setOnCancelListener(mOnCancelListener);
            if (mOnKeyListener != null) {
                dialog.setOnKeyListener(mOnKeyListener);
            }
            */
}
AlertController.AlertParams的apply方法主要做的事就是将AlertParams的属性值传给AlertController的对应属性,且AlertParams是AlertController的内部类,我们加到Build类,再看它的show()方法:
public AlertDialog show() {
            final AlertDialog dialog = create();
            dialog.show();
            return dialog;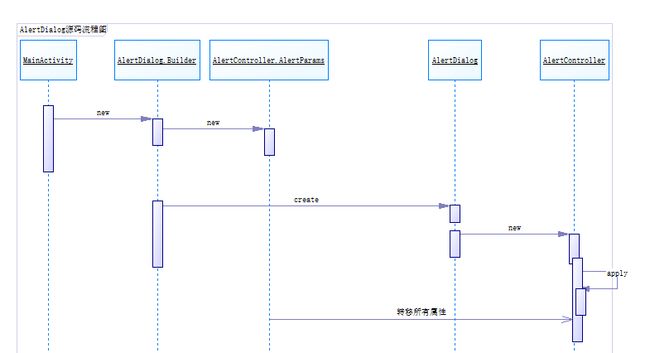
}三、AlertDialog源码UML顺序图
好了,AlertDialog的源码就简单分析完了,感谢大家的支持,谢谢!