SSM整合xml,半注解方式实现网页版crud
SpringMVC-Spring-Mybatis(ssm)
前言:
- 首先声明超级多内容,但是都是干货。
- 中间有些是图片的原因是因为最好看着动手敲敲,真的有帮助的。
- 没有很多写博客的经验,慢慢会好些的,能整合顺下来,能掌握很多东西。
- 加油!共同学习
准备后台的组件:
1.打开IDEA,创建web项目
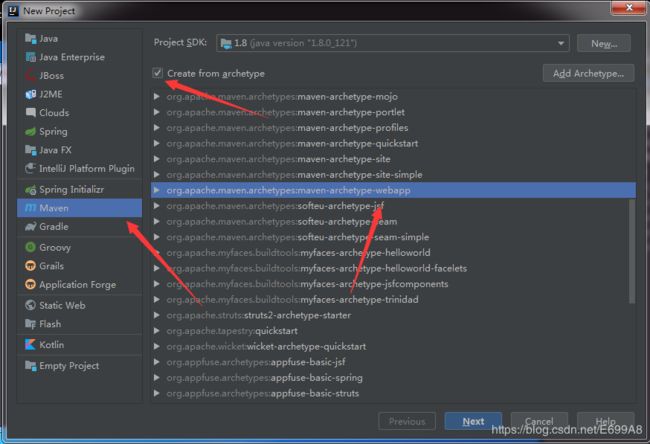
2.名字,这个按照自己需求
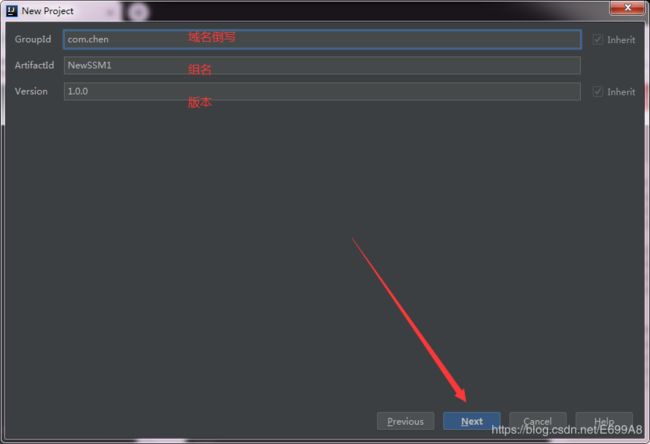
3.下一步
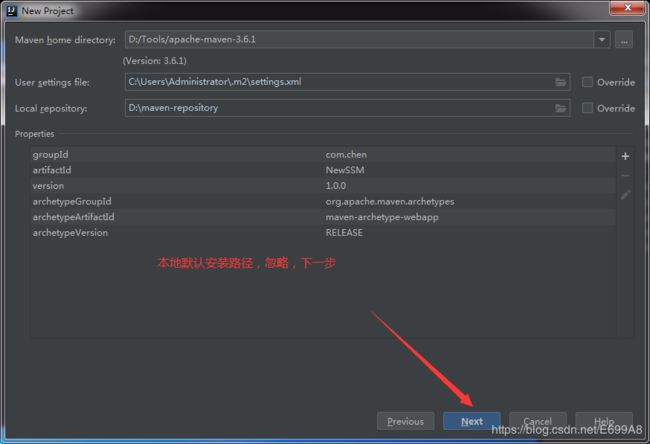
4.完成
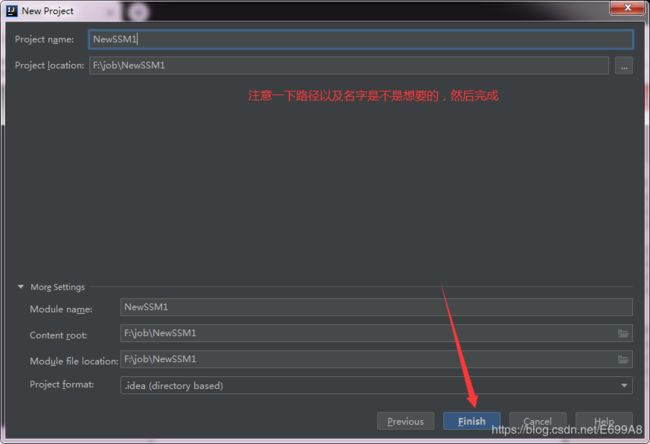
打开会默认配置一些东西,为了容易理解可以先把其它删除掉,如下:
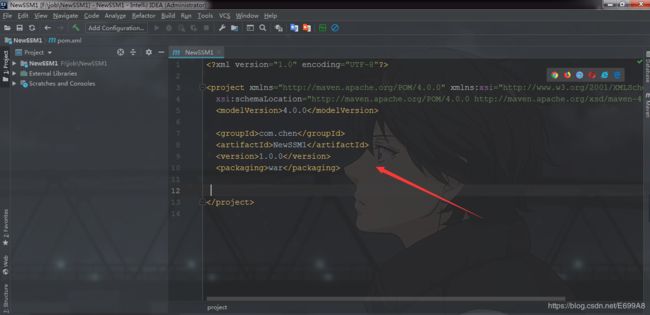
创建后的web项目缺少所需的文件需要我们手动创建:
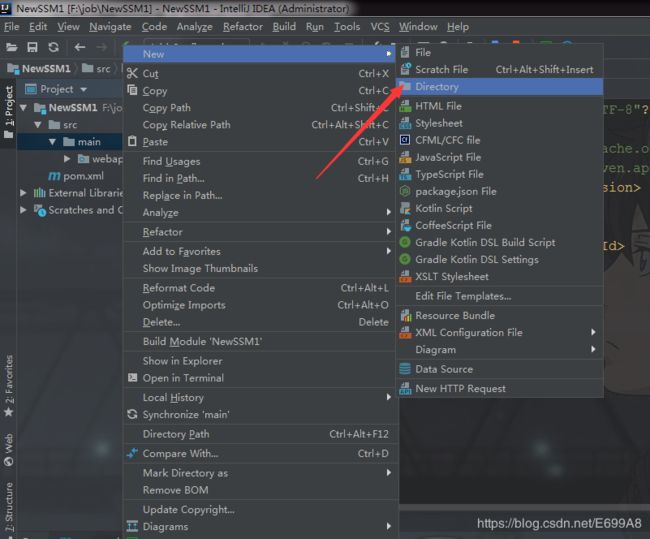
1,在main下面创建,java以及resources文件夹
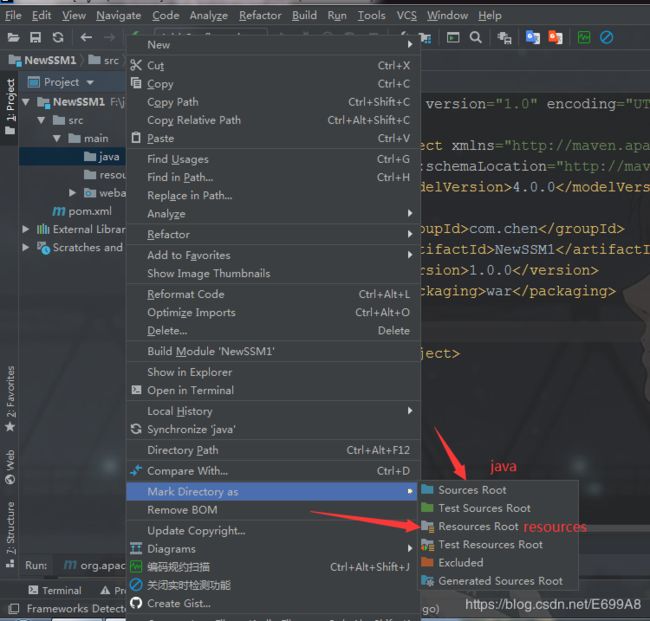
2,标记对应文件夹,test暂时不用,后面加上
3,创建所需文件夹,如下:
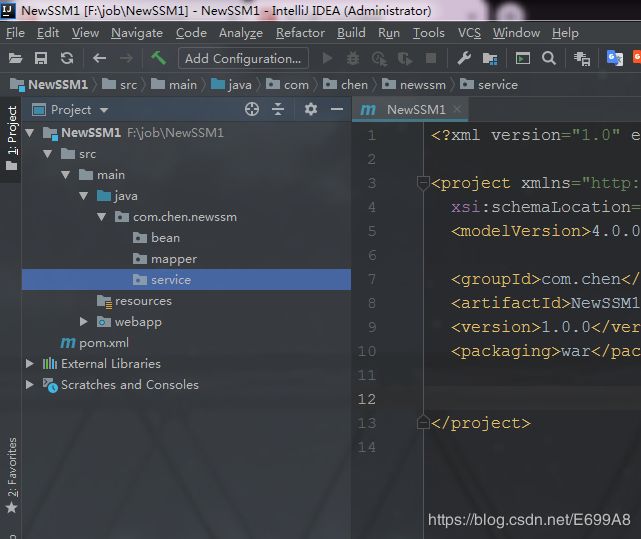
编写实体(bean)类
1.简单编写一个部门类
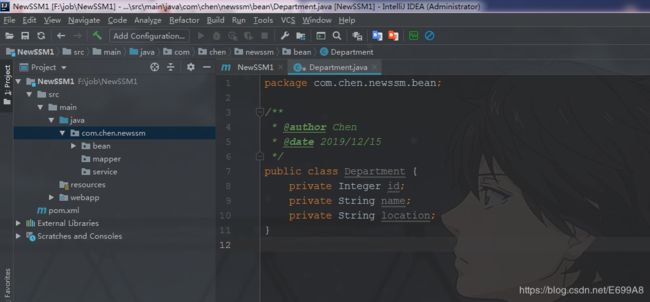
2.导入lombok依赖(省略get,set,string)
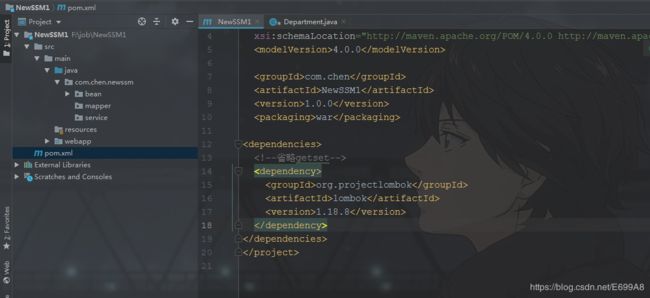
  <!--省略getset-->
  <dependency>
    <groupId>org.projectlombok</groupId>
    <artifactId>lombok</artifactId>
    <version>1.18.8</version>
  </dependency>
3.添加注解(添加@date和添加三个一样的效果)
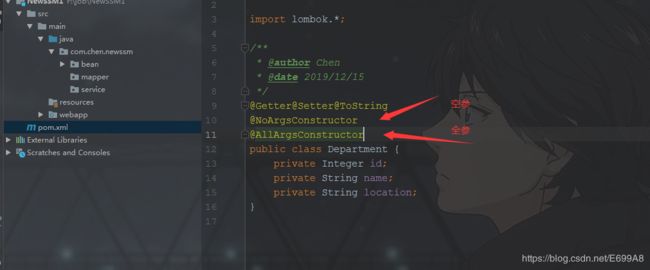
4.创建对应数据库信息,数据库名随意,只要能对应到就好
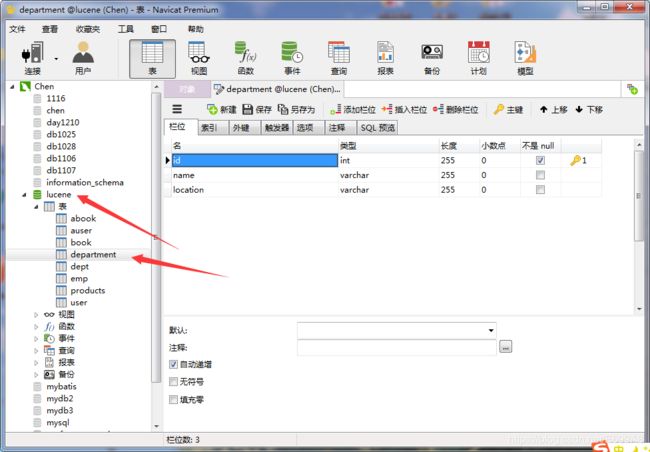
5,创建mapper的接口(通常命名规范就是对象的名字)

6,创建mapper的xml配置文件(通常在resources下,还可以在同一文件下)
ps:在resources下创建的文件夹要和前边文件结构保持一致,这里举例同一文件夹
mapper xml配置文件:namespace是mapper文件的全限定名,sql的id要和方法名保持一致
<?xml version="1.0" encoding="UTF-8"?>
<!DOCTYPE mapper PUBLIC "-//mybatis.org//DTD Mapper 3.0//EN"
        "http://mybatis.org/dtd/mybatis-3-mapper.dtd">
<mapper namespace="com.chen.mapper.DepartmentMapper">
    <!--结果集映射-->
    <resultMap id="baseResultMap" type="com.chen.bean.Department">
        <id column="id" property="id"/>
        <result column="name" property="name"/>
        <result column="location" property="location"/>
    </resultMap>

    <!--useGeneratedKeys可以获得数据库的主键,keyProperty 设置哪个属性,keyColumn主键列可不写-->
    <insert id="save" useGeneratedKeys="true" keyProperty="id" >
        insert into department(name ,location) values (#{name},#{location})
    </insert>

    <update id="update">
        update department set name =#{name},location=#{location} where id=#{id}
    </update>

    <delete id="delete">
        delete from department where id=#{id}
    </delete>

    <select id="get" resultMap="baseResultMap">
        select * from department where id =#{id}
    </select>

    <select id="list" resultMap="baseResultMap">
        select * from department
    </select>

</mapper>
7,创建service,接口和实现类
1.service接口方法和mapper一样,可以直接复制过来就好
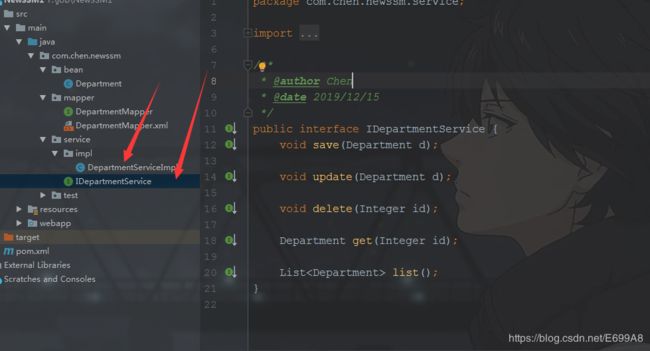
2.实现类,实现了接口后,可以按Alt+Enter快捷键直接导入
package com.chen.newssm.service.impl;

import com.chen.newssm.bean.Department;
import com.chen.newssm.mapper.DepartmentMapper;
import com.chen.newssm.service.IDepartmentService;

import java.util.List;

/**
 * @author Chen
 * @date 2019/12/15
 */
public class DepartmentServiceImpl implements IDepartmentService {

    private DepartmentMapper mapper;

    /*有了set构造,才能通过配置文件用property赋值*/
    public void setMapper(DepartmentMapper mapper) {
        this.mapper = mapper;
    }

    public void save(Department d) {
        mapper.save(d);
    }

    public void update(Department d) {
        mapper.update(d);
    }

    public void delete(Integer id) {
        mapper.delete(id);
    }

    public Department get(Integer id) {
       return mapper.get(id);
    }

    public List<Department> list() {
        return mapper.list();
    }
}
获取SqlSessionFactory对象(创建对象交给spring管理)
依赖
 <!--交给spring管理-->
    <dependency>
      <groupId>org.springframework</groupId>
      <artifactId>spring-context</artifactId>
      <version>5.1.10.RELEASE</version>
    </dependency>
    <!--测试-->
     <dependency>
      <groupId>org.springframework</groupId>
      <artifactId>spring-test</artifactId>
      <version>5.1.10.RELEASE</version>
    </dependency>
    <!--单元测试-->
    <dependency>
      <groupId>junit</groupId>
      <artifactId>junit</artifactId>
      <version>4.11</version>
    </dependency>
测试一下方法是否可用,为了方便直接在newssm下创建个test就好,名字随意
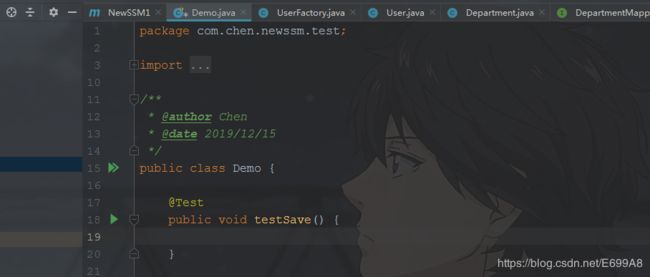
因为要获取service,而使用spring,要从spring容器中获取,在resources创建xml文件
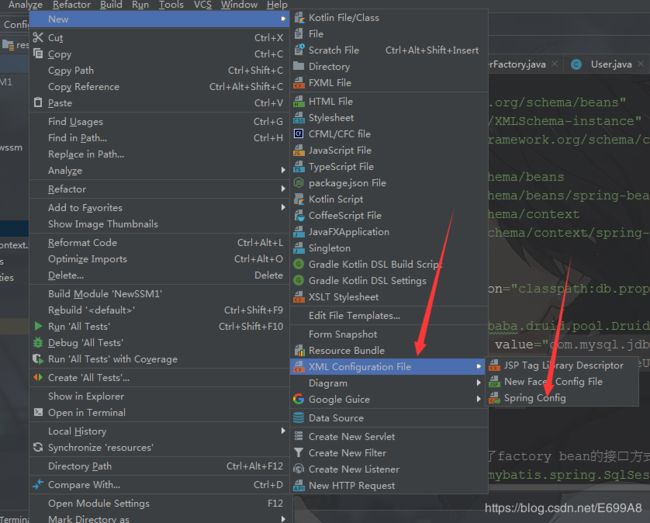
创建好了,交给spring管理

回到测试,创建容器,获取对象输入值(容器获取方式xml还是挺常用的)
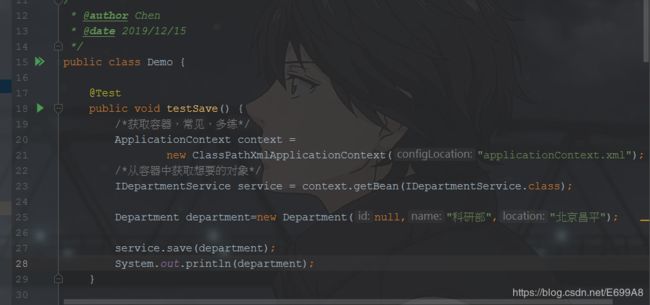
交给spring管理还没完,怎么和mybatis连通呢,这个时候要配置对应的文件
applicationContext.xml配置
<?xml version="1.0" encoding="UTF-8"?>
<beans xmlns="http://www.springframework.org/schema/beans"
       xmlns:xsi="http://www.w3.org/2001/XMLSchema-instance"
       xmlns:context="http://www.springframework.org/schema/context"
       xsi:schemaLocation="
       http://www.springframework.org/schema/beans
       http://www.springframework.org/schema/beans/spring-beans.xsd
       http://www.springframework.org/schema/context
       https://www.springframework.org/schema/context/spring-context.xsd">

    <!--命名空间,占位符-->
    <context:property-placeholder location="classpath:db.properties"/>

    <bean id="dataSource" class="com.alibaba.druid.pool.DruidDataSource">
        <property name="driverClassName" value="${jdbc.driverClassName}"/>
        <property name="url" value="${jdbc.url}"/>
        <property name="username" value="${jdbc.username}"/>
        <property name="password" value="${jdbc.password}"/>
    </bean>

    <!--获取sqlSessionFactory对象,原理实现了factory bean的接口方式获取某个对象-->
<bean id="sqlSessionFactory" class="org.mybatis.spring.SqlSessionFactoryBean">
    <!--获取数据源-->
    <property name="dataSource" ref="dataSource"/>
    <!--映射器位置-->
    <property name="mapperLocations" value="classpath:com/chen/newssm/mapper/DepartmentMapper.xml"/>
    <!--关联mybatis的主配置文件,让智能在mybatis文件中进行的配置生效-->
    <property name="configLocation" value="classpath:mybatis.xml"/>
</bean>
	<!--获取mapper包下,创建其中接口的代理对象-->
    <bean class="org.mybatis.spring.mapper.MapperScannerConfigurer">
        <property name="basePackage" value="com.ujiuye.mapper"/>
    </bean>

<!--交给spring管理-->

    <bean id="departmentService" class="com.chen.newssm.service.impl.DepartmentServiceImpl">
        <!--引用当前容器的mapper-->
        <property name="mapper" ref="departmentMapper"/>
    </bean>

</beans>
配置对应mybatis文件
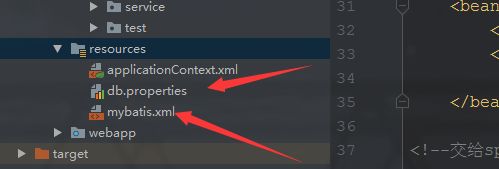
数据库连接:db.properties
ps:数据库名字,以及账号密码,要和自己的一样喔
jdbc.driverClassName=com.mysql.jdbc.Driver
jdbc.url=jdbc:mysql:///lucene?useUnicode=true&characterEncoding=UTF-8
jdbc.username=root
jdbc.password=root
mybatis主配置文件:mybatis.xml
<?xml version="1.0" encoding="UTF-8"?>
        <!DOCTYPE configuration
                PUBLIC "-//mybatis.org//DTD Config 3.0//EN"
                "http://mybatis.org/dtd/mybatis-3-config.dtd">
<configuration>
<mappers></mappers>

</configuration>
所需依赖
 <dependency>
      <groupId>org.springframework</groupId>
      <artifactId>spring-jdbc</artifactId>
      <version>5.1.10.RELEASE</version>
    </dependency>
    <!--mybatis的依赖-->
    <dependency>
      <groupId>org.mybatis</groupId>
      <artifactId>mybatis</artifactId>
      <version>3.4.6</version>
    </dependency>
    <!--整合最关键的依赖,整合包-->
    <dependency>
      <groupId>org.mybatis</groupId>
      <artifactId>mybatis-spring</artifactId>
      <version>2.0.3</version>
    </dependency>
    <!--mysql-->
    <dependency>
      <groupId>mysql</groupId>
      <artifactId>mysql-connector-java</artifactId>
      <version>5.1.38</version>
    </dependency>
<!--druid连接池-->
    <dependency>
      <groupId>com.alibaba</groupId>
      <artifactId>druid</artifactId>
      <version>1.1.10</version>
    </dependency>
因为默认配置文件会去找resources下的,咱们把xml放在了java下,会找不到报错,所以还需加上格外依赖
- 注意是在外,不要加在里面了,其作用就是避免找不到配置文件和xml文件
- include表示包含,includes表示排除
<build>
<resources>
<resource>
<directory>src/main/resources</directory>
<includes>
<include>**/*.properties
**/ *.xml</include>
</includes>
</resource>
<resource>
<directory>src/main/java</directory>
<includes>
<include>**/*.properties
**/ *.xml</include>
</includes>
</resource>
</resources>
</build>
因为日常使用mybatis都会添加上日志,这样可以清楚看出来sql语句,便于查看结果,方便调错
关于日志,mybatis为我们提供了很多种日志,这里用到的是Log4j

添加日志很简单
1. 添加依赖
<!--日志,首先创造的技术-->
    <dependency>
      <groupId>log4j</groupId>
      <artifactId>log4j</artifactId>
      <version>1.2.12</version>
    </dependency>
    <!--接口,日志的规范-->
    <dependency>
      <groupId>org.apache.logging.log4j</groupId>
      <artifactId>log4j-api</artifactId>
      <version>2.12.1</version>
    </dependency>
    <!--他俩的桥梁-->
    <dependency>
      <groupId>org.slf4j</groupId>
      <artifactId>slf4j-log4j12</artifactId>
      <version>1.7.25</version>
    </dependency>
2.在resources添加日志配置(log4j.properties)
ps:必须叫这个名字喔
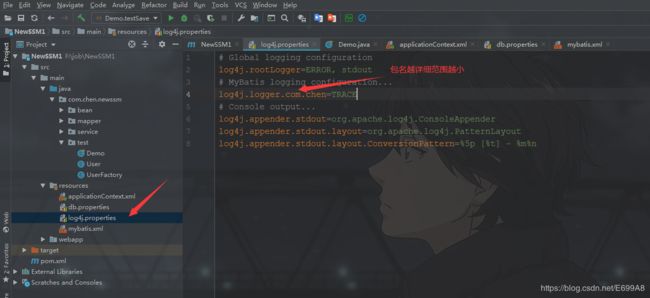
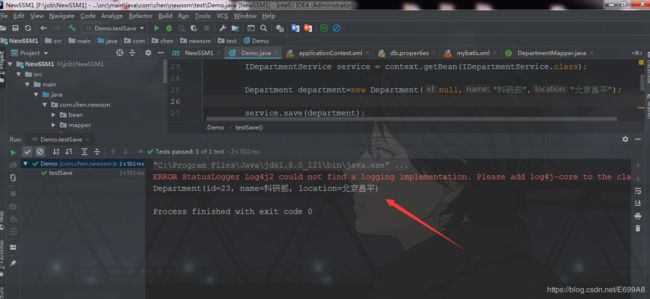
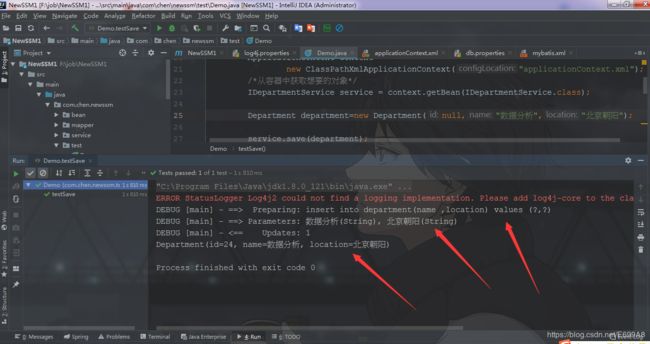
这样日志就添加好了,是不是很简单,咱们在测试添加一条看什么效果
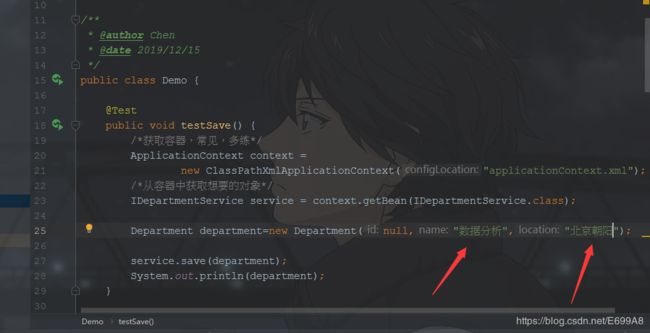
此时已经将sql语句打印出来,日志添加完成!
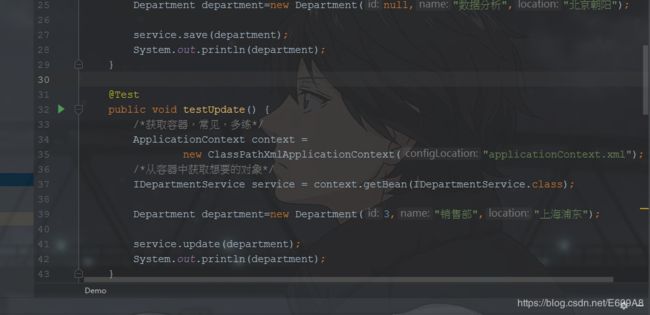
实现更新
实现删除
根据id查询
查询全部
因为是全部嘛,所以简单一个for循环遍历

------------------------------------------------------------------------------------------------------------------------------------------------------------------------------
------------------------------------------------------------------------------------------------------------------------------------------------------------------------------
以上是基于xml方式管理所有的对象的,下面介绍注解方式:
注解有两种:DI注解,IOC注解
1.DI注解:依赖注入,对象中的属性给它赋值
2.IOC注解:把对象交给spring去管理
注解不是所有都可以用注解代替,以下列出可以用注解代替的:
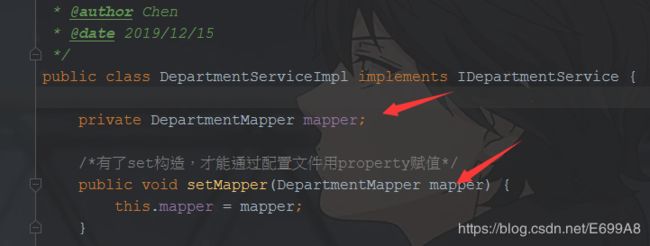
service实现类,用@service+@Autowired可以代替
ps:service是IOC注解,autowired是DI注解
applicationContext.xml中

只许两个注解代替以上代码

想要使用@service注解,需要在applicationContext.xml中启用,注解扫描的,DI注解是自动加的

到这里spring和mybatis就已经整合好了,使用全注解,和半注解方式
下面整合SpringMVC
依赖
<!--mvc的依赖-->
    <dependency>
      <groupId>org.springframework</groupId>
      <artifactId>spring-webmvc</artifactId>
      <version>5.1.10.RELEASE</version>
    </dependency>
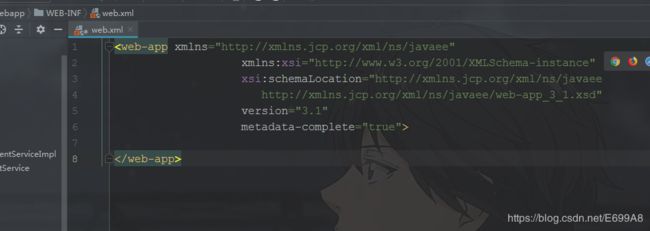
配置前端控制器
ps:servlet,过滤器,监听器,都是配置web.xml中的,DispatcherServlet – 前置控制器,是要配置在web.xml中的
<web-app xmlns="http://xmlns.jcp.org/xml/ns/javaee"
         xmlns:xsi="http://www.w3.org/2001/XMLSchema-instance"
         xsi:schemaLocation="http://xmlns.jcp.org/xml/ns/javaee
                      http://xmlns.jcp.org/xml/ns/javaee/web-app_3_1.xsd"
         version="3.1"
         metadata-complete="true">

</web-app>
DispatcherServlet前端控制器本身就是个servlet
<web-app xmlns="http://xmlns.jcp.org/xml/ns/javaee"
         xmlns:xsi="http://www.w3.org/2001/XMLSchema-instance"
         xsi:schemaLocation="http://xmlns.jcp.org/xml/ns/javaee
                      http://xmlns.jcp.org/xml/ns/javaee/web-app_3_1.xsd"
         version="3.1"
         metadata-complete="true">

    <!--配置前端控制器-->
    <servlet>
        <servlet-name>dispatcherServlet</servlet-name>
        <servlet-class>org.springframework.web.servlet.DispatcherServlet</servlet-class>
        <!--关联spring配置文件-->
        <init-param>
            <param-name>contextConfigLocation</param-name>
            <param-value>classpath:applicationContext-mvc.xml</param-value>
        </init-param>
        <!--初始化,tomcat启动运行初始化,不然是第一个人访问-->
        <load-on-startup>1</load-on-startup>
    </servlet>
    <!--映射路径-->
    <servlet-mapping>
        <servlet-name>dispatcherServlet</servlet-name>
        <url-pattern>/</url-pattern>
    </servlet-mapping>

<!--请求编码过滤器-->
<filter>
    <filter-name>characterEncodingFilter</filter-name>
    <filter-class>org.springframework.web.filter.CharacterEncodingFilter</filter-class>
    <init-param>
        <param-name>encoding</param-name>
        <param-value>UTF-8</param-value>
    </init-param>
</filter>
    <filter-mapping>
        <filter-name>characterEncodingFilter</filter-name>
        <url-pattern>/*
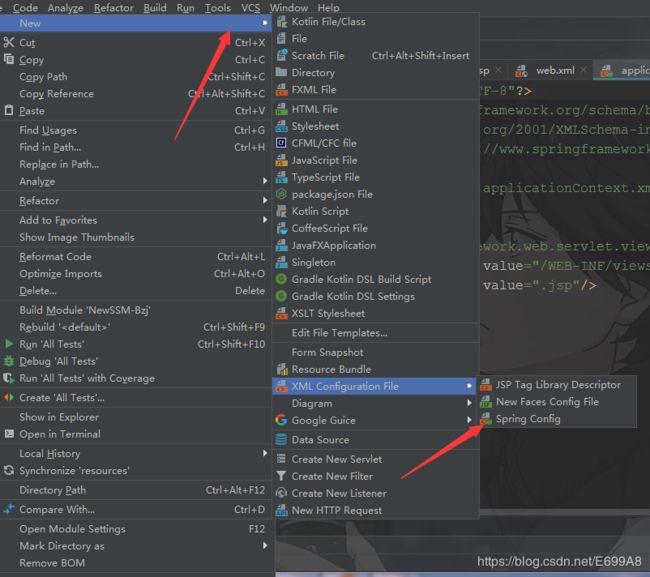
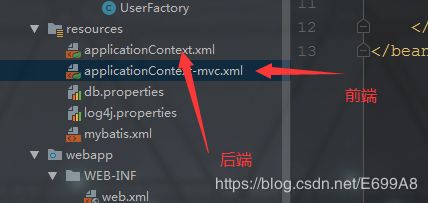
其中关联配置文件,为了前后端分离新建一个spring配置文件

新建名为applicationContext-mvc.xml的文件代表前端
创建Controller类

ps:@Controller是IOC注解,表示把这个类的创建对象的权利交给spring
因为Tomcat只认识web.xml的配置,只会初识化dispatcherServlet,dispatcherServlet只读取了applicationContext-mvc.xml和applicationContext.xml没有任何关系,为了让他们连通,在web.xml中添加配置

回到Controller
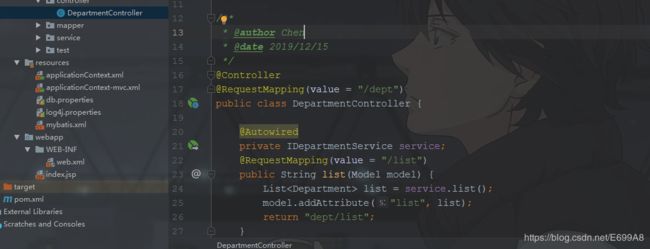
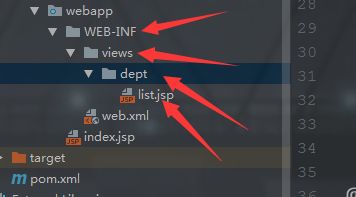
ps:webapp下的文件夹是可以通过地址栏访问到的,WEB-INF是没有办法在浏览器中访问到的,只能通过后台代码进行请求转发跳转,它可以保护我们的文件夹
创建WEB-INF下文件
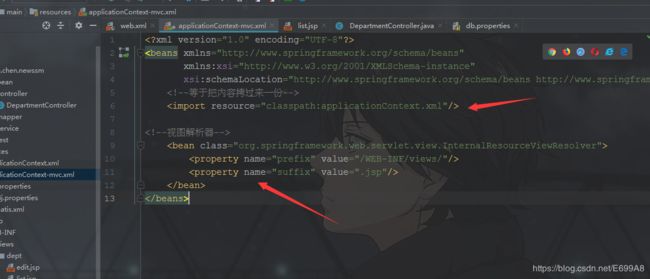
配置视图解析器(applicationContext-mvc.xml中)
<!--视图解析器-->
    <bean class="org.springframework.web.servlet.view.InternalResourceViewResolver">
        <property name="prefix" value="/WEB-INF/views/"/>
        <property name="suffix" value=".jsp"/>
    </bean>
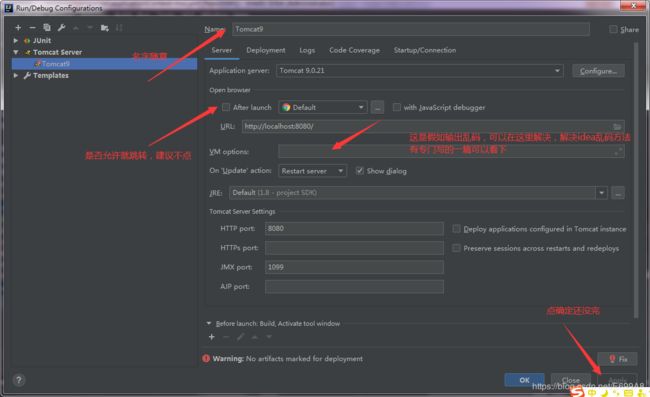
配置Tomcat
ps:如果乱码:-Dfile.coding=UTF-8
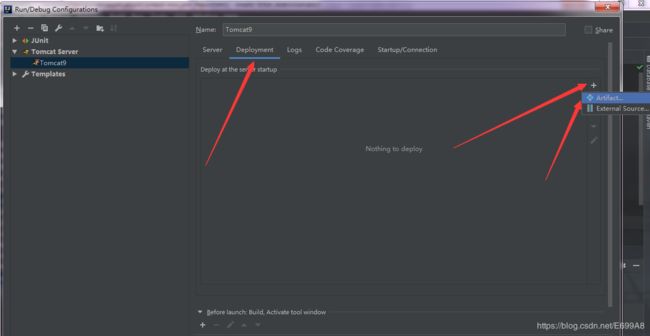
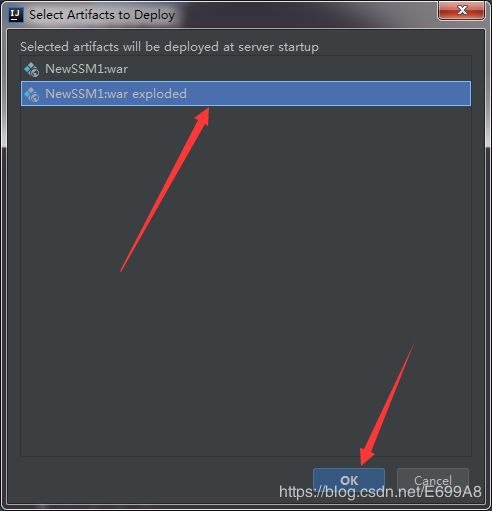
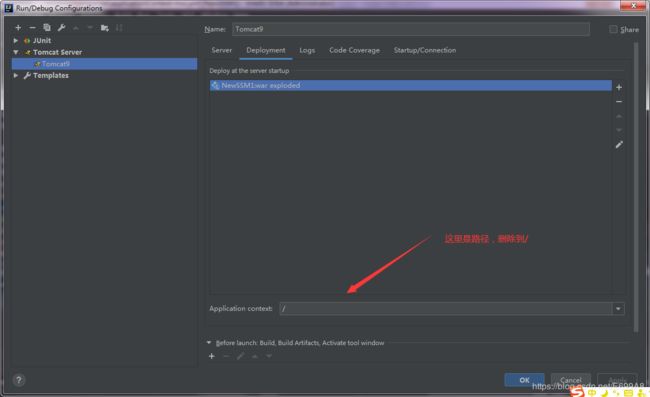
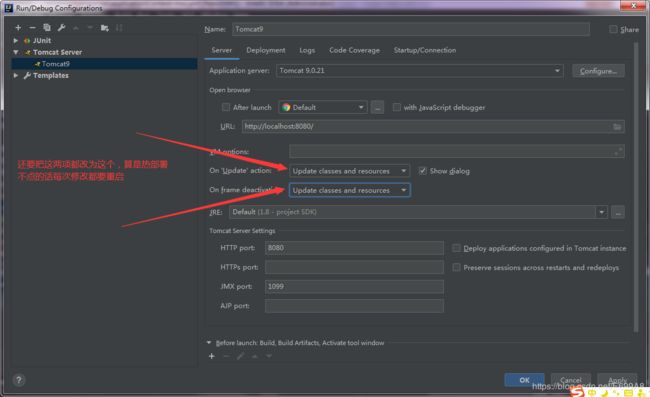
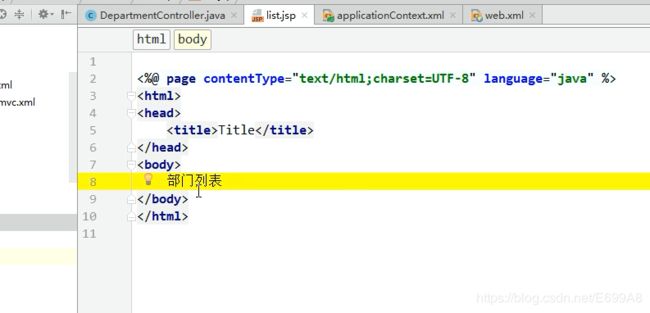
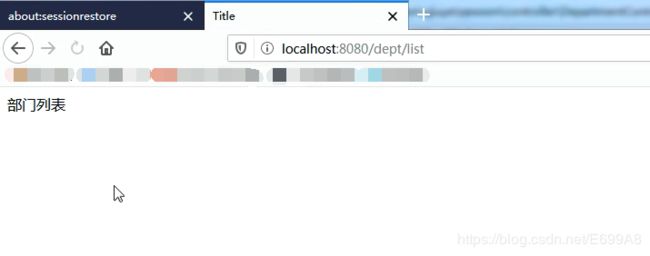
最后用浏览器访问页面,输出一下内容,证明就是顺利的
正式写list页面,因为要用到JS所以要添加JS依赖
<!--js的依赖-->
    <dependency>
      <groupId>javax.servlet</groupId>
      <artifactId>jstl</artifactId>
      <version>1.2</version>
    </dependency>
list 页面
<%@ page contentType="text/html;charset=UTF-8" language="java" %>
<%@taglib prefix="c" uri="http://java.sun.com/jsp/jstl/core" %>
<html>
<head>
    <title></title>
</head>
<body>

    <h1>部门列表</h1>
    <a href="/dept/edit">新增</a>

    <table>
        <tr>
            <th>序号</th>
            <th>部门名称</th>
            <th>部门地址</th>
            <th>操作</th>
        </tr>
        <%--循环遍历,varStatusa状态--%>
        <c:forEach items="${list}" var="dept" varStatus="index">
            <tr>
                <%--count,是当前多少条--%>
                <td>${index.index+1}</td>
                <td>${dept.name}</td>
                <td>${dept.location}</td>
                <td>
                    <a href="/dept/edit?id=${dept.id}">编辑</a>
                    <a href="/dept/delete?id=${dept.id}">删除</a>
                </td>
            </tr>
        </c:forEach>
    </table>
</body>
</html>
因为要修改添加,新建一个带有from表单页面作为录入这个部门的名称和地址(edit.jsp)
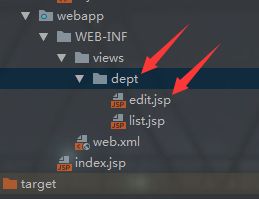
<%@ page contentType="text/html;charset=UTF-8" language="java" %>
<html>
<head>
    <title></title>
</head>
<body>
    <h1>部门编辑</h1>
    <form action="/dept/saveOrUpdate" method="post">
        <input type="hidden" value="${dept.id}" name="id">
        部门名称<input type="text" name="name" value="${dept.name}"/> <br>
        部门地址<input type="text" name="location" value="${dept.location}"/><br>
        <input type="submit" value="保存"/><br>
    </form>
</body>
</html>
Controller添加增,删,改,页面跳转
 @RequestMapping(value = "/edit")
    public String edit(Integer id, Model model) {
        if (id!=null) {
            model.addAttribute("dept", service.get(id));
        }
        return "dept/edit";
    }
    @RequestMapping("/saveOrUpdate")
    public String saveOrUpdate(Department d) {
        if (d.getId() != null) {
        service.update(d);
        }else {
            service.save(d);
        }
        /*表示以重定向访问,不通过视图解析*/
        return "redirect:/dept/list";
    }
    @RequestMapping("/delete")
    public String delete(Integer id) {
            service.delete(id);
        /*表示以重定向访问,不通过视图解析*/
        return "redirect:/dept/list";
    }
能到这也就完成了,不过确保中间没出什么问题,下面是完整的依赖,以及最重要的配置,可以对照下
pom.xml依赖
<?xml version="1.0" encoding="UTF-8"?>
<project xmlns="http://maven.apache.org/POM/4.0.0" xmlns:xsi="http://www.w3.org/2001/XMLSchema-instance"
xsi:schemaLocation="http://maven.apache.org/POM/4.0.0 http://maven.apache.org/xsd/maven-4.0.0.xsd">
<modelVersion>4.0.0</modelVersion>
<groupId>com.chen</groupId>
<artifactId>NewSSM1</artifactId>
<version>1.0.0</version>
<packaging>war</packaging>
<dependencies>
<!--省略getset-->
<dependency>
<groupId>org.projectlombok</groupId>
<artifactId>lombok</artifactId>
<version>1.18.8</version>
</dependency>
<!--交给spring管理-->
<dependency>
<groupId>org.springframework</groupId>
<artifactId>spring-context</artifactId>
<version>5.1.10.RELEASE</version>
</dependency>
<dependency>
<groupId>org.springframework</groupId>
<artifactId>spring-test</artifactId>
<version>5.1.10.RELEASE</version>
</dependency>
<!--单元测试-->
<dependency>
<groupId>junit</groupId>
<artifactId>junit</artifactId>
<version>4.11</version>
</dependency>
<dependency>
<groupId>org.springframework</groupId>
<artifactId>spring-jdbc</artifactId>
<version>5.1.10.RELEASE</version>
</dependency>
<!--mybatis的依赖-->
<dependency>
<groupId>org.mybatis</groupId>
<artifactId>mybatis</artifactId>
<version>3.4.6</version>
</dependency>
<!--mvc的依赖-->
<dependency>
<groupId>org.springframework</groupId>
<artifactId>spring-webmvc</artifactId>
<version>5.1.10.RELEASE</version>
</dependency>
<!--整合最关键的依赖,整合包-->
<dependency>
<groupId>org.mybatis</groupId>
<artifactId>mybatis-spring</artifactId>
<version>2.0.3</version>
</dependency>
<!--mysql-->
<dependency>
<groupId>mysql</groupId>
<artifactId>mysql-connector-java</artifactId>
<version>5.1.38</version>
</dependency>
<!--druid连接池-->
<dependency>
<groupId>com.alibaba</groupId>
<artifactId>druid</artifactId>
<version>1.1.10</version>
</dependency>
<!--日志,首先创造的技术-->
<dependency>
<groupId>log4j</groupId>
<artifactId>log4j</artifactId>
<version>1.2.12</version>
</dependency>
<!--接口,日志的规范-->
<dependency>
<groupId>org.apache.logging.log4j</groupId>
<artifactId>log4j-api</artifactId>
<version>2.12.1</version>
</dependency>
<!--他俩的桥梁-->
<dependency>
<groupId>org.slf4j</groupId>
<artifactId>slf4j-log4j12</artifactId>
<version>1.7.25</version>
</dependency>
<!--js的依赖-->
<dependency>
<groupId>javax.servlet</groupId>
<artifactId>jstl</artifactId>
<version>1.2</version>
</dependency>
</dependencies>
<build>
<resources>
<resource>
<directory>src/main/resources</directory>
<includes>
<include>**/*.properties
**/ *.xml</include>
</includes>
</resource>
<resource>
<directory>src/main/java</directory>
<includes>
<include>**/*.properties
**/ *.xml</include>
</includes>
</resource>
</resources>
</build>
</project>
applicationController.xml
<?xml version="1.0" encoding="UTF-8"?>
<beans xmlns="http://www.springframework.org/schema/beans"
xmlns:xsi="http://www.w3.org/2001/XMLSchema-instance"
xmlns:context="http://www.springframework.org/schema/context"
xsi:schemaLocation="
http://www.springframework.org/schema/beans
http://www.springframework.org/schema/beans/spring-beans.xsd
http://www.springframework.org/schema/context
https://www.springframework.org/schema/context/spring-context.xsd">
<!--命名空间,占位符-->
<context:property-placeholder location="classpath:db.properties"/>
<bean id="dataSource" class="com.alibaba.druid.pool.DruidDataSource">
<property name="driverClassName" value="${jdbc.driverClassName}"/>
<property name="url" value="${jdbc.url}"/>
<property name="username" value="${jdbc.username}"/>
<property name="password" value="${jdbc.password}"/>
</bean>
<!--获取sqlSessionFactory对象,原理实现了factory bean的接口方式获取某个对象-->
<bean id="sqlSessionFactory" class="org.mybatis.spring.SqlSessionFactoryBean">
<!--获取数据源-->
<property name="dataSource" ref="dataSource"/>
<!--映射器位置-->
<property name="mapperLocations" value="classpath:com/chen/newssm/mapper/DepartmentMapper.xml"/>
<!--关联mybatis的主配置文件,让智能在mybatis文件中进行的配置生效-->
<property name="configLocation" value="classpath:mybatis.xml"/>
</bean>
<!--一段配置只能获取一个mapper对象-->
<!-- <bean id="departmentMapper" class="org.mybatis.spring.mapper.MapperFactoryBean">-->
<!-- <property name="sqlSessionFactory" ref="sqlSessionFactory"/>-->
<!-- <property name="mapperInterface" value="com.ujiuye.mapper.DepartmentMapper"/>-->
<!-- </bean>-->
<!--获取mapper包下,创建其中接口的代理对象-->
<bean class="org.mybatis.spring.mapper.MapperScannerConfigurer">
<property name="basePackage" value="com.chen.newssm.mapper"/>
</bean>
<!--IOC的注解扫描-->
<context:component-scan base-package="com.chen.newssm"/>
<!--<!–交给spring管理,@service代替–>
<bean id="departmentService" class="com.chen.newssm.service.impl.DepartmentServiceImpl">
<!–引用当前容器的mapper–>
<property name="mapper" ref="departmentMapper"/>
</bean>-->
</beans>
DepartmentMapper.xml
<?xml version="1.0" encoding="UTF-8"?>
<!DOCTYPE mapper PUBLIC "-//mybatis.org//DTD Mapper 3.0//EN"
        "http://mybatis.org/dtd/mybatis-3-mapper.dtd">
<mapper namespace="com.chen.newssm.mapper.DepartmentMapper">
    <!--结果集映射-->
    <resultMap id="baseResultMap" type="com.chen.newssm.bean.Department">
        <id column="id" property="id"/>
        <result column="name" property="name"/>
        <result column="location" property="location"/>
    </resultMap>

    <!--useGeneratedKeys可以获得数据库的主键,keyProperty 设置哪个属性,keyColumn主键列可不写-->
    <insert id="save" useGeneratedKeys="true" keyProperty="id" >
        insert into department(name ,location) values (#{name},#{location})
    </insert>

    <update id="update">
        update department set name =#{name},location=#{location} where id=#{id}
    </update>

    <delete id="delete">
        delete from department where id=#{id}
    </delete>

    <select id="get" resultMap="baseResultMap">
        select * from department where id =#{id}
    </select>

    <select id="list" resultMap="baseResultMap">
        select * from department
    </select>

</mapper>
如果有问题或者建议请一定提,一起努力吧c
