运维笔记34 (lnmp+heartbeat高可用集群,drbd共享存储+Discuz论坛应用实战)
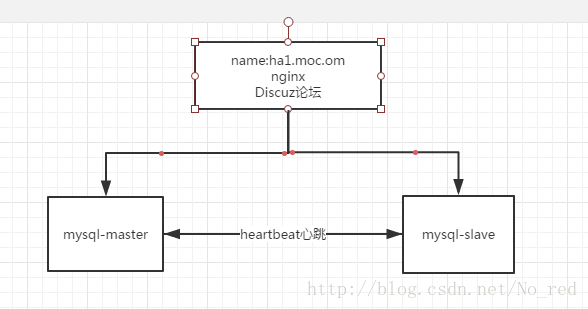
系统框图:

系统描述:
前端有一台web服务器,使用nginx作为web服务器,上面搭载Discuz论坛,是一个广泛使用的php开发的论坛,所以php在该服务器上也是必须的,而且是添加了memory cache(功能与redis类似)模块后的php。
后端两台是mysql数据库的双机高可用,使用的集群软件是heartbeat,使用的存储是drbd分布式存储,heartbeat和drbd集合起来是十分方便的,但是heartbeat本身并没有监控脚本,所以决定基于python的pycurl模块开发一个监控+警告脚本。
系统环境:
发行版:Red Hat Enterprise Linux Server release 6.5 (Santiago)
一.3台服务器的软件环境准备
1.nginx源码编译
源码包版本:nginx-0.7.69
对于nginx我们需要对源码做一些简易的修改才。
1)去掉nginx内部对版本的宏定义(为了防止别人发现我们的确切版本,毕竟每个版本都会有漏洞)
2)将编译后的文件改为release版而不是debug版本
将nginx-0.7.69/src/core目录下的下面的宏定义
#define NGINX_VERSION "0.7.69"替换成
#define NGINX_VERSION注释掉nginx-0.7.69/auto/cc文件中的下面一行
#CFLAGS="$CFLAGS -g"在这之前需要建立nginx用户。
现在可以开始进行编译了,configure的参数如下
./configure --prefix=/usr/local/lnmp/nginx --user=nginx --group=nginx --withhttp_stub_status_module --with-http_ssl_module接下来就进入了环境检测过程,系统提示你缺少什么你就安装什么就可以了。
我在configure过程中需要的其他软件包如下:
[root@localhost nginx-0.7.69]# yum install openssl-devel gcc pcre-devel -y 显示如下代表configure成功
  nginx path prefix: "/usr/local/nginx"
  nginx binary file: "/usr/local/nginx/sbin/nginx"
  nginx configuration prefix: "/usr/local/nginx/conf"
  nginx configuration file: "/usr/local/nginx/conf/nginx.conf"
  nginx pid file: "/usr/local/nginx/logs/nginx.pid"
  nginx error log file: "/usr/local/nginx/logs/error.log"
  nginx http access log file: "/usr/local/nginx/logs/access.log"
  nginx http client request body temporary files: "client_body_temp"
  nginx http proxy temporary files: "proxy_temp"
  nginx http fastcgi temporary files: "fastcgi_temp"
现在可以正式编译了,直接键入make && make install
make[1]: Leaving directory `/root/nginx-0.7.69'编译成功
2.mysql源码编译
源码包:mysql-boost-5.7.11
这里先提醒一下,装mysql的机器硬盘空间一定要多,起码要20G吧。
mysql5.7使用的是cmake,所以我们在之前先要安装cmake。
cmake版本:cmake-2.8.12.2-4.el6
cmake使用的是rpm包,直接用yum安装就可以
cmake的参数如下:
cmake -DCMAKE_INSTALL_PREFIX=/usr/local/lnmp/mysql \
-DMYSQL_DATADIR=/usr/local/lnmp/mysql/data \
-DMYSQL_UNIX_ADDR=/usr/local/lnmp/mysql/data/mysql.sock \
-DWITH_MYISAM_STORAGE_ENGINE=1 \
-DWITH_INNOBASE_STORAGE_ENGINE=1 \
-DWITH_ARCHIVE_STORAGE_ENGINE=1 \
-DWITH_BLACKHOLE_STORAGE_ENGINE=1 \
-DWITH_PARTITION_STORAGE_ENGINE=1 \
-DENABLED_LOCAL_INFILE=1 \
-DWITH_READLINE=1 \
-DWITH_SSL=yes -DDEFAULT_CHARSET=utf8 \
-DDEFAULT_COLLATION=utf8_general_ci \
-DEXTRA_CHARSETS=all -DMYSQL_TCP_PORT=3306 \
-DWITH_BOOST=./boost/boost_1_59_0/
上面的参数切记不要弄错,这里弄错可能会导致后面的一系列连锁反应就像这篇文章mysql5.7无法启动错误解决!(因源码编译时的疏忽引起的血案。。。)
cmake过程如果发现缺少某些依赖我们不仅要安装那个依赖,而且要删掉cmake的缓存文件
[root@localhost mysql-5.7.11]# rm -rf CMakeCache.txtcmake过程发现缺少的软件包
yum install gcc-c++ bison nurses-devel -y接下来就进入了mysql漫长的编译过程,起码半个小时吧
3.php+memorycache
php版本:php-5.6.20
该版本的php使用的是configure来解决安装过程的依赖,configure的参数如下
./configure --prefix=/usr/local/lnmp/php \
--with-config-file-path=/usr/local/lnmp/php/etc \
--with-openssl --with-snmp --with-gd --with-gmp \
--with-zlib --with-curl --with-libxml-dir \
--with-png-dir --with-jpeg-dir --with-freetype-dir \
--without-pear --with-gettext \
--enable-inline-optimization --enable-soap --enable-ftp \
--enable-sockets --enable-mbstring --enable-fpm \
--with-fpm-user=nginx --with-fpm-group=nginx \
--with-mcrypt --with-mhash --with-mysql --with-mysqli \
--with-pdo-mysql --enable-mysqlnd
安装过程需要解决的依赖性:
这里有一个叫做mcrypt.h的库塔的依赖性是yum无法解决的,所以我们在官网上下载了libmcrypt-2.5.8的包来解决,直接./configure –prefix=/usr/local/mcrypt就可以。
yum可以解决的依赖如下:
yum install libxml2-devel libcurl-devel libjpeg-turbo-devel
libpng-devel freetype-devel net-snmp-devel -y
出现如下的输出表示终于cmake过了
+--------------------------------------------------------------------+
| License:                                                           |
| This software is subject to the PHP License, available in this     |
| distribution in the file LICENSE.  By continuing this installation |
| process, you are bound by the terms of this license agreement.     |
| If you do not agree with the terms of this license, you must abort |
| the installation process at this point.                            |
+--------------------------------------------------------------------+

Thank you for using PHP.
二.3台服务器软件环境的配置(包含php的memcache)
1.nginx配置
建议将*/nginx/sbin/nginx添加到环境变量中这样可以方便nginx的启动,或者软连接
[root@localhost sbin]# ln -s /usr/local/nginx/sbin/nginx /usr/local/sbin/配置文件
location ~ \.php$ {
            root           html;
            fastcgi_pass   127.0.0.1:9000;
            fastcgi_index  index.php;
            fastcgi_param  SCRIPT_FILENAME  /scripts$fastcgi_script_name;
            include        fastcgi.conf;#原本是fastcgi_parms
        }
上面这些原本是注释掉的我们去掉注释即可,有一处需要修改,将include后面的文件改成fastcgi.conf。
接下来检查下配置文件的正确
[root@localhost conf]# nginx -t
the configuration file /usr/local/nginx/conf/nginx.conf syntax is ok
configuration file /usr/local/nginx/conf/nginx.conf test is successful
nginx-t参数可以帮助你检查配置文件是否有错误。经过检查没有错误,可以开启测试一下了
[root@localhost conf]# netstat -atnlp | grep :80
tcp        0      0 0.0.0.0:80                  0.0.0.0:*                   LISTEN      27274/nginx
2.mysql配置
mysql启动所需要的文件一般都在*/mysql/support-files下
[root@master support-files]# file mysql.server
mysql.server: POSIX shell script text executable
mysql.server就是启动脚本,将他放到/etc/init.d/下。
*/mysql/suport-files/my-default.cnf就是我们喜闻乐见的my.cnf,将他复制到我们的/etc下。
接下来就可以进行mysql的初始化了。
mysqld --initialize --user=mysql --basedir=/usr/local/lnmp/mysql/ --datadir=/usr/local/lnmp/mysql/data/
如果在启动过程出现问题可以看下我上面提到的那篇文章。
3.php的配置
php的很多配置文件很多都在他的源码包中放着,而不是你编译后生成的那个文件中,这点要注意。
我们需要php的启动脚本在下面目录
/php-5.6.20/sapi/fpm/init.d.php-fpm将他放在/etc/init.d/下
配置文件在
php/etc php-fpm.conf.default我们将该文件重命名,去掉default,之后将配置里的
pid = run/php-fpm.pid去掉注释,就可以运行php了。
php配好后,现在就可以给php加入memcache模块了。其实十分简单
首先通过yum源memcache模块
yum install memcached php-pecl-memcache -y
启动memcache,启动php
观察memcache是否加载成功
[root@localhost php.d]# php -m | grep memcache
memcache
通过这条命令可以看到php已经成功加载。
三.搭建mysql高可用集群
1.布置mysql的slave服务器
按照我们上面一,二的步骤我们应该已经完成了一台mysql的搭建,也就是master已经搭建完成了。但是slave还没有完成,那么怎么办?难道要在slave上再进行一次源码编译吗,当然不用我们既然已经编译好了,而且slave和master都是一样的环境,直接复制过去就ok了。
[root@master lnmp]# ls
mysql  mysql.tar.gz
我们将打包好的mysql直接scp到slave端就可以。
在slave端解压后,修改文件的权限,创建mysql用户,增加配置文件,启动脚本,mysql初始化后(也就是第二步所做的)后,另一台就配置好了。
2.配置heartbeart+drbd环境
在运维笔记29 (高可用集群之heartbeat+drbd+mysql)
有详细的heartbeat+drbd配置的介绍,这里我们决定用python写一个自动化部署脚本来安装集群。
集群配置文件:
ha.cf:
logfacility local0
keepalive 2
deadtime 30
warntime 10
initdead 60
udpport 694
bcast   eth0        # Linux
auto_failback on
node    master.mo.com
node    slave.mo.com
ping 172.25.3.250
respawn hacluster /usr/lib64/heartbeat/ipfail
apiauth ipfail gid=haclient uid=hacluster
authkeys: #切记这个文件的权限一定要是600
auth 1
1 crc
haresources:
master.mo.com IPaddr::172.25.3.200/24/eth0 drbddisk::mo Filesystem::/dev/drbd1::/usr/local/lnmp/mysql/data::ext4 mysqlddrbd.d/mo.res:
resource mo {
meta-disk internal;
device /dev/drbd1;
syncer {
verify-alg sha1;
}
on master.mo.com {
disk /dev/sdb;
address 172.25.3.102:7789;
}
on  slave.mo.com {
disk /dev/sdb;
address 172.25.3.103:7789;
}
}
Mar 23 17:02:17 master /usr/lib/ocf/resource.d//heartbeat/IPaddr(IPaddr_172.25.3.200)[2860]: INFO:  Success
Mar 23 17:02:17 master ResourceManager(default)[2741]: info: Running /etc/ha.d/resource.d/drbddisk mo start
Mar 23 17:02:17 master kernel: block drbd1: role( Secondary -> Primary )
Mar 23 17:02:17 master /usr/lib/ocf/resource.d//heartbeat/Filesystem(Filesystem_/dev/drbd1)[3004]: INFO:  Resource is stopped
Mar 23 17:02:17 master ResourceManager(default)[2741]: info: Running /etc/ha.d/resource.d/Filesystem /dev/drbd1 /usr/local/lnmp/mysql/data ext4 start
Mar 23 17:02:17 master Filesystem(Filesystem_/dev/drbd1)[3088]: INFO: Running start for /dev/drbd1 on /usr/local/lnmp/mysql/data
Mar 23 17:02:17 master kernel: EXT4-fs (drbd1): mounted filesystem with ordered data mode. Opts:
Mar 23 17:02:17 master /usr/lib/ocf/resource.d//heartbeat/Filesystem(Filesystem_/dev/drbd1)[3080]: INFO:  Success
Mar 23 17:02:17 master ResourceManager(default)[2741]: info: Running /etc/init.d/mysqld  start
通过上面日志我们可以看出服务已经正常运行了。
四.Discuz论坛的部署
在部署论坛之前,我们先要对mysql进行一个权限设置,现在和之前做过的论坛不一样,数据库和论坛并不在一台机器上,是需要靠网络链路通信的,也就是说连接数据库的时候使用的不在是本机的127.0.0.1或者是localhost,而是一个真正的ip,所以我们要给我们的论坛使用的数据库用户开放这个远程连接的权限。
mysql> select user,host from mysql.user;
+-----------+-----------+
| user      | host      |
+-----------+-----------+
| mysql.sys | localhost |
| root      | localhost |
+-----------+-----------+
3 rows in set (0.00 sec)
现在root只允许host去连接,现在开始授权
grant all privileges on *.* to 'root'@'%' identified by 'redhat'现在查看数据库的权限
mysql> select user,host from mysql.user;
+-----------+-----------+
| user      | host      |
+-----------+-----------+
| root      | %         |
| mysql.sys | localhost |
| root      | localhost |
+-----------+-----------+
3 rows in set (0.00 sec)
授权成功,开始数据库的部署。
Discuz的详细配置请见论坛搭建