高德地图实现定位
通过拷贝添加SDK
从官网下载按照需求下载开发包并解压。
以3.3.3版本的地图功能为例,解压后,得到一个 AMap3DMap_3.3.3_20160726.jar 文件和一个 armeabi 文件夹(文件夹中包含:libgdinamapv4sdk752.so、libgdinamapv4sdk752ex.so、libtbt3631.so、libwtbt144.so 四个so文件)。
1.添加 jar 文件:将下载的地图 SDK 的 jar包复制到工程(此处截图以官方示例Demo为例子)的 libs 目录下。如图所示:
2.添加 so 库
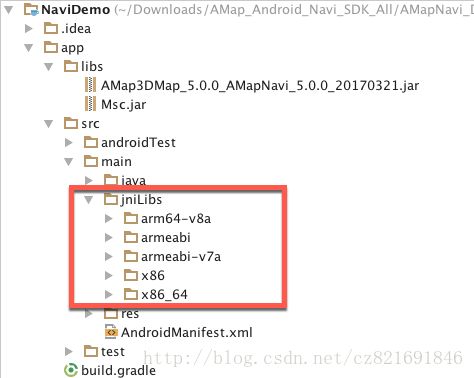
方法一:使用默认配置,不需要修改build.gradle。在 main 目录下创建文件夹 jniLibs (如果有就不需要创建了),将下载文件的 armeabi 文件夹复制到这个目录下,如果已经有这个目录,将下载的 so 库复制到这个目录即可。如图所示:
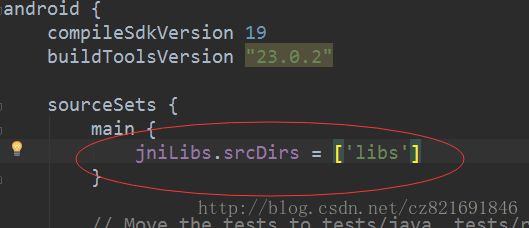
方法二:使用自定义配置,将下载文件的 armeabi 文件夹复制到 libs 目录,如果有这个目录,请将下载的 so 库复制到这个目录,然后打开build.gradle,找到 sourceSets 标签,在里面增加一项配置,如图所示:
通过Gradle集成SDK
1.在Project的build.gradle文件中配置repositories,添加maven或jcenter仓库地址
Android Studio默认会在Project的build.gradle为所有module自动添加jcenter的仓库地址,如果已存在,则不需要重复添加。Project的build.gradle文件在Project目录中位置如图所示:

配置如下:
allprojects {
 repositories {
 jcenter() // 或者 mavenCentral()
 }
 }
2.在主工程的build.gradle文件配置dependencies
根据项目需求添加SDK依赖。引入各个SDK功能最新版本, dependencies 配置方式如下:
3D地图:compile ‘com.amap.api:3dmap:latest.integration’
2D地图:compile ‘com.amap.api:map2d:latest.integration’
导航:compile ‘com.amap.api:navi-3dmap:latest.integration’
搜索:compile ‘com.amap.api:search:latest.integration’
定位:compile ‘com.amap.api:location:latest.integration’
使用
1.将demo里面的权限复制到相应位置
2.将meta标签复制到相应位置同时去高德API官网申请个key填到相应位置
3.在布局中添加个MapView
4.将主函数中location文件夹下的LocationModeSourceActivity.java中有用的东西复制到主函数中
以上,就可以实现最简单的定位
清单文件:
<manifest xmlns:android="http://schemas.android.com/apk/res/android"
    package="com.example.cuizhen.myamap">


    <uses-permission android:name="android.permission.ACCESS_COARSE_LOCATION">uses-permission>

    <uses-permission android:name="android.permission.ACCESS_FINE_LOCATION">uses-permission>

    <uses-permission android:name="android.permission.ACCESS_NETWORK_STATE">uses-permission>

    <uses-permission android:name="android.permission.ACCESS_WIFI_STATE">uses-permission>

    <uses-permission android:name="android.permission.CHANGE_WIFI_STATE">uses-permission>

    <uses-permission android:name="android.permission.INTERNET">uses-permission>

    <uses-permission android:name="android.permission.READ_PHONE_STATE">uses-permission>

    <uses-permission android:name="android.permission.WRITE_EXTERNAL_STORAGE">uses-permission>

    <uses-permission android:name="android.permission.ACCESS_LOCATION_EXTRA_COMMANDS">uses-permission>

    <uses-permission android:name="android.permission.BLUETOOTH">uses-permission>
    <uses-permission android:name="android.permission.BLUETOOTH_ADMIN">uses-permission>

    <application
        android:allowBackup="true"
        android:icon="@mipmap/ic_launcher"
        android:label="@string/app_name"
        android:supportsRtl="true"
        android:theme="@style/AppTheme">
        <meta-data
            android:name="com.amap.api.v2.apikey"
            android:value="d41d442e567f524dc25bf73d147abceb"/>//开发者申请的key
        <activity android:name=".MainActivity">
            <intent-filter>
                <action android:name="android.intent.action.MAIN" />

                <category android:name="android.intent.category.LAUNCHER" />
            intent-filter>
        activity>


        <service android:name="com.amap.api.location.APSService" >
        service>
    application>

manifest>
主函数:
public class MainActivity extends AppCompatActivity implements LocationSource,
        AMapLocationListener {
    private MapView mapView;
    private AMap aMap;
    private AMapLocationClient mlocationClient;
    private OnLocationChangedListener mListener;
    private AMapLocationClientOption mLocationOption;

    @Override
    protected void onCreate(Bundle savedInstanceState) {
        super.onCreate(savedInstanceState);
        setContentView(R.layout.activity_main);
        mapView= (MapView) findViewById(R.id.map);
        mapView.onCreate(savedInstanceState);// 此方法必须重写
        init();

    }

    /**
     * 初始化
     */
    private void init() {
        if (mapView != null) {
            aMap = mapView.getMap();
            setUpMap();
        }
    }

    /**
     * 设置一些amap的属性
     */
    private void setUpMap() {
        aMap.setLocationSource(this);// 设置定位监听
        aMap.getUiSettings().setMyLocationButtonEnabled(true);// 设置默认定位按钮是否显示
        aMap.setMyLocationEnabled(true);// 设置为true表示显示定位层并可触发定位,false表示隐藏定位层并不可触发定位,默认是false
        // 设置定位的类型为定位模式 ,可以由定位、跟随或地图根据面向方向旋转3种
        //跟随:LOCATION_TYPE_MAP_FOLLOW
        //旋转:LOCATION_TYPE_MAP_ROTATE
        //定位:LOCATION_TYPE_LOCATE
        aMap.setMyLocationType(AMap.MAP_TYPE_NORMAL);
    }

    /**
     * 定位成功后回调函数
     */
    @Override
    public void onLocationChanged(AMapLocation amapLocation) {
        if (mListener != null && amapLocation != null) {
            if (amapLocation != null
                    && amapLocation.getErrorCode() == 0) {
                Log.d("===经度:",""+amapLocation.getLongitude());
                Log.d("===纬度:",""+amapLocation.getLatitude());
                mListener.onLocationChanged(amapLocation);// 显示系统小蓝点
            } else {
                String errText = "定位失败," + amapLocation.getErrorCode()+ ": " + amapLocation.getErrorInfo();
                Log.e("AmapErr",errText);
            }
        }
    }

    /**
     * 激活定位
     */
    @Override
    public void activate(OnLocationChangedListener listener) {
        mListener = listener;
        if (mlocationClient == null) {
            mlocationClient = new AMapLocationClient(this);
            mLocationOption = new AMapLocationClientOption();
            //设置定位监听
            mlocationClient.setLocationListener(this);
            //设置为高精度定位模式
            mLocationOption.setLocationMode(AMapLocationClientOption.AMapLocationMode.Hight_Accuracy);
            //设置定位参数
            mlocationClient.setLocationOption(mLocationOption);
            // 此方法为每隔固定时间会发起一次定位请求,为了减少电量消耗或网络流量消耗,
            // 注意设置合适的定位时间的间隔(最小间隔支持为2000ms),并且在合适时间调用stopLocation()方法来取消定位请求
            // 在定位结束后,在合适的生命周期调用onDestroy()方法
            // 在单次定位情况下,定位无论成功与否,都无需调用stopLocation()方法移除请求,定位sdk内部会移除
            mlocationClient.startLocation();
        }
    }

    /**
     * 停止定位
     */
    @Override
    public void deactivate() {
        mListener = null;
        if (mlocationClient != null) {
            mlocationClient.stopLocation();
            mlocationClient.onDestroy();
        }
        mlocationClient = null;
    }


    /**
     * 方法必须重写
     */
    @Override
    protected void onResume() {
        super.onResume();
        mapView.onResume();
    }


    /**
     * 方法必须重写
     */
    @Override
    protected void onPause() {
        super.onPause();
        mapView.onPause();
        deactivate();
    }

    /**
     * 方法必须重写
     */
    @Override
    protected void onSaveInstanceState(Bundle outState) {
        super.onSaveInstanceState(outState);
        mapView.onSaveInstanceState(outState);
    }

    /**
     * 方法必须重写
     */
    @Override
    protected void onDestroy() {
        super.onDestroy();
        mapView.onDestroy();
        if(null != mlocationClient){
            mlocationClient.onDestroy();
        }
    }
}
布局文件中添加一个MapView即可
<com.amap.api.maps.MapView
        android:id="@+id/map"
        android:layout_width="match_parent"
        android:layout_height="match_parent" >
    com.amap.api.maps.MapView>