CC2640协处理器SensorController移植sc_uart串口程序到simple_peripheral工程,实现串口与手机的通信
协处理器串口程序移植过程
(1)通过sensorcontroller软件配置好串口初始化程序
(2)将生成的IAR project代码复制到simple_peripheral工程相应文件夹下
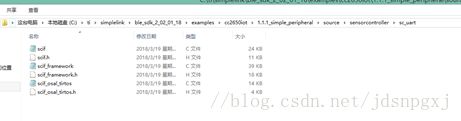
(1) 将.c和.h文件添加当工程中的GY_SerialPort/UART中,并添加编译路径
(2) 改写sc_uart.c文件,这个文件由main_tirtos.c根据开发者自身需求改写而成,这里,包含了串口初始化函数,串口RX接收回调函数,串口打印函数,以及串口任务往app层的回调任务。sc_uart.h则包含了这些函数的借口,保留给app.c使用。
#include "scif.h"
#include "sc_uart.h"
#define BV(n) (1 << (n))
// Display error message if the SCIF driverhas been generated with incorrect operating system setting
#ifndef SCIF_OSAL_TIRTOS_H
#error "SCIF driver has incorrect operating system configurationfor this example. Please change to 'TI-RTOS' in the Sensor Controller Studioproject panel and re-generate the driver."
#endif
// Display error message if the SCIF driverhas been generated with incorrect target chip package
#ifndefSCIF_TARGET_CHIP_PACKAGE_QFN48_7X7_RGZ
#error "SCIF driver has incorrect target chip package configurationfor this example. Please change to 'QFN48 7x7 RGZ' in the Sensor ControllerStudio project panel and re-generate the driver."
#endif
/*********************************************************************
*LOCAL PARAMETER
*/
GY_UartRxBufCallbackGY_UartReviceDataCallback;
/*********************************************************************
*@fn GY_UartTask_RegisterPacketReceivedCallback
*
*@brief 注册串口接收回调任务(将串口接收的数据传给app任务去处理)
*
*@param callback -> 串口接收数据回调(包括数据buf及len)
*
*@return None.
*/
voidGY_UartTask_SC_RegisterPacketReceivedCallback(GY_UartRxBufCallback callback)
{
GY_UartReviceDataCallback = callback;
}
void scCtrlReadyCallback(void) {
}
/*********************************************************************
*@fn scTaskAlertCallback
*
*@brief sensor controller任务进程警报回调,在这里等同于串口RX的接收回调
* 我们可以从这里拿到UART RX接收到的数据
*
*@param none
*
*@return None.
*/
void scTaskAlertCallback(void) {
// Clear the ALERT interrupt source
scifClearAlertIntSource();
// Echo all characters currently in the RX FIFO
//获取串口接收的数据长度
int rxFifoCount = scifUartGetRxFifoCount();
//获取串口RX接收的数据
uint8_trxbuf[200] = {0};
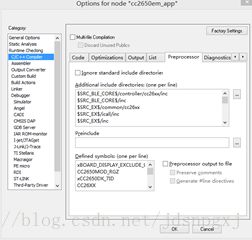
for(int i=0; i { rxbuf[i] = scifUartRxGetChar(); } GY_UartReviceDataCallback(rxbuf, rxFifoCount); //给app任务一个串口读回调 // Clear the events that triggered this scifUartClearEvents(); // Acknowledge the alert event scifAckAlertEvents(); } /********************************************************************* *@fn GY_UartTask_SC_Init * *@brief sensor controller串口进程任务初始化 * 这个初始化函数是由sensor controller studio生成main函数改写 * *@param None * *@return None. */ void ScUARTInit (void) { // Initialize the Sensor Controller scifOsalInit(); scifOsalRegisterCtrlReadyCallback(scCtrlReadyCallback); scifOsalRegisterTaskAlertCallback(scTaskAlertCallback); scifInit(&scifDriverSetup); // Start the UART emulator scifExecuteTasksOnceNbl(BV(SCIF_UART_EMULATOR_TASK_ID)); // Enable baud rate generation scifUartSetBaudRate(115200); // Enable RX (10 idle bit periods required before enabling start bitdetection) scifUartSetRxFifoThr(SCIF_UART_RX_FIFO_MAX_COUNT / 2); scifUartSetRxTimeout(10 * 2); scifUartSetRxEnableReqIdleCount(10 * 2); scifUartRxEnable(1); // Enable events (half full RX FIFO or 10 bit period timeout scifUartSetEventMask(BV_SCIF_UART_ALERT_RX_FIFO_ABOVE_THR |BV_SCIF_UART_ALERT_RX_BYTE_TIMEOUT); } 比较一下,改写后与改写前的区别 void scTaskAlertCallback(void) { // Wake up the OS task //唤醒任务进程,这边接收到串口数据会起作用 Semaphore_post(Semaphore_handle(&semScTaskAlert)); } // scTaskAlertCallback void taskFxn(UArg a0, UArg a1) { // Initialize the Sensor Controller //初始化SensorController驱动,注意着四个都需要 scifOsalInit(); scifOsalRegisterCtrlReadyCallback(scCtrlReadyCallback); scifOsalRegisterTaskAlertCallback(scTaskAlertCallback); scifInit(&scifDriverSetup); // Start the UART emulator //开始串口模拟进程,相当于打开串口功能 scifExecuteTasksOnceNbl(BV(SCIF_UART_EMULATOR_TASK_ID)); // Enable baud rate generation //设置串口波特率 scifUartSetBaudRate(57600); // Enable RX (10 idle bit periods required before enabling start bitdetection) //使能RX接收 scifUartSetRxFifoThr(SCIF_UART_RX_FIFO_MAX_COUNT / 2); scifUartSetRxTimeout(10* 2); scifUartSetRxEnableReqIdleCount(10 * 2); scifUartRxEnable(1); // Enable events (half full RX FIFO or 10 bit period timeout //启动时间(半完整RX FIFI或10位周期超时) scifUartSetEventMask(BV_SCIF_UART_ALERT_RX_FIFO_ABOVE_THR |BV_SCIF_UART_ALERT_RX_BYTE_TIMEOUT); // Main loop while (1) { // Wait for an ALERT callback //串口中断回调阻塞 Semaphore_pend(Semaphore_handle(&semScTaskAlert),BIOS_WAIT_FOREVER); // Clear the ALERT interrupt source //清除中断标志 scifClearAlertIntSource(); // Echo all characters currently in the RX FIFO //串口TX打印串口RX接收到的数据 int rxFifoCount = scifUartGetRxFifoCount(); while (rxFifoCount--) { scifUartTxPutChar((char) scifUartRxGetChar()); } // Clear the events that triggered this //清除串口事件 scifUartClearEvents(); // Acknowledge the alert event //确认中断事件 scifAckAlertEvents(); } } // taskFxn 可以看出来,改写前的taskFxn任务函数中的初始化过程即为改写后的ScUARTInit()串口进程任务初始化函数。改写钱的while(1)循环中的代码就是scTaskAlertCallback任务进程警报回调函数,只不过是多了一个给app任务串口读回调函数。 scTaskAlertCallback接收到串口数据会起作用。 (3) 改写simple_peripheral.c文件,实现获取串口数据的回调,实现与手机端通信的接口。 首先就是添加sc_uart.h的头文件。 声明变量: static Queue_Struct uartRxMsg; static Queue_Handle uartRxQueue; 然后在SimpleBLEPeripheral_init初始化函数中增加sensorcontroller串口的初始化 uartRxQueue =Util_constructQueue(&uartRxMsg);//如果这条语句不加,手机能扫描到蓝牙,但是连接不上 //初始化sensorcontroller 串口 ScUARTInit(); //上电后发送串口测试信息 ScUARTWrite("This my uart test!\r\n",sizeof("This my uarttest!\r\n")); GY_UartTask_SC_RegisterPacketReceivedCallback(TransUartReceiveDataCallback); //打开LCD显示 dispHandle = Display_open(Display_Type_LCD,NULL); 串口数据回调,作用是从app 下获取串口端接收的数据。 static voidTransUartReceiveDataCallback(uint8_t *buf, uint16_t len) { uint8_t *pMsg; //Create dynamic pointer to message. if((pMsg = ICall_malloc(200))) { pMsg[0] = len; memcpy(pMsg+1, buf, len); // Enqueue the message. Util_enqueueMsg(uartRxQueue,sem, (uint8*)pMsg); } } 接下来就要修改任务函数SimpleBLEPeripheral_taskFxn,增加串口接收数据队列处理 //串口接收回调函数队列中的RX消息不为空 while(!Queue_empty(uartRxQueue)) { uint8_t *pMsg = (uint8_t*)Util_dequeueMsg(uartRxQueue); if(pMsg) { Simple_Peripheral_NotiData(pMsg+1,pMsg[0]); //将串口数据发送手机端 ICall_free(pMsg); } } 接收到手机数据通过串口及LCD打印出来 static void SimpleBLEPeripheral_processCharValueChangeEvt(uint8_tparamID) { #ifndefFEATURE_OAD_ONCHIP uint8_t newValue; switch(paramID) { case SIMPLEPROFILE_CHAR1: SimpleProfile_GetParameter(SIMPLEPROFILE_CHAR1, &newValue); Display_print1(dispHandle, 4, 0,"Char 1: %d", (uint16_t)newValue); Display_print1(dispUHandle,0,0,"Char1: %d" , (uint16_t)newValue); ScUARTWrite(&newValue,1); break; case SIMPLEPROFILE_CHAR3: SimpleProfile_GetParameter(SIMPLEPROFILE_CHAR3, &newValue); Display_print1(dispHandle, 4, 0,"Char 3: %d", (uint16_t)newValue); Display_print1(dispUHandle,0,0,"Char3: %d" , (uint16_t)newValue); break; default: // should not reach here! break; } #endif//!FEATURE_OAD_ONCHIP } 将串口RX接收到的数据发送给手机端 voidSimleBLEPeripheral_NotiData(uint8_t *buf,uint16_t len) { uint8_t notiValue[21]={0}; notiValue[0]=len; memcpy(notfiValue+1,buf,len); SimpleProfile_SetParameter(SIMPLEPROFILE_CHAR4, sizeof(uint8_t), ¬fiValue); } 以上移植好以后,编译通过烧录app程序,实现现象:串口只能发送一个字节的数据,手机也只能发送一个自己的数据 那么如果想要发送任意字节的数据包,该如何改写呢? 首先,我们选择app工程的Options选项/C/C++Compiler,如图 定义一个PROFILE_Multibyte,相当定义了宏定义#definePROFILE_Multibyte 1,下面开始改写代码 (1)simple_peripheral.c文件中 static voidSimpleBLEPeripheral_processCharValueChangeEvt(uint8_t paramID) { #ifndefFEATURE_OAD_ONCHIP #ifdef PROFILE_Multibyte uint8_t newValue[21];//定义CC2640蓝牙接收手机发送数据,最大20,还有一个为长度 #else uint8_t newValue;//默认情况下值接收一个字节数据 #endif switch(paramID) { case SIMPLEPROFILE_CHAR1: #ifdef PROFILE_Multibyte SimpleProfile_GetParameter(SIMPLEPROFILE_CHAR1, newValue);//获取CHAR1的数据 ScUARTWrite(newValue+1,newValue[0]);//将手机接收到的数据通过串口打印出来 //GY_UartTask_Write(newValue+1,newValue[0]); #else SimpleProfile_GetParameter(SIMPLEPROFILE_CHAR1, &newValue);//默认情况下只接收一个字节 ScUARTWrite(&newValue,1); #endif Display_print0(dispHandle, 4, 0,"Char 1:"); Display_print1(dispHandle, 5, 0,"%s", newValue+1); break; case SIMPLEPROFILE_CHAR3: SimpleProfile_GetParameter(SIMPLEPROFILE_CHAR3, &newValue); //Display_print1(dispHandle, 4, 0,"Char 3: %d", (uint16_t)newValue); break; default: // should not reach here! break; } #endif//!FEATURE_OAD_ONCHIP } (2)simple_gatt_profile.h文件中 #ifdefPROFILE_Multibyte #definesimpleProfileChar4_len 20 #defineSIMPLEPROFILE_CHAR1_LEN 21//定义CHAR1一次可接收手机的数据包长度 staticuint8 char4ValueLen = 20; //定义CHAR4一次可接收串口的数据包长度 #endif (1) simple_gatt_profile.c文件中 // Characteristic 1 Value #ifdef PROFILE_Multibyte static uint8simpleProfileChar1[SIMPLEPROFILE_CHAR1_LEN] = {0};//定义CHAR1接收缓存数组 #else static uint8 simpleProfileChar1 = 0;//默认情况下一个字节 #endif // Characteristic 4 Value #ifdef PROFILE_Multibyte static uint8 simpleProfileChar4[simpleProfileChar4_len]= {0};//定义CHAR4接收数组 #else static uint8 simpleProfileChar4 = 0; #endif // Characteristic Value 1 { { ATT_BT_UUID_SIZE, simpleProfilechar1UUID }, GATT_PERMIT_READ | GATT_PERMIT_WRITE, 0, #ifdef PROFILE_Multibyte simpleProfileChar1//数组地址 #else &simpleProfileChar1 //char一个字节 #endif }, // Characteristic Value 4 { { ATT_BT_UUID_SIZE, simpleProfilechar4UUID }, 0, 0, #ifdef PROFILE_Multibyte simpleProfileChar4 #else &simpleProfileChar4 #endif }, #ifdef PROFILE_Multibyte if ( len == SIMPLEPROFILE_CHAR5_LEN ) //这里的len长度可以自己定义,但在调用该函数的时候对应的形参len要一致 { memcpy( simpleProfileChar1, value, SIMPLEPROFILE_CHAR1_LEN ); } #else if ( len == sizeof ( uint8 ) ) { simpleProfileChar1 = *((uint8*)value); } #endif #ifdef PROFILE_Multibyte uint8 *pBuf = value; memset(simpleProfileChar4, 0, simpleProfileChar4_len); VOID memcpy( simpleProfileChar4, pBuf+1, pBuf[0] );//第一个字节是长度 // See if Notification has been enabled GATTServApp_ProcessCharCfg( simpleProfileChar4Config,simpleProfileChar4, FALSE, simpleProfileAttrTbl, GATT_NUM_ATTRS( simpleProfileAttrTbl ), INVALID_TASK_ID,simpleProfile_ReadAttrCB ); #else simpleProfileChar4 = *((uint8*)value); // See if Notification has been enabled GATTServApp_ProcessCharCfg( simpleProfileChar4Config,&simpleProfileChar4, FALSE, simpleProfileAttrTbl, GATT_NUM_ATTRS( simpleProfileAttrTbl ), INVALID_TASK_ID, simpleProfile_ReadAttrCB ); #endif case SIMPLEPROFILE_CHAR1: #ifdef PROFILE_Multibyte memcpy( value, simpleProfileChar1, SIMPLEPROFILE_CHAR1_LEN ); //simpleProfileChar1 是数组名 #else *((uint8*)value) = simpleProfileChar1; #endif break; case SIMPLEPROFILE_CHAR4: #ifdef PROFILE_Multibyte memcpy( value, simpleProfileChar4, simpleProfileChar4_len ); #else *((uint8*)value) = simpleProfileChar4; #endif break; #ifdef PROFILE_Multibyte *pLen = char4ValueLen; memcpy( pValue, pAttr->pValue, char4ValueLen ); #else *pLen = 1; pValue[0] = *pAttr->pValue; #endif 最后重新编译,烧录。 实验现象: 手机用蓝牙调试助手在CHAR1发送20字节以内的数据包可以在水墨屏上显示,且串口会打印出来。在CHAR4可以接收到串口发送的数据。
其中GY_UartTask_SC_RegisterPacketReceivedCallback是sc_uart.c中的串口接收回调函数,将串口接收的数据传给app任务去处理。TransUartReceiveDataCallback的定义如下