小知识点总结2020-4-8
1、onNewIntent
(1)触发条件有哪些?
1、activity 设置为SingleTop 且位于栈顶:再次开启activity会走 onNewIntent
2、activity设置为SingleTask、singleInstance,任务栈中存在实例:再次开启activity会走onNewIntent
(2)总结
activity位于栈顶且再次开启activity,当复用activity实例时:这时不走onCreate,而是走onNewIntent。
(3)实战场景
外部应用开启我们的正在运行的activity(activity为singleTask),此时满足条件触发onNewIntent
2、获取资源图片所在的uri
(1)方式1
 String imgPath = ContentResolver.SCHEME_ANDROID_RESOURCE +
                "://" + getPackageName() +
                "/"+R.drawable.ic_launcher;

                Uri uri = Uri.parse(imgPath)

                Log.i(TAG, "方式1: "+imgPath);//android.resource://com.example.myapplication/2131099733
(2)方式2
 Resources resources = getResources();
        String path = ContentResolver.SCHEME_ANDROID_RESOURCE+"://"
                +resources.getResourcePackageName(R.drawable.ic_launcher)+"/"
                +resources.getResourceTypeName(R.drawable.ic_launcher)+"/"
                +resources.getResourceEntryName(R.drawable.ic_launcher);

        Uri uri = Uri.parse(path)
        Log.i(TAG, "方式2: "+path);// android.resource://com.example.myapplication/drawable/ic_launcher
(3)总结
方式1:包名+资源id方式(这里资源id不能替换为文件名)
方式2:包名+资源文件名+文件名
3、检测通知栏的有无(安卓的通知栏)
public void checkNotificationBar() {
        NotificationManager mNotificationManager = (NotificationManager) getSystemService(Context.NOTIFICATION_SERVICE);
        StatusBarNotification[] activeNotifications = mNotificationManager.getActiveNotifications();
        if (activeNotifications == null || activeNotifications.length == 0) {
            Log.i(TAG, "checkNotificationBar: 通知栏为空");
        } else {
            Log.i(TAG, "checkNotificationBar: 存在通知栏");
        }
    }
4、BuildConfig类
安卓gradle封装了一个BuildConfig类,在项目配置完成时这个类的字段信息也就初始化完成了。这个类中一般都是常量字段。如下所示。
(1)安卓项目建立完成时的BuildConfig 类
public final class BuildConfig {
 // 系统默认
  public static final boolean DEBUG = Boolean.parseBoolean("true");
  public static final String APPLICATION_ID = "com.example.myapplication";
  public static final String BUILD_TYPE = "debug";
  public static final String FLAVOR = "";
  public static final int VERSION_CODE = 1;
  public static final String VERSION_NAME = "1.0";
}
如上图,我们建立个项目完成时gradle就默认为我们创建了这个类,还默认添加了些成员。
1、APPLICATION_ID 应用的application id
2、BUILD_TYPE 应用的类型(debug或者release)
3、等等。。。
ps:上面的这些字段我们直接可以使用BuildConfig 调用。
(2)手动添加其他自定义字段
buildTypes {
        release {
            buildConfigField("String","TESE","\"i am a release test\"") //字符串类型时双引号要使用转义字符
            buildConfigField("boolean","IS_PRODUCT","true")
            minifyEnabled false
            proguardFiles getDefaultProguardFile('proguard-android-optimize.txt'), 'proguard-rules.pro'
        }
        debug {
            buildConfigField("String","TESE","\"i am a debug test\"")
            buildConfigField("boolean","IS_PRODUCT","false")
            minifyEnabled false
            proguardFiles getDefaultProguardFile('proguard-android-optimize.txt'), 'proguard-rules.pro'
        }
    }
如上使用buildConfigField方法在gradle中配置即可。注意要debug、release都配置。
3个参数:
1、你要配置的字段类型(String、int、boolean等)
2、字段名
3、字段值
(3)构建下
public final class BuildConfig {
 // 系统默认
  public static final boolean DEBUG = Boolean.parseBoolean("true");
  public static final String APPLICATION_ID = "com.example.myapplication";
  public static final String BUILD_TYPE = "debug";
  public static final String FLAVOR = "";
  public static final int VERSION_CODE = 1;
  public static final String VERSION_NAME = "1.0";
  // 我们自定义配置
  public static final boolean IS_PRODUCT = false;
  public static final String TESE = "i am a debug test";
}
5、子类必须调用父类的方法:@CallSuper
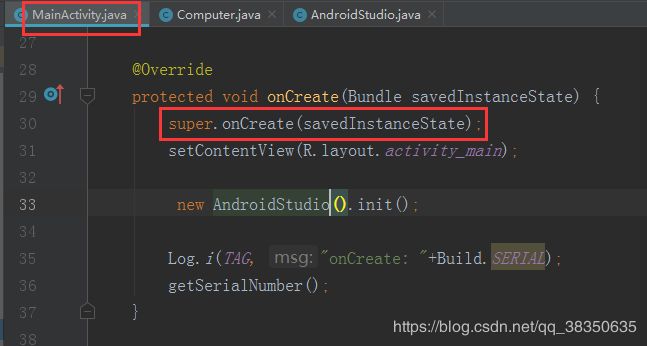
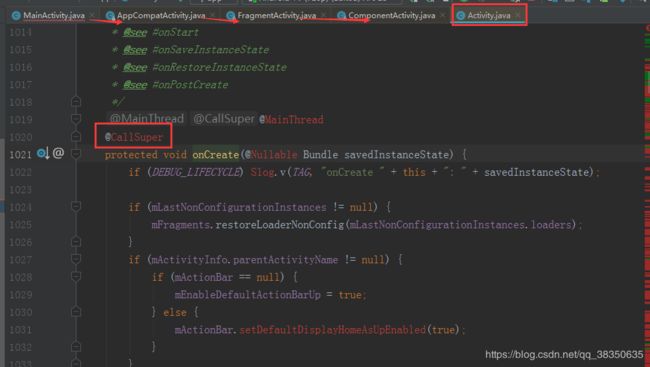
搞安卓块一年了,最近有个疑惑为啥写个activity继承Activity时,在重写其生命周期方法时为啥要在方法中先调用父类的方法。
通过跟踪定位源码发现在其最终父类的activity中有个注解@CallSuper
这里主要完成一些必要的初始化配置。
(3)必要初始化栗子
/**
 * Create by SunnyDay on 2020/04/12
 */
public class Computer {
    public static final  String TAG = Computer.class.getSimpleName();
    @CallSuper
    public void init(){
        Log.i(TAG, "开始系统配置...");
        Log.i(TAG, "系统配置中:5%");
        Log.i(TAG, "系统配置中:18%");
        Log.i(TAG, "系统配置中:89%");
        Log.i(TAG, "系统配置中:100%");
        Log.i(TAG, "---系统配置完成---");
    }
}
/**
 * Create by SunnyDay on 2020/04/12
 */
public class AndroidStudio  extends Computer{
    @Override
    public void init() {
        super.init();
        Log.i(TAG, "使用AS写代码bula bula ...");
    }
}
6、idea代理设置
背景:访问墙外的网受限。公司内网,访问外网访问不了。提供了代理。可以访问。
(1)win 10的代理
发现再网络设置里面设置了代理后电脑可以访问外网了。但是使用idea、Android studio这类的软件下插件、添加依赖还是time out,引入失败。有时打包都不行。
(2)idea、Android studio设置代理
设置方式:
1、项目里单独设置:项目中可用,其他项目还需要配置才能使用。(栗子如下)
2、编译器全局配置:所有新建项目都能使用。
项目中设置:gradle.properties文件中配置如下
域名为公司给你的代理域名
端口为公司给你的端口号

systemProp.https.proxyHost=xxx.xxx.xxx.xxx.xx
systemProp.https.proxyPort=xxx

systemProp.http.proxyHost=xxx.xxx.xxx.xxx.xx
systemProp.http.proxyPort=xxx


