编写i2c驱动-基于Linux3.10
i2c驱动
很多芯片的控制方法均使用了i2c的方式,EEPROM,音频芯片AK4951,索尼、松下、豪威的图像传感器、电机驱动等均采用i2c的控制方式。彻底的弄懂i2c设备驱动,对于理解其它驱动非常有帮助,从投入和产出比而言还是值得的。
I2c设备分为两种,一种叫i2c适配器(adpater),一种客户端(client);与client类似的可以参考USB,我们通常使用的u盘、usb鼠标、usb摄像头等,和adapter类似是usb控制器,usb那里将其称为EHCI(enhancedhost controller Interface),这个控制用于实现协议相关的一些内容。为了节约cpu资源,我们不会使用cpu产生协议需要的通信时序和数据格式,我们希望,当我们需要设备的数据时,告诉adapter,我们需要地址为XXX,偏移为XXX的寄存器的内容,adapter读完毕后中断通知cpu就行了,对于写,我们希望将待写的数据和寻址设备地址和偏移寄存器的相关信息扔给adapter,至于设备写是否成功,通过adapter返回给cpu就可以了。由于client都遵循i2c协议,所以一个adapter能适应各种client,i2c设备的驱动也较为简单,编写一个就可以了,且其驱动框架较为固定,但是client就千差万别了,所以本文对于adapter只给出了一个示例,对于client则给出了好几个。I2c_adapter对应于具体的adapter,其中的algo成员是读写i2c设备的具体方法。
I2C子系统拓扑图
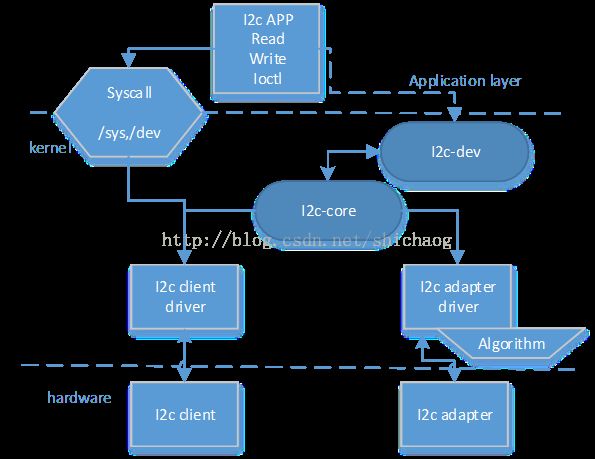
首先看一张i2c系统在内核中的拓扑图。
结合这张图,先看看内核关于i2c驱动的源代码目录,上面这张图中的i2c-core对应于drivers/i2c/i2c-core.c,i2c adapter driver代码对应在drivers/i2c/busses/目录下,不同的平台会有不同的命名方法。I2c-dev代码位于在drivers/i2c/i2c-dev.c,驱动器的传输驱动在drivers/i2c/algo目录下。而client设备则随设备的不同分散在内核的各处。其它文件向smbus其实和i2c协议的一个子集,本质上没有多大区别。
i2c子系统关键数据结构拓扑
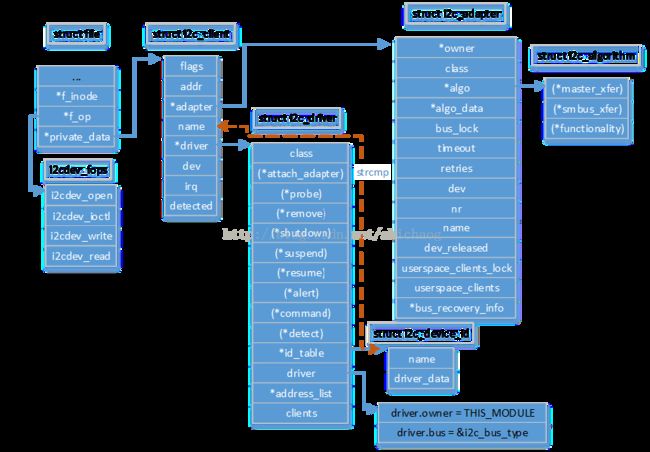
下面来看看内核中和上述i2c文件相关的数据结构拓扑图。
adapter侧驱动
这里我们先看和adapter相关的代码,和驱动工作着息息相关的包括设备树、drivers/i2c/busses/目录下的adapter代码,先给出adapter的devicetree的相关代码。client设备树的表示将在后面使用到时在给出,关于设备树的相关知识,可以参考我的《Linux系统启动那些事-基于Linux3.10》的设备树解析一节。
/{
	Compatible = “…”;
	Chosen {
	…
}
apb@e0000000 {
compatible = “…”;
…
	i2c0: i2c@e0008000{
		compatible = “MYI2C”;
		#address-cells=<1>;
		#size-cells = <0>;
		reg = <0xe0008000 0x1000>;
		interrupts = <19, 0x4>;
		pinctl-names = “default”;
		pinctl-0 = <&i2c0_pins>;
		clock-frequencty = <100000>;
		MYI2C,i2c-class = <0x81>;
		status = “disabled”
};
i2c2: i2c@e0007000{
		compatible = “MYI2C”;
		#address-cells=<1>;
		#size-cells = <0>;
		reg = <0xe0007000 0x1000>;
		interrupts = <36, 0x4>;
		pinctl-names = “default”;
		pinctl-0 = <&i2c_pins>;
		clock-frequencty = <400000>;
		MYI2C,i2c-class = <0x81>;
		status = “disabled”
};
};
在注册i2c的adapter驱动注册代码在drivers/i2c/busses/目录下,这里有24XX等,假设我们的自己的adapter的驱动文件为MYI2C.c,通常i2c设备在每一个SOC微控制器上都有,在系统启动时在do_basic_setup函数中会调用若干initcall,那么MYI2C.c的驱动框架如下:
MYI2C.c //adapter的数据结构表示 static struct MYI2C_i2c_dev_info { unsigned char __iomem *regbase; struct device *dev; unsigned int irq; struct i2c_adapter adap; enum MYI2C_i2c_state state; u32 clk_limit; struct i2c_msg *msg; __u16 msg_num; __u16 msg_addr; }; //adapter的通信方法 Static const struct i2c_algorithm MYI2C_i2c_algo = { .master_xfer = MYI2C_i2c_xfer, .functionality = MYI2C_i2c_func, }; //以前需要先注册i2c设备然后注册设备,但是这里驱动和设备的注册顺序和上面正好相反 static int MYI2C_i2c_probe(struct platform_device *pdev) { struct device_node *np = pdev->dev.of_node; struct MYI2C_i2c_dev_info * pinfo; … /*解析设备树,获得相关的设备信息,比如regbase,将根据以下两行得到,每行对应一个adapter. reg = <0xe0008000 0x1000>; reg = <0xe0007000 0x1000>; 基地址分别为0xe0008000,0xe0007000;设备树相关内容见一文 */ mem = platform_get_resource(pdev, IORESOURCE_MEMO); pinfo->dev = &pdev->dev; pinfo->regbase = devm_ioremap(&pdev->dev, mem->start, resource_size(mem)); pinfo->irq = platform_get_irq(pdev, 0); of_property_read_u32(np, “clock_frequency”, &pinfo->clklimit); //根据上述得到的regbase,依据datasheet,初始化adapter相关控制寄存器。 hw_init();//芯片相关 pdev->dev->p->driver_data = pinfo; devm_request_irq(&pdev->dev, pinfo->irq, MYI2C_i2c_irq, IRQ_TRIGER_HIGH, \ dev_name(&pdev->dev), pinfo); //pinfo结构体是adapter内核下的表示, pinfo->adap.owner = THIS_MODULE; pinfo->adap.parent = &pdev->dev; pinfo-> adap.of_node = np; pinfo-> adap.class = i2c_class; //& MYI2C_i2c_algo,该文件中定义的adapter读写等控制接口 pinfo-> adap.algo = & MYI2C_i2c_algo; pinfo-> adap.nr = of_alias_get_id(np, “i2c”); i2c_add_numbered_adapter(adap); //会调用i2c_new_device(adap, info),创建该adap of_i2c_register_devices(adap); } Static const struct of_device_id MYI2C_i2c_of_match[] = { { .compatible = “MYI2C,i2c”,}, {}, }; Static struct platform_driver MYI2C_i2c_driver = { .probe = MYI2C_i2c_probe, .remove = MYI2C_i2c_remove, .driver = { .name = “MYI2C-i2c”, .owner = “THIS_MODULE”, .of_match_table = MYI2C_i2c_of_match, }; }; Platform_driver_register(&MYI2C_i2c_driver); static int __init MYI2C_i2c_init (void) { return platform_driver_register(&MYI2C_i2c_driver); } subsys_initcall(MYI2C_i2c_init);
在Linux操作系统启动时,MYI2C_i2c_init函数会得到执行,注册MYI2C_i2c_driver表示的i2cadapter侧的驱动程序,注册过程中会调用.probe = MYI2C_i2c_probe,回调函数,MYI2C_i2c_probe函数执行完毕,adapter的驱动就可以使用了。
I2c驱动adapter可能不止一个,例如这里就有两个adapter,adapter之间根据bus号区别,如果adapter的总线号如果指定了则调用i2c_add_adapter()注册一个动态分配I2C总线号的adapter。动态的方法使用__i2c_add_numbered_adapter(),接着会调用of_i2c_register_devices(adap);注册adapter的设备。该函数定义在drivers/of/of_i2c.c,使用了设备树的方法。该函数调用i2c_new_device()枚举adapter。
struct i2c_board_info info = { addr = of_get_property(adap->dev.of_node, “reg”, &len); info.addr = be32_to_cpu(addr); info.irq = irq_of_parse_and_map(node, 0); info.of_node = of_node_get(node); }; i2c_new_device函数的原型如下: struct i2c_client * i2c_new_device(struct i2c_adapter *adap, struct i2c_board_info const *info)
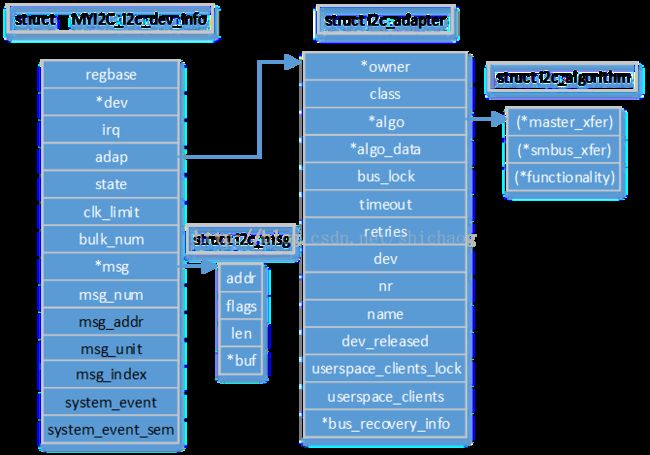
其中的第一个参数是i2c_adapter注意看第一张数据结构表,第二个参数的内容如上,使用of(open firmware)的方式获得adapter的信息,然后根据info的信息创建一个client并填充相关信息,再调用device_register()将其注册,这样adapter就驱动就和各个adapter设备关联起来了,通过adapter驱动的algo字段,就可以找到设备的操作方法了。最后来看一下adapter驱动和adapter设备相关联的数据结构表示。
在上面的结构体中,有一个i2c_msg结构体,在向i2c 的client侧读写数据时,数据和设备相关信息存放在 i2c_msg中,后面i2c_master_send/i2c_master_rcv调用i2c_transfer()传输数据,i2c_transfer()里会调用adapter->algo->(*master_xfer)最终完成数据的传输。
用户空间的read/write会调用i2cdev_write()/I2cdev_write(),相应的下一级调用i2c_master_send/i2c_master_rcv完成数据的传输。
client侧驱动
接下来看看i2c 的client侧驱动,先接着设备树的方法将,使用ak4951语音芯片:
statict const struct i2c_device_id = ak4951_i2c_id[] = { {“ak4951”, 0x12}, {} }; static struct i2c_driver ak4951_i2c_driver = { .driver = { .name = “ak4951-codec”, .owner = THIS_MODULE, }; .probe = ak4951_i2c_probe, .remove = ak4951_i2c_remove, .id_table = ak4951_i2c_id, }; static int __init ak4951_init(void) { i2c_add_driver(&ak4951_i2c_driver); } module_init(ak4951_init); static int ak4951_i2c_probe() { … }
下面再来看一个常规套路的EEPROM驱动,该驱动以字符设备驱动为例,并没有使用i2c-dev.c下的读写控制接口,而是自己实现了。
static struct file_operations e2p_fops = { .owner = THIS_MODULE, .open = e2p_open, .read = e2p_read, .write = e2p_write, }; static dev_t dev_number; static struct class *e2p_class; int __init e2p_init(void) { int err,i; alloc_chrdev_region(&dev_number, 0, 0, “”e2p); e2p_class = class_create(THIS_MODULE,DEVICE_NAME); cdev_init(cdev, &e2p_fops); cdev_add(cdev, dev_number, 1); device_create(e2p_class, NULL, MKDEV((MAJOR)(dev_number),0), “e2p%d”, i); i2c_add_driver(&e2p_driver); }更多i2cclient侧驱动请看drivers/misc/目录。


