亚马逊 AWS IoT资料收集
什么是 AWS IoT?
https://docs.aws.amazon.com/zh_cn/iot/latest/developerguide/what-is-aws-iot.html
https://docs.aws.amazon.com/zh_cn/iot/latest/developerguide/iot-console-signin.html
登录控制台
https://console.aws.amazon.com/console/home
AWS IoT Core 资源
https://aws.amazon.com/cn/iot-core/resources/
文档:


下一步

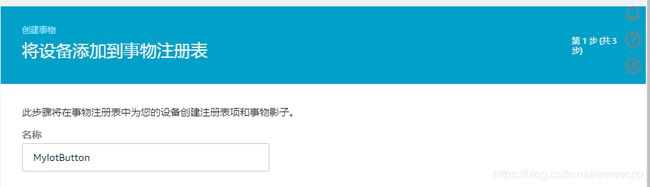
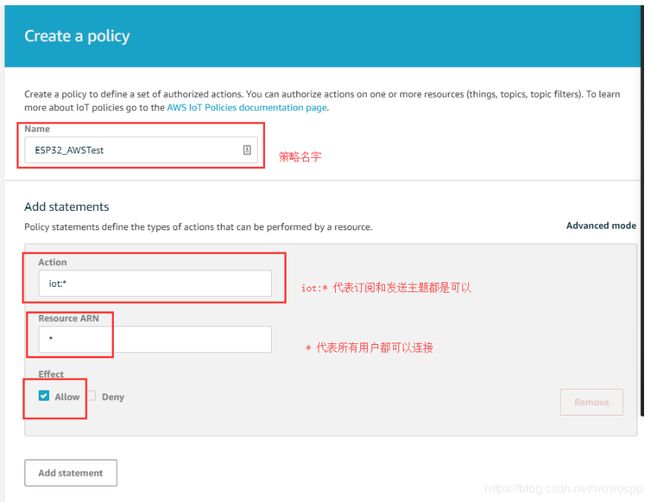
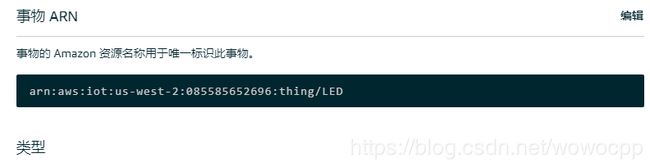
创建证书
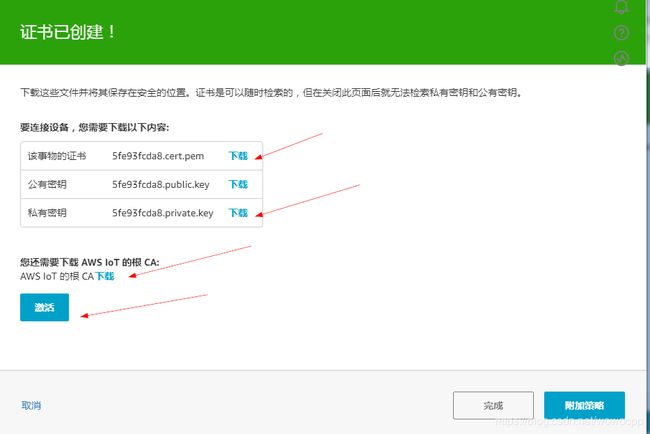
AWS IoT 的根 CA 下载
到底用那个呢 ?
点击 激活 , 然后 点击 完成


ESP32 开发笔记(三)连接 AWS IOT
https://blog.csdn.net/qq_27114397/article/details/79042659?utm_source=blogxgwz2
AWS IOT接入及测试
https://blog.csdn.net/m0_37263637/article/details/80989986
ESP32 连接AWS IOT
https://blog.csdn.net/u014377238/article/details/80422016?utm_source=blogxgwz8
https://www.exploreembedded.com/wiki/Secure_IOT_with_AWS_and_Hornbill_ESP32
https://exploreembedded.com/wiki/AWS_IOT_with_Arduino_ESP32
https://github.com/espressif/esp-iot-solution
https://blog.csdn.net/espressif/article/details/79359817?utm_source=blogxgwz3
https://www.amazonaws.cn/inbounddg-events/iot/?sc_channel=ps&sc_campaign=inbounddg&sc_publisher=baidu&sc_detail={亚马逊 IoT}&sc_country=cn&sc_geo=chna&sc_category=mult&sc_segment={iot|iot_Product}&sc_outcome=field&trkCampaign=inbounddgiot&trk=Baidu|iot|iot_Product|亚马逊 IoT&audience=189053
您可以借助 AWS IoT 轻松将设备连接至云和其他设备。AWS IoT 支持 HTTP、WebSockets 和 MQTT,可最大限度地减少代码在设备上占用的空间并降低带宽要求。
AWS IoT Button
AWS IOT with Arduino ESP32
https://exploreembedded.com/wiki/AWS_IOT_with_Arduino_ESP32
I am able to develop code using ARDUINO IDE that connects ESP8266 with AWS IOT by using this repo:http://github.com/odelot/aws-mqtt-websockets
https://www.instructables.com/id/Arduino-Using-AWS-IoT-Serivce/
https://anwaarullah.wordpress.com/2015/07/30/getting-started-with-iot-on-aws-and-arduino-esp8266/
https://github.com/Schm1tz1/aws-sdk-arduino-esp8266
https://exploreembedded.com/wiki/AWS_IOT_with_Arduino_ESP32
参考资料链接:https://www.exploreembedded.com/wiki/Secure_IOT_with_AWS_and_Hornbill_ESP32
  iotClient.setAWSRegion("eu-west-1");
  iotClient.setAWSEndpoint("amazonaws.com");
  iotClient.setAWSDomain("foobar.iot.eu-west-1.amazonaws.com");
  iotClient.setAWSPath("/things/example-1/shadow");
  iotClient.setAWSKeyID("ID");
  iotClient.setAWSSecretKey("SECRET");
  iotClient.setHttpClient(&httpClient);
  iotClient.setDateTimeProvider(&dateTimeProvider);
下一个:
iotClient.setAWSRegion("us-west-2");
iotClient.setAWSEndpoint("amazonaws.com");
iotClient.setAWSDomain("al1x5kb4rzh0x.iot.us-west-2.amazonaws.com");
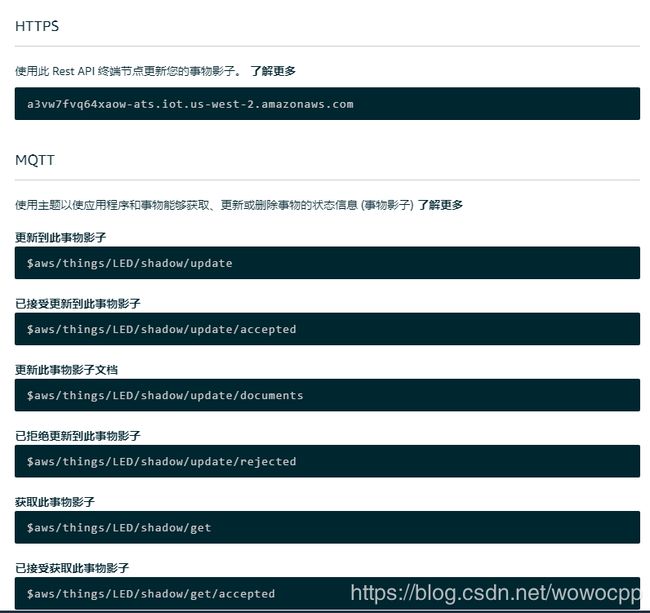
iotClient.setAWSPath("$aws/things/esp8266/shadow/update/accepted");
iotClient.setAWSKeyID("AKIAJJQ6ASLIDIPBE4PQ");
iotClient.setAWSSecretKey("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");
iotClient.setHttpClient(&httpClient);
iotClient.setDateTimeProvider(&dateTimeProvider);
222
void initAWS()
{
  iotClient.setAWSRegion("ap-southeast-1");
  iotClient.setAWSEndpoint("amazonaws.com");
  iotClient.setAWSDomain("aphpti0fiyatr.iot.ap-southeast-1.amazonaws.com");
  iotClient.setAWSPath("/things/IOTfl2017/shadow");
  iotClient.setAWSKeyID("AKIAI6WQ7UFK4JKZ7YJA");
  iotClient.setAWSSecretKey("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");
  iotClient.setHttpClient(&httpClient);
  iotClient.setDateTimeProvider(&dateTimeProvider);
}
I was facing a similar problem: trying to update a thing’s shadow on AWS IoT with no success. After some research, I found out that I was using an outdated library. In this question they advise to use heskew’s aws-sdk-arduino, on iot-get-shadow-and-cleanup branch:
https://github.com/heskew/aws-sdk-arduino/tree/iot-get-shadow-and-cleanup.
Additionally, I think you have a little error on your code. As far as I know, AWSPath, it should look like:
iotClient.setAWSPath("/things/esp8266/shadow");
At least that works for me, and they use it this way on this video.
That’s all I can tell… I am learning at this moment as well. Hope it helps!!
https://arduino.stackexchange.com/questions/51059/esp8266-dht11-aws-iot-thing-not-updating-thing-shadow-was-working-before
合作伙伴网站
Mongoose OS ESP32-DevKitC
https://aws.amazon.com/cn/iot-core/getting-started/#kits
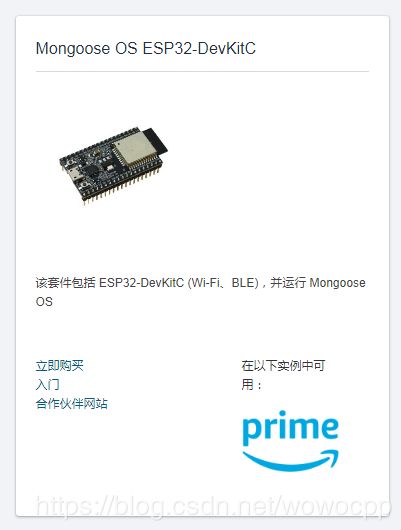
入门手册 按照 这个 来一遍
https://docs.aws.amazon.com/zh_cn/iot/latest/developerguide/what-is-aws-iot.html
在Arduino中添加第3方库
听起来是个设置的问题,但是由于对arduino还不太熟,导致摸索对了好半天才搞定。
首先我google的官方的做法 https://www.arduino.cc/en/Guide/Libraries 这里面分别说了3种添加的方法:
1)使用在线方式,在之前安装esp8266 board的时候就是用的这个方法 。
2)将现成的zip文件导入,这是好心人已经把库文件压缩成zip的情况下使用的,我这里不适合,因为库文件还在文件夹里放着呢,好几个库都是这样放的,我不能一个一个的都给压缩去吧,也太土了,但是要是没有第3中方法的话我也只能用2)了。
3)将库文件放到arduino指定的目录中,这个指定的目录在分不同的平台而定:
在Windows平台一般是 “My Documents\Arduino\libraries”.
在mac平台 一般是 “Documents/Arduino/libraries”.
在Linux平台是sketchbook目录下的libraries。
因为我的是mac,所以就将库文件都放到 Documents/Arduino/libraries 目录中去了,注意,人家有嘱咐:
There may be more files than just the .cpp and .h files, just make sure they’re all there. (The library won’t work if you put the .cpp and .h files directly into the libraries folder or if they’re nested in an extra folder. For example: Documents\Arduino\libraries\ArduinoParty.cpp and Documents\Arduino\libraries\ArduinoParty\ArduinoParty\ArduinoParty.cpp won’t work.)
Restart the Arduino application. Make sure the new library appears in the Sketch->Import Library menu item of the software. That’s it! You’ve installed a library!
完事之后果然如我所料—我没有添加成功,又仔细对比了一下,路径没有错误啊,Documents/Arduino/libraries 啊,库文件也有啊。编译的时候还是提示找不到头文件。打开ide看看Preferences,突然发现我的Sketchbook location 是在另外路径,这个路径我安装完Arduino后修改的,然后就在那个路径中复制了libraries的各个子文件夹,重启打开IDE后,可以从Sketch->Include Library中看到新添加的库了。
到此完成。