apollo代码学习2.2——深度解析(control)
每次遇见复杂的事情总是在先寻找一种简单明了的方式进行研究,用一种浅显易懂的方式来表达。
今天继续apollo代码中control模块的总结。
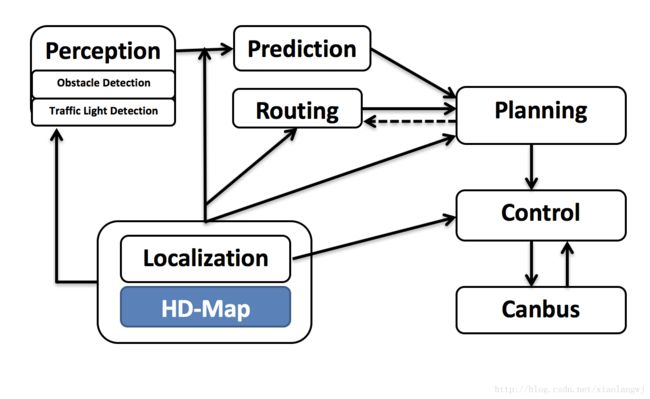
好了,还是先看下总框架图吧:
回忆下上次的代码总结。如下:
int ApolloApp::Spin() {
  ros::AsyncSpinner spinner(callback_thread_num_);         ///开消息线程
  auto status = Init();                                    ///模块初始化(由子类具体重写的)
  if (!status.ok()) {
    AERROR << Name() << " Init failed: " << status;
    return -1;
  }
  status = Start();                                        ///模块开启(由子类具体重写的)
  if (!status.ok()) {
    AERROR << Name() << " Start failed: " << status;
    return -2;
  }
  ExportFlags();                                           ///输出一些flag参数
  spinner.start();                                         ///消息线程开启
  ros::waitForShutdown();                                  ///消息循环处理并检测关闭
  Stop();                                                  ///退出(由子类具体重写的)
  AINFO << Name() << " exited.";
  return 0;
}
可以说百度的apollo代码框架非常规范,从上面的代码结构来看,control模块就是包括:开消息线程---->初始化模块---->开启---->输出flag参数---->消息处理开启---->循环处理并检测关闭---->关闭。但是有些步骤是比较复杂的,上次总结仅仅针对初始化,那么今天,开始总结下开始模块。
开始模块主要的流程在文件control.cc中。下面来看。
///control模块开启
Status Control::Start() {
  // set initial vehicle state by cmd
  // need to sleep, because advertised channel is not ready immediately
  // simple test shows a short delay of 80 ms or so
  AINFO << "Control resetting vehicle state, sleeping for 1000 ms ...";
  usleep(1000 * 1000);                                                                ///先休眠一会

  // should init_vehicle first, let car enter work status, then use status msg
  // trigger control

  AINFO << "Control default driving action is "
        << DrivingAction_Name(control_conf_.action());                                ///查看驱动模式
  pad_msg_.set_action(control_conf_.action());                                        ///设置踏板驱动模式

  timer_ = AdapterManager::CreateTimer(
      ros::Duration(control_conf_.control_period()), &Control::OnTimer, this);        ///启用定时器做消息处理-间隔为0.01s

  AINFO << "Control init done!";

  common::monitor::MonitorBuffer buffer(&monitor_);                                   ///日志缓存
  buffer.INFO("control started");

  return Status::OK();
}
上面的start()函数中主要讲一下开启事件定时器, AdapterManager::CreateTimer(ros::Duration(control_conf_.control_period()), &Control::OnTimer, this);
定时器时间间隔为control_period=0.01s,OnTimer将指向具体事件。
void Control::OnTimer(const ros::TimerEvent &) {
  double start_timestamp = Clock::NowInSeconds();                            ///获取当前开始时刻

  ControlCommand control_command;                                            ///声明一个命令类

  Status status = ProduceControlCommand(&control_command);                    ///产生命令
  AERROR_IF(!status.ok()) << "Failed to produce control command:"
                          << status.error_message();

  double end_timestamp = Clock::NowInSeconds();                               ///获取结束时刻

  if (pad_received_) {
    control_command.mutable_pad_msg()->CopyFrom(pad_msg_);
    pad_received_ = false;
  }                                                                            ///将产生的新命令移送至缓存

  const double time_diff_ms = (end_timestamp - start_timestamp) * 1000;        ///计算产生命令所用的时间
  control_command.mutable_latency_stats()->set_total_time_ms(time_diff_ms);
  ADEBUG << "control cycle time is: " << time_diff_ms << " ms.";
  status.Save(control_command.mutable_header()->mutable_status());

  SendCmd(&control_command);                                                   ///发送命令
}
相关注释已经写在了代码中,就不一行一行解释了。上面的代码段中主要包含产生控制命令接口。
ProduceControlCommand(&control_command);这个函数稍微长一点,但还是一些检查处理信息。如下:
 ///一下为control模块计算控制命令
Status Control::ProduceControlCommand(ControlCommand *control_command) {
  Status status = CheckInput();                                                ///检查所需输入信号是否正常
  // check data
  if (!status.ok()) {
    AERROR_EVERY(100) << "Control input data failed: "
                      << status.error_message();
    estop_ = true;
  } else {
    Status status_ts = CheckTimestamp();                                        ///检查时间撮
    if (!status_ts.ok()) {
      AERROR << "Input messages timeout";
      estop_ = true;
      status = status_ts;
    }
  }

  // check estop
  estop_ = estop_ || trajectory_.estop().is_estop();

  // if planning set estop, then no control process triggered
  if (!estop_) {
    if (chassis_.driving_mode() == Chassis::COMPLETE_MANUAL) {
      controller_agent_.Reset();                              ///控制器进行复位。
      AINFO_EVERY(100) << "Reset Controllers in Manual Mode";
    }

    auto debug = control_command->mutable_debug()->mutable_input_debug();
    debug->mutable_localization_header()->CopyFrom(localization_.header());
    debug->mutable_canbus_header()->CopyFrom(chassis_.header());
    debug->mutable_trajectory_header()->CopyFrom(trajectory_.header());

      ///控制模块的具体算法在controller_agent_中,这里相当于调用一个控制器接口。
    Status status_compute = controller_agent_.ComputeControlCommand(
        &localization_, &chassis_, &trajectory_, control_command);

    if (!status_compute.ok()) {
      AERROR << "Control main function failed"
             << " with localization: " << localization_.ShortDebugString()
             << " with chassis: " << chassis_.ShortDebugString()
             << " with trajectory: " << trajectory_.ShortDebugString()
             << " with cmd: " << control_command->ShortDebugString()
             << " status:" << status_compute.error_message();
      estop_ = true;
      status = status_compute;
    }
  }

    /**
     * 以下代码可以解释为程序运行异常,estop_为false,程序强制将控制输出量置为0,即让车辆原地停止。
     */
  if (estop_) {
    AWARN_EVERY(100) << "Estop triggered! No control core method executed!";
    // set Estop command
    control_command->set_speed(0);
    control_command->set_throttle(0);
    control_command->set_brake(control_conf_.soft_estop_brake());
    control_command->set_gear_location(Chassis::GEAR_DRIVE);
  }
  // check signal
  ///将车辆控制信号中的轨迹决策存储起来。
  if (trajectory_.decision().has_vehicle_signal()) {
    control_command->mutable_signal()->CopyFrom(
        trajectory_.decision().vehicle_signal());
  }
  return status;
}
ProduceControlCommand代码段先要检查下数据通道是否正常输入数据,再检查数据帧的时间搓。这里需要注意的是,代码段中会检查两个信息数据接受的状态,不仅仅是control自身数据接收情况,还包括上游模块中轨迹输出的状态。通过estop_参数来判断车辆的驾驶模式(手动还是自动)。当然正常情况下肯定是自动喽,前面的程序只要没有异常都会很自然设置成为自动驾驶,后面就开始自动驾驶的代码,但是假若车辆在运行当中出现异常,代码中也进行了相关设置,将控制命令中的目标参数均置0。
if (estop_) {
    AWARN_EVERY(100) << "Estop triggered! No control core method executed!";
    // set Estop command
    control_command->set_speed(0);
    control_command->set_throttle(0);
    control_command->set_brake(control_conf_.soft_estop_brake());
    control_command->set_gear_location(Chassis::GEAR_DRIVE);
  }
其实上面这段代码我们主要看的是下面的代码
if (!estop_) {
.........
}
这部分主要是对控制器进行操作,当设置好驱动模式后,就调用Status status_compute = controller_agent_.ComputeControlCommand( &localization_, &chassis_, &trajectory_, control_command );这个接口进行计算。这个函数调用的是算法层面的代码,具体现在先不介绍了,后续补充。
到此, Status status = ProduceControlCommand(&control_command);的流程就算结束了,我们继续回到定时器函数往下看代码。
计算完控制命令,会将pad_received_信息保存起来。最后将计算数据发布出去。
SendCmd(&control_command);
具体如下:
void Control::SendCmd(ControlCommand *control_command) {
  // set header
  AdapterManager::FillControlCommandHeader(Name(), control_command);  ///添加控制命令帧的头信息

  ADEBUG << control_command->ShortDebugString();                      ///打印信息
  if (FLAGS_is_control_test_mode) {
    ADEBUG << "Skip publish control command in test mode";
    return;
  }                                                                    ///若是在测试模式下,将不发布控制命令
  AdapterManager::PublishControlCommand(*control_command);             ///发布控制命令
}
这段代码也很容易理解了。好了,今天就先总结到这里,其实开始步骤还没有总结完,下一次再接着总结。
本文仅仅针对模块start()步骤进行了简单梳理,下一篇会接着总结。欢迎关注。
刚刚学习apollo,难免写的不准确,欢迎大家指正。
