Promethus+Grafana方案-实现MYSQl+LINUX+Windows监控
一、Promethus简介
Prometheus基本原理是通过HTTP协议周期性抓取被监控组件的状态,这样做的好处是任意组件只要提供HTTP接口就可以接入监控系统,不需要任何SDK或者其他的集成过程。这样做非常适合虚拟化环境比如VM或者Docker 。
输出被监控组件信息的HTTP接口被叫做exporter 。目前互联网公司常用的组件大部分都有exporter可以直接使用,比如Varnish、Haproxy、Nginx、MySQL、Linux 系统信息 (包括磁盘、内存、CPU、网络等等),具体支持的源看:https://github.com/prometheus
与其他监控系统相比,Prometheus的主要特点是:
一个多维数据模型(时间序列由指标名称定义和设置键/值尺寸)。
非常高效的存储,平均一个采样数据占~3.5bytes左右,320万的时间序列,每30秒采样,保持60天,消耗磁盘大概228G。
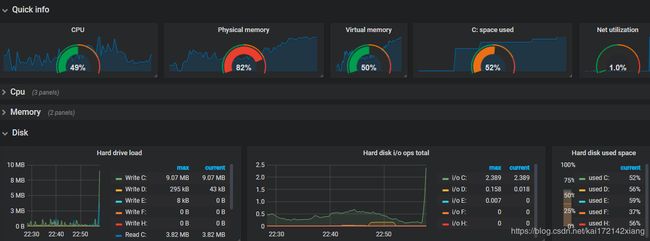
二、初步实现效果图
2.1、linux服务器监控效果
2.2、 mysql监控效果
三、安装步骤
服务端安装:
3.1、安装go环境
安装包下载地址为:https://golang.org/dl/。
如果打不开可以使用这个地址:https://golang.google.cn/dl/。
参考博客地址:https://www.runoob.com/go/go-environment.html
安装步骤:
	1、下载二进制包:go1.13.8.linux-arm64.tar.gz。
	2、将下载的二进制包解压至 /usr/local目录。
tar -zxvf go1.13.8.linux-arm64.tar.gz
3、将 /usr/local/go/bin 目录添加至PATH环境变量:
export PATH=$PATH:/usr/local/go/bin
3.2 、安装prometheus
1、下载地址:
     https://prometheus.io/download/
2、安装步骤:
tar -zxvf prometheus-2.16.0.linux-amd64.tar.gz
mv prometheus-2.16.0.linux-amd64  /usr/local/prometheus
3、修改配置文件,添加要监控节点
在里面写清楚监控节点的信息。注意此文件是yml文件,对格式要求很严格。
主机的9090端口是必须配置的,这是prometheus自带的web界面
9100是node_exporter的默认端口
9104是mysqld_exporter默认端口
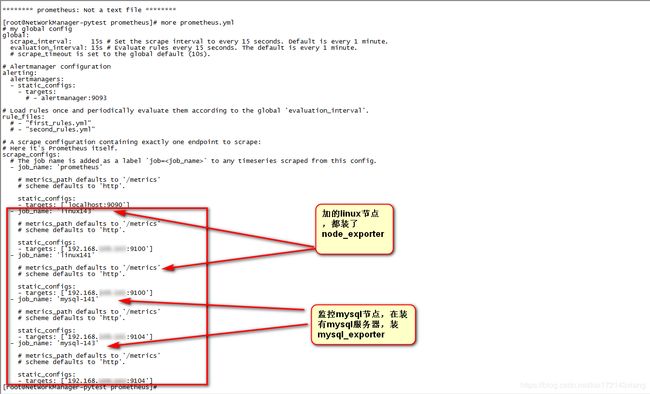
配置详解参考是:https://www.cnblogs.com/afterdawn/p/9020129.html
启动promethus
nohup /usr/local/prometheus/prometheus --config.file=/usr/local/prometheus/prometheus.yml --storage.tsdb.path="/data/prometheus" --storage.tsdb.retention=30d &
config.file:指定配置文件
storage.tsdb.path:指定监控数据存放目录
storage.tsdb.retention:指定保留30天监控数据
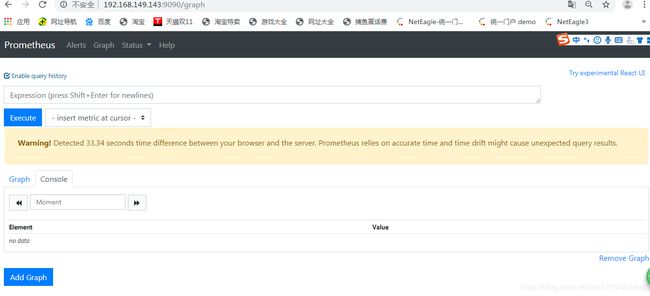
4、配置启动成功后,登入验证
四、安装客户端 node_exporter、mysqld_exporter、windows
4.1、node_exporter、mysqld_exporter下载地址:
https://prometheus.io/download/
安装window采集器下载地址,wmi_exporter-0.9.0-amd64.exe
https://github.com/martinlindhe/wmi_exporter/releases
4.1.2 实现linux服务器监控
1、安装命令
tar xvf node_exporter-1.0.0.linux-amd64.tar.gz
mv node_exporter-0.16.0.linux-amd64 /usr/local/node_exporter
2、启动node_exporter命令,主要采集系统层面的监控数据:
nohup /usr/local/node_exporter/node_exporter &
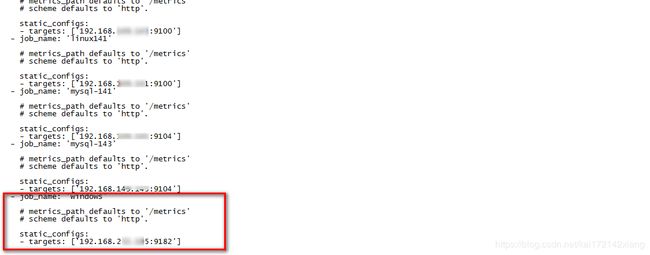
3、在promethus.yml添加节点
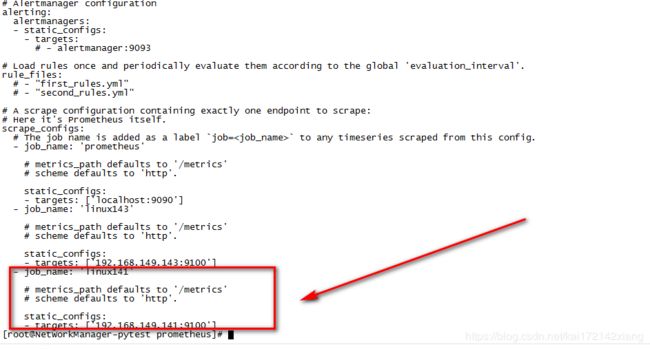
4、重启promethus
nohup /usr/local/mysqld_exporter/mysqld_exporter --config.my-cnf="/usr/local/mysqld_exporter/.my.cnf" &
4.1.3 实现mysqld监控
1、上传安装包,解压
tar -zxvf mysqld_exporter-0.12.1.linux-amd64.tar.gz
2、移动mysql包位置
mv mysqld_exporter-0.12.1.linux-amd64 /usr/local/mysqld_exporter
3、创建配置文件
[root@mydb1 ~]# cat /usr/local/mysqld_exporter/.my.cnf
[client]
host=192.168.1.101
user=mysql_monitor
password=mysql_monitor
其中.my.cnf通过vi新创建的
4、添加节点到promethus.yml
5、重启promerhus,启动命令:
nohup /usr/local/mysqld_exporter/mysqld_exporter --config.my-cnf="/usr/local/mysqld_exporter/.my.cnf" &
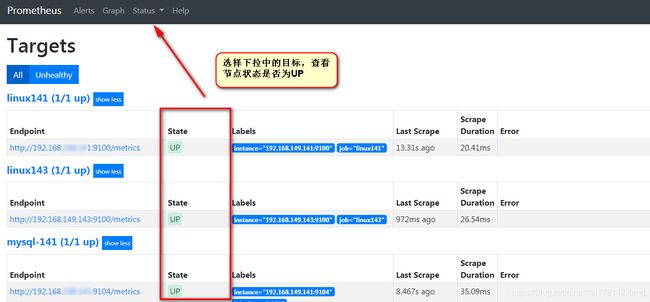
6、验证是否成功(ip:9090)
4.1.4 实现Windows服务器监控
1、 #下载地址:https://github.com/martinlindhe/wmi_exporter/releases
	 #选择最新msi文件下载安装即可。
	 通过访问http://ip+默认端口9182(如:http://localhost:9182) 出现下图,即代表安装采集数据成功。
 2、添加节点到Promethus.yml
3、重启promerhus,启动命令:
nohup /usr/local/mysqld_exporter/mysqld_exporter --config.my-cnf="/usr/local/mysqld_exporter/.my.cnf" &
5、登入promethus验证是否成功
五、展示界面grafana
安装grafana步骤可以参考上一篇博客https://blog.csdn.net/kai172142xiang/article/details/102770394
1、登入garana后首先配置数据源

2、导入模板
解压grafana-dashboards包,该包中提供了大量的json格式文件的grafana dashboards,根据需要自行选择,https://github.com/percona/grafana-dashboards
linux_overview-1531814759712.json
MySQL_Overview-1531814739662.json
MySQL_InnoDB_Metrics-1531814772539.json
MySQL_Replication-1531814749684.json
windows模板,根据自己需要选择,搜索栏选择windows:
https://grafana.com/grafana/dashboards/6545
六、附件脚本
找到一些启动Promethus,可以参考使用
https://github.com/lyb-geek/monitor-scrpit
七、下一步部署告警功能
如有错误,欢迎大家随时提出,感谢。
参考链接
https://www.cnblogs.com/allenhu320/p/11339089.html
https://blog.csdn.net/tiger199/article/details/90447149
https://www.cnblogs.com/Keep-Ambition/p/10644293.html


