Unity5.3 使用Awesomium插件内嵌网页
使用Awesomium插件
爬坑指南
1.使用的为awesomium_unity1.7.4.2win_full插件;
2.此插件最大不爽之处在于非要发布后才能看到网页,谨记;
3.主要写脚本控制WebUIComponent即可;
4.拖预制体的时候会有莫名奇妙的错误,请自行体会;
插件导入后,新建一个空物体,
添加组件后

好了,离成功不远了,首先是Common下的Source就是要显示的网址。
看见组件中的Rendering下的Visible没?现在没勾,这个要勾上显示用的。
如果只是显示的话,现在不要任何脚本,发布一个PC端的,运行后就能看到网页了。
下面介绍WebUIComponent的属性
Width,Height 宽和高;
Target 渲染目标,1、None 2、GUI用OnGUI 3、Render 用网格渲染器(要把WebUIComponent添加到Plane或Quad等3D物体上);
Achor 锚点;
IsTransparent 是否有透明通道;
FilterMode 渲染模式
Visible 可见
下面说说代码吧,直接上干货
首先是继承WebUIScript,重写了方法(这里只是简单重写了主要的)
using UnityEngine;
using System.Collections;
using UnityEngine.UI;
using Awesomium.Core;
using Awesomium.Unity;
using Awesomium.Core.Data;
using UnityEngine.EventSystems;

public class WebRoomInfoHandler : WebUIScript
{
    Ray ray;
    RaycastHit hit;
    private WebSession session;

    #region//重写

    protected override void Awake()
    {
        if (Application.isEditor)
            return;

        if (!webUI)
            return;

        // Get or create an in-memory WebSession.
        if (session == null)
        {
            session = WebCore.CreateWebSession(new WebPreferences() { SmoothScrolling = true });
            UnityEngine.Debug.Log("Created In-Memory Session");
        }

        if (session.GetDataSource("media") == null)
        {
            // Create and add a ResourceDataSource. This will be used to load assets
            // from the resources assembly (AwesomiumSampleResources) available with this sample.
            ResourceDataSource dataSource = new ResourceDataSource(
                ResourceType.Embedded,
                typeof(AwesomiumSampleResources.Loader).Assembly);
            session.AddDataSource("media", dataSource);

            UnityEngine.Debug.Log("Added DataSource");
        }

        // Assign the WebSession to the WebUIComponent.
        webUI.WebSession = session;
    }

    // Use this for initialization
    protected override void Start()
    {
        if (Application.isEditor)
            return;

        // Check if there's a WebUIComponent available
        // in this GameObject.
        if (!webUI)
            return;

        // Set a handler for the DocumentReady event.
        webUI.DocumentReady += OnDocumentReady;
    }
    protected override void OnGUI()
    {
        if (Input.GetMouseButtonDown(0))
        {
            OnClickRoom();
        }

    }
    #endregion
    #region//事件
    private void OnDocumentReady(object sender, UrlEventArgs e)
    {
        JSObject webUIManager = webUI.CreateGlobalJavascriptObject("webUIManager");
        if (webUIManager == null)
            return;
        webUIManager.Bind("closeWebUI", false, CloseWebUIHandler);//

    }
    #endregion
下面才是控制的重点;和上面在一个脚本哦。
#region//方法
    void OnClickRoom()
    {

        ray = Camera.main.ScreenPointToRay(Input.mousePosition);
        if (Physics.Raycast(ray, out hit, 100f))
        {
            if (hit.collider.name.Equals("Cube"))
            {
                Debug.Log("点击房间");
                BtnOnClick();
            }
        }
    }
    void CloseWebUIHandler(object sender, JavascriptMethodEventArgs e)
    {
        webUI.Visible = false;
    }

    public void BtnOnClick()
    {
        webUI.Source = "https://www.baidu.com".ToUri();
        webUI.Visible = true;
    }
    #endregion
在场景中新建一个Cube,这样点击就会显示网页了,如果你想关闭这个网页,不好意思自己慢慢研究吧。如过你会写网页,注意一下webUIManager,在网页里写上closeWebUI方法,相信你会实现与unity交互的。
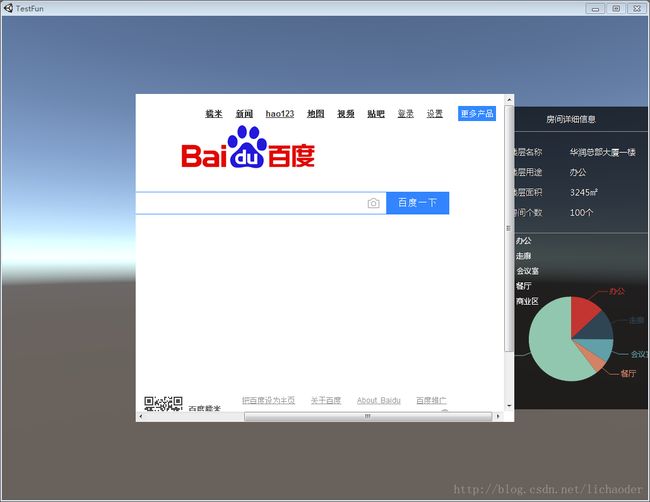
效果图如下
错误之处欢迎之处,哈哈!Demo下载地址:
链接:https://pan.baidu.com/s/1i4U07kh 密码:70wl
(%E9%93%BE%E6%8E%A5%EF%BC%9Ahttp://pan.baidu.com/s/1i4U07kh%20%E5%AF%86%E7%A0%81%EF%BC%9A70wl)