【Springboot深入解析】系统初始化器
文章目录
- 系统初始化器
- 一、系统初始化器介绍
- 二、SpringFactoriesLoader介绍
- 三、系统初始化器原理
系统初始化器
一、系统初始化器介绍
我们知道Spring 是一个扩展性很强的容器框架,为开发者提供了丰富的扩展入口,其中一个扩展点便是ApplicationContextInitializer (应用上下文初始化器 或者 系统初始化器)。
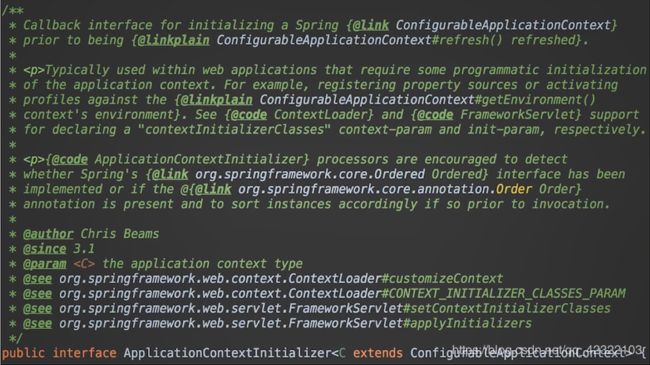
ApplicationContextInitializer 是 Spring 在执行 ConfigurableApplicationContext.refresh() 方法对应用上下文进行刷新之前调用的一个回调接口,用来完成对 Spring 应用上下文个性化的初始化工作,该接口定义在 org.springframework.context 包中,其内部仅包含一个 initialize() 方法
官方对其描述是 Spring容器刷新之前执行的一个回调函数,它的作用是向 Springboot容器中注册属性。
使用的话,可以继承接口自定义实现,我们先认识一下它能呈现给我们的效果。
下面通过系统初始化器向springboot容器中注入属性的方式,
方法一:
初始化一个springboot项目之后,我们创建initializer的包,里面定义了一个自定义系统初始化器。该类继承了ApplicationContextInitializer,参数类型是ConfigurableApplicationContext 。
ConfigurableApplicationContext 接口的作用就是在ApplicationContext的基础上增加了一系列配置应用上下文的功能。
import org.springframework.context.ApplicationContextInitializer;
import org.springframework.context.ConfigurableApplicationContext;
import org.springframework.core.annotation.Order;
import org.springframework.core.env.ConfigurableEnvironment;
import org.springframework.core.env.MapPropertySource;

import java.util.HashMap;
import java.util.Map;

@Order(1) // 使用order属性,设置该类在spring容器中的加载顺序,值越小优先级越高
public class FirstInitializer implements ApplicationContextInitializer<ConfigurableApplicationContext> {

    @Override
    public void initialize(ConfigurableApplicationContext applicationContext) {
        // 获取环境
        ConfigurableEnvironment environment = applicationContext.getEnvironment();
        // 自定义一个属性
        Map<String, Object> map = new HashMap<>();
        map.put("chenxiao","gogo");
        MapPropertySource mapPropertySource = new MapPropertySource("firstInitializer", map);
        // 加入环境的属性集中
        environment.getPropertySources().addLast(mapPropertySource);
        System.out.println("run FirstInitializer");
    }
}
之后我们在resource目录下创建一个META-INF,里面创建一个文件spring.factories(配置文件),配置信息是系统初始化器的路径。
org.springframework.context.ApplicationContextInitializer=com.example.demo.Initializer.FirstInitializer
接下来为了验证效果,我们创建一个service
import org.springframework.beans.BeansException;
import org.springframework.context.ApplicationContext;
import org.springframework.context.ApplicationContextAware;
import org.springframework.stereotype.Component;

@service
public class TestService implements ApplicationContextAware {

    private ApplicationContext applicationContext;

    @Override
    public void setApplicationContext(ApplicationContext applicationContext) throws BeansException {
        this.applicationContext = applicationContext;
    }

    public String test() {
        // 返回上下文当中的环境变量中的属性
        return applicationContext.getEnvironment().getProperty("chenxiao");
    }
}
再创建一个controller,调用service的方法:
import com.example.demo.service.TestService;
import org.springframework.beans.factory.annotation.Autowired;
import org.springframework.web.bind.annotation.GetMapping;
import org.springframework.web.bind.annotation.RestController;

@RestController
public class DemoController {

    @Autowired
    private TestService testService;

    @GetMapping("test")
    public String test() {
        return testService.test();
    }
}
启动springboot之后
com.example.demo.DemoApplication

  .   ____          _            __ _ _
 /\\ / ___'_ __ _ _(_)_ __  __ _ \ \ \ \
( ( )\___ | '_ | '_| | '_ \/ _` | \ \ \ \
 \\/  ___)| |_)| | | | | || (_| |  ) ) ) )
  '  |____| .__|_| |_|_| |_\__, | / / / /
 =========|_|==============|___/=/_/_/_/
 :: Spring Boot ::        (v2.2.1.RELEASE)

run FirstInitializer
2020-03-28 10:34:55.270  INFO 19092 --- [           main] com.example.demo.DemoApplication         : Starting DemoApplication on DESKTOP-Q10BPSI with PID 19092 (D:\CodePractise\springbootLearn\target\classes started by JunQiao Lv in D:\CodePractise\springbootLearn)
...
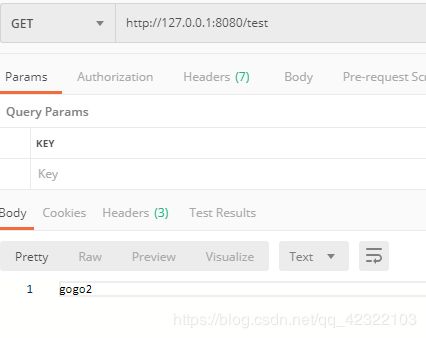
可以看到打印的信息“run FirstInitializer”。用postman进行测试:
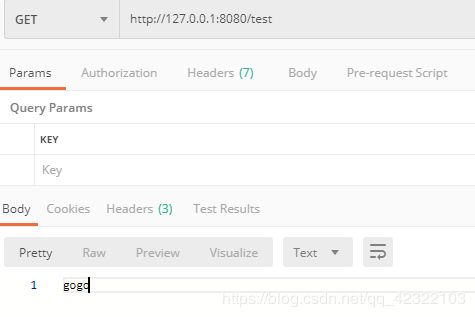
获取到了我们想要的结果。
方法二:
创建SecondInitializer
import org.springframework.context.ApplicationContextInitializer;
import org.springframework.context.ConfigurableApplicationContext;
import org.springframework.core.annotation.Order;
import org.springframework.core.env.ConfigurableEnvironment;
import org.springframework.core.env.MapPropertySource;

import java.util.HashMap;
import java.util.Map;

@Order(2)
public class SecondInitializer implements ApplicationContextInitializer<ConfigurableApplicationContext> {
    @Override
    public void initialize(ConfigurableApplicationContext applicationContext) {
        ConfigurableEnvironment environment = applicationContext.getEnvironment();
        Map<String, Object> map = new HashMap<>();
        map.put("chenxiao2", "gogo2");
        MapPropertySource mapPropertySource = new MapPropertySource("secondInitializer", map);
        environment.getPropertySources().addLast(mapPropertySource);
        System.out.println("run secondInitializer");
    }
}
更改启动类
import com.example.demo.Initializer.SecondInitializer;
import org.springframework.boot.SpringApplication;
import org.springframework.boot.autoconfigure.SpringBootApplication;

@SpringBootApplication
public class DemoApplication {

    public static void main(String[] args) {
//        SpringApplication.run(DemoApplication.class, args);
        SpringApplication springApplication = new SpringApplication(DemoApplication.class);
        springApplication.addInitializers(new SecondInitializer());
        springApplication.run(args);
    }
}
更改service方法
 public String test() {
        // 返回上下文当中的环境变量中的属性
        return applicationContext.getEnvironment().getProperty("chenxiao2");
}
启动springboot
  .   ____          _            __ _ _
 /\\ / ___'_ __ _ _(_)_ __  __ _ \ \ \ \
( ( )\___ | '_ | '_| | '_ \/ _` | \ \ \ \
 \\/  ___)| |_)| | | | | || (_| |  ) ) ) )
  '  |____| .__|_| |_|_| |_\__, | / / / /
 =========|_|==============|___/=/_/_/_/
 :: Spring Boot ::        (v2.2.1.RELEASE)

run FirstInitializer
run secondInitializer
2020-03-28 11:05:03.732  INFO 19808 --- [           main] com.example.demo.DemoApplication         : Starting DemoApplication on DESKTOP-Q10BPSI with PID 19808 (D:\CodePractise\springbootLearn\target\classes started by JunQiao Lv in D:\CodePractise\springbootLearn)
...
创建一个ThirdInitializer
import org.springframework.context.ApplicationContextInitializer;
import org.springframework.context.ConfigurableApplicationContext;
import org.springframework.core.annotation.Order;
import org.springframework.core.env.ConfigurableEnvironment;
import org.springframework.core.env.MapPropertySource;

import java.util.HashMap;
import java.util.Map;

@Order(3)
public class ThirdInitializer implements ApplicationContextInitializer<ConfigurableApplicationContext> {
    @Override
    public void initialize(ConfigurableApplicationContext applicationContext) {
        ConfigurableEnvironment environment = applicationContext.getEnvironment();
        Map<String, Object> map = new HashMap<>();
        map.put("chenxiao3", "gogo3");
        MapPropertySource mapPropertySource = new MapPropertySource("thirdInitializer", map);
        environment.getPropertySources().addLast(mapPropertySource);
        System.out.println("run thirdInitializer");
    }
}
这次我们在application.properties文件中添加自定义系统初始器的位置
context.initializer.classes=com.example.demo.Initializer.ThirdInitializer
更改service方法
 public String test() {
        // 返回上下文当中的环境变量中的属性
        return applicationContext.getEnvironment().getProperty("chenxiao3");
}
启动springboot。
  .   ____          _            __ _ _
 /\\ / ___'_ __ _ _(_)_ __  __ _ \ \ \ \
( ( )\___ | '_ | '_| | '_ \/ _` | \ \ \ \
 \\/  ___)| |_)| | | | | || (_| |  ) ) ) )
  '  |____| .__|_| |_|_| |_\__, | / / / /
 =========|_|==============|___/=/_/_/_/
 :: Spring Boot ::        (v2.2.1.RELEASE)

run thirdInitializer
run FirstInitializer
run secondInitializer
2020-03-28 11:07:03.732  INFO 19808 --- [           main] com.example.demo.DemoApplication         : Starting DemoApplication on DESKTOP-Q10BPSI with PID 19808 (D:\CodePractise\springbootLearn\target\classes started by JunQiao Lv in D:\CodePractise\springbootLearn)
...
我们发现 “run thirdInitializer”竟然在最前面,我们后面会说这个
以上通过三种方式利用系统初始化器向 Springboot容器中注册属性。
实现方式一
- 实现 ApplicationContextInitializer接口
- spring.factories内填写接口实现
- 填写的key为org.springframework.context.ApplicationContextInitializer
实现方式二
- 实现 ApplicationContextInitializer接口
- SpringApplication类初始后设置进去
实现方式三
- 实现 ApplicationContextinitializer接口
- application. properties内填写接口实现
- 填写的key为context.initializer.classes
我们知道Order值越小越先执行,但是application properties中定义的却更优先。下面开始扣原理了,看一下我们定义的系统初始化器是如何被springboot容器所识别并加载到容器中的。
二、SpringFactoriesLoader介绍
上述说的实现的关键是SpringFactoriesLoader,下面是官方给的介绍。

意思是:
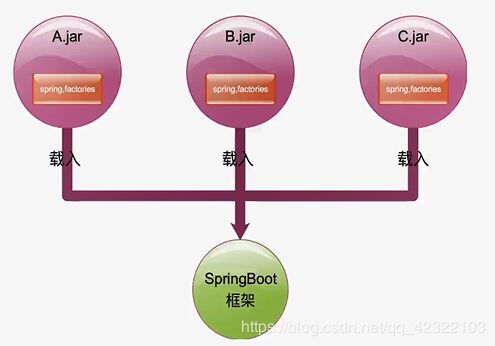
- 框架内部使用的通用工厂加载机制
- 从classpath下多个jar包特定的位置读取文件并初始化类
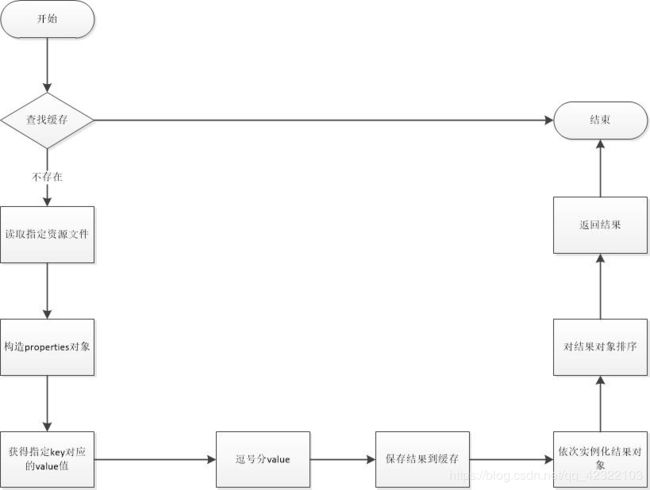
- 文件内容须是k-v形式,即properties类型
- key是全限定名(抽象类|接口)、value是实现,如果是多个实现则用,分隔
我们在第一篇文章中说过
框架初始化分为:
- 配置资源加载器
- 配置primarySources(一般是我们的启动类)
- 应用环境的检测(springboot1.x版本有两种环境,标准环境和web环境,spingboot2.x添加了一种Reactive环境)
- 配置系统初始化器
- 配置应用监听器
- 配置main方法所在类
好,我们看一下源码,探究系统初始化器是如何被springboot发现的
我们一层一层往下剖

调用的是这个run方法

继续,发现这里初始化一个springApplication的实例

进入SpringApplication的构造方法
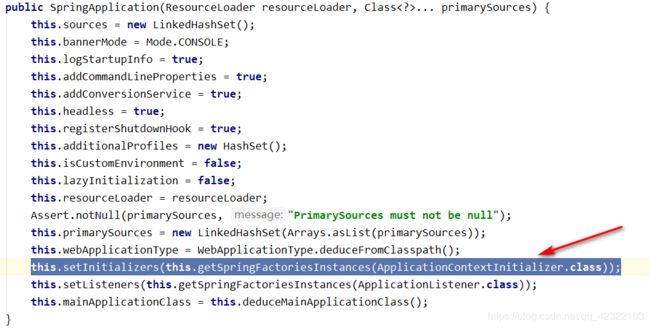
看到这里发现 系统初始化器的注册。具体是通过getSpringFactoriesInstances(ApplicationContextInitializer.class)方法进行的一个系统初始化器的实现,继续挖。

这里调用了一个同名方法,继续

方法中首先获取一个类加载器,下面通过SpringFactoriesLoader.loadFactoryNames(type, classLoader)方法获得所有的类的全限定名。
createSpringFactoriesInstances(type, parameterTypes, classLoader, args, names) 通过获取到的全限定名创建相应的实例。
接着对这些实例进行一个排序AnnotationAwareOrderComparator.sort(instances);
最后返回这些实例。
下面依次看这三个方法:
首先是pringFactoriesLoader.loadFactoryNames(type, classLoader)。

这里首先获得工厂类的名字,继续往下

类似的,我们看一下springboot容器中META-INF目录下的spring.factories

这里有好多个系统初始化器
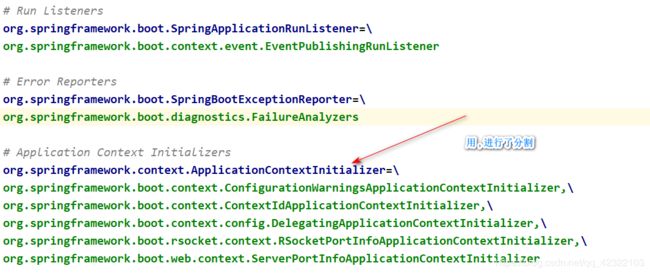
看一下断点处,可以找到我们定义的FirstInitializer。

下面开始调用getOrDefault方法,没有key的话,则返回空集合。

回退到上一级,我们下面介绍第二个方法createSpringFactoriesInstances(type, parameterTypes, classLoader, args, names);这个方法会为它们创造实例。
(name为系统初始化容器哈)

进入createSpringFactoriesInstances方法

实例都初始化结束后,返回上一级

接着看第三个方法AnnotationAwareOrderComparator.sort(instances);,他负责对实例集合进行一个排序(通过order中的值),值越小越排在前面。
接下来就是返回实例集合,然后完成注册。
![]()
看一下set方法
public void setInitializers(Collection<? extends ApplicationContextInitializer<?>> initializers) {
        this.initializers = new ArrayList(initializers);
    }
这就是完整的系统初始化器从被发现,并被初始化,以及到被注册到SpringApplication实例的过程。
核心是SpringFactoriesloader作用:Spring Boot框架中从类路径jar包中读取特定文件实现扩展类的载入。
三、系统初始化器原理
下面探究一下系统初始化器是如何被调用的以及被调用的原理。
- 上下文刷新即spring的refresh方法前调用
- 用来编码设置一些属性变量通常用在web环境中
- 可以通过order接口进行排序
在第一篇文章中,我们过了springboot大体的流程,其中在准备上下文过程中,会遍历调用Initalizer的initalize方法,我们之前自定义实现过

我们在run方法内看一下源码

进去之后

我们进入准备上下文的方法prepareContext中,可以看到调用初始化器部分。
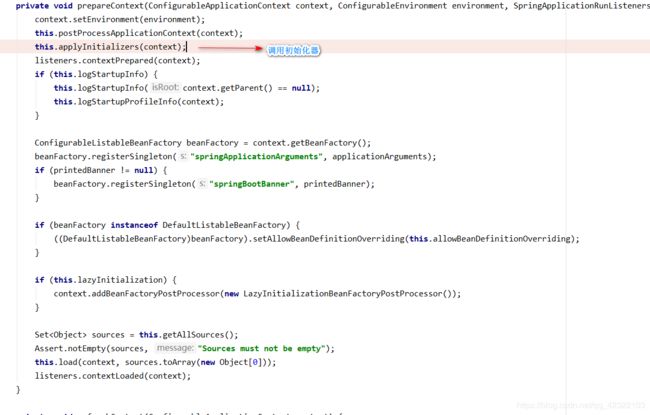
进入,发现一目了然,这里进行了迭代调用系统初始化器的初始化方法。( getInitializers返回所有的系统初始化器)

下面看一下最初系统初始化器实现方式二的情况:
    public static void main(String[] args) {
//        SpringApplication.run(DemoApplication.class, args);
        SpringApplication springApplication = new SpringApplication(DemoApplication.class);
        springApplication.addInitializers(new SecondInitializer());
        springApplication.run(args);
    }
我们通过new一个SpringApplication,然后添加我们的初始化器。
我们知道SpringApplication初始化之后,系统初始化器已经设置过了。
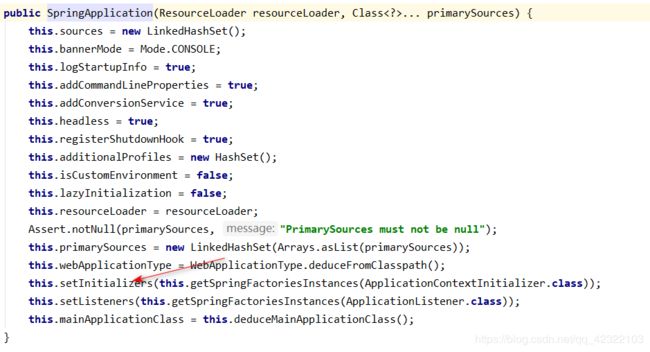
但是SpingApplication实例提供了addInitializers(new SecondInitializer())方法来帮助我们增加自定义的初始化器

然后才是springApplication.run(args);的run方法 。和方式一的run方法是同一个。
        SpringApplication springApplication = new SpringApplication(DemoApplication.class);
        springApplication.addInitializers(new SecondInitializer());
        springApplication.run(args);
然后就能保证添加的系统初始化器能够在后面的run方法中正常执行。
下面看一下第三种方式,我们是通过在application.properties 文件中添加配context.initializer.classes=com.example.demo.initializer.ThirdInitializer来实现的。
这个主要是通过DelegatingApplicationContextInitializer初始化器来实现的这个类DelegatingApplicationContextInitializer定义在SpringBoot中
这种实现方式主要通过入DelegatingApplicationContextInitializer类来完成的。可以看到DelegatingApplicationContextInitializer里的order=0。这个初始化器最先被调到。

在spring的springFactories中有这个类初始化器,这个在加载系统类初始化器的时候被加载。

三种实现初始化器的实现原理:
- 定义在spring.factories 文件中被SpringFactoriesLoader发现注册
- 初始化完毕手动添加
- 定义成环境变量被DelegatingApplicationContextInitializer发现注册
搞清楚这个,你就了解Spring 应用上下文个性化的初始化工作是如何进行的,以及为你今后想拓展Spring的功能准备了基础。
