跟着笨鸟一步一步学习spring开发(1 spring mvc 版hello world)
翻译了一位韩国哥们儿的博客,再加上一些自己的理解。写一个spring mvc开发的系列,当个自己的学习笔记。
原文链接:http://www.mkyong.com/spring3/spring-3-mvc-hello-world-example/
开发一个最简单的spring mvc版的hello world应用。
技术准备:
1、Spring 3.0.5.RELEASE
2、JDK 1.6
3、Maven 3
4、Eclipse 3.6(或者是IntellJ IDEA韩国哥们儿用的是Eclipse,我这儿用的是IntellJ IDEA 12.1.4)
一、 工程依赖pom文件
    4.0.0

    hellospring
    hellospring
    1.0-SNAPSHOT
    war


        3.0.5.RELEASE


            org.springframework
            spring-core
            ${spring.version}


            org.springframework
            spring-web
            ${spring.version}


            org.springframework
            spring-webmvc
            ${spring.version}
package controller;

import org.springframework.stereotype.Controller;
import org.springframework.ui.ModelMap;
import org.springframework.web.bind.annotation.RequestMapping;
import org.springframework.web.bind.annotation.RequestMethod;

@Controller
@RequestMapping("/welcome")
public class HelloController {

    @RequestMapping(method = RequestMethod.GET)
    public String printWelcome(ModelMap model) {

        model.addAttribute("message", "Spring 3 MVC Hello World");
        return "hello";

    }

}
Message : ${message}
			/WEB-INF/pages/


			.jsp
	xmlns="http://java.sun.com/xml/ns/j2ee" xmlns:xsi="http://www.w3.org/2001/XMLSchema-instance"
	xsi:schemaLocation="http://java.sun.com/xml/ns/j2ee
	http://java.sun.com/xml/ns/j2ee/web-app_2_4.xsd">

	Spring Web MVC Application


		mvc-dispatcher
		org.springframework.web.servlet.DispatcherServlet
		1


		mvc-dispatcher
		/


		contextConfigLocation
		/WEB-INF/mvc-dispatcher-servlet.xml


		org.springframework.web.context.ContextLoaderListener
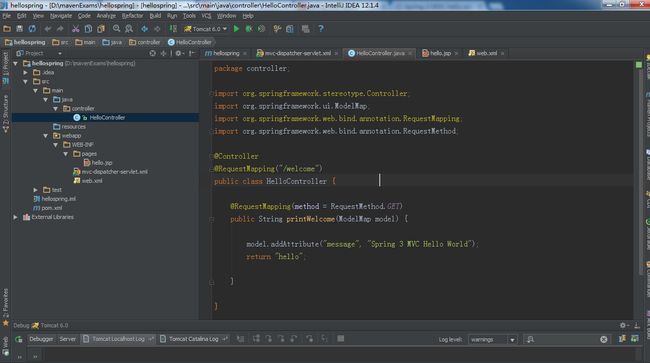
七、工程结构图:
八、自己的理解:
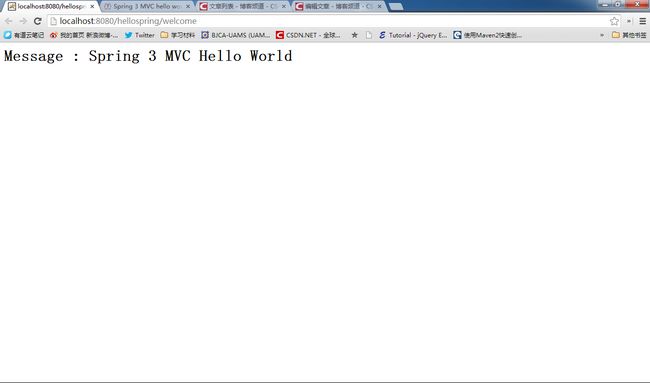
咱们可以简单的来分析一下这个简单的demo是怎么执行的,首先在浏览器中输入一个URL:http://localhost:8080/hellospring/welcome
hellospring是这个应用的上下文即application context,welcome是一个请求映射。
服务器在收到这样的一个请求以后,首先会查看web.xml文件,在web.xml中配置了spring的配置文件地址
		contextConfigLocation
		/WEB-INF/mvc-dispatcher-servlet.xml
@Controller
@RequestMapping("/welcome")@RequestMapping大概代表的就是请求映射吧,@RequestMapping("/welcome")代表的就是刚才在浏览器中输入一个URL:http://localhost:8080/hellospring/welcome的最后一个映射名称吧,即welcome。综合起来,就可以确定这个类就是用来处理welcome这个请求的。
@RequestMapping(method = RequestMethod.GET)
public String printWelcome(ModelMap model)public String printWelcome(ModelMap model) {
model.addAttribute("message", "Spring 3 MVC Hello World");
return "hello";
}
/WEB-INF/pages/
.jsp
第一个属性大概代表的就是要返回给浏览器的页面的路径即/WEB-INF/pages/
第二个属性大概代表的就是要返回的后缀,即返回的文件的格式是.jsp,即返回的文件类型是jsp页面而不是html页面,那么返回给浏览器的到底是/WEB-INF/pages/下的哪一个页面呢,哈哈,在printWelcome(Model model)方法中不是返回了一个"hello"字符串吗,这个字符串就是返回的页面的文件名,而返回文件的类型是.jsp格式,所以最终返回给浏览器的页面就是hello.jsp页面,再具体一点就是/WEB-INF/pages/路径下的hello.jsp即/WEB-INF/pages/hello.jsp在我们的这个路径下也正好有个hello.jsp页面。下面让我们来见识见识hello.jsp页面的庐山面目:
Message : ${message}
3.0.5.RELEASE
org.springframework
spring-core
${spring.version}
public String printWelcome(ModelMap model) {

        model.addAttribute("message", "Spring 3 MVC Hello World");
        return "hello";

}好吧,今天就写到这里吧,早睡早起身体棒,身体是革命的本钱,咱们码农要爱惜自己的身体。明天继续学习spring mvc,我会陆续的翻译那位韩国仁兄的spring mvc博客,与大家一起分享。
IntellJ 开发源码下载地址: http://download.csdn.net/detail/shfqbluestone/7358899 (这个代码是我自己的)
eclipse开发源码下载地址: http://www.mkyong.com/wp-content/uploads/2011/08/Spring3-MVC-HelloWorld-Example.zip(这个代码是我在一开始提到的那位韩国仁兄的)

