网上查看了很多关于环境搭建的文章,都比较久远了很多安装包源都不可用了,今天收集了很多资料组合尝试使用新版本来搭建,故在此记录。
采集数据(collectd)-> 存储数据(influxdb) -> 显示数据(grafana)
常用配置:
influxdb + grafana安装在一台机器负责监控数据收集及展示
collectd安装在一台或多台被监控服务端,跟监控端的25826端口对接,上传本地监控的数据
influxdb监控25826端口以获得数据,自身处于8086端口,grafana从8086获得数据进行展示- InfluxDB 是 Go 语言开发的一个开源分布式时序数据库,非常适合存储指标、事件、分析等数据
- collectd C 语言写的一个系统性能采集工具
- Grafana 是纯 Javascript 开发的前端工具,用于访问 InfluxDB,自定义报表、显示图表等
- Jmeter是Apache组织开发的基于Java的压力测试工具
Jmeter+Collectd+Influxdb+Grafana
本次安装版本
collectd 5.8.1
influxDB 1.5.1
Grafana 5.1.3
安装collectd
安装
collectd是一个守护(daemon)进程,用来收集系统性能和提供各种存储方式来存储不同值的机制。比如以RRD 文件形式,当系统运行和存储信息的时候,Collectd会周期性统计系统的相关统计信息。那些信息可以用来找到当前系统性能瓶颈。(如作为性能分析 performance analysis)和预测系统未来的load(如能力部署capacity planning)
官方地址
下载安装 本次未使用该方法
1、获取collectd安装包
[root@VM_0_13_centos ~]# wget https://storage.googleapis.com/collectd-tarballs/collectd-5.8.0.tar.bz22、进行编译和安装
[root@VM_0_13_centos ~]# tar xf collectd-5.8.0.tar.bz2
[root@VM_0_13_centos ~]# cd collectd-5.8.0/
[root@VM_0_13_centos ~]# ./configure
[root@VM_0_13_centos collectd-5.8.0]# make all install- 出现报错:
[root@VM_0_13_centos collectd-5.8.0]# ./configure
checking build system type... x86_64-unknown-linux-gnu
checking host system type... x86_64-unknown-linux-gnu
checking how to print strings... printf
checking for gcc... no
checking for cc... no
checking for cl.exe... no
configure: error: in `/root/collectd-5.8.0':
configure: error: no acceptable C compiler found in $PATH
See `config.log' for more details
- 解决办法:
[root@VM_0_13_centos collectd-5.8.0]# yum install gcc #安装gccyum安装
1、先安装epel-release
[root@VM_0_13_centos ~]# yum install epel-release如果提示Error: Nothing to do就证明系统已存在了,那就不安装了
2、安装collectd
[root@VM_0_13_centos ~]# yum install -y collectd修改配置
[root@VM_0_13_centos ~]# vim /etc/collectd.conf #更改以下内容,前面的#记得删除掉 没有就使用find / -name collectd.conf 查找在哪里
            FQDNLookup   true
            Hostname    "VM_0_13_centos" #直接使用hostname命令查看
            BaseDir     "/var/lib/collectd"
            PIDFile     "/var/run/collectd.pid"
            PluginDir   "/usr/lib64/collectd"
            TypesDB     "/usr/share/collectd/types.db"
            LoadPlugin  syslog
            LoadPlugin rrdtool
            LoadPlugin disk
            LoadPlugin interface
            LoadPlugin load
            LoadPlugin memory
            LoadPlugin network
            LoadPlugin processes
            LoadPlugin users
            interface>
                    Interface "eth0"
                    IgnoreSelected false


                    Server "127.0.0.1" "25826" #这里填写的是influxDB安装的服务器ip
                    Server

                    DataDir "/usr/var/lib/collectd/rrd" #如果你是使用下载安装前面应该会多出一个${prefix},未尝试是否有影响
根据需要自行添加但不要少于这些
3、安装rrdtool插及依赖包
yum install collectd-rrdtool rrdtool rrdtool-devel启动collectd
[root@VM_0_13_centos ~]# systemctl start collectd.service #启动
[root@VM_0_13_centos ~]# systemctl enable collectd.service #配置开机自启
如果系统版本低于7 可能会遇到报错-bash: systemctl: command not found 把systemctl替换成service。
Job for collectd.service failed because the control process exited with error code. See "systemctl status collectd.service" and "journalctl -xe" for details.如果启动时报这个错检查配置文件中上下标签,如下错误示例对应的两个标签只注释一个也会出现这个报错
        Server "127.0.0.1" "25826"

        #Server
默认collectd进程会每10s中调用注册在配置文件中的插件,默认全局参数interval=10s(10s上报一次数据到influxdb等),针对不同的插件可以配置不同的搜集数据的时间间隔interval
4、确认配置是否成功
[root@instance-arkj4je3 ~]# cd /var/lib/collectd
[root@instance-arkj4je3 collectd]# ls
rrd
如果/var/lib/collectd目录下生成rrd文件,说明有数据了,如果没有应该是配置问题
安装InfluxDB
安装
安装方法一
配置yum(此方法为最新版本InfluxDB)
[root@VM_0_13_centos ~]# cat <
>[influxdb]
>name = InfluxDB Repository - RHEL \$releasever
>baseurl = https://repos.influxdata.com/rhel/\$releasever/\$basearch/stable
>enabled = 1
>gpgcheck = 1
>gpgkey = https://repos.influxdata.com/influxdb.key
>EOF
开始安装
[root@VM_0_13_centos ~]# yum install -y influxdb安装方法二 本次未使用该方法
[root@VM_0_13_centos ~]# yum -y install http://dl.influxdata.com/influxdb/releases/influxdb-1.2.2.x86_64.rpm 我知道的版本(1.4版本以后没有web页面)
influxdb-1.2.2.x86_64.rpm
influxdb-1.3.5.x86_64.rpm
influxdb-1.5.1.x86_64.rpm
备用地址 密码:uw0o
启动InfluxDB
[root@VM_0_13_centos ~]# systemctl start influxdb.service#启动
[root@VM_0_13_centos ~]# systemctl enable influxdb.service #配置influxdb开机自启

启动后TCP端口:8083 为InfluxDB 管理控制台
  TCP端口:8086 为客户端和InfluxDB通信时的HTTP API
启动后InfluxDB用户认证默认是关闭的,先创建用户:geekwolf geekwolf
命令行输入influx
配置数据库
[root@VM_0_13_centos ~]# influx #进入InfluxDB
Visit https://enterprise.influxdata.com to register for updates, InfluxDB server management, and monitoring.
Connected to http://localhost:8086 version 0.12.2
InfluxDB shell 0.12.2
> create database collectdb #创建数据库
> show databases #查看数据库
name: databases
\------
name
_internal
collectdb
> create user geekwolf with password 'geekwolf' #创建一个用户和密码
> show users #查看所有用户
user            admin
geekwolf        false
> grant all on collectdb to geekwolf #把上面创建的数据库的所有权限赋给geekwolf用户
> help show
Usage:
    connect port>   connects to another node specified by host:port
    auth                  prompts for username and password
    pretty                toggles pretty print for the json format
    use          sets current database
    format        specifies the format of the server responses: json, csv, or column
    precision     specifies the format of the timestamp: rfc3339, h, m, s, ms, u or ns
    consistency    sets write consistency level: any, one, quorum, or all
    history               displays command history
    settings              outputs the current settings for the shell
    exit/quit/ctrl+d      quits the influx shell
    show databases        show database names
    show series           show series information
    show measurements     show measurement information
    show tag keys         show tag key information
    show field keys       show field key information
    A full list of influxql commands can be found at:
    https://docs.influxdata.com/influxdb/v0.10/query_language/spec
> quit #退出
启用认证
修改配置文件启用认证
[root@VM_0_13_centos ~]# sed -i 's#auth-enabled = false#auth-enabled = true#g' /etc/influxdb/influxdb.conf
[root@VM_0_13_centos ~]# systemctl restart influxdb.service #重启influxdb
配置InfluxDB支持Collectd
[root@VM_0_13_centos ~]# vim /etc/influxdb/influxdb.conf

                [collectd]
                enabled = true
                bind-address = "127.0.0.1:25826"
                database = "collectdb"
                typesdb = "/usr/share/collectd/types.db" #查找一下types.db文件不一定在这个路径,如果路径配置错误就不能监听成功
                batch-size = 5000
                batch-pending = 10
                batch-timeout = "10s"
                read-buffer = 0

[root@VM_0_13_centos ~]# systemctl restart influxdb.service #重启influxdb
查看25826这个端口是否已经监听,如果有,则代表启动正常
[root@VM_0_13_centos ~]# netstat -anp| grep 25826
udp        0      0127.0.0.1:25826    0.0.0.0:*   125967/influxd
确认数据
[root@VM_0_13_centos ~]# influx
Visit https://enterprise.influxdata.com to register for updates, InfluxDB server management, and monitoring.
Connected to http://localhost:8086 version 0.12.2
InfluxDB shell 0.12.2
> use collectdb #s使用这个数据库
Using database collectdb
> show field keys #显示所有的keys
name: cpu_value
---------------
fieldKey
value
name: df_free
-------------
fieldKey
value
name: df_used
-------------
fieldKey
value
name: disk_read
---------------
fieldKey
value
> select * from cpu_value limit 15; #显示15条cpu_value的信息
name: cpu_value
---------------
time                    host                    instance        type    type_instance   value
1461657293000000000     host.example.com        1               cpu     idle            1.59845e+06
1461657293000000000     host.example.com        1               cpu     system          2316
1461657293000000000     host.example.com        1               cpu     nice            508
1461657293000000000     host.example.com        0               cpu     steal           0
1461657293000000000     host.example.com        1               cpu     user            11619
1461657293000000000     host.example.com        1               cpu     interrupt       0
1461657293000000000     host.example.com        1               cpu     steal           0
1461657293000000000     host.example.com        1               cpu     wait            172
1461657293000000000     host.example.com        1               cpu     softirq         0
1461657303000000000     host.example.com        1               cpu     wait            172
1461657303000000000     host.example.com        1               cpu     softirq         0
1461657303000000000     host.example.com        1               cpu     nice            508
1461657303000000000     host.example.com        0               cpu     idle            1.587007e+06
1461657303000000000     host.example.com        0               cpu     softirq         127
1461657303000000000     host.example.com        0               cpu     interrupt       54
安装Grafana
1、开始安装
[root@VM_0_13_centos ~]# sudo yum install https://s3-us-west-2.amazonaws.com/grafana-releases/release/grafana-5.1.3-1.x86_64.rpmgrafana目录结构
/usr/sbin/grafana-server
/etc/init.d/grafana-server          上述命令的拷贝,启动脚本
/etc/sysconfig/grafana-server       环境变量
/etc/grafana/grafana.ini            配置文件
/var/log/grafana/grafana.log        日志文件
/var/lib/grafana/grafana.db     sqlite3数据库
2、启动grafana
[root@VM_0_13_centos ~]# systemctl start grafana-server.service #启动
[root@VM_0_13_centos ~]# systemctl enable grafana-server.service #配置开机自启
配置Grafana
访问地址:http://127.0.0.1:3000 默认账号为admin 密码 admin
#127.0.0.1为grafana所在服务器ip,如不能访问首先确认grafana启动命令是否已执行成功
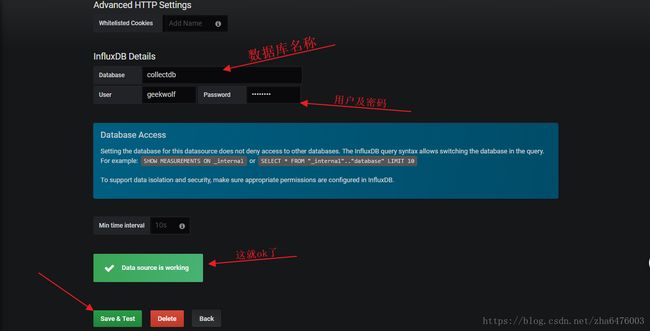
添加InfluxDB数据源
有可能出现的报错:
1、保存并测试时报错:Network Error: Bad Gateway(502)是数据库http的ip配置问题几个都设置成127.0.0.1
添加一个监控图
我一开始成功配置但不能展示出数据,感谢下面文章作者给出的指点:
参考链接


