vue-cli项目集成环信WebIM
环信SDK相关文档:
http://docs.easemob.com/im/start
在vue-cli项目中配置和使用环信WebIM
1、执行下面两行之一安装node版本的环信SDK
npm install easemob-websdk --save
cnpm install easemob-websdk --save
2、安装strophe.js,作用是返回一个必要的方法,如$iq、$build、$msg、$pres等,在easemob-websdk模块下src目录里面的connect.js中使用
npm install strophe.js (这里注意加上.js)
3、找到node_modules/easemob-websdk/src/connection.js,在里面引入strophe.js
// 这一行的目的是使用Strophe方法
var Strophe = require('../../strophe.js').Strophe;
// 这一行主要是提供$iq、$build、$msg、$pres等方法
var meStrophe = require('../../strophe.js');
// 声明$iq、$build、$msg、$pres等方法
$iq = meStrophe.$iq;
$build = meStrophe.$build;
$msg = meStrophe.$msg;
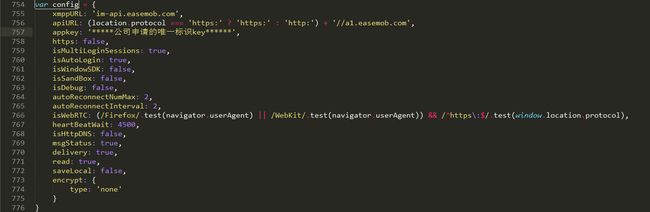
var config = {
xmppURL: 'im-api.easemob.com',
apiURL: (location.protocol === 'https:' ? 'https:' : 'http:') + '//a1.easemob.com',
appkey: '这里是公司申请的唯一标识key',
https: false,
isMultiLoginSessions: true,
isAutoLogin: true,
isWindowSDK: false,
isSandBox: false,
isDebug: false,
autoReconnectNumMax: 2,
autoReconnectInterval: 2,
isWebRTC: (/Firefox/.test(navigator.userAgent) || /WebKit/.test(navigator.userAgent)) && /^https\:$/.test(window.location.protocol),
heartBeatWait: 4500,
isHttpDNS: false,
msgStatus: true,
delivery: true,
read: true,
saveLocal: false,
encrypt: {
type: 'none'
}
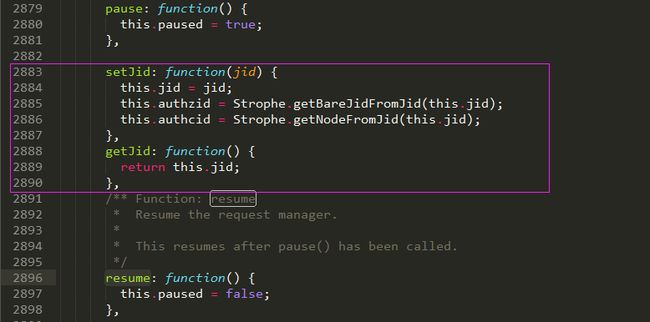
setJid: function(jid) {
this.jid = jid;
this.authzid = Strophe.getBareJidFromJid(this.jid);
this.authcid = Strophe.getNodeFromJid(this.jid);
},
getJid: function() {
return this.jid;
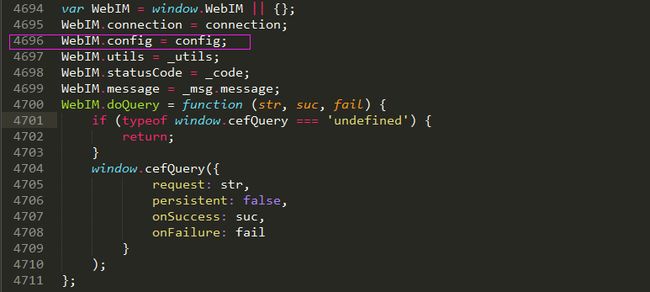
import websdk from 'easemob-websdk'
let webIM = window.WebIM = websdk
Vue.prototype.$WebIM = webIM
const imConn = new webIM.connection({
isMultiLoginSessions: webIM.config.isMultiLoginSessions,
https: typeof webIM.config.https === 'boolean' ? webIM.config.https : location.protocol === 'https:',
url: webIM.config.xmppURL,
isAutoLogin: true,
heartBeatWait: webIM.config.heartBeatWait,
autoReconnectNumMax: webIM.config.autoReconnectNumMax,
autoReconnectInterval: webIM.config.autoReconnectInterval,
apiUrl: webIM.config.apiURL
})
mounted(){
var that = this;
this.$imConn.listen({
onTextMessage: function ( message ) {
console.log(message);
that.chatCont.push({id: 2, cont: message.data});
},
onPresence: function ( message ) {
// 这里需要弹出面板标识有人要添加您为好友
console.log(message)
if(message.type == 'subscribe') {
that.privateUser = message.from;
that.privateUserPanel = true;
}
}
});
http://docs.easemob.com/im/start
在vue-cli项目中配置和使用环信WebIM
1、执行下面两行之一安装node版本的环信SDK
npm install easemob-websdk --save
cnpm install easemob-websdk --save
2、安装strophe.js,作用是返回一个必要的方法,如$iq、$build、$msg、$pres等,在easemob-websdk模块下src目录里面的connect.js中使用
npm install strophe.js (这里注意加上.js)
3、找到node_modules/easemob-websdk/src/connection.js,在里面引入strophe.js
// 这一行的目的是使用Strophe方法
var Strophe = require('../../strophe.js').Strophe;
// 这一行主要是提供$iq、$build、$msg、$pres等方法
var meStrophe = require('../../strophe.js');
// 声明$iq、$build、$msg、$pres等方法
$iq = meStrophe.$iq;
$build = meStrophe.$build;
$msg = meStrophe.$msg;
$pres = meStrophe.$pres;

var config = {
xmppURL: 'im-api.easemob.com',
apiURL: (location.protocol === 'https:' ? 'https:' : 'http:') + '//a1.easemob.com',
appkey: '这里是公司申请的唯一标识key',
https: false,
isMultiLoginSessions: true,
isAutoLogin: true,
isWindowSDK: false,
isSandBox: false,
isDebug: false,
autoReconnectNumMax: 2,
autoReconnectInterval: 2,
isWebRTC: (/Firefox/.test(navigator.userAgent) || /WebKit/.test(navigator.userAgent)) && /^https\:$/.test(window.location.protocol),
heartBeatWait: 4500,
isHttpDNS: false,
msgStatus: true,
delivery: true,
read: true,
saveLocal: false,
encrypt: {
type: 'none'
}
}
WebIM.config = config;
setJid: function(jid) {
this.jid = jid;
this.authzid = Strophe.getBareJidFromJid(this.jid);
this.authcid = Strophe.getNodeFromJid(this.jid);
},
getJid: function() {
return this.jid;
},
import websdk from 'easemob-websdk'
let webIM = window.WebIM = websdk
Vue.prototype.$WebIM = webIM
const imConn = new webIM.connection({
isMultiLoginSessions: webIM.config.isMultiLoginSessions,
https: typeof webIM.config.https === 'boolean' ? webIM.config.https : location.protocol === 'https:',
url: webIM.config.xmppURL,
isAutoLogin: true,
heartBeatWait: webIM.config.heartBeatWait,
autoReconnectNumMax: webIM.config.autoReconnectNumMax,
autoReconnectInterval: webIM.config.autoReconnectInterval,
apiUrl: webIM.config.apiURL
})
Vue.prototype.$imConn = imConn

mounted(){
var that = this;
this.$imConn.listen({
onTextMessage: function ( message ) {
console.log(message);
that.chatCont.push({id: 2, cont: message.data});
},
onPresence: function ( message ) {
// 这里需要弹出面板标识有人要添加您为好友
console.log(message)
if(message.type == 'subscribe') {
that.privateUser = message.from;
that.privateUserPanel = true;
}
}
});
}
