好久没更新了,今天准备写一个在实战项目中大家经常遇到的,就是图片上传头像。 下面介绍从本地上传。首先,一般我们头像是需要保存在本地的,所以我们要建个本地类,用来存图片字节。
UserDefaults.m文件
#import "UserDefaults.h"

@implementation UserDefaults

+ (void)setImage:(NSData *)img
{
    [[NSUserDefaults standardUserDefaults] setObject:img forKey:@"img"];
    [[NSUserDefaults standardUserDefaults] synchronize];
}

+ (NSData *)getImage
{
    return [[NSUserDefaults standardUserDefaults] objectForKey:@"img"];
}

@end
然后在你的控制器页面将UserDefaults.h导进来。
- (void)viewDidLoad {
    [super viewDidLoad];
    // Do any additional setup after loading the view, typically from a nib.

    _topView = [[UIView alloc] initWithFrame:CGRectMake(0, 0, self.view.frame.size.width, self.view.frame.size.width / 2)];
    [_topView setBackgroundColor:[UIColor clearColor]];
    [self.view addSubview:_topView];

    UIImageView *imageView = [[UIImageView alloc] initWithFrame:CGRectMake(0, 0, _topView.frame.size.width, _topView.frame.size.height)];
    [imageView setBackgroundColor:[UIColor clearColor]];
    [imageView setImage:[UIImage imageNamed:@"chen.png"]];
    [_topView addSubview:imageView];

    _avatarBtn = [[UIButton alloc] initWithFrame:CGRectMake((imageView.frame.size.width - 70) / 2, (imageView.frame.size.height - 70) / 2, 70, 70)];
    _avatarBtn.layer.masksToBounds = YES;
    _avatarBtn.layer.cornerRadius = _avatarBtn.frame.size.height / 2;
    _avatarBtn.layer.borderWidth = 1.0f;
    _avatarBtn.layer.borderColor = [UIColor lightGrayColor].CGColor;
    [_avatarBtn setBackgroundImage:[UIImage imageNamed:@"loin_icon_noSelect"] forState:UIControlStateNormal];
    [_avatarBtn addTarget:self action:@selector(onImageTouch:) forControlEvents:UIControlEventTouchUpInside];
    [_topView addSubview:_avatarBtn];
}
初始化创建所需要的控件。接下来,在点击按钮的事件中,我们就来个提示框提示是否选择图片或拍照,都是在一个点击事件的方法里面
- (void)onImageTouch:(UIButton *)btn
{
    UIAlertController *alertSheet = [UIAlertController alertControllerWithTitle:@"请选择头像来源" message:nil preferredStyle:UIAlertControllerStyleActionSheet];
    UIImagePickerController *imagePickerController = [[UIImagePickerController alloc] init];
    imagePickerController.delegate = self;
    imagePickerController.allowsEditing = YES;

    // 判断是否支持相机
    if ([UIImagePickerController isSourceTypeAvailable:UIImagePickerControllerSourceTypeCamera])  {
        UIAlertAction *cameraAction = [UIAlertAction actionWithTitle:@"拍照" style:UIAlertActionStyleDefault handler:^(UIAlertAction * _Nonnull action)  {
            // 设置数据源
            imagePickerController.sourceType = UIImagePickerControllerSourceTypeCamera;
            [self presentViewController:imagePickerController animated:YES completion:nil];
        }];
        [alertSheet addAction:cameraAction];
    }
    if ([UIImagePickerController isSourceTypeAvailable:UIImagePickerControllerSourceTypePhotoLibrary]) {
        UIAlertAction *photoAction = [UIAlertAction actionWithTitle:@"从手机相册选择" style:UIAlertActionStyleDefault handler:^(UIAlertAction * _Nonnull action) {
            imagePickerController.sourceType = UIImagePickerControllerSourceTypePhotoLibrary;
            [self presentViewController:imagePickerController animated:YES completion:nil];
        }];
        [alertSheet addAction:photoAction];
    }
    UIAlertAction *cancelAction = [UIAlertAction actionWithTitle:@"取消" style:UIAlertActionStyleCancel handler:nil];
    [alertSheet addAction:cancelAction];
    [self presentViewController:alertSheet animated:YES completion:nil];
}
之后,我们就去写UIImagePickerController的代理方法,当取消或选中之后的操作:
#pragma mark -
#pragma mark UIImagePickerControllerDelegate

- (void)imagePickerControllerDidCancel:(UIImagePickerController *)picker
{
    [picker dismissViewControllerAnimated:YES completion:nil];
}

- (void)imagePickerController:(UIImagePickerController *)picker didFinishPickingMediaWithInfo:(NSDictionary *)info
{
    NSString *mediaType = [info objectForKey:UIImagePickerControllerMediaType];
    // 被选中的图片
    if ([mediaType isEqualToString:@"public.image"])   {
        // 获取照片
        UIImage *image = [info objectForKey:UIImagePickerControllerEditedImage];
        NSString *path = [self saveImg:image WithName:@"avatar.png"];
        if (path != nil)  {
            // 图片存在,做你想要的操作
            NSData *data = [NSData dataWithContentsOfFile:path];
            [UserDefaults setImage:data];
        }
        [picker dismissViewControllerAnimated:YES completion:nil];          // 隐藏视图
    }
}
我们需要写一个图片保存到本地的方法
// 图片保存本地

- (NSString *)saveImg:(UIImage *)curImage WithName:(NSString *)imageName;
{
    NSData *imageData = UIImageJPEGRepresentation(curImage, 1);             // 1为不缩放保存,取值(0~1)

    // 获取沙盒路径
    NSString *path = [[NSSearchPathForDirectoriesInDomains(NSDocumentDirectory, NSUserDomainMask, YES) objectAtIndex:0] stringByAppendingPathComponent:imageName];

    // 将照片写入文件
    //atomically:这个参数意思是: 如果为YES则保证文件的写入原子性,就是说会先创建一个临时文件,直到文件内容写入成功再导入到目标文件里.如果为NO,则直接写入目标文件里
    if ([imageData writeToFile:path atomically:NO]) {
        return path;
    }  else {
        return nil;
    }
}
到了这里已经把图片从手机相册还是手机拍照之后传到了头像控件里面了。但是要注意,我们是本地保存,所以再每次进入到视图View的时候都要记得取加载保存过的那张图片
- (void)viewWillAppear:(BOOL)animated
{
    [super viewWillAppear:animated];
    [[UIApplication sharedApplication] setStatusBarStyle:UIStatusBarStyleLightContent];
    if ([UserDefaults getImage].length > 0) {
        [_avatarBtn setImage:[UIImage imageWithData:[UserDefaults getImage]] forState:UIControlStateNormal];
    } else {
        // 否则,获取你从服务器上加载的图片(读者的建议,很nice),获取后记得把图片保存本地,这样长度就有啦
        [_avatarBtn setImage@“服务器上加载的图片” forState:UIControlStateNormal];
    }
}

- (void)viewWillDisappear:(BOOL)animated
{
    [super viewWillDisappear:animated];
    [[UIApplication sharedApplication] setStatusBarStyle:UIStatusBarStyleDefault];
}
最后,提醒一点,记得把访问跟拍照权限添加进来,这不列举一下
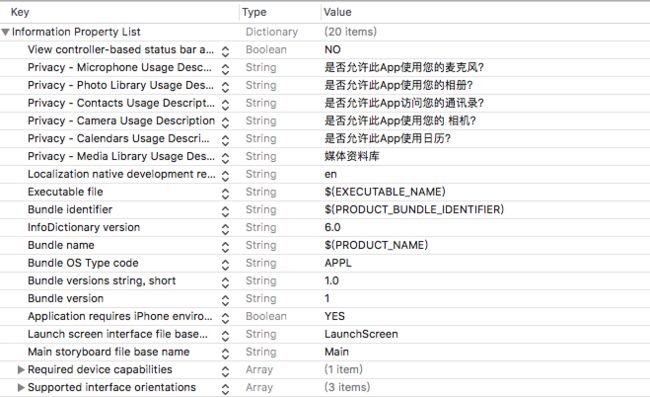
截图01.png
NSMicrophoneUsageDescription 是否允许此App使用您的麦克风?
NSPhotoLibraryUsageDescription 是否允许此App使用您的相册?
NSContactsUsageDescription 是否允许此App访问您的通讯录?
NSCameraUsageDescription 是否允许此App使用您的 相机?
NSCalendarsUsageDescription 是否允许此App使用日历?
NSAppleMusicUsageDescription 媒体资料库
效果图:
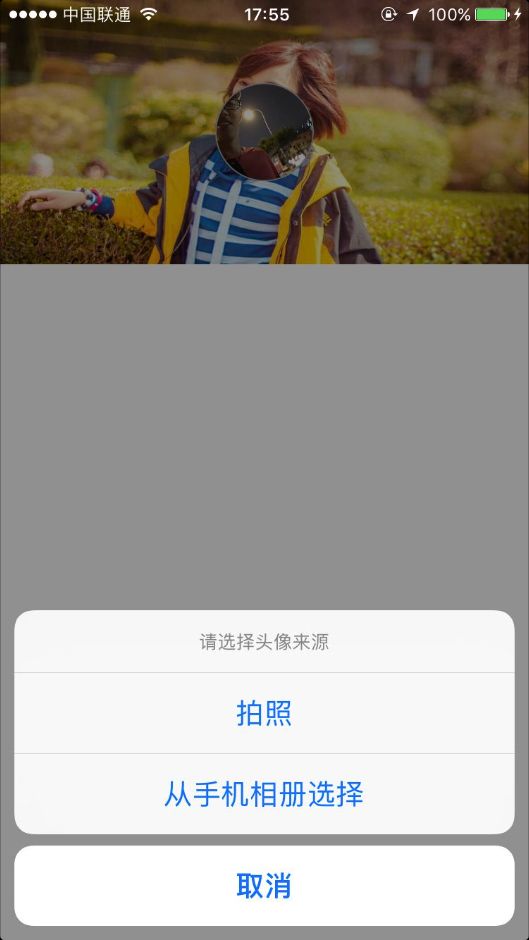
截图02.png
好了,大概图片上传也就这些啦,简单易懂。全部代码都贴出来了,背景框是我女神,大家猜一猜喽。我会再继续分享自己的菜鸟经历中的心得,感谢了!