windows 系统下安装influxdb 版本 influxdb-1.5.2 windows

双击获取链接下载  

下载成功以后直接解压

一 下载地址

需要 https://portal.influxdata.com/downloads 


二 安装

解压后对配置文件influxdb.conf进行修改,修改项(红字部分)如下:

1.全局部分

  1. # Once every 24 hours InfluxDB will report usage data to usage.influxdata.com
  2. # The data includes a random ID, os, arch, version, the number of series and other
  3. # usage data. No data from user databases is ever transmitted.
  4. # Change this option to true to disable reporting.
  5. reporting-disabled =true
  6. bind-address = ":8087"
2.[admin]部分  


  1. <span style="color:#5a5a5a;"> # Determines whether the admin service is enabled.
  2. span> <span style="color:#ff0000;">enabled = true span> <span style="color:#5a5a5a;">
  3. # The default bind address used by the admin service.
  4. span> <span style="color:#ff0000;"> bind-address = ":8083" span>


三 启动

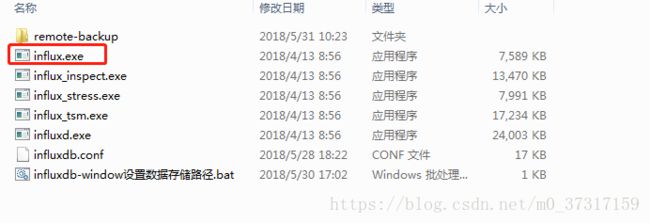
通过cmd命令窗口,切换到influxDB目录,执行以下命令:

windows 系统下安装influxdb 版本 influxdb-1.5.2 windows_第1张图片


influxd -config influxdb.conf


在浏览器中打开 http://localhost:8083  

ps: 1.3版本后没有网页访问界面

4. InfluxDB数据备份和恢复方法,支持本地和远程备份

本地备份

1、备份元数据

influxDB本地备份元数据的语法如下,这只会备份InfluxDB的的internal库数据,包含那些最基本的系统信息、用户信息等。

influxd backup 

示例:

$ influxd backup /tmp/backup
2016/02/01 17:15:03 backing up metastore to /tmp/backup/meta.00
2016/02/01 17:15:03 backup complete

2备份数据库

可以通过 -database 参数来指定备份的数据库。

语法:

influxd backup -database  

其他可选参数:

-retention 
-shard 
-since <date>

注:日期为RFC3339 格式,例如:2015-12-24T08:12:23Z

示例:

$ influxd backup -database telegraf -retention autogen -since 2016-02-01T00:00:00Z /tmp/backup
2016/02/01 18:02:36 backing up rp=default since 2016-02-01 00:00:00 +0000 UTC
2016/02/01 18:02:36 backing up metastore to /tmp/backup/meta.01
2016/02/01 18:02:36 backing up db=telegraf rp=default shard=2 to /tmp/backup/telegraf.default.00002.01 since 2016-02-01 00:00:00 +0000 UTC
2016/02/01 18:02:36 backup complete

以上为转载

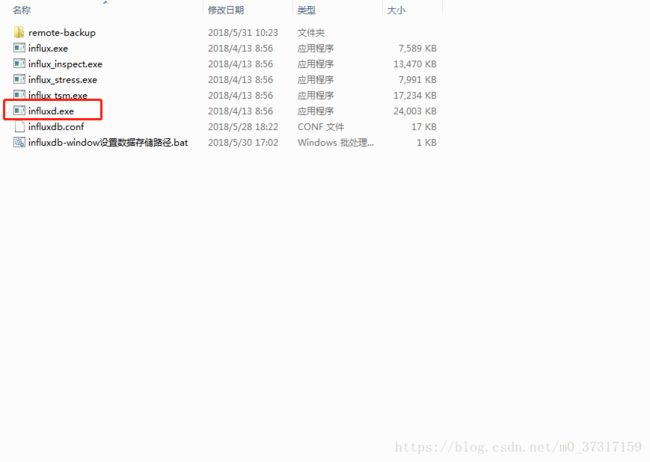
实际操作如下, 将路径切入 influx.exe  

执行以下命令  

  ps:你要备份的数据库          ps:数据库要备份路径 

influxd backup -database  

windows 系统下安装influxdb 版本 influxdb-1.5.2 windows_第2张图片


远程备份

InfluxDB可以使用 -host 参数实现数据的远程备份,端口一般是8088

示例:

$ influxd backup -database mydatabase -host 10.0.0.1:8088 /tmp/mysnapshot

注,上文所有参数在远程备份中均可使用。

数据恢复

语法:

influxd restore [ -metadir | -datadir ]  

必要参数:

-metadir -datadir 

可选参数:

-database 
-retention 
-shard id>

示例,恢复数据库:

$ influxd restore -database telegraf -datadir /var/lib/influxdb/data /tmp/backup                                                                         
Restoring from backup /tmp/backup/telegraf.*
unpacking /var/lib/influxdb/data/telegraf/default/2/000000004-000000003.tsm
unpacking /var/lib/influxdb/data/telegraf/default/2/000000005-000000001.tsm


influxd restore -database rwjk2017-yhj -datadir d:\tools\influxDB\DATA\.influxdb\data d:\influxdb-backup

标红的为你之前备份的数据库  

 d:\tools\influxDB\DATA\.influxdb\data 这个是你恢复备份的路径 

 d:\influxdb-backup 是你之前备份的路径 


influxdb 文档地址  :  http://docs.influxdata.com/influxdb/v1.5/

给数据库添加权限 :

windows 系统下安装influxdb 版本 influxdb-1.5.2 windows_第3张图片

给influxdb.conf  配置文件中添加以下配置 ,按照下文操作验证 

[http]
  enabled = true
  bind-address = ":8086"
  auth-enabled = true
  log-enabled = true
  write-tracing = false
  pprof-enabled = false
  https-enabled = false
  https-certificate = "/etc/ssl/influxdb.pem"

以下是原官方文档转载 

InfluxDB中的身份验证和授权


本文档介绍如何在InfluxDB中设置和管理身份验证和授权。

验证: 授权:
设置身份验证 用户类型和权限
验证请求 用户管理命令
HTTP错误 HTTP错误

注意:不应依赖身份验证和授权来阻止访问并保护数据免受恶意攻击者的攻击。如果需要其他安全性或合规性功能,InfluxDB应该在第三方服务后面运行。

认证

InfluxDB的HTTP API和命令行界面(CLI)使用API​​连接到数据库,包括基于用户凭据的简单内置身份验证。启用身份验证时,InfluxDB仅执行使用有效凭据发送的HTTP请求。

注意:身份验证仅发生在HTTP请求范围内。插件当前无法对请求进行身份验证,并且服务端点(例如,Graphite,collectd等)未经过身份验证。

设置身份验证

1.创建至少一个管理员用户

有关如何创建管理员用户的信息,请参阅授权部分

注意:如果启用身份验证且没有用户,InfluxDB将不会强制执行身份验证,并且只接受创建新管理员用户查询

一旦有管理员用户,InfluxDB将强制执行身份验证。

2.默认情况下,配置文件中禁用身份验证

通过在配置文件部分中设置auth-enabled选项来启用身份验证true[http]

[http]
  enabled = true
  bind-address = ":8086"
  auth-enabled = true
  log-enabled = true
  write-tracing = false
  pprof-enabled = false
  https-enabled = false
  https-certificate = "/etc/ssl/influxdb.pem"

3.重新启动该过程

现在InfluxDB将检查每个请求的用户凭据,并且只处理具有现有用户的有效凭据的请求。

验证请求

使用HTTP API进行身份验证

使用HTTP API进行身份验证有两种选择

如果使用基本身份验证 URL查询参数进行身份验证则查询参数中指定的用户凭据优先。以下示例中的查询假定用户是管理员用户请参阅有关不同用户类型的授权,其权限以及有关用户管理的更多信息部分。

注意:在启用身份验证时,InfluxDB会编辑密码。

使用RFC 2617第2节中描述的基本身份验证进行身份验证


这是提供用户凭据的首选方法。

例:

curl -G http://localhost:8086/query -u todd:influxdb4ever --data-urlencode "q=SHOW DATABASES"
通过在URL或请求正文中提供查询参数进行身份验证


设置u为用户名和p密码。

使用查询参数的示例:

curl -G "http://localhost:8086/query?u=todd&p=influxdb4ever" --data-urlencode "q=SHOW DATABASES"

使用请求正文的示例:

curl -G http://localhost:8086/query --data-urlencode "u=todd" --data-urlencode "p=influxdb4ever" --data-urlencode "q=SHOW DATABASES"

使用CLI进行身份验证

使用CLI进行身份验证有三种选择

使用INFLUX_USERNAMEINFLUX_PASSWORD环境变量进行身份验证


例:

export INFLUX_USERNAME todd
export INFLUX_PASSWORD influxdb4ever
echo $INFLUX_USERNAME $INFLUX_PASSWORD
todd influxdb4ever

influx
Connected to http://localhost:8086 version 1.4.x
InfluxDB shell 1.4.x
通过在启动CLI时设置usernamepassword标志进行身份验证


例:

influx -username todd -password influxdb4ever
Connected to http://localhost:8086 version 1.4.x
InfluxDB shell 1.4.x
auth 启动CLI后进行身份验证


例:

influx
Connected to http://localhost:8086 version 1.4.x
InfluxDB shell 1.4.x
> auth
username: todd
password:
>

验证对InfluxDB的Telegraf请求

在启用身份验证的情况下向InfluxDB实例验证Telegraf请求需要一些额外的步骤。在Telegraf的配置文件(/etc/telegraf/telegraf.conf)中,取消注释并编辑usernamepassword设置:

###############################################################################
#                            OUTPUT PLUGINS                                   #
###############################################################################

[...]

## Write timeout (for the InfluxDB client), formatted as a string.
## If not provided, will default to 5s. 0s means no timeout (not recommended).
timeout = "5s"
username = "telegraf" #                                    
你可能感兴趣的:(influxdb)