spring中注册bean的几种方式
一、xml文件方式
xml文件是spring较早用来注册对象实例的方法,比较直观,简单,但是随着对象增多,也比较麻烦。
(1)先定义一个person类,用来注入spring容器
public class Person {

    private String name;

    private Integer age;

    public Person() {
    }

    public Person(String name, Integer age) {
        this.name = name;
        this.age = age;
    }

    public String getName() {
        return name;
    }

    public void setName(String name) {
        this.name = name;
    }

    public Integer getAge() {
        return age;
    }

    public void setAge(Integer age) {
        this.age = age;
    }

    @Override
    public String toString() {
        return "Person{" +
                "name='" + name + '\'' +
                ", age=" + age +
                '}';
    }
}
(2)创建beans.xml文件,配置bean
(3)测试类测试
public class Cap1Test {
    public static void main(String[] args) {
        ApplicationContext app = new ClassPathXmlApplicationContext("beans.xml");

        Person persono1 = (Person) app.getBean("person1");

        System.out.println(persono1);
    }
}
测试类中,通过ClassPathXmlApplicationContext实现类来加载bean.xml文件,返回ApplicationContext spring容器,通过getBean()方法获取到指定对象,beans.xml中对应id属性就是指定容器中对象的名称。
二、@Bean注解方式
(1)创建配置类
@Configuration
public class Cap1Config {
    @Bean("person3")
    public Person person2(){
        return new Person("james lee",25);
    }
}
spring中配置类都要用@Configuration来申明,否则配置不生效。
(2)创建测试类
public class Cap2Test {
    public static void main(String[] args) {
        ApplicationContext app = new AnnotationConfigApplicationContext(Cap1Config.class);

        String[] beanNamesForType = app.getBeanNamesForType(Person.class);
        for(String name : beanNamesForType){
            System.out.println(name);
        }
    }
}
通过AnnotationConfigApplicationContext实现类读取配置类Cap1Config,会向spring容器注册带有@Bean注解的返回对象,利用容器的getBeanNamesForType()方法,查看容器中Person类的对象名,默认情况下,spring会把有@Bean的方法名作为容器中对象的name,但@Bean()也提供name/value属性来自定义对象的name。
(3)我们还可以使用@Condition来添加我们自定义的条件类,但是条件类要继承Condition接口。
三、@ComponentScan
ComponentScan常用于注册我们自己写的类,可以指定特定包下有特定注解的类注册到spring容器中
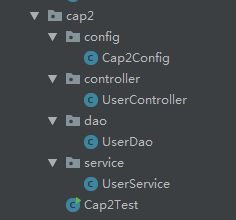
(1)如下图建立controller、service、dao三层,用于测试,内容可以不写,还有用于配置的配置类以及测试的测试类
@Controller
public class UserController {
}
@Service
public class UserService {
}@Repository
public class UserDao {
}@Configuration
@ComponentScan("com.enjoy.cap2")
public class Cap2Config {
}public class Cap2Test {
public static void main(String[] args) {
ApplicationContext app = new AnnotationConfigApplicationContext(Cap2Config.class);
String[] beanDefinitionNames = app.getBeanDefinitionNames();
for(String name : beanDefinitionNames){
System.out.println(name);
}
}
}还是通过AnnotationConfigApplicationContext实现类读取配置类Cap2Config,通过getBeanDefinitionNames()获取容器中的类,打印类名,可以看到controller、service、dao都被注入容器了。我们配置了@ComponentScan指定了cap2的包,spring会扫描该包,将所有有@Component注解的类注册到spring容器中,而@Controller、@Service、@Repository本质上都是@Component,所以controller、service、dao都会注册到spring容器中。
(2)@ComponentScan是比较灵活的,可以指定多个包,而且可以使用过滤器包含和排斥一些类,而@ComponentScans则是可以指定多个@ComponentScan。
四、@Import
(1)@Import(对象类.class)
配置类:
@Configuration
@Import({Person.class})
public class Cap3Config {
}
测试类:
public class Cap3Test {
    public static void main(String[] args) {
        ApplicationContext app = new AnnotationConfigApplicationContext(Cap3Config.class);

        String[] beanDefinitionNames = app.getBeanDefinitionNames();
        for(String name : beanDefinitionNames){
            System.out.println(name);
        }
    }
}
结果:
在Import后直接加上要注册对象的类,容器中的名称是类名的全路径
(2)@Import(ImportSelect.class)
要读取的对象配置类:
public class MyImportSelector implements ImportSelector {
    public String[] selectImports(AnnotationMetadata annotationMetadata) {
        return new String[]{"com.enjoy.cap3.MyImportSelectorEntity"};
    }
}
要注册的对象类:
public class MyImportSelectorEntity {
}
修改上述配置类,添加MyImportSelector:
@Configuration
@Import({Person.class,MyImportSelector.class})
public class Cap3Config {
}
测试类:
public class Cap3Test {
    public static void main(String[] args) {
        ApplicationContext app = new AnnotationConfigApplicationContext(Cap3Config.class);

        String[] beanDefinitionNames = app.getBeanDefinitionNames();
        for(String name : beanDefinitionNames){
            System.out.println(name);
        }
    }
}
结果对象注册成功:
(3)@Import(ImportBeanDefinitionRegistrar.class)
注册对象类:
public class MyImportBeanDefinitionRegistrarEntity {
}
要读取的对象配置类:
public class MyImportBeanDefinitionRegistrar implements ImportBeanDefinitionRegistrar {
    public void registerBeanDefinitions(AnnotationMetadata annotationMetadata, BeanDefinitionRegistry beanDefinitionRegistry) {
        RootBeanDefinition beanDefinition = new RootBeanDefinition(MyImportBeanDefinitionRegistrar.class);
        beanDefinitionRegistry.registerBeanDefinition("registerEntity", beanDefinition);
    }
}
修改配置类添加register:
@Configuration
@Import({Person.class,MyImportSelector.class,MyImportBeanDefinitionRegistrar.class})
public class Cap3Config {
}
测试类:
public class Cap3Test {
    public static void main(String[] args) {
        ApplicationContext app = new AnnotationConfigApplicationContext(Cap3Config.class);

        String[] beanDefinitionNames = app.getBeanDefinitionNames();
        for(String name : beanDefinitionNames){
            System.out.println(name);
        }
    }
}
结果registerEntity对象成功注册:
(4)实现factoryBean接口
注册的对象类:
public class FactoryBeanEntity {
}
要读取的对象配置类:
public class MyBeanFactory implements FactoryBean {

    public FactoryBeanEntity getObject() throws Exception {
        return new FactoryBeanEntity();
    }

    public Class getObjectType() {
        return FactoryBeanEntity.class;
    }

    public boolean isSingleton() {
        return true;
    }
}
配置类使用@Import和@Bean都可以:
@Configuration
@Import({MyBeanFactory.class})
public class Cap4Config {

    @Bean
    public MyBeanFactory myFactory(){
        return new MyBeanFactory();
    }

}
测试类:
public class Cap4Test {
    public static void main(String[] args) {
        ApplicationContext app = new AnnotationConfigApplicationContext(Cap4Config.class);

        String[] beanDefinitionNames = app.getBeanDefinitionNames();
        for(String name : beanDefinitionNames){
            System.out.println(name);
        }
    }
}
测试结果,两种方式都导入了对象,只是在容器中的名字不同:
总结:xml方式、@Bean方法都比较简单直接,但是对象数量多的情况下尽量使用@ComponentScan扫描包,批量注册对象,在有条件的情况下按具体情况使用@Bean+@Condition、@ComponentScan的filter。


