Shell脚本实现SSH免密登录及批量配置管理
1、SSH免密登录及批量配置管理
本节索引
场景分析
ssh免密登录
pssh工具批量管理
SHELL自动化脚本
本篇总结
场景分析
作为一个运维工程师,不是每个人工作的环境都想阿里、腾讯那样,动不动就上亿的PV量,上万台服务器。我们通常还是工作在,几十台上百台服务器这样的环境,而使用ansible或者puppet这样的自动化运维工具则显得大材小用,并且最终的效果可能还不如几个小工具达到的效果好。像ssh免密登录在配合pssh这样的推送工具,在配合自动化配置脚本,可以说是即方便也使用。这一节将详细带大家以shell脚本的形式实现ssh免密登录进行百台机器的配置和管理。
ssh服务
随着明文通信协议telnet渐渐退出历史舞台,ssh这个作为安全的远程登录工具,更加受广大用户的青睐。SSH 为 Secure Shell 的缩写,由 IETF 的网络小组(Network Working Group)所制定;SSH 为建立在应用层基础上的安全协议。SSH 是目前较可靠,专为远程登录会话和其他网络服务提供安全性的协议。利用 SSH 协议可以有效防止远程管理过程中的信息泄露问题。SSH最初是UNIX系统上的一个程序,后来又迅速扩展到其他操作平台。SSH在正确使用时可弥补网络中的漏洞。SSH客户端适用于多种平台。几乎所有UNIX平台—包括HP-UX、Linux、AIX、Solaris、Digital UNIX、Irix,以及其他平台,都可运行SSH。
ssh服务有两种验证用户登录的方式,一种是基于密码口令的认证,一种是基于密钥的认证,本文主要是实现基于密钥的认证。ssh基于密钥认证过程:

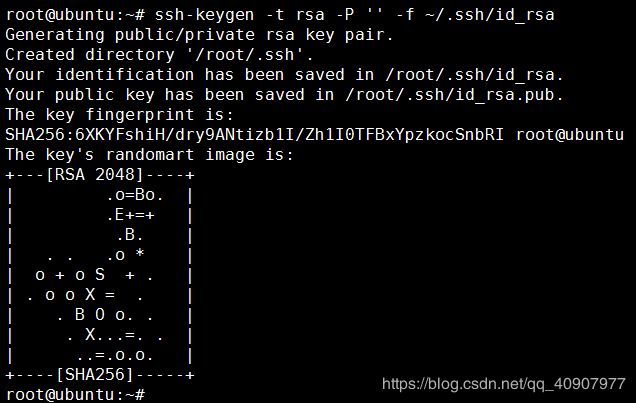
ssh工具不仅仅提供了远程登录的功能,他还自带了一些命令工具,能够生成ssh会话密钥,并且能够将生成密钥对的公钥复制到远程主机,例如:
root@ubuntu:~# ssh-keygen -t rsa -P ‘’ -f ~/.ssh/id_rsa

复制公钥至远程主机:ssh-copy-id [-i indetify_file ][user@host_ip]
#ssh-copy-id -i .ssh/id_rsa.pub 192.168.1.111

inux服务器A登陆Linux服务器B
服务器A上需要先安装expect。
test.exp
使用shell脚本编程中的expect语法,他能代替我们输入登录密码:
#!/usr/bin/expect
spawn ssh 172.18.8.100
expect {
    "yes/no" { send "yes\n";exp_continue }      # 替你回答下载公钥是的提示
    "password" { send "your_passwd\n" }         # 提示输入密码
}
interact
expect eof
[root@vinsent app]# cat ssh_auto.sh
#!/bin/bash
#!/bin/bash
#------------------------------------------#
# FileName:             ssh_auto.sh
# Revision:             1.1.0
# Date:                 2017-07-14 04:50:33
# Author:               vinsent
# Email:                [email protected]
# Website:              www.vinsent.cn
# Description:          This script can achieve ssh password-free login,
#                       and can be deployed in batches, configuration
#------------------------------------------#
# Copyright:            2017 vinsent
# License:              GPL 2+
#------------------------------------------#
[ ! -f /root/.ssh/id_rsa.pub ] && ssh-keygen -t rsa -p '' &>/dev/null  # 密钥对不存在则创建密钥
while read line;do
        ip=`echo $line | cut -d " " -f1`             # 提取文件中的ip
        user_name=`echo $line | cut -d " " -f2`      # 提取文件中的用户名
        pass_word=`echo $line | cut -d " " -f3`      # 提取文件中的密码
expect <<EOF
        spawn ssh-copy-id -i /root/.ssh/id_rsa.pub $user_name@$ip   # 复制公钥到目标主机
        expect {
                "yes/no" { send "yes\n";exp_continue}     # expect 实现自动输入密码
                "password" { send "$pass_word\n"}
        }
        expect eof
EOF

done < /root/host_ip.txt      # 读取存储ip的文件

pscp.pssh -h /root/host_ip.txt /root/your_scripts.sh /root     # 推送你在目标主机进行的部署配置
pssh -h /root/host_ip.txt -i bash /root/your_scripts.sh        # 进行远程配置,执行你的配置脚本
host_ip.txt文件可以通过手动写(当然了这就显得不自动化)你可以使用扫描工具扫描你网络中的主机,然后配合awk等工具生成该文件。ip地址即登录用户名密码的文件实例:
[root@vinsent app]# cat host_ip.txt
172.18.14.123 root 123456
172.18.254.54 root 123456
...
2、免密(免密码,不用输入密码)输入远程登录到服务器,并且执行命令,执行完后并退出
#!/usr/bin/expect -f
set TARGET [lindex $argv 0]
set USER [lindex $argv 1]
set PASSWD [lindex $argv 2]
set PORT [lindex $argv 3]
set DIR [lindex $argv 4]
set timeout 10

spawn ssh $USER@$TARGET -p $PORT
#'cd /root/'
expect {
    "*yes/no" {send "yes\r"; exp_continue}
    "*password:" {send "$PASSWD\r"}
}
#\r 代表回车执行
 send "cd $DIR\r"
 send "pwd\r"
 interact
3、shell脚本实现同时多台远程主机执行命令的代码分享
实现需求
在对单台机器做操作时我们会用“ssh ip”的方式登录到机器上,可以写这样一个工具vssh ip1,ip2,…ipn 来模拟登录到n 台服务器,登录后所有操作相当于同时对n 台服务器生效。
实现方法
首页要确保可以通过本地公钥无密码登录远程主机:
ssh-copy-id [-i [identity_file]] [user@]machine
shell脚本
#!/bin/bash
# -------------------------------------------------------------------------------
# Author:   Loya.Chen
# Description: Execute commands on multiple remote hosts at the same time.
# -------------------------------------------------------------------------------
set -e
Usage() {
  echo "Usage: $0 host1 host2 ... 'command'"
}
if [ $# -lt 2 ] ;then
  Usage
  exit 0
else
  cmd=${!#}
fi
logfile=$(mktemp)
i=1
success=0
failed=0
for ip in $@;do
  if [ $i -eq $# ];then
    break
  fi
  ssh $ip $cmd &> $logfile
  if [ $? -eq 0 ];then
    #((success++))
    success=$(($success+1))
    echo -e "\n\033[32m$ip | success \033[0m \n"
    cat $logfile
  else
    ((failed++))
    echo -e "\n\033[31m$ip | failed \033[0m\n "
    cat $logfile
  fi
  ((i++))
done
echo -e '\n-------------------------'
echo -e "\033[32msuccess: $success | failed: $failed \033[0m"
echo '-------------------------'
示例
$ bash vssh 10.0.0.11 10.0.0.12 ‘free -m’
10.0.0.11 | success
       total    used    free   shared  buffers   cached
Mem:     2871    156    2715     0     8     36
-/+ buffers/cache:    111    2760
Swap:     2047     0    2047
10.0.0.12 | success
       total    used    free   shared  buffers   cached
Mem:      980    615    365     0     12     69
-/+ buffers/cache:    533    447
Swap:     2047     0    2047
-------------------------
success: 2 | failed: 0
-------------------------
4、批量执行同一命令 shell 脚本
#!/bin/bash
if [ "$#" -ne 2 ] ; then
    echo "USAGE: $0 -f server_list_file cmd"
    exit -1
fi

file_name=$1
cmd_str=$2

cwd=$(pwd)
cd $cwd
serverlist_file="$cwd/$file_name"

if [ ! -e $serverlist_file ] ; then
    echo 'server.list not exist';
    exit 0
fi

while read line
do
    #echo $line
    if [ -n "$line" ] ; then
        echo "DOING--->>>>>" $line "<<<<<<<"
        ssh $line $cmd_str < /dev/null > /dev/null
        if [ $? -eq 0 ] ; then
            echo "$cmd_str done!"
        else
            echo "error: " $?
        fi
    fi
done < $serverlist_file
使用方法:
- 新建一个文件host_file_list,文件中为服务器的地址,每个一行;
vi host_file_list
192.168.177.128
192.168.177.129
192.168.177.130
192.168.177.131
-
保存上面shell 脚本, 如保存为 allcmd.sh,注意使用 chmod +x allcmd.sh 使之成为可执行脚本;
-
运行 allcmd.sh host_file_list md 即可, host_file_list 是第1步的文件名(记得和 allcmd.sh 放在相同目录下), cmd 就是要执行的命令,用单引号包起来,例如:删除/home/nuaazdh/下面的一个 tmp.txt 文件: ./allcmd.sh host_file_list ‘rm /home/nuaazdh/tmp.txt’

5、shell - 批量服务器执行相同命令的一种方式
通过shell脚本,在批量服务器上执行相同脚本,简单记录下
#!/bin/bash
iplist=(192.168.174.132 192.168.174.133 192.168.174.134)
for ip in ${iplist[*]}
do
  nohup ssh wfq@$ip "cd; mkdir test07;cd test07;echo '$ip log create done';exit;"&
  echo $ip
done
执行结果
wfq@ubuntu:~/sbin/shell$ ./update_softlink.sh
192.168.174.132
192.168.174.133
192.168.174.134
wfq@ubuntu:~/sbin/shell$ cat nohup.out
192.168.174.133 log create done
192.168.174.132 log create done
192.168.174.134 log create done
参考
批量登陆linux主机脚本
#test.sh
 #!/bin/bash
 dir=/home/test
 while read line
 do
 host=`echo $line| awk '{print $1}'`
 passwd=`echo $line | awk '{print $2}'`
 $dir/expect_ssh.sh $host $passwd &
 done < $dir/host.txt

 #expect_ssh.sh
 #!/usr/bin/env expect
 set HOST [lindex $argv 0]
 set PASSWD [lindex $argv 1]
 spawn ssh root@$HOST
 expect  "(yes/no)?" { send "yes\n" }
 expect "*password:" { send "$PASSWD\n" }
 expect "*password:" { send "$PASSWD\n" }
 expect "*#" { send "useradd -u 0 -g 0 username\n" } #执行相关操作,比如adduser
 expect eof
 #host.txt格式,可从数据库中导出
IP           passwd
shell 登录批量服务器
#!/bin/bash
cat iplist|while read line  #iplist文件中存放了IP地址和密码,每行格式为“IP地址 密码”
do
a=($line)                   #a为数组
/usr/bin/expect<<EOF
spawn ssh root@${a[0]}
expect {
"*yes/no" { send "yes\r"; exp_continue}
"*password:" { send "${a[1]}\r" }
}
expect "#"
send "hostname\r"
send "exit\r"
expect eof
EOF
done
服务器免密登陆shell脚本
#!/bin/bash
#ssh免密登录shell脚本
#配置免密登录的所有机子都要运行该脚本

#修改/etc/ssh/sshd_config配置文件
#sed -i 's/被替换的内容/替换成的内容/'  /配置文件地址
#sed -i 's/#PubkeyAuthentication yes/PubkeyAuthentication yes/' /etc/ssh/sshd_config
#cat >> /etc/ssh/sshd_config <
#RSAAuthentication yes
#EOF

#yum install expect expect-devel tcl -y  #安装expect
echo "按enter键3次即可"
ssh-keygen -t rsa   #生成秘钥(按enter键3次即可生成)
SERVERS="arango mysql es redis"   #需要配置的主机名
PASSWORD=123456   #需要配置的主机登录密码

#将本机生成的公钥复制到其他机子上
#如果(yes/no)则自动选择yes继续下一步
#如果password:怎自动将PASSWORD写在后面继续下一步
auto_ssh_copy_id(){
        expect -c "set timeout -1;
        spawn ssh-copy-id $1;
        expect {
                *(yes/no)* {send -- yes\r;exp_continue;}
                *password:* {send -- $2\r;exp_continue;}
                eof        {exit 0;}
        }";
}

ssh_copy_id_to_all(){
        for SERVER in $SERVERS #遍历要发送到各个主机的ip
        do
                auto_ssh_copy_id $SERVER $PASSWORD
        done
}
ssh_copy_id_to_all
常见问题:
1、直接ssh登录,也报错了。
root@ubuntu:~# ssh-copy-id -i .ssh/id_rsa.pub 192.168.1.132
/usr/bin/ssh-copy-id: INFO: Source of key(s) to be installed: ".ssh/id_rsa.pub"
/usr/bin/ssh-copy-id: INFO: attempting to log in with the new key(s), to filter out any that are already installed
/usr/bin/ssh-copy-id: INFO: 1 key(s) remain to be installed -- if you are prompted now it is to install the new keys
root@192.168.1.132's password:
Permission denied, please try again.
root@192.168.1.132's password:
Permission denied, please try again.
root@192.168.1.132's password:
Permission denied (publickey,password).
解决办法 ##
1、登录目标机器 打开 /etc/ssh/sshd_config ,修改PasswordAuthentication no 为:
PasswordAuthentication yes
2、重启服务
/etc/init.d/sshd restart
2、客户端拒绝连接Connection to 192.168.1.132 closed by remote host.
root@ubuntu:~# ssh-copy-id -i .ssh/id_rsa.pub 192.168.1.132
/usr/bin/ssh-copy-id: INFO: Source of key(s) to be installed: ".ssh/id_rsa.pub"
/usr/bin/ssh-copy-id: INFO: attempting to log in with the new key(s), to filter out any that are already installed
/usr/bin/ssh-copy-id: INFO: 1 key(s) remain to be installed -- if you are prompted now it is to install the new keys
Connection to 192.168.1.132 closed by remote host.
解决办法
(1)查看这两个文件是否有阻止
cat /etc/hosts.deny
cat /etc/hosts.allow
(2)客户端连接数过多
修改/etc/ssh/sshd_config中#MaxStartups 10,将其改为MaxStartups 100
重启
3、给远程主机发送公钥

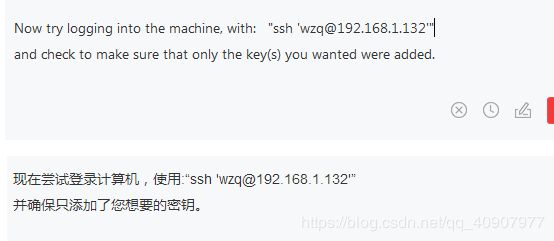
Now try logging into the machine, with: “ssh ‘[email protected]’”
and check to make sure that only the key(s) you wanted were added.

4、expect脚本执行脚本出现spawn: command not found的问题
test.exp: line 8: spawn: command not found
使用expect -f xxx.sh可行呢
说明执行方式不正确,因为expect用的不是bash所以会报错。执行的时候直接./autosu.sh就可以了
(1)使用vi工具
 oracle@linux-106:~/RMAN/bin> vi test.sh

(2)利用如下命令查看文件格式
 :set ff 或 :set fileformat
 可以看到如下信息
 fileformat=dos 或 fileformat=unix
 (3) 利用如下命令修改文件格式
 :set ff=unix 或 :set fileformat=unix
 :wq (存盘退出)
最后再执行
./test.sh
参考链接 :
https://www.cnblogs.com/mmdln/p/8963551.html
shell - 批量服务器执行相同命令的一种方式 :https://blog.csdn.net/wang725/article/details/81142355
https://blog.csdn.net/lowman2/article/details/89489957
Linux 集群上批量执行同一命令 shell 脚本 :https://blog.csdn.net/jdbc/article/details/79936346
https://blog.51cto.com/bronte/1535807
服务器免密登陆shell脚本 :http://blog.51cto.com/superleedo/2298141
https://blog.csdn.net/weixin_33841722/article/details/91803886
https://blog.csdn.net/Evan_2008/article/details/90703820
通过linux的shell脚本批量处理交换机配置变更 :https://blog.csdn.net/weixin_33714884/article/details/91805774
linux expect 自动登录交换机保存配置https://blog.csdn.net/u014590164/article/details/51236797
