PKI介绍及搭建Linux私有CA (SSL 示例)
PKI介绍及搭建Linux私有CA
- PKI 介绍
- PKI 概念
- CA
- 构建私有CA
- 步骤1:生成私钥
- 步骤2:生成自签证书
- 步骤3:为CA提供所需的目录及文件
- 请求证书
- 步骤1:查看httpd服务是否安装
- 步骤2:需要用到证书的主机生成私钥
- 步骤3:生成证书签署请求
- 步骤4:将请求通过可靠方式发送给CA主机
- 步骤5:在CA主机上签署证书
- 步骤6:把生成的crt文件再发送回申请的web服务器
- 步骤6:查看证书中的信息
- 吊销证书
- 步骤1:客户端获取要吊销的证书的serial(在使用证书的主机执行)
- 步骤2: CA主机吊销证书
- 步骤3:生成吊销证书的吊销编号(第一次吊销证书时执行)
- 步骤4:更新证书吊销列表
- 步骤5:查看 crl 文件
- 如何让浏览器识别自签的证书
- 1、Windows 浏览器
- 证书管理器管理证书
- Chrome 浏览器证书加载
- 2、NSS 可信任根证书库
PKI 介绍
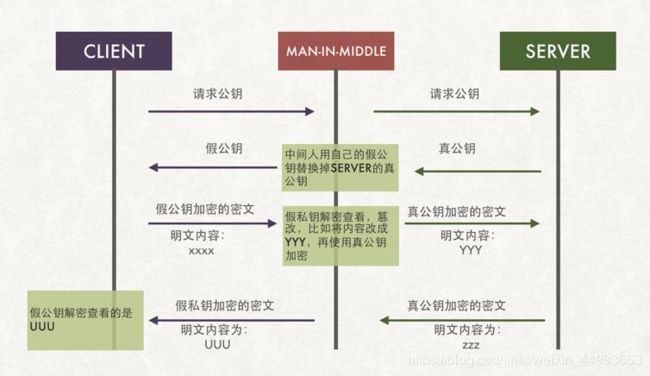
PKI的诞生主要是为了防范中间人攻击。中间人攻击如下图所示:

PKI 概念
PKI(Public Key Infrastructure):公钥基础设施,主要包括以下四个部分:
- 签证机构(CA)
- 注册机构(RA)
- 证书吊销列表(CRL)
- 证书存取库
X.509v3:定义了证书的结构以及认证协议标准。
- 版本号
- 序列号
- 签名算法ID
- 发行者名称
- 有效期限
- 主体名称
- 主体公钥
- 发行者的唯一标识
- 主体的唯一标识、
- 扩展
- 发行者的签名
CA
CA一般有公共信任的CA和私有CA。
建立私有CA使用的工具:OpenSSL 和 OpenCA 。
# openssl命令
	配置文件:/etc/pki/tls/openssl.cnf
构建私有CA
在确定配置为CA的服务上生成一个自签证书,并为CA提供所需要的目录及文件即可。
步骤1:生成私钥
# (umask 077; openssl genrsa -out /etc/pki/CA/private/cakey.pem 4096)
[root@LeeMumu ~]# (umask 077; openssl genrsa -out /etc/pki/CA/private/cakey.pem 4096)
Generating RSA private key, 4096 bit long modulus
........................++
........................++
e is 65537 (0x10001)

[root@LeeMumu CA]# ll /etc/pki/CA/private/cakey.pem
-rw-------. 1 root root 3247 Jul 19 21:50 /etc/pki/CA/private/cakey.pem

[root@LeeMumu ~]# cat /etc/pki/CA/private/cakey.pem
-----BEGIN RSA PRIVATE KEY-----
MIIJKgIBAAKCAgEAzZJJ2dvomneSkZQpI4t//UUaEj/duUigQ7fVmbqbQvqEGzQU
86UaG7QgNiL6n1f9TQ8X+fbaQCofnWzTNof/Qkq3k4QPDLqrTQ4b646EZpihoc99
... ...
0xACKBZkrlssQJ9SrAa7wTrTBZ3GAxRSFrcQk5F5w+9W8FPedhywAkjbUO0uxAdt
oDrDhwcSPTnSWl9w5oUY9DfAwz6EXVxCgdKWrTKWeHyNjgp11YV1sBXKpLOS+A==
-----END RSA PRIVATE KEY-----
步骤2:生成自签证书
# openssl req -new -x509 -key /etc/pki/CA/private/cakey.pem -out /etc/pki/CA/cacert.pem -days 3655
		-new:生成新证书签署请求;
		-x509:生成自签格式证书,专用于创建私有CA时;
		-key:生成请求时用到的私有文件路径;
		-out:生成的请求文件路径;如果自签操作将直接生成签署过的证书;
		-days:证书的有效时长,单位是day;
[root@LeeMumu ~]# openssl req -new -x509 -key /etc/pki/CA/private/cakey.pem -out /etc/pki/CA/cacert.pem -days 3655
You are about to be asked to enter information that will be incorporated
into your certificate request.
What you are about to enter is what is called a Distinguished Name or a DN.
There are quite a few fields but you can leave some blank
For some fields there will be a default value,
If you enter '.', the field will be left blank.
-----
Country Name (2 letter code) [XX]:CN
State or Province Name (full name) []:BJ
Locality Name (eg, city) [Default City]:BJ
Organization Name (eg, company) [Default Company Ltd]:JT
Organizational Unit Name (eg, section) []:NEO
Common Name (eg, your name or your server's hostname) []:JT.NEO
Email Address []:

[root@LeeMumu ~]# cd /etc/pki/CA/
[root@LeeMumu CA]# ls
cacert.pem  certs  crl  newcerts  private
[root@LeeMumu CA]# ll
total 4
-rw-r--r--. 1 root root 1960 Jul 19 21:52 cacert.pem
drwxr-xr-x. 2 root root    6 Oct 30  2018 certs
drwxr-xr-x. 2 root root    6 Oct 30  2018 crl
drwxr-xr-x. 2 root root    6 Oct 30  2018 newcerts
drwx------. 2 root root   23 Jul 19 21:50 private
步骤3:为CA提供所需的目录及文件
# mkdir  -pv  /etc/pki/CA/{certs,crl,newcerts}
# touch  /etc/pki/CA/{serial,index.txt}
# echo  01 > /etc/pki/CA/serial
[root@LeeMumu CA]# touch  /etc/pki/CA/{serial,index.txt}
[root@LeeMumu CA]# ll
total 4
-rw-r--r--. 1 root root 1960 Jul 19 21:52 cacert.pem
drwxr-xr-x. 2 root root    6 Oct 30  2018 certs
drwxr-xr-x. 2 root root    6 Oct 30  2018 crl
-rw-r--r--. 1 root root    0 Jul 19 21:53 index.txt
drwxr-xr-x. 2 root root    6 Oct 30  2018 newcerts
drwx------. 2 root root   23 Jul 19 21:50 private
-rw-r--r--. 1 root root    0 Jul 19 21:53 serial

[root@LeeMumu CA]# cat serial
[root@LeeMumu CA]# echo  01 > /etc/pki/CA/serial
[root@LeeMumu CA]# cat serial
01
请求证书
要用到证书进行安全通信的服务器,需要向CA请求签署证书。
下面以httpd为例进行讲解。
步骤1:查看httpd服务是否安装
# rpm -q httpd
[root@JiaoTangtang ~]# rpm -q httpd
httpd-2.4.6-89.el7.centos.x86_64
步骤2:需要用到证书的主机生成私钥
# mkdir  /etc/httpd/ssl
# cd  /etc/httpd/ssl
# (umask  077; openssl  genrsa -out  /etc/httpd/ssl/httpd.key  2048)
[root@JiaoTangtang ~]# cd /etc/httpd/
[root@JiaoTangtang httpd]# ls
conf  conf.d  conf.modules.d  logs  modules  run
[root@JiaoTangtang httpd]# mkdir  /etc/httpd/ssl
[root@JiaoTangtang httpd]#
[root@JiaoTangtang httpd]# ls
conf  conf.d  conf.modules.d  logs  modules  run  ssl
[root@JiaoTangtang httpd]# cd /etc/httpd/ssl
[root@JiaoTangtang ssl]#
[root@JiaoTangtang ssl]# (umask  077; openssl  genrsa -out  /etc/httpd/ssl/httpd.key  2048)
Generating RSA private key, 2048 bit long modulus
.............................................+++
...........................+++
e is 65537 (0x10001)
[root@JiaoTangtang ssl]# ll
total 4
-rw-------. 1 root root 1679 Jul 19 22:00 httpd.key
步骤3:生成证书签署请求
# openssl  req  -new  -key  /etc/httpd/ssl/httpd.key  -out /etc/httpd/ssl/httpd.csr  -days  365
	# 因为是私有CA,公司名一定要与CA一致
	# 主机名一定要与客户端访问的地址一致(后续使用的时候,不然会有证书名称不一致的告警提示)
[root@JiaoTangtang ssl]# openssl  req  -new  -key  /etc/httpd/ssl/httpd.key  -out /etc/httpd/ssl/httpd.csr  -days  365
You are about to be asked to enter information that will be incorporated
into your certificate request.
What you are about to enter is what is called a Distinguished Name or a DN.
There are quite a few fields but you can leave some blank
For some fields there will be a default value,
If you enter '.', the field will be left blank.
-----
Country Name (2 letter code) [XX]:CN
State or Province Name (full name) []:BJ
Locality Name (eg, city) [Default City]:BJ
Organization Name (eg, company) [Default Company Ltd]:JT
Organizational Unit Name (eg, section) []:NEO
Common Name (eg, your name or your server's hostname) []:JIAO.COM
Email Address []:

Please enter the following 'extra' attributes
to be sent with your certificate request
A challenge password []:root
An optional company name []:NEO
[root@JiaoTangtang ssl]#
[root@JiaoTangtang ssl]# ls
httpd.csr  httpd.key
步骤4:将请求通过可靠方式发送给CA主机
# 可使用scp命令或其他可靠的方式发送给CA主机
[root@JiaoTangtang ssl]# scp httpd.csr [email protected]:/etc/pki/CA/certs
The authenticity of host '192.168.1.9 (192.168.1.9)' can't be established.
ECDSA key fingerprint is SHA256:FPBGn5p7YMfNDkVYCc3Fi9EOZiEkxRSM8P6QJU5wC8c.
ECDSA key fingerprint is MD5:d5:ec:ba:5f:cd:0b:ae:61:32:e4:38:3e:56:ed:ac:90.
Are you sure you want to continue connecting (yes/no)? yes
Warning: Permanently added '192.168.1.9' (ECDSA) to the list of known hosts.
[email protected]'s password:
httpd.csr                                                 100% 1033   688.0KB/s   00:00
# CA主机上进行查看是否发送成功
[root@LeeMumu certs]# ll
total 4
-rw-r--r--. 1 root root 1033 Jul 19 22:06 httpd.csr
步骤5:在CA主机上签署证书
~]# openssl ca -in /tmp/httpd.csr -out /etc/pki/CA/certs/httpd.crt -days 365
[root@LeeMumu certs]# openssl ca -in /etc/pki/CA/certs/httpd.csr -out /etc/pki/CA/certs/httpd.crt -days 365
Using configuration from /etc/pki/tls/openssl.cnf
Check that the request matches the signature
Signature ok
Certificate Details:
        Serial Number: 1 (0x1)
        Validity
            Not Before: Jul 20 02:08:05 2019 GMT
            Not After : Jul 19 02:08:05 2020 GMT
        Subject:
            countryName               = CN
            stateOrProvinceName       = BJ
            organizationName          = JT
            organizationalUnitName    = NEO
            commonName                = JIAO.COM
        X509v3 extensions:
            X509v3 Basic Constraints:
                CA:FALSE
            Netscape Comment:
                OpenSSL Generated Certificate
            X509v3 Subject Key Identifier:
                84:97:99:5A:EB:C6:B9:3E:D2:AE:10:CB:FE:D0:9F:C9:76:20:44:C4
            X509v3 Authority Key Identifier:
                keyid:7D:5A:15:7D:9F:2E:F2:08:ED:09:57:B6:1A:41:8F:A9:8F:50:7C:0C

Certificate is to be certified until Jul 19 02:08:05 2020 GMT (365 days)
Sign the certificate? [y/n]:y


1 out of 1 certificate requests certified, commit? [y/n]y
Write out database with 1 new entries
Data Base Updated
[root@LeeMumu certs]#
[root@LeeMumu certs]# ll                      # 生成 httpd.crt
total 12
-rw-r--r--. 1 root root 5627 Jul 19 22:08 httpd.crt
-rw-r--r--. 1 root root 1033 Jul 19 22:06 httpd.csr
步骤6:把生成的crt文件再发送回申请的web服务器
# 可使用scp命令或其他可靠的方式发送给CA主机
[root@LeeMumu certs]# scp /etc/pki/CA/certs/httpd.crt [email protected]:/etc/pki/CA/certs/
The authenticity of host '192.168.1.10 (192.168.1.10)' can't be established.
ECDSA key fingerprint is SHA256:jiD9xP+ayA5wt4WMwKiXa9eVX7JAZF3MopajfwqB/50.
ECDSA key fingerprint is MD5:81:14:e6:5f:27:83:a0:8b:c2:88:35:a3:5b:0d:ae:b3.
Are you sure you want to continue connecting (yes/no)? yes
Warning: Permanently added '192.168.1.10' (ECDSA) to the list of known hosts.
[email protected]'s password:
httpd.crt                                                 100% 5627     3.7MB/s   00:00
步骤6:查看证书中的信息
# openssl  x509  -in /etc/pki/CA/certs/httpd.crt  -noout  -serial  -subject
# 通常只看序列号和subject
# CA主机上查看
[root@LeeMumu certs]# openssl  x509  -in /etc/pki/CA/certs/httpd.crt  -noout  -serial  -subject
serial=01
subject= /C=CN/ST=BJ/O=JT/OU=NEO/CN=JIAO.COM
[root@LeeMumu CA]# cat index.txt
V	200719020805Z		01	unknown	/C=CN/ST=BJ/O=JT/OU=NEO/CN=JIAO.COM
# 申请证书的web服务器上查看
[root@JiaoTangtang certs]#  openssl  x509  -in /etc/pki/CA/certs/httpd.crt  -noout  -serial  -subject
serial=01
subject= /C=CN/ST=BJ/O=JT/OU=NEO/CN=JIAO.COM
吊销证书
步骤1:客户端获取要吊销的证书的serial(在使用证书的主机执行)
# openssl x509 -in /etc/pki/CA/certs/httpd.crt -noout -serial -subject
步骤2: CA主机吊销证书
先根据客户提交的serial和subject信息,对比其与本机数据库index.txt中存储的是否一致。
# openssl  ca  -revoke  /etc/pki/CA/newcerts/SERIAL.pem      # 吊销命令
	# 其中的SERIAL要换成证书真正的序列号
步骤3:生成吊销证书的吊销编号(第一次吊销证书时执行)
# echo 01 > /etc/pki/CA/crlnumber
步骤4:更新证书吊销列表
# openssl ca -gencrl -out /etc/pki/CA/thisca.crl
步骤5:查看 crl 文件
# openssl crl -in /etc/pki/CA/thisca.crl -noout -text
示例:
[root@LeeMumu CA]# echo  01  > /etc/pki/CA/crlnumber
[root@LeeMumu CA]# openssl  ca  -revoke  /etc/pki/CA/newcerts/01.pem
Using configuration from /etc/pki/tls/openssl.cnf
Revoking Certificate 01.
Data Base Updated

[root@LeeMumu CA]# openssl  ca  -gencrl  -out  thisca.crl
Using configuration from /etc/pki/tls/openssl.cnf

[root@LeeMumu CA]# openssl  crl  -in  thisca.crl  -noout  -text
Certificate Revocation List (CRL):
        Version 2 (0x1)
    Signature Algorithm: sha256WithRSAEncryption
        Issuer: /C=CN/ST=BJ/L=BJ/O=JT/OU=NEO/CN=JT.NEO
        Last Update: Jul 20 02:19:16 2019 GMT
        Next Update: Aug 19 02:19:16 2019 GMT
        CRL extensions:
            X509v3 CRL Number:
                1
Revoked Certificates:
    Serial Number: 01
        Revocation Date: Jul 20 02:19:00 2019 GMT
    Signature Algorithm: sha256WithRSAEncryption
         ac:fe:c5:5e:d1:96:13:6d:54:6f:b5:61:3c:2d:53:31:56:fd:
       	 ... ...
         dc:4f:35:a0:5d:e5:0a:fd
如何让浏览器识别自签的证书
自签名证书,由于浏览器不信任该证书,访问网站的时候总会提示安全风险,为了避免频繁的提示,可以手动将证书添加到浏览器的可信任根证书库中。
常见两种可信任根证书库:
- Windows 可信任根证书库:被IE、Edge和Windows 平台的 Chrome 使用
- NSS 可信任根证书库:被Firefox和Linux平台的 Chrome 使用。
1、Windows 浏览器
证书管理器管理证书
Windows 有一个证书管理器。所以不管是从 Windows 系统的证书管理器中导入安装证书,还是直接根据 IE 的提示来安装,效果都是一样的。唯一不同的是,通过 Windows 证书管理器来安装证书的话,需要先将安全证书(.crt 类型的那个文件)保存到本地磁盘。
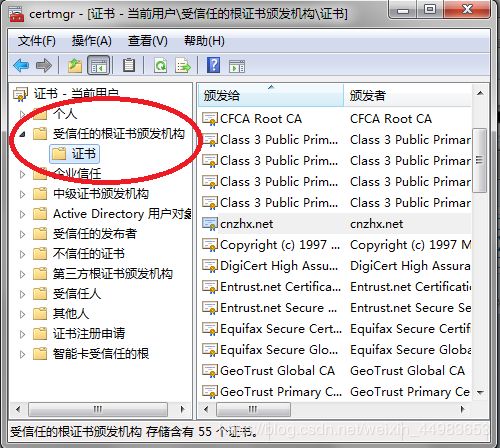
在 Windows 7 中(via 微软),要查看或管理证书,必须以管理员身份进行登录,才能执行这些步骤。可以使用“证书管理器”查看有关证书的详细信息,修改、删除这些证书,或者申请新证书。要打开证书管理器:通过单击“开始”按钮,在“搜索”框中键入 certmgr.msc,然后按 Enter,打开“证书管理器”。 如果系统提示输入管理员密码或进行确认,则需要键入密码或提供确认。

先展开左边栏里的“受信任的根证书颁发机构”,选中其下的“证书”,然后点击菜单栏的“操作”——>“所有任务”——>“导入”,即可打开证书导入向导。然后就可以接着前面的“证书导入向导”那幅图(快速跳转)开始往下操作了。
另外,在查看证书详情那一步,如果打开详细信息标签页,可以看到有个复制到文件的按钮,单击此按钮即可保存该证书为一个 CA 文件。
Chrome 浏览器证书加载
- 打开 Chrome 浏览器
- 选项 > 高级选项 > 管理证书…
- 导入证书 > 下一步 > 选择 GoAgent/local 目录下的 CA.crt 证书 > 下一步 > 选择 证书存储:浏览… > 受信任的根证书颁发机构 > 下一步 … > 完成 (注意一定要选择受信任的根证书颁发机构)
- 重启浏览器
2、NSS 可信任根证书库
-
安装 nss-tools
[root@neo ~]# yum install nss-tools -y [root@neo ~]# yum info nss-tools Loaded plugins: fastestmirror Loading mirror speeds from cached hostfile * base: centos.ustc.edu.cn * extras: centos.ustc.edu.cn * updates: centos.ustc.edu.cn Installed Packages Name : nss-tools Arch : x86_64 Version : 3.36.0 Release : 7.1.el7_6 Size : 2.0 M Repo : installed From repo : updates Summary : Tools for the Network Security Services URL : http://www.mozilla.org/projects/security/pki/nss/ License : MPLv2.0 Description : Network Security Services (NSS) is a set of libraries designed to : support cross-platform development of security-enabled client and : server applications. Applications built with NSS can support SSL v2 : and v3, TLS, PKCS #5, PKCS #7, PKCS #11, PKCS #12, S/MIME, X.509 : v3 certificates, and other security standards. : : Install the nss-tools package if you need command-line tools to : manipulate the NSS certificate and key database. -
列出安全数据库中的证书
# certutil -L -d certdir 说明:列出指定的目录certdir的所有证书,-d 后面接上证书库的目录 -L表示列出所有证书 -
添加证书到数据库中
# certutil  -A  -n  [email protected]   -t  "p,p,p"  -i  mycert.crt  -d  certdir
说明:
	-A     # 表示添加证书到数据库中
	-n     # 表示证书的呢称
	-t     # 表示设置信任属性
	-i     # 表示输入文件,即crt文件
	-d     # 后面接上证书库的目录