Netty入门——拆粘包与编解码(三)
回顾一下上一篇文章中MyClientInitializer类中的代码。
        //(1)加入拆包器
        pipeline.addLast(new LengthFieldBasedFrameDecoder(Integer.MAX_VALUE,0,4,0,4));
        //(2)加入粘包器
        pipeline.addLast(new LengthFieldPrepender(4));
        //字符串解码 (3)
        pipeline.addLast(new StringDecoder(CharsetUtil.UTF_8));
        //字符串编码 (4)
        pipeline.addLast(new StringEncoder(CharsetUtil.UTF_8));
上面代码中用到了Netty的拆包器、粘包器、编解码器。本文会对Netty 是如何拆包进行分析。
TCP的粘包与拆包
在TCP/IP协议中,数据是以二进制流的方式传播的,数据包映射到数据链路层、IP 层和 TCP 层分别叫Frame、Packet、Segment,我们这边不死磕如何翻译,下面都统一用英文表示。
粘包
粘包是TCP在传输过程中,为了提高有效负载,把多个数据包合并成一个数据包发送的现象。如何理解?比如10字节的数据,每次发送1个字节,需要10次TCP传输,10 ACK 确认。如果合并成一个数据包一起发送,可以提高有效负载,节省带宽(前提是对数据实时性要求不高的场景)。
但是粘包会引发语义级别的message识别问题。比如下面这张图:
ABC+DEF+GHI分3个message, 也就是3个Frame 发送出去,接收端收到4个Frame,不在是原来的3个message 对应的3 个Frame。这就是TCP的粘包与半包现象。AB、H、I的情况是半包,CDEFG的情况是粘包。虽然顺序是和原来一样,但是分组不再是原来的3个分组,这个时候就需要语义上message识别,即拆包。
拆包
发送端把4个数据包粘成2个就需要接收端把这2个数据包拆分成4个。按照如下步骤进行拆包:
1、读取数据,根据协议判断是否可以构成一个完整的包
2、如果能够构成一个完整的数据包,那么和之前接收到的数据一起拼接成一个完整的数据包给业务逻辑层,多余的数据等待下一次的拼接。
3、如果不能,那么继续从缓存中读取数据。
那么如何判断是否是一个完整的包?
有两种方式:
方式 1:分隔符。为人熟知的SMTP、POP3、IMAP、Telnet等等。下图显示的是使用“\r\n”分隔符的处理过程。
图中的数字说明:1、字节流。2、第一帧。3、第二帧
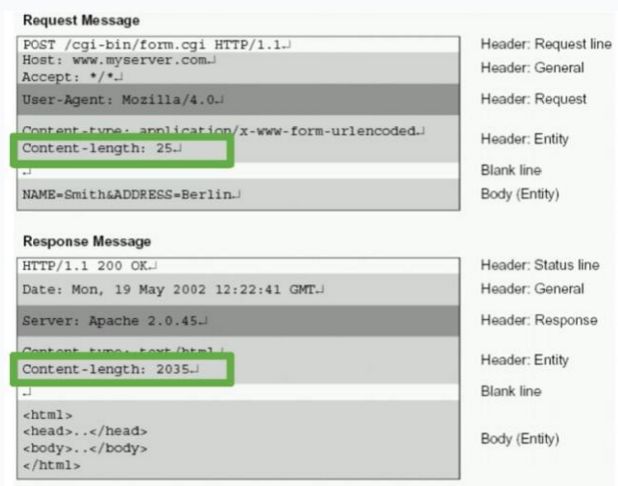
方式 2:固定长度。大家最熟悉的HTTP协议就是这种方式:Header+Content。
- Header : 协议头部,放置一些Meta信息。
-
Content : 应用之间交互的信息主体。
在HTTP header中 通过Content-Length告知message有多长,应用层才能识别到这条message。比如下图的HTTP1.1协议。
Netty拆包流程
首先在Netty的拆包流程中有两个重要的变量cumulation和cumulator。cumulation 是Netty中自定义的ByteBuf,与Java原生的ByteBuf还不一样,这个我们之后再讲,我们就直接理解成一个字节容器,cumulator 是一个累加器。
    ByteBuf cumulation;
    private Cumulator cumulator = MERGE_CUMULATOR;
累加器的代码如下。简单讲就是通过调用API buffer.writeBytes(in); 把in数据通过内存拷贝的方式合并到cumulation中,在合并前判断是否要对cumulation 进行扩容。
    public static final Cumulator MERGE_CUMULATOR = new Cumulator() {
        @Override
        public ByteBuf cumulate(ByteBufAllocator alloc, ByteBuf cumulation, ByteBuf in) {
            final ByteBuf buffer;
            if (cumulation.writerIndex() > cumulation.maxCapacity() - in.readableBytes()
                    || cumulation.refCnt() > 1 || cumulation.isReadOnly()) {
                // Expand cumulation (by replace it) when either there is not more room in the buffer
                // or if the refCnt is greater then 1 which may happen when the user use slice().retain() or
                // duplicate().retain() or if its read-only.
                //
                // See:
                // - https://github.com/netty/netty/issues/2327
                // - https://github.com/netty/netty/issues/1764
                buffer = expandCumulation(alloc, cumulation, in.readableBytes());
            } else {
                buffer = cumulation;
            }
            buffer.writeBytes(in);
            in.release();
            return buffer;
        }
    };
理解了这两个变量后我们在看ByteToMessageDecoder 中的channelRead方法,该方法是每次从缓冲区读到数据时自动调用。
    @Override
    public void channelRead(ChannelHandlerContext ctx, Object msg) throws Exception {
        if (msg instanceof ByteBuf) {
            CodecOutputList out = CodecOutputList.newInstance();
            try {
               //1、合并数据到字节容器中
                ByteBuf data = (ByteBuf) msg;
                first = cumulation == null;
                if (first) {
                    cumulation = data;
                } else {
                    cumulation = cumulator.cumulate(ctx.alloc(), cumulation, data);
                }
                //2、把字节容器中的数据拆包并添加到业务数据容器out中
                callDecode(ctx, cumulation, out);
            } catch (DecoderException e) {
                throw e;
            } catch (Throwable t) {
                throw new DecoderException(t);
            } finally {
                //3、清理字节容器
                if (cumulation != null && !cumulation.isReadable()) {
                    numReads = 0;
                    cumulation.release();
                    cumulation = null;
                } else if (++ numReads >= discardAfterReads) {
                    // We did enough reads already try to discard some bytes so we not risk to see a OOME.
                    // See https://github.com/netty/netty/issues/4275
                    numReads = 0;
                    discardSomeReadBytes();
                }
                //4、把拆包后的数据交给后面的Handler解码
                int size = out.size();
                decodeWasNull = !out.insertSinceRecycled();
                fireChannelRead(ctx, out, size);
                out.recycle();
            }
        } else {
            ctx.fireChannelRead(msg);
        }
    }
主要步骤已经在代码中注释。下面我们来具体分析一下。
1、合并数据到字节容器中。先判断字节容器cumulation中是否有数据,没有就直接赋值,有的话,有的话就调用累加器进行累加。
2、把字节容器中的数据拆包并添加到业务数据容器out中。
我们来看一下callDecode
protected void callDecode(ChannelHandlerContext ctx, ByteBuf in, List3、清理字节容器。如果累加容器不为空并且没有可读数据,那么直接释放掉。否则如果还有未读数据,并且次数大于16,discardAfterReads的默认值为16。调用discardSomeReadBytes,discardSomeReadBytes源码如下表示当读索引超过容量的一半时,进行数据前移。
    @Override
    public ByteBuf discardSomeReadBytes() {
     ......
        if (readerIndex >= capacity() >>> 1) {
            setBytes(0, this, readerIndex, writerIndex - readerIndex);
            writerIndex -= readerIndex;
            adjustMarkers(readerIndex);
            readerIndex = 0;
        }
     ......
        return this;
    }
丢弃前
丢弃后
4、把拆包后的数据交给后面的Handler解码。通过fireChannelRead实现,同时会设置变量decodeWasNull,用来标识是否解出数据包。该变量用在 channelReadComplete 函数中,该函数的源码如下。
    @Override
    public void channelReadComplete(ChannelHandlerContext ctx) throws Exception {
        numReads = 0;
        discardSomeReadBytes();
        if (decodeWasNull) {
            decodeWasNull = false;
            if (!ctx.channel().config().isAutoRead()) {
                ctx.read();
            }
        }
        ctx.fireChannelReadComplete();
    }
decodeWasNull 为true,表示没有解出数据包,这个时候如果channel 设置成了非自动读取,调用ctx.read()。这个方法有什么作用呢?
在AbstractChannelHandlerContext类中找到了read 方法。read()函数会调用invokeRead(),这个方法的源代码如下:
    private void invokeRead() {
        if (invokeHandler()) {
            try {
                ((ChannelOutboundHandler) handler()).read(this);
            } catch (Throwable t) {
                notifyHandlerException(t);
            }
        } else {
            read();
        }
    }
最终传播到HeadContext的read()方法,最后调用unsafe.beginRead()设置关心底层read事件,从而实现激活后自动读取数据。
        @Override
        public void read(ChannelHandlerContext ctx) {
            unsafe.beginRead();
        }
unsafe是Netty内部实现底层IO细节的类,beginRead()方法设定底层Selector关心read事件,如果read事件就绪,则会调用unsafe.read()方法读取数据,然后调用channelPipe.fireChannelRead()方法通知用户已读取到数据,可进行业务处理。
自定义协议的拆包
在上一篇文章中采用的是通用拆包器LengthFieldBasedFrameDecoder,基本上所有的基于长度的二进制协议都可以用他进行拆包。关于LengthFieldBasedFrameDecoder如何使用,我这里依然推荐闪电侠同学的这篇文章,LengthFieldBasedFrameDecoder,这里不在赘述。
那么如何对自定义的协议进行拆包?
我曾在上看到过关于这方面的文章,比如这篇文章,但是这篇文章中的例子却没有考虑半包问题,所以我这边以另外一个例子作为讲解内容。
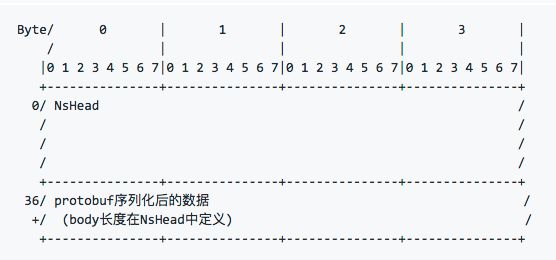
我在学习RPC开源框架的时候,偶然发现了张旭大神一个人写的RPC框架——Navi-pbrpc,这个框架基于Netty网络通信和Protobuf的序列化,非常适合学习RPC的同学入门(推荐学习完Navi-pbrpc源码,再去看Dubbo的源码会更好)。在这个框架中,应用层他自定义了一个协议,该协议基于header+body方式,header内含的body length属性来表明二进制数据长度,body采用经过protobuf压缩后的二进制数据。
NsHead是Navi-pbrpc 内部的header。NsHead + protobuf序列化body包结构示意如下
NsHead结构如下:
NsHead的固定长度36个字节,Header各字段中可以看到body-length字段,用来标识消息体长度。
了解了协议结构之后,下面我们看一下Navi-pbrpc是如何进行拆包的。
拆包的源码如下:
@Override
protected void decode(ChannelHandlerContext ctx, ByteBuf in, List1、可以看到的是先从ByteBuf 中读取可读的字节数,如果没有达到NsHead的大小,就不做处理,如果达到了就读取36个字节到字节数组中,并且封装成一个nsHead,里面包含了上图NsHead结构里的所有字段。
2、拿到NsHead中body-length,,可以知道body的长度,接着读取ByteBuf中可读字段大小,如果小于body长度就返回,否则读取ByteBuf到字节数组中,解决半包问题。
3、最后利用Protobuf客户端SDK反序列化方法拿到消息体。
这里涉及到Netty的ByteBuf,留在以后的文章中再讲。
总结
本文主要通过源码分析介绍了Netty的拆包流程,主要分为了四个步骤:
1、合并数据到字节容器中。
2、把字节容器中的数据拆包并添加到业务数据容器out中
3、清理字节容器
4、把拆包后的数据交给后面的Handler解码
并且通过一个例子介绍了如何自定义协议拆包。其实不管是netty还是自己去拆包,流程无非是文章开头介绍的流程,万变不离其宗吧。


