Unity3D Entitas Wooga的ECS Entity Component System入门学习2
版本:unity 2017.1 语言:C#
总起:
这一章更加深入的介绍Entitas的各个System的编写,刚开始接触的童鞋请先看上一篇文章,该篇内容会紧接着之前的内容编写程序。
之前谈到了现在的Entitas框架中有两大Context,其一是之前用过的game,其二是今天要介绍的input,看到名字自然也就是知道,该Context环境是用来处理玩家的输入的。
*在生成代码的时候可能会报一个Could not found file ‘...’的一个错误,这个是项目名称错了,定位到项目的根目录,把csproj的整个文件名复制到Project Path中就好。
Hello World的补充:
打开之前文章完成后的工程,运行后发现打印了HelloWorld,但Entity下的DebugMessage组件仍旧存在,按照道理来说,这个Entity打印完内容之后就没什么用了,可以销毁了。
这边就先来介绍CleanupSystem来销毁多余的组件。
♦ Cleanup System
之前在写GameController的时候其实留了一手,让程序集执行完Execute后,执行了Cleanup。而可以Cleanup的System只需要实现ICleanupSystem就可以了。
让我们来看代码:
// CleanupDebugMessageSystem.cs
using System;
using Entitas;

// 继承于ICleanupSystem
public class CleanupDebugMessageSystem : ICleanupSystem
{
    // 保存game环境
    readonly GameContext _context;
    // 保存所有拥有DebugMessage组件的Entity
    readonly IGroup _debugMessages;

    // 构造函数,添加game环境和保存拥有DebugMessage组件的Group
    public CleanupDebugMessageSystem(Contextscontexts)
    {
        _context = contexts.game;
        _debugMessages = _context.GetGroup(GameMatcher.DebugMessage);
    }

    // Cleanup函数,只要有DebugMessage组件的Entity就直接销毁
    public void Cleanup()
    {
        foreach(var e in _debugMessages.GetEntities())
        {
            e.Destroy();
        }
    }
}
写完之后,将该系统添加到系统集TutorialSystems中,在运行程序,就可以发现Entity在打印完后就被删除了。
OK,继续,接下来要实现打印鼠标左击、右击的Debug信息。
♦ 鼠标点击打印信息
思路就是当鼠标点击的时候,就添加一个拥有DebugMessage组件的Entity。
之前说的ReactiveSystem是每当Component的值发生变化就会执行Execute,而类似MonoBehaviour中的Update呢?那就是IExecuteSystem。
这边就不用input环境了,直接监听判断:
// LogMouseClickSystem.cs
using UnityEngine;
using Entitas;

// 继承IExecuteSystem,添加到系统集的System,会每帧执行Execute方法
public class LogMouseClickSystem :IExecuteSystem
{
    // game的环境
    readonly GameContext _context;
    public LogMouseClickSystem(Contexts contexts)
    {
        _context = contexts.game;
    }

    public void Execute()
    {
        // 获取到左右按键,就创建个Entity,并添加一个DebguMessage组件
        if (Input.GetMouseButtonDown(0))
            _context.CreateEntity().AddDebugMessage("Left Mouse Button Clicked");
        if(Input.GetMouseButtonDown(1))
            _context.CreateEntity().AddDebugMessage("Right Mouse Button Clicked");
    }
}
好的,当然不要忘记在TutorialSystems中添加System。
点击运行就看到我们想要的效果了:点击左键提示Left Mouse Button Clicked;点击右键提示Right Mouse Button Clicked。
哈哈,有些一脸懵逼的同学,我知道你们在想什么。点击没有效果是吧?其实效果是有的,仔细看看game环境下的entities数量是有变化的。所以没有打印信息的原因是在哪里呢?
让我们再来看看TutorialSystems中最终的写法:
// TutorialSystems.cs
public class TutorialSystems :Feature
{
    // 添加所有要用到的System,base里面是调试节点的名字
    public TutorialSystems(Contexts contexts) :base("Tutorial Systems")
    {
        Add(new HelloWorldSystem(contexts));
        Add(new CleanupDebugMessageSystem(contexts));
        Add(new LogMouseClickSystem(contexts));
        Add(new DebugMessageSystem(contexts));
    }
}
注意了,LogMouseClickSystem必须写在DebugMessageSystem的前面,这样创建DebugMessage的Entity后才能顺利的被DebugmessageSystem打印。不然要等到下一帧才打印,而在那之前会执行一次Cleanup清除掉Entity。所以只看到了entities数量的变化却没有看到效果,所以System的添加顺序是比较重要的。
Entitas的效率:
不要暂停你的程序,来看看DontDestroyOnLoad下的信息:
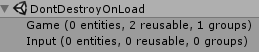
为什么说Entitas的效率很高呢?仔细看看有一行2 reusable的信息,这个数量2的东西就是刚刚帮你打印信息的Entity(拥有DebugMessage组件),也就是说这两个Entity在执行Destroy之后并没有被销毁,而是被隐藏了。类似于对象池,如果再次该组件再次被调用,就会重新显示出来。
Input Entity的一个例子:
下一篇文章介绍一个点击移动的例子,但是会比较长,然后这篇文章的篇幅又不够。ECS的一个好处就是,耦合性很低,所以我这边先把Input(玩家输入)的部分提取出来放到这里来介绍。
首先来创建Components脚本,没错可以将所有的Component只放在一个文件中。
// InputComponents.cs
using Entitas;
using Entitas.CodeGeneration.Attributes;
using UnityEngine;

[Input, Unique]
public class LeftMouseComponent :IComponent
{
}

[Input, Unique]
public class RightMouseComponent :IComponent
{
}

[Input]
public class MouseDownComponent :IComponent
{
    public Vector2 position;
}

[Input]
public class MousePositionComponent :IComponent
{
    public Vector2 position;
}

[Input]
public class MouseUpComponent :IComponent
{
    public Vector2 position;
}
根据Component的名称很容易判断它们的作用,主要说一下Unique标签(在C#这个东西叫做Attribute,而类中的变量佳作Property,很容易搞混,所以我这边就称Attribute为标签)的作用,字面意思上是唯一,而做到这一点是它是直接在Context可以直接访问。
比如上面的LeftMouseComponent,就可以通过_inputContext.isLeftMouse = true来创建该唯一的Entity,注意官方文档中的措辞,是Entity,也就是说可以在它的上面添加其他的Component。而访问方法就是_inputContext.LeftMouseEntity.
接下来是创建一个System与Unity的Input相关联:
// EmitInputSystem
using UnityEngine;
using Entitas;

// 处理Input,需要初始化leftMouseEntity和rightMouseEntity,并且需要每帧执行读取,所以实现下面两个接口
public class EmitInputSystem :IInitializeSystem,IExecuteSystem
{
    readonly InputContext _context;
    private InputEntity _leftMouseEntity;
    private InputEntity _rightMouseEntity;

    public EmitInputSystem(Contexts contexts)
    {
        _context = contexts.input;
    }

    // 初始化创建leftMouse和rightMouse的Entity后保存下来
    public void Initialize()
    {
        _context.isLeftMouse = true;
        _context.isRightMouse = true;
        _leftMouseEntity = _context.leftMouseEntity;
        _rightMouseEntity = _context.rightMouseEntity;
    }

    // 在leftMouse和rightMouse的Entity上添加或替换Position的组件
    public void Execute()
    {
        // 根据当前鼠标位置获取世界坐标
        Vector2 mousePosition = Camera.main.ScreenToWorldPoint(Input.mousePosition);

        // 处理左右点击
        replacePositionProcess(_leftMouseEntity, 0, mousePosition);
        replacePositionProcess(_rightMouseEntity, 1, mousePosition);
    }

    // 根据点击状态和鼠标的位置替换位置组件
    void replacePositionProcess(InputEntity entity,int buttonNum,Vector2 mousePosition)
    {
        // 如果判断到按键按下了,则替换entity上的MouseDown组件,下同
        if (Input.GetMouseButtonDown(buttonNum))
            entity.ReplaceMouseDown(mousePosition);

        if (Input.GetMouseButton(buttonNum))
            entity.ReplaceMousePosition(mousePosition);

        if (Input.GetMouseButtonUp(buttonNum))
            entity.ReplaceMouseUp(mousePosition);
    }
}
然后在系统集中添加EmitInputSystem,最终可以获得以下效果:
之后就可以创建一个ReactiveSystem检测到值变化后就可以做一些操作。
好了,今天就这样。