Netty零拷贝--一起看源码呗
Netty零拷贝–一起看源码呗
先推荐一下贴出的文章。本篇文章也是参考下述文章后,再对部分类进行源码查看的。
理解Netty中的零拷贝(Zero-Copy)机制
netty深入理解系列-Netty零拷贝的实现原理
对于 Netty ByteBuf 的零拷贝(Zero Copy) 的理解
netty四种BUFFER的内存测试
Netty学习之ByteBuf
netty与内存分配(2)-PooledByteBufAllocator
Netty的零拷贝,基本就是对ByteBuf的内存空间的重复利用。而原理的话,没什么高深的,土话说就是Netty帮你管理了ByteBuf的指针。
所以可以做到不同的ByteBuf使用相同区域的内存(只复制指针、不new新的内部数组空间)。也可以把逻辑上的N个ByteBuf“合并”成一个新的大ByteBuf,但是内部没有new出N个ByteBuf内存之和的空间来存储整个大ByteBuf,而是使用原本的内存空间,只不过Netty封装该N个ByteBuf到List中,帮你管理了指针。反之,一个ByteBuf拆成多个ByteBuf,而共用相同的内存空间也是Netty能做到的。
(想必,对于学过C语言的各位来说,应该不难理解。就是Netty这种实现,听上去简单,但是要我们自己手动实现和管理的话,还是比较复杂的。)
下面,就和大家一起看看Netty中使用到零拷贝思想的类。
(下面的类,主要根据文章开头提及的文章去展开,上面的那些文章我觉得都挺好的。)
0. PooledByteBufAllocator(池化ByteBuf分配器)和UnpooledByteBufAllocator
这两个的源代码就不走了。感兴趣的可以自己看看netty与内存分配(2)-PooledByteBufAllocator这一片文章关于PooledByteBufAllocator的解读。
池化ByteBuf的技术,和线程池的目的都是为了减少资源开销,个人认为和零拷贝的思想也是相符的。
下面PooledByteBufAllocator和UnpooledByteBufAllocator介绍摘至《Netty-Redis-ZooKeeper高并发实战》
Netty通过ByteBufAllocator分配器来创建缓冲区和分配内存空间。Netty提供了ByteBufAllocator的两种实现:PooledByteBufAllocator和UnpooledByteAllocator。
PooledByteBufAllocator(池化ByteBuf分配器)将ByteBuf实例放入池中,提高了性能,将内存碎片减少到最小**;这个池化分配器采用了jemalloc高效内存分配的策略,该策略被好几种现代操作系统所使用**。
UnpooledByteBufAllocator是普通的未池化ByteBuf分配器,它没有把ByteBuf放入池中,每次被调用时,返回一个新的ByteBuf实例:通过Java的垃圾回收机制回收。
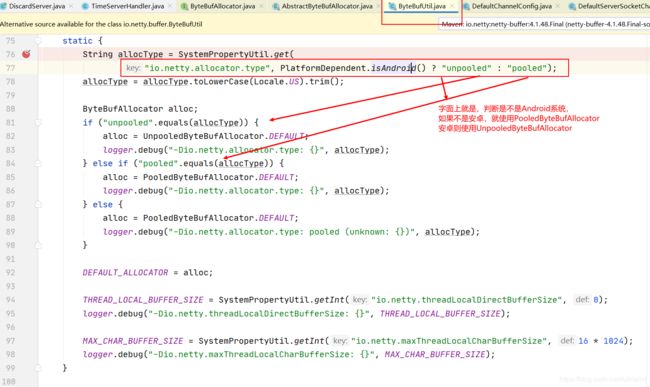
使用Netty官方的DiscardServer代码进行DEBUG,也可以看到,Server服务启动的bind绑定端口时,会进行一些初始化的操作,其中就有根据系统来使用不同的ByteBufAllocator。
ByteBufUtil,如果当前系统是Android,就使用UnPooledByteBufAllocator,否则使用PooledByteBufAllocator。一般服务器的服务端代码都是部署在Linux的,也就是使用PooledByteBufAllocator。
1. 通过 CompositeByteBuf 实现零拷贝
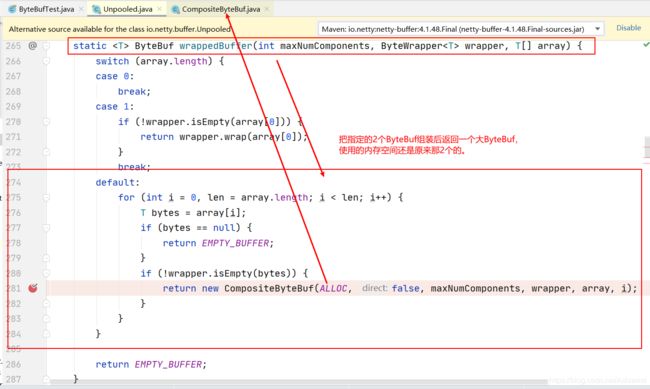
该类可以将多个ByteBuf“组合”成一个新的ByteBuf,这里不是直接复制N个ByteBuf的内容到一个新的ByteBuf对象并返回,而是用一个数组将多个ByteBuf组成一个返回。实际使用通常通过Unpooled.wrappedBuffer(…),一般不会直接使用到CompositeByteBuf 。(即新返回的ByteBuf还是使用的原本的内存空间)。
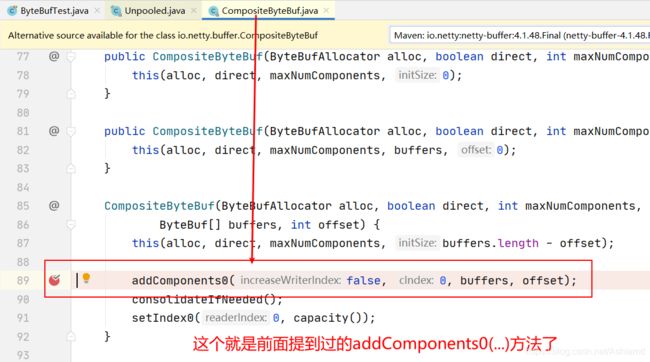
下面贴出部分源代码,可以根据序号(1)(2)…(4)顺序查看。
/**
 * A virtual buffer which shows multiple buffers as a single merged buffer.  It is recommended to use
 * {@link ByteBufAllocator#compositeBuffer()} or {@link Unpooled#wrappedBuffer(ByteBuf...)} instead of calling the
 * constructor explicitly.
 */
public class CompositeByteBuf extends AbstractReferenceCountedByteBuf implements Iterable<ByteBuf> {

    // (1)(1)(1)(1)(1)(1)(1)(1)(1)(1)(1)(1)(1)(1)(1)(1)(1)
    // 存储组装的ByteBuf,比如N个ByteBuf组成一个,内部就是把N个ByteBuf存这个数组里了
    // Component含有ByteBuf类型的成员对象。
    private Component[] components; // resized when needed


    // (2)(2)(2)(2)(2)(2)(2)(2)(2)(2)(2)(2)(2)(2)(2)(2)(2)
    // Component内部类,里面含有ByteBuf成员对象
    // 可以看到下面完全没有 新建ByteBuf的操作,用的都是ByteBuf对象的引用。
    private static final class Component {
        final ByteBuf srcBuf; // the originally added buffer
        final ByteBuf buf; // srcBuf unwrapped zero or more times
        int srcAdjustment; // index of the start of this CompositeByteBuf relative to srcBuf
        int adjustment; // index of the start of this CompositeByteBuf relative to buf
        int offset; // offset of this component within this CompositeByteBuf
        int endOffset; // end offset of this component within this CompositeByteBuf

        private ByteBuf slice; // cached slice, may be null

        Component(ByteBuf srcBuf, int srcOffset, ByteBuf buf, int bufOffset,
                int offset, int len, ByteBuf slice) {
            this.srcBuf = srcBuf;
            this.srcAdjustment = srcOffset - offset;
            this.buf = buf;
            this.adjustment = bufOffset - offset;
            this.offset = offset;
            this.endOffset = offset + len;
            this.slice = slice;
        }

        int srcIdx(int index) {
            return index + srcAdjustment;
        }

        int idx(int index) {
            return index + adjustment;
        }

        int length() {
            return endOffset - offset;
        }

        void reposition(int newOffset) {
            int move = newOffset - offset;
            endOffset += move;
            srcAdjustment -= move;
            adjustment -= move;
            offset = newOffset;
        }

        // copy then release
        void transferTo(ByteBuf dst) {
            dst.writeBytes(buf, idx(offset), length());
            free();
        }

        ByteBuf slice() {
            ByteBuf s = slice;
            if (s == null) {
                slice = s = srcBuf.slice(srcIdx(offset), length());
            }
            return s;
        }

        ByteBuf duplicate() {
            return srcBuf.duplicate();
        }

        ByteBuffer internalNioBuffer(int index, int length) {
            // Some buffers override this so we must use srcBuf
            return srcBuf.internalNioBuffer(srcIdx(index), length);
        }

        void free() {
            slice = null;
            // Release the original buffer since it may have a different
            // refcount to the unwrapped buf (e.g. if PooledSlicedByteBuf)
            srcBuf.release();
        }
    }

    //...

    // (3)(3)(3)(3)(3)(3)(3)(3)(3)(3)(3)(3)(3)(3)(3)(3)(3)
    // 组合ByteBuf的操作,最后都会执行这个方法。
    // N个ByteBuf被组装成1个大ByteBuf返回给用户使用,本质是通过数组存储了ByteBuf的引用
    // 学过C/C++的应该对指针这个词很熟悉了吧。这里相当于把对象的指针都存储起来了,
    // 大ByteBuf用的内存还是原本那些指针所指向的对象所占用的内存。
    // 不需要在Java中new一个和N个ByteBuf所占用的内存空间相同大小的ByteBuf对象来组装它们。
    private CompositeByteBuf addComponents0(boolean increaseWriterIndex,
                                            final int cIndex, ByteBuf[] buffers, int arrOffset) {
        final int len = buffers.length, count = len - arrOffset;
        // only set ci after we've shifted so that finally block logic is always correct
        int ci = Integer.MAX_VALUE;
        try {
            checkComponentIndex(cIndex);
            shiftComps(cIndex, count); // will increase componentCount
            int nextOffset = cIndex > 0 ? components[cIndex - 1].endOffset : 0;
            for (ci = cIndex; arrOffset < len; arrOffset++, ci++) {
                ByteBuf b = buffers[arrOffset];
                if (b == null) {
                    break;
                }
                // 这个方法里面也没有new ByteBuf,往下翻,看newComponent方法的实现就知道了
                Component c = newComponent(ensureAccessible(b), nextOffset);
                components[ci] = c;
                nextOffset = c.endOffset;
            }
            return this;
        } finally {
           // ...
        }
    }

    // ...

    // (4)(4)(4)(4)(4)(4)(4)(4)(4)(4)(4)(4)(4)(4)(4)(4)(4)
    // (3)代码片段中addComponents0(...)使用到该方法,这里同样没有新建ByteBuf对象。
    @SuppressWarnings("deprecation")
    private Component newComponent(final ByteBuf buf, final int offset) {
        final int srcIndex = buf.readerIndex();
        final int len = buf.readableBytes();

        // unpeel any intermediate outer layers (UnreleasableByteBuf, LeakAwareByteBufs, SwappedByteBuf)
        ByteBuf unwrapped = buf;
        int unwrappedIndex = srcIndex;
        while (unwrapped instanceof WrappedByteBuf || unwrapped instanceof SwappedByteBuf) {
            unwrapped = unwrapped.unwrap();
        }

        // unwrap if already sliced
        if (unwrapped instanceof AbstractUnpooledSlicedByteBuf) {
            unwrappedIndex += ((AbstractUnpooledSlicedByteBuf) unwrapped).idx(0);
            unwrapped = unwrapped.unwrap();
        } else if (unwrapped instanceof PooledSlicedByteBuf) {
            unwrappedIndex += ((PooledSlicedByteBuf) unwrapped).adjustment;
            unwrapped = unwrapped.unwrap();
        } else if (unwrapped instanceof DuplicatedByteBuf || unwrapped instanceof PooledDuplicatedByteBuf) {
            unwrapped = unwrapped.unwrap();
        }

        // We don't need to slice later to expose the internal component if the readable range
        // is already the entire buffer
        final ByteBuf slice = buf.capacity() == len ? buf : null;

        return new Component(buf.order(ByteOrder.BIG_ENDIAN), srcIndex,
                unwrapped.order(ByteOrder.BIG_ENDIAN), unwrappedIndex, offset, len, slice);
    }

    // ...
    @Override
    public ByteBuf unwrap() {
        return null;
    }

}
上面删掉了一些源代码。注意点就是CompositeByteBuf有个内部类数组成员对象private Component[] components;,而内部类Component中封装了ByteBuf,可以看到在CompositeByteBuf的addComponents0(...)方法中,用components这个Component数组存储“预组合在一起”的N个ByteBuf,并没有真正新建和N个Bytebuf占用内存相同大小的新Java对象ByteBuf。
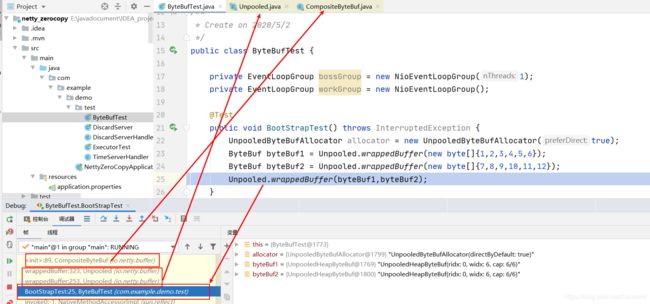
而实际中,我们不需要直接对CompositeByteBuf操作,往往用Unpooled.wrappedBuffer(...)来完成ByteBuf的“组装”。
public class ByteBufTest {

    private EventLoopGroup bossGroup = new NioEventLoopGroup(1);
    private EventLoopGroup workGroup = new NioEventLoopGroup();

    @Test
    public void BootStrapTest() throws InterruptedException {
        UnpooledByteBufAllocator allocator = new UnpooledByteBufAllocator(true);
        ByteBuf byteBuf1 = Unpooled.wrappedBuffer(new byte[]{1,2,3,4,5,6});
        ByteBuf byteBuf2 = Unpooled.wrappedBuffer(new byte[]{7,8,9,10,11,12});
        Unpooled.wrappedBuffer(byteBuf1,byteBuf2); // 这里打断点
    }
}
2. ByteBuf对象.slice()
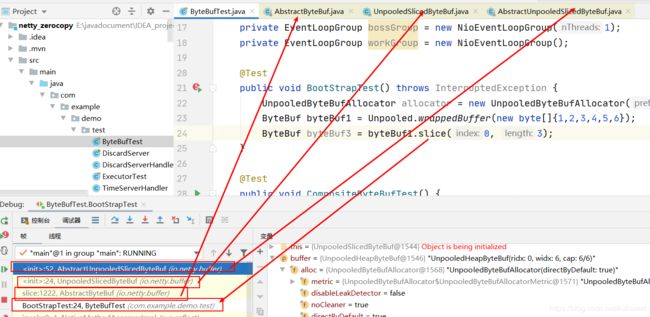
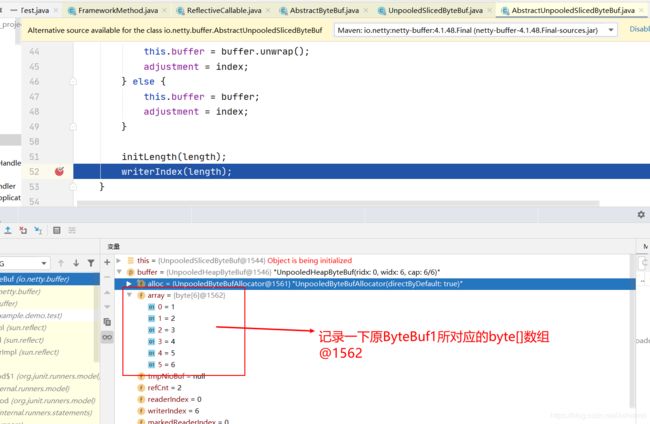
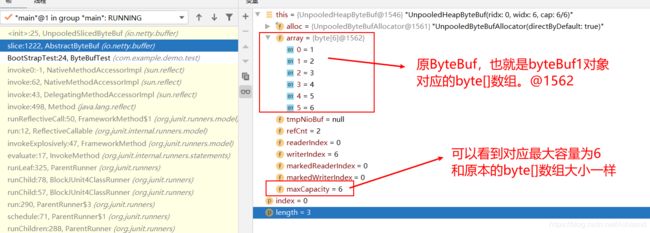
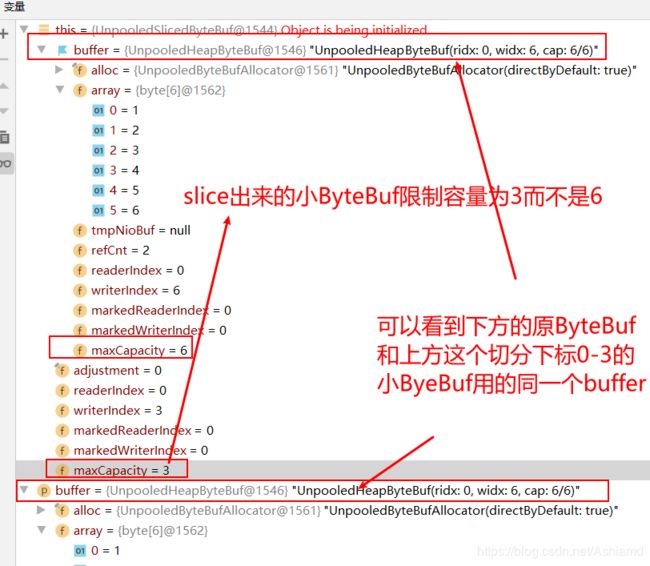
Netty的ByteBuf的slice()方法,将1个ByteBuf切分成N个ByteBuf,也可以重用原本的ByteBuf内存空间,而不是另外new出N个ByteBuf导致多占用1倍的原内存空间。
从上面的过程可以看出,ByteBuf的slice()切分出来的小ByteBuf对应的数据来源和原本的大ByteBuf是一致的。也就是slice()能复用原本的内存空间,而不需要copy一份数据,new新对象。
3. 通过 FileRegion 实现零拷贝
这个不再展开了。额,可以去看看上面提到的文章对于 Netty ByteBuf 的零拷贝(Zero Copy) 的理解。

