Node.js开发入门—Express安装与使用
之前我们在安装完Node.js后直接写了个HelloWorld网站,这次呢,我们使用Node.js的Web框架Express来重写一下HelloWorld,看看有什么不同。同时我们还会重写之前的文件服务器,功能更完善而代码更简洁。
安装 express
为了重写我们的HelloWorld,我们需要安装Express模块。Express基于Node.js的一个Web框架,官方网站在这里:http://expressjs.com/。官网对Express的介绍是:
Fast, unopinionated, minimalist web framework for Node.js
Express很轻巧,通常用来做Web后端的开发。有一些推荐的书,可以看这里:http://www.expressjs.com.cn/resources/books.html。
要安装express模块,直接使用npm命令即可。在命令行环境下不带参数执行npm命令,即可看到npm的帮助信息。安装某个Node.js模块,使用install子命令。“npm install xxx”会将xxx模块安装到当前路径下,“npm install -g xxx”则将xxx模块安装到当前用户的全局位置。使用“npm helo install”可以查看install子命令的细节。要卸载一个模块,使用“npm uninstall xxx”,假如你是全局安装,则使用“npm uninstall -g xxx”。
在使用npm安装某个模块时,它会自动解决依赖。
在命令行环境执行下面的命令来安装express:
npm install -g express –registry=https://registry.npm.taobao.org
注意,我指定了使用淘宝的镜像,快一些。
特别说明一下:
我参考了这里的教程哦:https://github.com/alsotang/node-lessons
很快啦,你就可以看到下面的界面(注意我们安装的Express版本是4.13.3):
好啦,Express安装完毕。
需要说明的是,使用-g命令全局安装Node.js模块后,需要设置环境变量NODE_PATH,否则在我们使用node命令启动某个应用时可能会报找不到指定的模块这种错误。在我的Windows 7环境下,全局安装时npm模块的位置为“C:\Users\Administrator\AppData\Roaming\npm\node_modules”(看上面的图可知)。至于环境变量的设置,计算机->高级系统设置->高级->环境变量,添加一个名为NODE_PATH的环境变量, 将其值设置为全局模块的根目录。设置完成后,重新进入命令行环境即可生效。
提一下,如果要在NODE_PATH中添加多个模块路径,只需用“;”分隔开即可。具体含义,命令行下执行“node -h”可查看帮助。
HelloWorld
代码就是这么简单:
// 引入 express 模块
var express = require('express');

// 创建 express 实例
var app = express();

// 响应HTTP的GET方法
app.get('/', function (req, res) {
  res.send('Hello World!');
});

// 监听到8000端口
app.listen(8000, function () {
  console.log('Hello World is listening at port 8000');
});
保存为HelloExpress.js,然后在Node.js的命令行环境下执行“node HelloExpress.js”命令,网站就运行起来了。浏览器访问一下,和上次的示例一样一样的。
使用Express有什么不同
没有使用Express的代码是酱紫的:
// 引入http模块
var http = require("http");

// 创建server,指定处理客户端请求的函数
http.createServer(
    function(request, response) {
        response.writeHead(200, {"Content-Type": "text/plain"});
        response.write("Hello World!");
        response.end();
    }
).listen(8000);

console.log("Hello World is listening at port 8000");
上面的代码直接使用Node.js带的http模块来创建HTTP服务器,指定了一个处理请求的函数。实际应用时,我们需要在这个函数内区分不同的HTTP请求,比如GET、HEAD、POST等。而Express版本的HelloWorld则有所不同,它可以针对每一个路径和HTTP请求指定响应函数,比如Express版本的HelloWorld实例,只有你在浏览器中输入“http://localhost:8000”时它才会返回“HelloWorld”,如果你在浏览器中输入“http://localhost:8000/abc”,你就看到一条错误信息(会收到404状态码,express自动帮你处理了)。这里边有一个URL路由(URL routing)的概念。假如把代码修改成下面的样子:
app.get('*', function (req, res) {
  res.send('Hello World!');
});
效果就和使用http模块的版本类似了。因为我使用了“*”作为通配符,可以匹配任何路径。Express的get方法原型如下:
app.METHOD(path, callback [, callback …])
具体可以参考这里:http://expressjs.com/4x/api.html#app.METHOD。
使用express创建HelloExpress
express模块有一个命令行工具express,可以用来生成基于express模块的应用结构(网站结构)。
express 4.x之后,express命令被独立出来放在了express-generator模块中。我们用下面的命令全局安装express这个命令行工具:
npm install -g express-generator
安装完成后,在命令行环境下执行“express -V”,可以看到express的版本是4.13.1。
好了,现在我们使用express命令来创建一个默认的网站。
在命令行环境下导航到myprojects这个目录下,执行下面的命令:
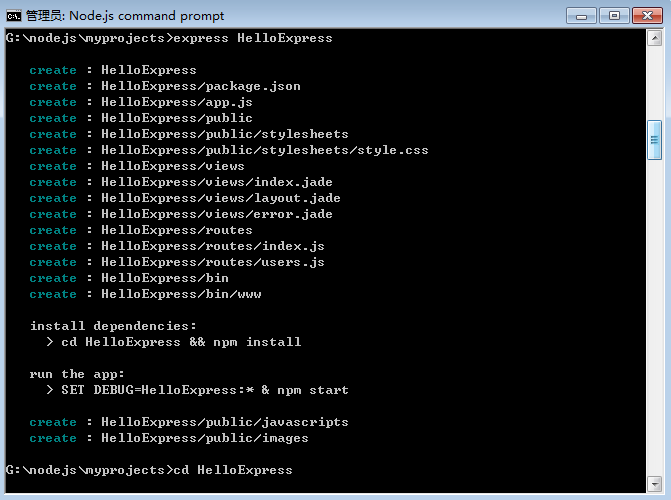
express HelloExpress
然后可以看到:
仔细看上面的图哦,它告诉了我们三类非常重要的信息:
- express命令创建的网站的目录结构以及创建的文件
- 安装依赖(进入到HelloExpress下,执行npm install)
- 使用npm start启动网站(express 4.x后)
好啦,我们先安装依赖。这里要先提一下HelloExpress目录下的package.json文件,其内容如下:
{
  "name": "HelloExpress",
  "version": "0.0.0",
  "private": true,
  "scripts": {
    "start": "node ./bin/www"
  },
  "dependencies": {
    "body-parser": "~1.13.2",
    "cookie-parser": "~1.3.5",
    "debug": "~2.2.0",
    "express": "~4.13.1",
    "jade": "~1.11.0",
    "morgan": "~1.6.1",
    "serve-favicon": "~2.3.0"
  }
}
这个文件定义了一个Node.js应用的基本信息,我们这次注意的是 dependencies ,它定义了应用依赖的模块。
在HelloExpress下执行“npm install”命令,npm会自动找到package.json,分析它,安装所有依赖模块。这要花费一些时间,休息一下,去喝杯茶。
看看,下面是安装结果:
G:\nodejs\myprojects\HelloExpress>npm install
[email protected] node_modules\debug
└── [email protected]

[email protected] node_modules\cookie-parser
├── [email protected]
└── [email protected]

[email protected] node_modules\serve-favicon
├── [email protected]
├── [email protected]
├── [email protected]
└── [email protected]

[email protected] node_modules\morgan
├── [email protected]
├── [email protected]
├── [email protected]
└── [email protected] ([email protected])

[email protected] node_modules\body-parser
├── [email protected]
├── [email protected]
├── [email protected]
├── [email protected] ([email protected])
├── [email protected]
├── [email protected]
├── [email protected] ([email protected], [email protected])
├── [email protected] ([email protected])
└── [email protected] ([email protected], [email protected])

[email protected] node_modules\express
├── [email protected]
├── [email protected]
├── [email protected]
├── [email protected]
├── [email protected]
├── [email protected]
├── [email protected]
├── [email protected]
├── [email protected]
├── [email protected]
├── [email protected]
├── [email protected]
├── [email protected]
├── [email protected]
├── [email protected]
├── [email protected]
├── [email protected]
├── [email protected]
├── [email protected] ([email protected])
├── [email protected] ([email protected])
├── [email protected] ([email protected], [email protected], [email protected], [email protected], http-er
[email protected])
├── [email protected] ([email protected], [email protected])
├── [email protected] ([email protected], [email protected])
└── [email protected] ([email protected], [email protected])

[email protected] node_modules\jade
├── [email protected]
├── [email protected]
├── [email protected]
├── [email protected] ([email protected])
├── [email protected] ([email protected])
├── [email protected] ([email protected], [email protected])
├── [email protected] ([email protected], [email protected], source-map@0.
1.34, [email protected])
├── [email protected] ([email protected], [email protected])
├── [email protected] ([email protected], [email protected], [email protected])
└── [email protected] ([email protected], [email protected])

G:\nodejs\myprojects\HelloExpress>
有兴趣的可以研究下各个依赖模块的信息,现在我们启动网站了。执行 npm start 命令,很快就可以看到下面的图:
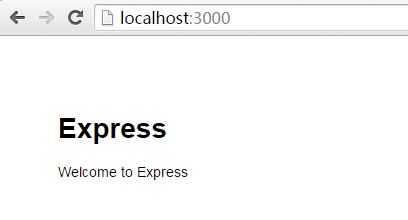
看到上图,说明网站已正常运行。你可以在浏览器里访问http://localhost:3000,然后就可以看到这个页面:
OK,大功告成。
这个由express generator创建的HelloExpress和我们基于express手动写的HelloWorld又有一些不同,比如你在浏览器地址栏里输入http://localhost:3000/abc,就会看到一个默认的404页面,显示了具体的错误信息。而我们的HelloWorld,显示的则是“Cannot GET /abc”这个文本串。这就是模板的便利之处,有很多默认处理,可以为我们省很多麻烦。
Express版本的文件服务器
express是在Node.js的http的基础上实现的,相比http模块,封装更多更适用于web服务器场景的功能。之前我们在Node.js开发入门——HTTP文件服务器里使用http模块实现了一个简单的文件服务器。那个版本的文件服务器还有一个缺陷,就是没有根据文件名设置HTTP的Content-Type头部。如果我们使用express来实现文件服务器(用到了Request对象的sendFile方法),哈哈,就只有几行代码,还解决了Content-Type问题!
代码如下:
var express = require('express');
var app = express();

app.get('*', function(req, res){
    res.sendFile(req.path, {root: __dirname+'/', dotfiles: 'deny'});
});

app.listen(3000);
是不是超级简单?
其它文章:
- Node.js开发入门——HTTP文件服务器
- Node.js开发入门——HelloWorld再分析
- Node.js开发入门——环境搭建与HelloWorld


