SpringBoot项目使用配置中心Nacos
阅读文本大概需要3分钟。
目前市面上用的比较多的配置中心有
Disconf:2014年7月百度开源的配置管理中心,同样具备配置的管理能力,不过目前已经不维护了,最近的一次提交是两年前了。
Spring Cloud Config:2014年9月开源,Spring Cloud 生态组件,可以和Spring Cloud体系无缝整合。
Apollo:2016年5月,携程开源的配置管理中心,具备规范的权限、流程治理等特性。
Nacos:2018年6月,阿里开源的配置中心,也可以做DNS和RPC的服务发现。
更详细的对比可以参考这篇网友写的文章:
https://www.jianshu.com/p/2f0ae9c7f2e1
今天的主要任务是SpringBoot项目如何使用配置中心Nacos。
0x01:新建SpringBoot项目
新建项目com-nacos-config,在pom.xml文件中引入如下配置
  4.0.0


        org.springframework.boot
        spring-boot-starter-parent
        2.1.3.RELEASE


  com.nacos
  com-nacos-config
  0.0.1-SNAPSHOT
  jar

  com-nacos-config
  http://maven.apache.org


    UTF-8
    1.8


            org.springframework.boot
            spring-boot-starter-web


            org.springframework.boot
            spring-boot-starter-data-jpa


            com.alibaba.boot
            nacos-config-spring-boot-starter
            0.2.1


            mysql
            mysql-connector-java
            5.1.47


                org.springframework.boot
                spring-boot-maven-plugin
0x02:编写数据库持久层
使用的jpa的CrudRepository
package com.nacos.config.dao;

import org.springframework.data.repository.CrudRepository;

import com.nacos.config.model.UserModel;

public interface UserRepository extends CrudRepository {

}
实体类映射关系如下
package com.nacos.config.model;

import javax.persistence.Entity;
import javax.persistence.Id;

@Entity(name = "t_user")
public class UserModel {

    @Id
    private Integer  id;

    private String username;

    private String password;

    //get set 省略


}
从实体类可以知道表格很简单就只有id、username、password三个字段。
0x03:编写控制器Controller
package com.nacos.config.controller;

import org.springframework.beans.factory.annotation.Autowired;
import org.springframework.web.bind.annotation.GetMapping;
import org.springframework.web.bind.annotation.RequestParam;
import org.springframework.web.bind.annotation.ResponseBody;
import org.springframework.web.bind.annotation.RestController;

import com.nacos.config.dao.UserRepository;
import com.nacos.config.model.UserModel;

@RestController("/user")
public class UserController {

    @Autowired
    private UserRepository userRepository;

    @GetMapping
    @ResponseBody
    public UserModel get(@RequestParam int id) {
        return userRepository.findById(id).get();
    }

}
0x04:编写启动类型及配置application.properties文件
package com.nacos.config;

import org.springframework.boot.SpringApplication;
import org.springframework.boot.autoconfigure.SpringBootApplication;
import org.springframework.web.bind.annotation.RestController;

import com.alibaba.nacos.spring.context.annotation.config.NacosPropertySource;

@SpringBootApplication
@NacosPropertySource(dataId = "mysql", autoRefreshed = true)
@RestController
public class Application {

    public static void main(String[] args) {
        SpringApplication.run(Application.class, args);
    }

}
启动类,用使用如下代码引入Nacos的配置项
@NacosPropertySource(dataId = "mysql", autoRefreshed = true)
application.properties文件内容如下:
spring.application.name=com-nacos-config
server.port=8090
nacos.config.server-addr=127.0.0.1:8848
nacos.config.server-addr配置项指定了配置中心Nacos的服务地址。
0x05:验证
在启动项目之前先确认
数据库已经启动并新建了t_user表
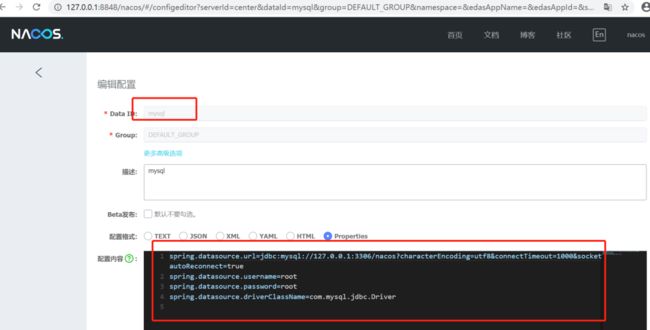
启动配置中心并添加配置项(见下图)
spring.datasource.url=jdbc:mysql://127.0.0.1:3306/nacos?characterEncoding=utf8&connectTimeout=1000&socketTimeout=3000&autoReconnect=true
spring.datasource.username=root
spring.datasource.password=root
spring.datasource.driverClassName=com.mysql.jdbc.Driver
启动项目com-nacos-config
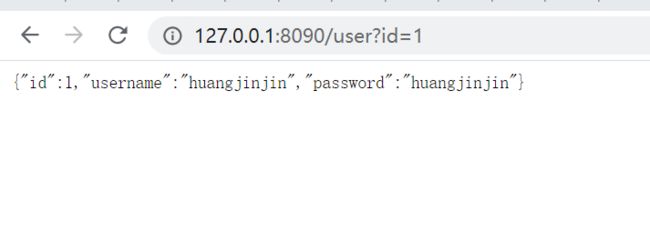
在浏览器输入
http://127.0.0.1:8090/user?id=1
可以看到如下效果
这条数据是数据库里预埋的数据
☆
往期精彩
☆
01 Sentinel如何进行流量监控
02 Nacos源码编译
03 基于Apache Curator框架的ZooKeeper使用详解
04 spring boot项目整合xxl-job
05 互联网支付系统整体架构详解
关注我
每天进步一点点
![]()
喜欢!在看☟


