浅入ICE组件编程
一、ICE介绍
ICE是ZeroC公司开发的一款高效的开源中间件平台,全称是Internet Communications Engine。
它的主要设计目标是:
• 提供适用于异种环境的面向对象中间件平台。
• 提供一组完整的特性,支持广泛的领域中的实际的分布式应用的开发。
• 避免不必要的复杂性,使平台更易于学习和使用。
• 提供一种在网络带宽、内存使用和 CPU 开销方面都很高效的实现。
• 提供一种具有内建安全性的实现,使它适用于不安全的公共网络。
ICE支持多种编程语言:C++、Java、C#、VB、Python、Ruby,也就是说使用ICE时我们可以让这些语言无缝沟通,不过由于ICE是用C++编写的,不管用什么语言,你都需要先用C++编译出一个ICE才行(或者下载已编译的版本)。
跨语言的分布式系统首先要定义一个与编程语言无关的接口描述语法,用于分布于各处的服务器与客户端之间对话。比如DCOM和CORBA使用IDL语法,SOAP使用WSDL语法,当然还有时下流行的JSON。ICE使用的是称为Slice(Specificatoin Language for Ice)的语法,Slice语法和C++(或Java,C#)比较相近,只要会C++(或Java,C#)很容易就能写Slice定义了。
二、配置ICE开发环境
首先,从http://www.zeroc.com/download.html 下载ICE,目前最新版本是Ice-3.5.1。下载页面里除了ICE的源码之外,也提供了VC或C++Builder的已编译安装包以及各Linux版本的RPM下载。
如果下载的是源码版本,需要编译的话,最好使用相同版本的编译器。
1)、ICE需要一些第三方库,在编译ICE之前要先编译第三方库,清单如下(它们也能在ICE官网上下载):
Berkeley DB
expat
OpenSSL
bzip2
mcpp
2)、编译完上面这些库以后,把它们放到同一个目录中,然后设置用户环境变量。
ICE_ROOT= D:\Program Files\ZeroC\Ice-3.5.1
3)、把上面编译好或直接下载的已编译版本的ice.lib和iceutil.lib(或Debug版本的iced.lib和 iceutild.lib)链接入项目即可。
三、ICE的“HelloWorld”
本文以网上用到比较多的printer经典代码作为范例说明。
1)、定义接口文件demo.ice
//**********************************************************************

//

// Copyright (c) 2014

// xxxxx有限公司

// 2014.05.23

// liuxuezong, 上海

//

// AllRights Reserved

//

//**********************************************************************


#ifndef demo_ice

#define demo_ice

//

// version 1.0.0

//


module Demo

{

         interface Printer

         {

              void printString(string strMsg);

         };

};


#endif2)、生成接口文件
使用slice2cpp程序依据这个Slice定义生成C++使用的头文件和对应的代理代码。
>slice2cpp demo.ice
如果没提示错误,就会生成demo.h和demo.cpp,把这两个文件加入到服务器端项目和客户端项目后,客户端就可以向服务器发送消息了。
> slice2java demo.ice
生成java相关代码,文件较多,这里就不一一写出了。
> slice2cs demo.ice
生成c#相关代码只有一份:demo.cs。
3)、Slice与C++的映射关系
| Slice |
C++ |
| #include |
#include |
| #ifndef |
#ifndef |
| #define |
#define |
| #endif |
#endif |
| module |
namespace |
| bool |
bool |
| byte |
Ice::Byte |
| short |
Ice::Short |
| int |
Ice::Int |
| long |
Ice::Long |
| float |
Ice::Float |
| double |
Ice::Double |
| string |
Ice::string |
| enum |
enum(不支持指定数字) |
| struct |
struct |
| class |
class(所有方法都是纯虚函数) |
| interface |
struct(所有方法都是纯虚函数,没有成员变量) |
| sequence |
std::vector |
| dictionary |
std::map |
| exception Err |
class Err:public Ice:UserException |
| nonmutating方法限定符 |
const方法 |
| idempotent方法限定符 |
- |
| out 参数限定符 |
引用类型 |
| * |
对应类型的代理类 |
参考这个表,可以知道上面的Slice定义对应的C++映射如下:
namespace Demo
{
struct Printer
{
virtual void printString(string strMsg) = 0;
};
};
4)、C++代码实现
第1步:新建一个控制台项目democlient;
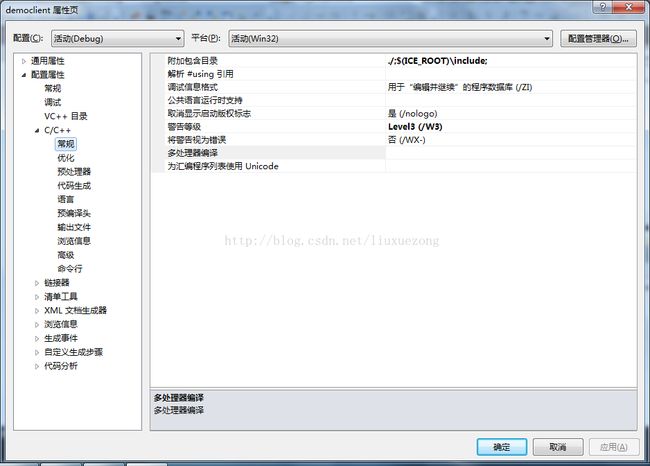
第2步:将“./;$(ICE_ROOT)\include”添加到“c/c++”->“常规”->“附件包含目录” 列表中;
图3-1 包含目录设置
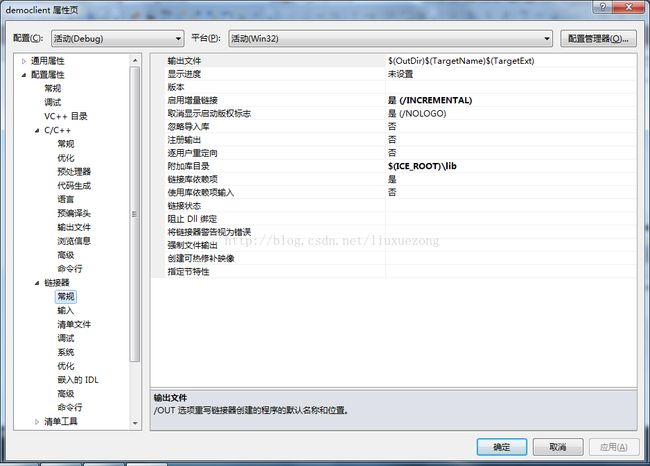
第3步:将“$(ICE_ROOT)\lib” 添加到“链接器”->“常规“->“附件库目录”列表中;
图3-2 附加库目录设置
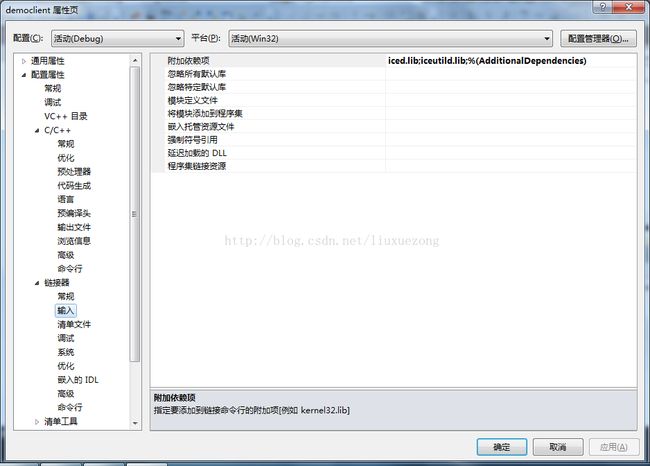
第4步:将“iced.lib”和“iceutild.lib”(debug版本)添加到“链接器”->“输入“-> “附加依赖项”列表中,链接入到项目中。
图3-3 导入静态库设置
C++客户端代码democlient:
#include

#include "demo.h"


using namespace std;

using namespace Demo;


int main(int argc, char *argv[])

{

         Ice::CommunicatorPtr ic;

         try

         {

                   // 初始化Ice运行库

                   ic = Ice::initialize(argc,argv);

                   // 在10000端口取得 SimplePrinter代理对象

                   Ice::ObjectPrx base =ic->stringToProxy("SimplePrinter:default -p10000");

                   // 把对象转换成Printer 代理

                   PrinterPrx printer =  PrinterPrx::checkedCast(base);

                   if(!printer)

                   {

                            throw "InvalidProxy!";

                   }

                   // 能够用这个代码调用printString方法

                   printer->printString("Hello World!");

         }

         catch (const Ice::Exception &e)

         {

             cerr << e << endl;

         }

         catch (const char *msg)

         {

              cerr << msg << endl;

         }

         // 回收Ice运行库所用的资源

         if (ic)

         {

                   ic->destroy();

         }

         return0;

} Ice::ObjectPrx base =ic->stringToProxy("SimplePrinter:default -h 127.0.0.1 -p 10000")
C++服务器代码demoserver:
#include "demo.h"


using namespace std;

using namespace Demo;


// 实现printString方法

struct CPrinterImp : Printer

{

         virtual void printString(const::std::string& strMsg,

                   const::Ice::Current& = ::Ice::Current())

         {

              cout << strMsg << endl;

         }

};


int main(int argc, char *argv[])

{

         Ice::CommunicatorPtr ic;


         try

         {

                   // 回收Ice运行库所用的资源

                   ic = Ice::initialize(argc,argv);

                   // 建立ObjectAdapter,命名为SimplePrinterAdapter,使用默认协议一般是tcp并在10000端口监听。

                   Ice::ObjectAdapterPtr adapter= ic->createObjectAdapterWithEndpoints(

                            "SimplePrinterAdapter", "default -p 10000");

                   // 把我们实现的Printer加入ObjectAdapter,并命名为SimplePrinter

                   Ice::ObjectPtr object = new CPrinterImp;

                   adapter->add(object,ic->stringToIdentity("SimplePrinter"));

                   adapter->activate();

                   // 等待直到Communicator关闭

                   ic->waitForShutdown();

         }

         catch (const Ice::Exception &e)

         {

                   cerr << e <destroy();

         }

         return0;

} “Hello World!”
5)、java代码实现
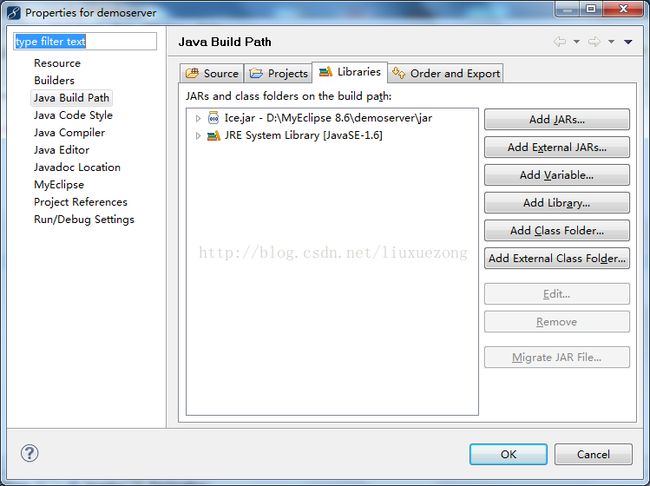
图3-4 设置ice.jar
从iec3.5.1的lib文件中,把ice.jar添加到工程jar目录中。
java客户端代码democlient:
democlient.java主程序:
public class democlient

{

    public static void main(String[] args)

    {

        int status = 0;

        Ice.Communicator ic = null;

        try

        {

            // Initialize ICE

            ic = Ice.Util.initialize(args);


            // Ice.ObjectPrxbase = ic.stringToProxy(

            //"SimplePrinter:tcp -h 127.0.0.1 -p 10000");

            Ice.ObjectPrx base = ic.stringToProxy(

                    "SimplePrinter:default-p 10000");


            Demo.PrinterPrx printer = Demo.PrinterPrxHelper.checkedCast(base);


            if (printer == null)

            {

                thrownew Error("Invalidproxy");

            }


            printer.printString("Hello World!");

        }

        catch (Ice.LocalException ex)

        {

            ex.printStackTrace();

            status = 1;

        }

        catch (Exception e)

        {

            System.err.println(e.getMessage());

            status = 1;

        }

        if (ic != null)

        {

            try

            {

                ic.destroy();

            }

            catch (Exception e)

            {

                System.err.println(e.getMessage());

                status = 1;

            }

        }

        System.exit(status);

    }

}
java服务端代码demoserver:
PrinterImp.java接口实现:
public class PrinterImp extends Demo._PrinterDisp

{

    private static final long serialVersionUID = 1L;


    public void printString(String strMsg, Ice.Current current)

    {

         System.out.println(strMsg);

    }

}demoserver.java主程序:
public class demoserver

{

    public static void main(String[] args)

    {

        int status = 0;

        Ice.Communicator ic = null;

        try

        {

            // Initialize ICE

            ic = Ice.Util.initialize(args);


            // Create anobject adapter, which listens on port 1000, using TCP/IP.

            Ice.ObjectAdapter adapter =ic.createObjectAdapterWithEndpoints(

                    "SimplePrinterAdapter", "default -hlocalhost -p 10000");


            // Create servant(implementation) object.

            Ice.Object object = new PrinterImp();


            // Add servant tothe object adapter's active servant map.

            adapter.add(object, Ice.Util.stringToIdentity("SimplePrinter"));


            // Activate theobject adapter.

            adapter.activate();


            // Just waituntil we're finished.

            ic.waitForShutdown();

        }

        catch (Ice.LocalException ex)

        {

            ex.printStackTrace();

            status = 1;

        }

        catch (Exception e)

        {

            System.err.println(e.getMessage());

            status = 1;

        }

        if (ic != null)

        {

            try

            {

                ic.destroy();

            }

            catch (Exception e)

            {

                System.err.println(e.getMessage());

                status = 1;

            }

        }

        System.exit(status);

    }

}"SimplePrinterAdapter","default-p 10000");
运行demoserver之后,会出现如下错误:
Ice.SocketException
error = 0
atIceInternal.Network.doBind(Network.java:251)
atIceInternal.TcpAcceptor.
atIceInternal.TcpEndpointI.acceptor(TcpEndpointI.java:414)
atIceInternal.IncomingConnectionFactory.
atIce.ObjectAdapterI.
atIceInternal.ObjectAdapterFactory.createObjectAdapter(ObjectAdapterFactory.java:160)
atIce.CommunicatorI.createObjectAdapterWithEndpoints(CommunicatorI.java:89)
atdemoserver.main(demoserver.java:12)
Caused by: java.net.SocketException: Address family not supported by protocol family: bind
atsun.nio.ch.Net.bind(Native Method)
atsun.nio.ch.ServerSocketChannelImpl.bind(ServerSocketChannelImpl.java:119)
atsun.nio.ch.ServerSocketAdaptor.bind(ServerSocketAdaptor.java:59)
atIceInternal.Network.doBind(Network.java:245)
... 7 more
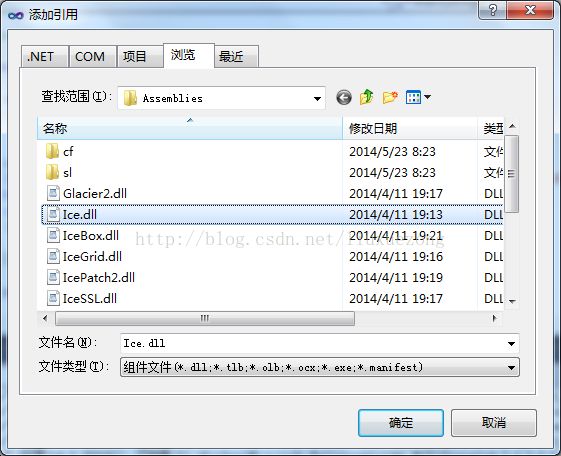
6)、C#代码实现
图3-5 添加引用库ice
democlient.cs主程序:
using System;
using System.Collections.Generic;
using System.Linq;
using System.Text;

namespace democlient
{
    class Program
    {
        static int Main(string[] args)
        {
            int status = 0;
            Ice.Communicator ic = null;
            try
            {
                ic = Ice.Util.initialize(ref args);
                Ice.ObjectPrx obj = ic.stringToProxy("SimplePrinter:default -h localhost -p 10000");
                Demo.PrinterPrx printer = Demo.PrinterPrxHelper.checkedCast(obj);
                if (printer == null)
                {
                    throw new ApplicationException("Invalid proxy");
                }

                printer.printString("Hello World!");
            }
            catch (Exception e)
            {
                Console.Error.WriteLine(e);
                status = 1;
            }
            if (ic != null)
            {
                try
                {
                    ic.destroy();
                }
                catch(Exception e)
                {
                    Console.Error.WriteLine(e);
                    status = 1;
                }
            }
            return status;
        }
    }
}
demoserver.cs主程序:
using System;

using System.Collections.Generic;

using System.Linq;

using System.Text;

using System.Reflection;


public class PrinterImpl : Demo.PrinterDisp_

{

    public override void printString(string strMsg, Ice.Current current)

    {

        Console.WriteLine(strMsg);

    }

}


namespace demoserver

{

    class Program

    {

        public static int Main(string[]args)

        {

            intstatus = 0;

            Ice.Communicatoric = null;

            try

            {

                ic = Ice.Util.initialize(refargs);

                Ice.ObjectAdapteradapter =

                    ic.createObjectAdapterWithEndpoints("SimplePrinterAdapter", "default -h localhost -p 10000");

                Ice.Objectobj = new PrinterImpl();

                adapter.add(obj,ic.stringToIdentity("SimplePrinter"));

                adapter.activate();

                ic.waitForShutdown();

            }

            catch (Exception e)

            {

                Console.Error.WriteLine(e);

                status = 1;

            }

            if (ic != null)

            {

                try

                {

                    ic.destroy();

                }

                catch (Exception e)

                {

                    Console.Error.WriteLine(e);

                    status = 1;

                }

            }

            returnstatus;

        }

    }

}
四、ICE使用小结
本文主要从printer经典的例子入手,综合使用三种开发语言,验证ICE在不同语言环境下的使用性如何。从ICE的开发流程上来看,与CORBA开发流程类似。两者的接口文件定义基本相接近。如果您曾经深入接触或开发过CORBA组件软件,那么再入手ICE研究开发工作,将是一件令人愉快的事情,因为它是那么随心所欲—Easy。
从企业今后部署的经济方面考虑,相对于重量级CORBA中间件组件,ICE是开源的、免费的,并且版本还不断升级。在运行性能与网络接口处理方面,我们需要测试其稳定性,鲁棒性,健壮性等,研究它是否符合企业用户的业务需求。
