安卓日记——设计简洁好看的UI
最近看到谷歌的to-do的那个demo,虽然他的mvp暂时还看不懂,但我觉得他的界面还是挺好看的,所以决定跟着模仿一下
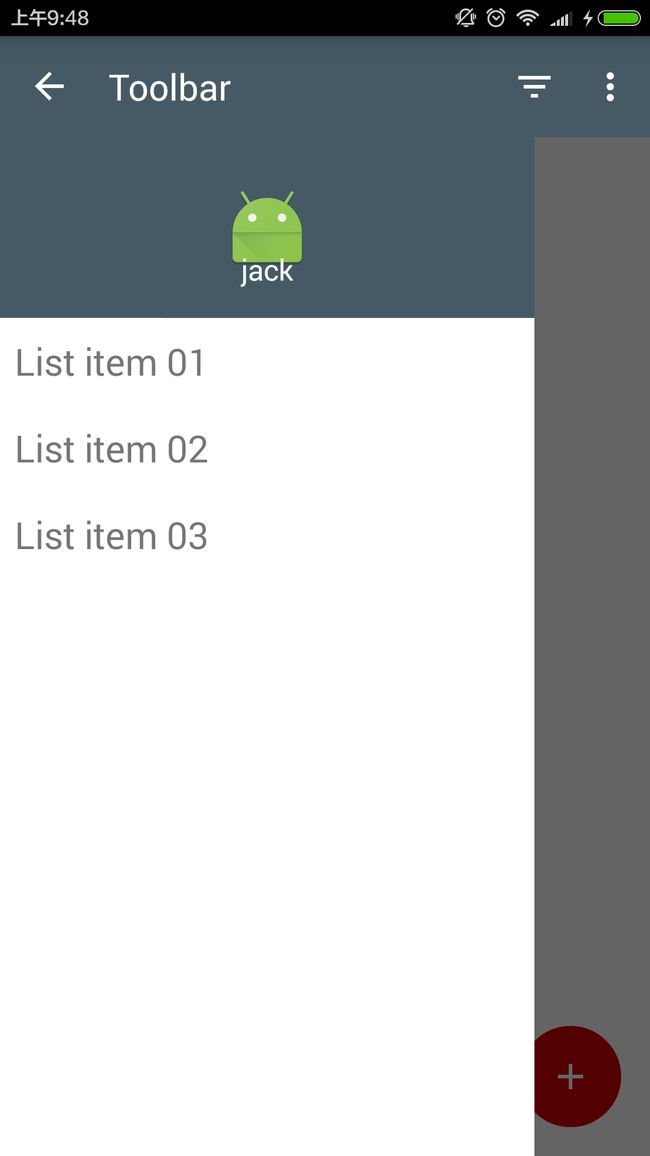
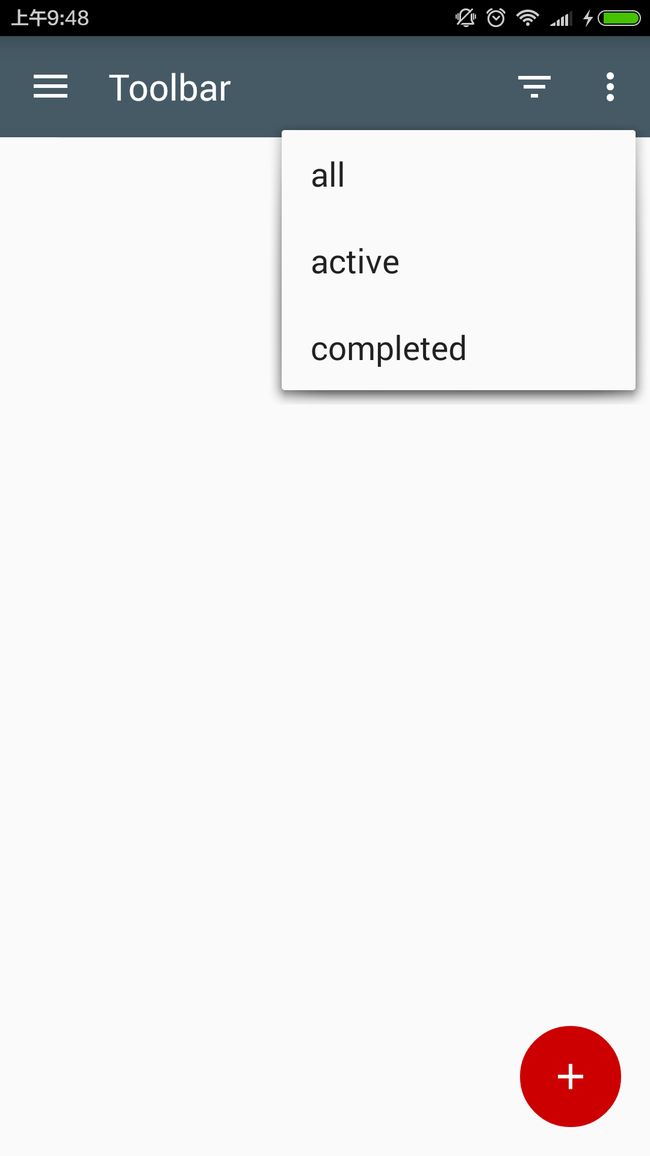
效果图 

主要是用到下面几个东西
- ToolBar
- ActionBarDrawerToggle
- Menu
- PopupMenu
- DrawerLayout
- FrameLayout
- ImageButton
首先说明一点,不同部分的布局分开写很重要
这样以后修改起来就会很方便,而不用慢慢地进入哪个主布局里滚啊滚啊
而且这样也更方便复写,所以强烈建议不同部分的布局分开来写
由于Actionbar功能不满足开发需求,现在基本上被Toolbar这个更好看更强大的顶部栏所取代
1.首先先设置一下主题先,把Actionbar去掉,把AppTheme的parent改为Theme.AppCompat.Light.NoActionBar,还有设置一下Toolbar的样式
<resources>
<style name="AppTheme" parent="Theme.AppCompat.Light.NoActionBar">
-- Customize your theme here. -->
<item name="colorPrimary">@color/colorPrimary
- "colorPrimaryDark"
>@color/colorPrimaryDark
- "colorAccent">@color/colorAccent
style>
<style name="Toolbar" parent="ThemeOverlay.AppCompat.Dark.ActionBar" />
resources>
2.好,我们首先来新建一个名为custom_toolbar的layout写这个Toolbar
因为直接输入Toolbar的话系统可能不会提示,所以要记得写上在Toolbar前写上android.support.v7.widget,(建议直接复制我的代码过去)这个layout的全部代码如下
<android.support.v7.widget.Toolbar xmlns:android="http://schemas.android.com/apk/res/android"
    xmlns:app="http://schemas.android.com/apk/res-auto"
    android:id="@+id/tl_custom"
    android:layout_width="match_parent"
    android:layout_height="wrap_content"
    android:background="?attr/colorPrimary"
    android:minHeight="?attr/actionBarSize"
    android:popupTheme="@style/ThemeOverlay.AppCompat.Light"
    app:theme="@style/Toolbar">
android.support.v7.widget.Toolbar>
3.接下来就是DrawerLayout
新建一个名为custom_drawerlayout的layout写这个DrawerLayout,记得在DrawerLayout前加上android.support.v4.widget,全部代码如下
<android.support.v4.widget.DrawerLayout xmlns:android="http://schemas.android.com/apk/res/android"
    android:id="@+id/dl_left"
    android:layout_width="match_parent"
    android:layout_height="match_parent">

    <RelativeLayout
        android:layout_width="match_parent"
        android:layout_height="match_parent">

        <ImageButton
            android:layout_width="56dp"
            android:layout_height="56dp"
            android:src="@drawable/ic_add"
            android:layout_alignParentBottom="true"
            android:layout_alignParentRight="true"
            android:layout_marginRight="16dp"
            android:layout_marginBottom="16dp"
            android:tint="@android:color/white"
            android:id="@+id/fab"
            android:elevation="1dp"
            android:background="@drawable/ripple"
            />
    RelativeLayout>

    <LinearLayout
        android:layout_width="match_parent"
        android:layout_height="match_parent"
        android:background="#fff"
        android:orientation="vertical"
        android:layout_gravity="start">

        <FrameLayout
            android:layout_width="match_parent"
            android:layout_height="100dp"
            android:padding="16dp"
            android:background="@color/colorPrimary">
            <ImageView
                android:layout_width="wrap_content"
                android:layout_height="wrap_content"
                android:src="@mipmap/ic_launcher"
                android:id="@+id/iv"
                android:layout_gravity="center"/>
            <TextView
                android:layout_width="wrap_content"
                android:layout_height="wrap_content"
                android:layout_gravity="bottom|center"
                android:layout_marginTop="30dp"
                android:textColor="#fff"
                android:text="jack"/>
        FrameLayout>

        <ListView
            android:id="@+id/lv_left_menu"
            android:layout_width="match_parent"
            android:layout_height="match_parent"
            android:divider="@null"
            android:text="DrawerLayout" />
    LinearLayout>
android.support.v4.widget.DrawerLayout>
4.我们在主布局中设置了一个漂浮的圆形按钮用的是ImageButton,要把它设为圆形,需要把它的backgound改为我们想要的drawable。
新建一个名为ripple的drawable文件,代码如下
<selector xmlns:android="http://schemas.android.com/apk/res/android">
    <item>

        <shape android:shape="oval">

            <solid android:color="@android:color/holo_red_dark" />
        shape>
    item>
selector>
5.然后就是拼接在一起了
在主布局中只需两个include,代码如下
<LinearLayout xmlns:android="http://schemas.android.com/apk/res/android"
    xmlns:tools="http://schemas.android.com/tools"
    android:layout_width="match_parent"
    android:layout_height="match_parent"
    xmlns:app="http://schemas.android.com/apk/res-auto"
    android:orientation="vertical"
    android:id="@+id/contentFrame"
    tools:context=".MainActivity">

    <include layout="@layout/custom_toolbar" />

    <include layout="@layout/custom_drawerlayout" />
LinearLayout>
6.接下来是在Activity设置他们的逻辑
主要有下面几个控件
    private Toolbar toolbar;
    private DrawerLayout mDrawerLayout;
    //左上角的标志
    private ActionBarDrawerToggle mDrawerToggle;
    //菜单列表
    private ListView lvLeftMenu;
    //菜单选项标题
    private String[] lvs={"List item 01","List item 02","List item 03"};
    private ArrayAdapter arrayAdapter;
    //浮动按钮
    private ImageButton ib;
7.首先是绑定他们的id
然后把ActionBar设为我们的Toolbar
        toolbar.setTitle("Toolbar");
        setSupportActionBar(toolbar);
8.左上角的按钮绑定ToolBar和DrawerLayout
    //后面的R.string.close,R.string.open好像没什么用,但一定要设
        mDrawerToggle=new ActionBarDrawerToggle(this,mDrawerLayout,toolbar,R.string.close,R.string.open);
        mDrawerToggle.syncState();
        mDrawerLayout.setDrawerListener(mDrawerToggle);
9.然后就是显示我们的菜单内容
    arrayAdapter=new ArrayAdapter(this,android.R.layout.simple_list_item_1,lvs);
        lvLeftMenu.setAdapter(arrayAdapter);
10.最后我们还有个menu没有讲
我们是有普通的menu和PopupMenu
首先新建一个menu样式
右键res->Android resource directory->Resource type->menu
代码如下
<menu xmlns:android="http://schemas.android.com/apk/res/android"
    xmlns:app="http://schemas.android.com/apk/res-auto">
    <item
        android:id="@+id/menu_filter"
        android:title="menu_filter"
        android:icon="@drawable/ic_filter_list"
        app:showAsAction="always" />
    <item
        android:id="@+id/menu_clear"
        android:title="clear"
        app:showAsAction="never" />
    <item
        android:id="@+id/menu_refresh"
        android:title="refresh"
        app:showAsAction="never" />
menu>
11.那个menu_filter是会显示在toolbar,然后我们点击它要显示一个PopupMenu
我们PopupMenu也需要新建一个menu文件
代码如下
<menu xmlns:android="http://schemas.android.com/apk/res/android">
    <item
        android:id="@+id/all"
        android:title="all" />
    <item
        android:id="@+id/active"
        android:title="active" />
    <item
        android:id="@+id/completed"
        android:title="completed" />
menu>
12.回到Acitivity,重写onCreateOptionsMenu这个方法,加载我们自定义的menu
@Override
    public boolean onCreateOptionsMenu(Menu menu) {
        getMenuInflater().inflate(R.menu.tasks_fragment_menu,menu);
        return  true;
    }
13.监听点击事件
重写onOptionsItemSelected方法,代码如下
 @Override
    public boolean onOptionsItemSelected(MenuItem item) {
        switch (item.getItemId()){
            case R.id.menu_clear:
                Toast.makeText(this,"clear",Toast.LENGTH_SHORT).show();
                break;
            case R.id.menu_refresh:
                Toast.makeText(this,"refresh",Toast.LENGTH_SHORT).show();
                break;
            case R.id.menu_filter:
                Toast.makeText(this,"refresh",Toast.LENGTH_SHORT).show();
                //点击时弹出PopupMenu
                showFilterPopupMenu();
                break;
        }
        return true;
    }
14.在showFilterPopupMenu方法新建并显示PopupMenu,代码如下
private void showFilterPopupMenu() {
        //绑定点击的item
        PopupMenu popup=new PopupMenu(this,findViewById(R.id.menu_filter));
        //加载自定义的PopupMenu内容
        popup.getMenuInflater().inflate(R.menu.filter_tasks,popup.getMenu());
        //设置item点击监听
        popup.setOnMenuItemClickListener(new PopupMenu.OnMenuItemClickListener() {
            @Override
            public boolean onMenuItemClick(MenuItem item) {
                switch (item.getItemId()){
                    case R.id.active:
                        Toast.makeText(MainActivity.this,"active",Toast.LENGTH_SHORT).show();
                        break;
                    case R.id.completed:
                        Toast.makeText(MainActivity.this,"completed",Toast.LENGTH_SHORT).show();
                        break;
                    default:
                        Toast.makeText(MainActivity.this,"all",Toast.LENGTH_SHORT).show();
                        break;
                }
                return true;
            }
        });
//        展示PopupMenu
        popup.show();
    }
至于那个浮动按钮你们可以设置一些监听事件啦
好啦,一个简单好看的UI就这样完成了
源码地址
https://github.com/jkgeekJack/ImateUI