android 自定义控件--用viewGroup实现流式布局
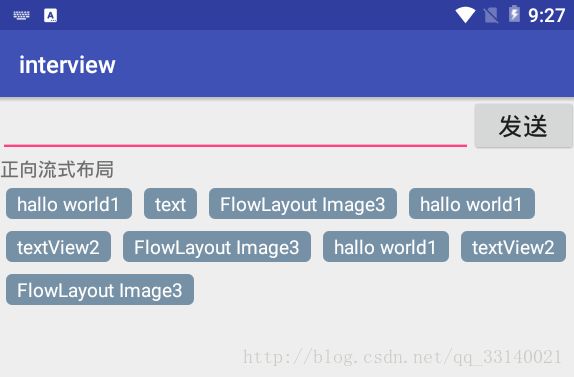
java布局中有一个流式布局,但是android布局中并没有。手机上用到流式布局大概就是热门标签的添加吧。流式布局就是控件一个一个的自动往右添加,如果超出宽度,则自动到下一行。
步骤分析
1.对于本布局,我们需要能得到margin属性的LayoutParams,即MarginLayoutParams.
2.在onMeasure()方法中计算所有子view的高度和宽度,以便得到FlowLayout 的宽高(流式布局为warp_content模式)。
3.在onLayout()方法中放置所有子view的位置。
解决问题
1.得到MarginLayoutParams
只需要我们重写generateLayoutParams()方法
 public ViewGroup.LayoutParams generateLayoutParams(AttributeSet attrs)
    {
        return new MarginLayoutParams(getContext(), attrs);
    }
2.onMeasure()计算宽高
 @Override
    protected void onMeasure(int widthMeasureSpec, int heightMeasureSpec) {
        super.onMeasure(widthMeasureSpec,heightMeasureSpec);
        int widthSize = MeasureSpec.getSize(widthMeasureSpec);
        int widthMode = MeasureSpec.getMode(widthMeasureSpec);

        int heightSize = MeasureSpec.getSize(heightMeasureSpec);
        int heightMode = MeasureSpec.getMode(heightMeasureSpec);

        //如果为warp_content模式下测量的宽高
        int width = 0;
        int height = 0;

        //记录每一行的宽高
        int lineW = 0;
        int lineH = 0;

        int childCount = getChildCount();
        for (int i = 0; i < childCount; i++) {
           View child = getChildAt(i);//获取每一个子view
            measureChild(child,widthMeasureSpec,heightMeasureSpec);//测量子view
            MarginLayoutParams lp = (MarginLayoutParams) child.getLayoutParams();
            int childW = child.getMeasuredWidth() + lp.leftMargin + lp.rightMargin;//得到子view的宽高
            int childH = child.getMeasuredHeight() + lp.topMargin + lp.bottomMargin;

            //如果放入该view是超过父布局宽度,需要换行,那么高度累加,宽度取当前行与该子view最大的为父布局宽度
            if (childW + lineW > widthSize - getPaddingLeft() - getPaddingRight()){
                width = Math.max(lineW,childW);
                height +=lineH;//高度累加

                //开启新行
                lineW = childW;
                lineH = childH;
            }else {//如果不换行,则宽度累加,高度取最大值
                lineW += childW;
                lineH = Math.max(lineH,childH);
            }

            if (i == childCount -1){//最后一个子view
                width = Math.max(width, lineW);
                height += lineH;
            }
        }

        Log.i("FLOW",width+"   "+height);
        setMeasuredDimension((widthMode == MeasureSpec.EXACTLY) ? widthSize : width +getPaddingLeft()+getPaddingRight(),
                (heightMode == MeasureSpec.EXACTLY ? heightSize : height +getPaddingTop()+getPaddingBottom()));
    }
首先得到父布局的测量模式和宽高,然后遍历所有的子view,得到子view的宽高,计算父布局wrap_content模式下的宽高,最后根据模式设置父布局的宽高。但是在测量时应注意一点,在遍历到最后一个子view时,可能会换行,会走换行的if语句,但是并没有将在view的高度进行累加,所以要单独写一个判断进行累加。
3.onLayout()为子view布局
 List> allViews  = new ArrayList<>();
    List lineH = new ArrayList<>();
 @Override
    protected void onLayout(boolean changed, int l, int t, int r, int b) {

        allViews.clear();
        lineH.clear();

        int width = getWidth();//父布局的宽度

        int lineWidth = 0;
        int lineHeight = 0;

        //存放每一行的子view
        List lineViews = new ArrayList<>();

        int childCount = getChildCount();

        for (int i = 0; i < childCount; i++) {

            View child = getChildAt(i);//得到view实例

            MarginLayoutParams lp = (MarginLayoutParams) child
                    .getLayoutParams();

            //得到子view的宽高
            int childWidth = child.getMeasuredWidth() + lp.leftMargin +lp.rightMargin;
            int childHeight = child.getMeasuredHeight() + lp.bottomMargin +lp.topMargin;

            if (lineWidth + childWidth > (width -getPaddingLeft() - getPaddingRight())){//如果需要换行
                lineH.add(lineHeight);//保存这一行的view以及最大高度
                allViews.add(lineViews);
                //重置宽高
                lineWidth = 0;
                lineHeight = 0;
                lineViews = new ArrayList<>();
            }
            //如果不换行,则行高等于最高的,行宽累加
                lineWidth = lineWidth + childWidth;
                lineHeight = Math.max(lineHeight,childHeight);
                lineViews.add(child);


        }
        lineH.add(lineHeight);
        allViews.add(lineViews);

        int lineNums = allViews.size();
        int left = getPaddingLeft();
        int top = getPaddingTop();
        for (int i =0; i < lineNums; i++) {
            lineViews = allViews.get(i);
            lineHeight = lineH.get(i);

            //遍历每一行的view
            for (int j = 0; j < lineViews.size(); j++) {
                View child = lineViews.get(j);
                if (child.getVisibility() == View.GONE){
                    continue;
                }

                MarginLayoutParams lp = (MarginLayoutParams) child.getLayoutParams();

                //计算子view的坐标
                int lc = left +lp.leftMargin;
                int tc = top +lp.topMargin;
                int rc = lc + child.getMeasuredWidth();
                int bc = tc + child.getMeasuredHeight();

                child.layout(lc,tc,rc,bc);
                left += child.getMeasuredWidth() + lp.rightMargin
                        + lp.leftMargin;
            }
            //重置left和top 为下一行的计算坐准备
            left = getPaddingLeft();
            top +=lineHeight;
        }
    }
代码分析:
allViews 存放所有的子view,lineH 存放每一行的最大高度,lineView 存放每一行的view。
然后遍历所有子view,设置每一行的高度,和每一行的子view,最后遍历每一行的子view。设置每一个view的left,top,right,bottom.
测试
我用几个textView来测试,看一看效果
在res/values/styles.xml中:
frag_01.xml
<shape xmlns:android="http://schemas.android.com/apk/res/android" >

    <solid android:color="#7690A5" >
    solid>

    <corners android:radius="5dp"/>
    <padding
        android:bottom="2dp"
        android:left="10dp"
        android:right="10dp"
        android:top="2dp" />

shape>
item_flow.xml
<TextView xmlns:android="http://schemas.android.com/apk/res/android"

    style="@style/text_flag_01"
    android:layout_margin="5dp"
    android:layout_width="wrap_content"
    android:layout_height="wrap_content" >

TextView>
代码动态添加textview
FlowLayout flow;
String[] str = new String[]{"hallo world1","text","FlowLayout Image3","hallo world1",
            "textView2","FlowLayout Image3","hallo world1",
            "textView2","FlowLayout Image3"};

 LayoutInflater inflater = LayoutInflater.from(this);
        for (int i = 0; i < str.length; i++) {
            TextView tv = (TextView) inflater.inflate(R.layout.item_flow,flow,false);
            tv.setText(str[i]);
            flow.addView(tv);
        }
最后效果如图

到这里,流式布局基本上就实现了,如果想动态添加,可以自己定义一个接口实现单个添加标签。
优化
上面的方法实现了流式布局,但是我们可以看到,在onMeasure()和onLayout()方法中都计算了子view的宽高。如此,我们可不可以只计算一次呢,在onMeasure()中就将view的坐标计算好呢?
要解决这个问题,就需要有一个数组或列表来保存每一个view的坐标。
比如定义一个类,记录坐标点
 public class ViewPosition{
        int left;
        int top;
        int right;
        int bottom;

        public ViewPosition(int left,int top,int right,int bottom){
            this.left = left;
            this.top = top;
            this.right = right;
            this.bottom = bottom;
        }
    }
在onMeasure()中实现坐标计算
List<ViewPos> vPos = new ArrayList<>();

if (childW + lineW > widthSize - getPaddingLeft() - getPaddingRight()){//如果放入该view是超过父布局宽度,换行
                width = Math.max(lineW,childW);//取最大行宽为父布局行宽
                height +=lineH;//高度累加

                //开启新行
                lineW = childW;
                lineH = childH;
                vPos.add(new ViewPos(getPaddingLeft()+lp.leftMargin,
                        getPaddingTop()+lp.topMargin+height,
                        getPaddingLeft() + childW - lp.rightMargin,
                        getPaddingTop() + height + childH - lp.bottomMargin));
            }else {//如果不换行,则宽度累加,高度取最大值
                vPos.add(new ViewPos(getPaddingLeft() + lineW + lp.leftMargin,
                        getPaddingTop() + height + lp.topMargin,
                        getPaddingLeft() + lineW + childW - lp.rightMargin,
                        getPaddingTop() + height + childH - lp.bottomMargin));
                lineW += childW;
                lineH = Math.max(lineH,childH);

            }
最后在onLayout()中就简单了
 @Override
    protected void onLayout(boolean changed, int l, int t, int r, int b) {
        int count = getChildCount();
        for (int i = 0; i < count; i++) {
            View child = getChildAt(i);
            ViewPos pos = vPos.get(i);
            //设置View的左边、上边、右边底边位置
            child.layout(pos.left, pos.top, pos.right, pos.bottom);
        }
    }
参考博客:Android 自定义ViewGroup 实战篇 -> 实现FlowLayout