小程序 - 折线图画法
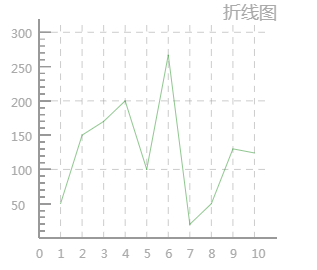
折线图的原理其实很简单:选定两个坐标点,调用moveTo()和lineTo()方法画出直线,多个点连续连线也是一样,一个一个点连接,但moveTo()是最开始的坐标执行,后面只调用lineTo()即可。
效果图:
首先是XML布局:
<
view
class
=
"canvas-view">
<
canvas
class
=
"canvas"
canvas-id
=
"canvasId">
canvas
>
view
>
样式CSS
/* 折线图 */
.canvas-view
{
height:
100%
;
background:
#FFFFFF
;
display:
flex
;
align-items:
center
;
margin-top:
48
rpx
;
}
.canvas
{
width:
100%
;
height:
640
rpx
;
}
JS代码
主要函数介绍:
1. getEleWidth():获取屏幕自适应宽度,自适应手机屏幕分辨率大小
2. drawYScale():划分Y轴,设定Y轴的起点(Y轴坐标原点是图层最上面),Y轴总高度,然后划分Y轴坐标,坐标分为大刻度坐标和小刻度坐标,设定大刻度坐标长度和小刻度坐标长度,画好Y轴坐标之后,再画刻度横线
![]()
3. drawXScale():划分X轴,同Y轴一样,设定X轴坐标原点和长度,划分刻度值
![]()
4. drawDashLine() :画虚线,X轴和Y轴的虚线,这个其实很简单,确定虚线的起始坐标和终点坐标,画直线就行了,主要是找到坐标
5. drawCharts():画折线,一个一个点连接,就成了一条折线图
完整JS代码
const
app = getApp()
Page({
data: {
list: [
50
,
150
,
170
,
200
,
100
,
267
,
20
,
50
,
130
,
124
],
h32:
32
,
h64:
64
,
h360:
360
,
h420:
420
,
s28:
28
,
s18:
18
,
//Y轴分成的大分段
heightLineNum:
7
,
//X轴分成的大分段
widthLineNum:
10
,
//Y轴一个分段的值
yOneDuan:
50
},
onLoad:
function
(options) {
//折线图
this
.initChart()
},
// 初始化折线图
initChart:
function
() {
const
ctx = wx.createCanvasContext(
'canvasId'
)
ctx.beginPath()
ctx.setStrokeStyle(
'#999999'
)
ctx.setFillStyle(
'#AAAAAA'
)
ctx.setLineWidth(
1
)
//坐标原点,Y轴坐标值从上往下是增加
const
leftBottomX =
this
.getEleWidth(
this
.data.h64)
const
leftBottomY =
this
.getEleWidth(
this
.data.h360)
//Y坐标
const
leftTopX =
this
.getEleWidth(
this
.data.h64)
const
leftTopY =
this
.getEleWidth(
this
.data.h32)
//X坐标
const
rightBottomX =
this
.getEleWidth(
this
.data.h420)
const
rightBottomY =
this
.getEleWidth(
this
.data.h360)
const
yHeight =
this
.getEleWidth(
this
.data.h360 -
this
.data.h32)
const
xWidth =
this
.getEleWidth(
this
.data.h420 -
this
.data.h64)
//从Y轴坐标开始画坐标系
//Y轴坐标到原点坐标画出Y轴线
//画完Y轴线,再从原点坐标到X轴坐标画出X轴线
ctx.moveTo(leftTopX, leftTopY)
ctx.lineTo(leftBottomX, leftBottomY)
ctx.lineTo(rightBottomX, rightBottomY)
//设置字体大小
ctx.setFontSize(
this
.getEleWidth(
this
.data.s28))
//设置字的位置
ctx.fillText(
"折线图"
,
this
.getEleWidth(
340
),
this
.getEleWidth(
32
))
//划分Y轴
this
.drawYScale(ctx);
//划分X轴
this
.drawXScale(ctx);
//画折线
this
.drawCharts(ctx);
ctx.stroke()
ctx.draw(
true
)
},
//划分Y轴
drawYScale:
function
(ctx) {
var
that =
this
;
//Y轴坐标刻度横坐标起点
var
scaleStartX =
this
.getEleWidth(
this
.data.h64)
//长的刻度
var
scaleEndX =
this
.getEleWidth(
this
.data.h64 +
18
)
//短的刻度
var
littleScaleEndX =
this
.getEleWidth(
this
.data.h64 +
9
)
//Y轴刻度总高度
const
yHeight =
this
.getEleWidth(
this
.data.h360)
//一个大分段的长度,一共分为6段
var
oneScaleX = yHeight /
this
.data.heightLineNum
//大分段数字字体大小
ctx.setFontSize(
this
.getEleWidth(
this
.data.s18))
//大分段数字位置横坐标
var
textX =
this
.getEleWidth(
this
.data.h64 -
42
)
//大分段,长刻度:50-300
for
(
var
i =
1
; i <
this
.data.heightLineNum; i++) {
var
scaleEndY = yHeight - oneScaleX * i
//画长刻度线条
ctx.moveTo(scaleStartX, scaleEndY)
ctx.lineTo(scaleEndX, scaleEndY)
ctx.fillText(
this
.data.yOneDuan * i, textX, scaleEndY +
this
.getEleWidth(
10
))
var
littleScaleStartY = yHeight - oneScaleX * (i -
1
)
//小分段,短刻度
for
(
var
j =
1
; j <
5
; j++) {
var
littleScaleEndY = littleScaleStartY - (oneScaleX /
5
) * j
//画短刻度线条
ctx.moveTo(scaleStartX, littleScaleEndY)
ctx.lineTo(littleScaleEndX, littleScaleEndY)
ctx.stroke();
}
}
//高和低虚线Y轴坐标
const
lowlimitLineY = yHeight - oneScaleX *
2
const
middlelimitLineY = yHeight - oneScaleX *
4
const
highlimitLineY = yHeight - oneScaleX *
6
//虚线总长度
const
rightBottomX =
this
.getEleWidth(
this
.data.h420)
const
space =
this
.getEleWidth(
10
)
//限制虚线
that.drawDashLine(ctx, scaleStartX, lowlimitLineY, rightBottomX, lowlimitLineY, space)
that.drawDashLine(ctx, scaleStartX, middlelimitLineY, rightBottomX, middlelimitLineY, space)
that.drawDashLine(ctx, scaleStartX, highlimitLineY, rightBottomX, highlimitLineY, space)
},
//划分X轴
drawXScale:
function
(ctx) {
var
that =
this
;
//虚线总高度
var
scaleStartY =
this
.getEleWidth(that.data.h360)
//虚线顶点Y轴高度
var
scaleEndY =
this
.getEleWidth(that.data.h32)
//X轴总长度=X轴横坐标-向右偏移长度
const
xWidth =
this
.getEleWidth(that.data.h420 - that.data.h64)
//X轴起始点
const
xMaginLeft =
this
.getEleWidth(that.data.h64)
//一个分段的宽度
const
oneScaleX = xWidth / (that.data.widthLineNum +
1
)
const
space =
this
.getEleWidth(
10
)
for
(
var
i =
0
; i < that.data.widthLineNum +
1
; i++) {
var
toEndX = xMaginLeft + oneScaleX * i;
if
(i >
0
) {
that.drawDashLine(ctx, toEndX, scaleStartY, toEndX, scaleEndY, space)
}
ctx.fillText(i, toEndX -
this
.getEleWidth(
5
), scaleStartY +
this
.getEleWidth(
30
))
}
},
//画虚线
drawDashLine:
function
(ctx, x1, y1, x2, y2, dashLength) {
//传context对象,始点x和y坐标,终点x和y坐标,虚线长度
ctx.beginPath()
ctx.setLineWidth(
0.5
)
var
dashLen = dashLength ===
undefined
?
3
: dashLength,
//得到横向的宽度;
xpos = x2 - x1,
//得到纵向的高度;
ypos = y2 - y1,
numDashes = Math.floor(Math.sqrt(xpos * xpos + ypos * ypos) / dashLen);
//利用正切获取斜边的长度除以虚线长度,得到要分为多少段;
for
(
var
i =
0
; i < numDashes; i++) {
if
(i %
2
===
0
) {
ctx.moveTo(x1 + (xpos / numDashes) * i, y1 + (ypos / numDashes) * i);
//有了横向宽度和多少段,得出每一段是多长,起点 + 每段长度 * i = 要绘制的起点;
}
else
{
ctx.lineTo(x1 + (xpos / numDashes) * i, y1 + (ypos / numDashes) * i);
}
}
ctx.stroke();
},
//
画
折线
drawCharts:
function
(ctx) {
ctx.beginPath()
ctx.setStrokeStyle(
"#238E23"
)
var
that =
this
;
var
list = that.data.list;
const
yHeight =
this
.getEleWidth(that.data.h360)
const
xWidth =
this
.getEleWidth(that.data.h420 -
this
.data.h64)
//X坐标,一个空格的值
const
oneScaleX = xWidth / (that.data.widthLineNum +
1
)
//Y坐标,一个空格的值
var
oneScaleY = yHeight /
this
.data.heightLineNum;
for
(
var
i =
0
; i < list.length; i++) {
var
height = list[i];
//计算X坐标
var
x = oneScaleX * (i +
1
) +
this
.getEleWidth(that.data.h64);
//计算Y坐标
var
y = yHeight - oneScaleY /
this
.data.yOneDuan * height
if
(i ==
0
) {
ctx.moveTo(x, y)
}
else
{
ctx.lineTo(x, y)
}
}
ctx.stroke()
ctx.draw(
true
)
},
//获取屏幕自适应宽度
getEleWidth:
function
(w) {
var
real =
0
;
try
{
var
res = wx.getSystemInfoSync().windowWidth;
//以宽度480px设计做宽度的自适应
var
scale = (
480
/
2
) / (w /
2
);
real = Math.floor(res / scale);
return
real;
}
catch
(e) {
return
false
;
}
}
})
