LayoutInflater加载布局
LayoutInflater用于把XML布局文件实例化成view对象树。
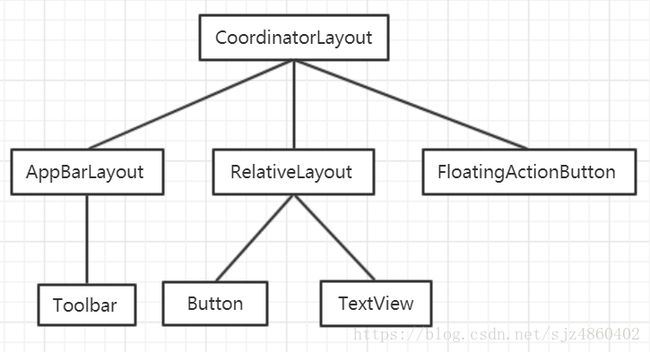
XML布局文件:
"1.0" encoding="utf-8"?>
.support.design.widget.CoordinatorLayout
    xmlns:android="http://schemas.android.com/apk/res/android"
    xmlns:app="http://schemas.android.com/apk/res-auto"
    xmlns:tools="http://schemas.android.com/tools" android:layout_width="match_parent"
    android:layout_height="match_parent" android:fitsSystemWindows="true"
    tools:context=".MainActivity">

    .support.design.widget.AppBarLayout android:layout_height="wrap_content"
        android:layout_width="match_parent" android:theme="@style/AppTheme.AppBarOverlay">

        .support.v7.widget.Toolbar android:id="@+id/toolbar"
            android:layout_width="match_parent" android:layout_height="?attr/actionBarSize"
            android:background="?attr/colorPrimary" app:popupTheme="@style/AppTheme.PopupOverlay" />

    .support.design.widget.AppBarLayout>

    "@layout/content_main" />

    .support.design.widget.FloatingActionButton android:id="@+id/fab"
        android:layout_width="wrap_content" android:layout_height="wrap_content"
        android:layout_gravity="bottom|end" android:layout_margin="@dimen/fab_margin"
        android:src="@android:drawable/ic_dialog_email" />

.support.design.widget.CoordinatorLayout>
content_main的布局文件:
<RelativeLayout xmlns:android="http://schemas.android.com/apk/res/android"
    xmlns:tools="http://schemas.android.com/tools"
    xmlns:app="http://schemas.android.com/apk/res-auto" android:layout_width="match_parent"
    android:layout_height="match_parent" android:paddingLeft="@dimen/activity_horizontal_margin"
    android:paddingRight="@dimen/activity_horizontal_margin"
    android:paddingTop="@dimen/activity_vertical_margin"
    android:paddingBottom="@dimen/activity_vertical_margin"
    app:layout_behavior="@string/appbar_scrolling_view_behavior"
    tools:showIn="@layout/activity_main" tools:context=".MainActivity">

    <TextView
        android:id="@+id/testView"
        android:text="Hello World!"
        android:layout_width="wrap_content"
        android:layout_height="wrap_content" />

    <Button
        android:id="@+id/parcelable_button"
        android:layout_width="wrap_content"
        android:layout_height="wrap_content"
        android:layout_below="@+id/testView"
        android:text="@string/parcelable_button_name"/>
RelativeLayout>
view对象树:
LayoutInflater通过对XML标签逐个的view实例化,最后把XML布局文件形成一颗view树,并返回其跟节点view对象。如下:
本篇的目录结构为:
一. LayoutInflater对象的获取
二. LayoutInflater中的Factory和Factory2的设计
三. LayoutInflater把XML布局文件实例化成view对象树
1. 正常标签的处理
2. merge标签的处理
3. include标签的处理
4. blink标签的处理
5. requestFocus标签的处理
6. tag标签的处理
一. LayoutInflater对象的获取
LayoutInflater的构造方法设计为protected,只能通过其子类来实例化,LayoutInflater的子类只有一个:PhoneLayoutInflater。但是PhoneLayoutInflater是一个hide的类,不对外开放。因此,LayoutInflater提供了from()函数来返回其实例化对象。
protected LayoutInflater(Context context) {
    mContext = context;
}
protected LayoutInflater(LayoutInflater original, Context newContext) {
    mContext = newContext;
    mFactory = original.mFactory;
    mFactory2 = original.mFactory2;
    mPrivateFactory = original.mPrivateFactory;
    setFilter(original.mFilter);
}
public static LayoutInflater from(Context context) {
    LayoutInflater LayoutInflater =
            (LayoutInflater) context.getSystemService(Context.LAYOUT_INFLATER_SERVICE);
    if (LayoutInflater == null) {
        throw new AssertionError("LayoutInflater not found.");
    }
    return LayoutInflater;
}
其实例化对象PhoneLayoutInflater的来源如下:
ContextImpl:
@Override
public Object getSystemService(String name) {
    return SystemServiceRegistry.getSystemService(this, name);
}
@Override
public String getSystemServiceName(Class serviceClass) {
    return SystemServiceRegistry.getSystemServiceName(serviceClass);
}
SystemServiceRegistry:
SystemServiceRegistry中使用了两个Hash Map来保存注册过的系统服务。SYSTEM_SERVICE_NAMES以类名name为键值,SYSTEM_SERVICE_FETCHERS以class对象为键值
private static final HashMap, String> SYSTEM_SERVICE_NAMES =
        new HashMap, String>();
private static final HashMap> SYSTEM_SERVICE_FETCHERS =
        new HashMap>();
//获取系统服务
public static Object getSystemService(ContextImpl ctx, String name) {
    ServiceFetcher fetcher = SYSTEM_SERVICE_FETCHERS.get(name);
    return fetcher != null ? fetcher.getService(ctx) : null;
}
public static String getSystemServiceName(Class serviceClass) {
    return SYSTEM_SERVICE_NAMES.get(serviceClass);
}
//注册系统服务,把LayoutInflater注册到SystemService中。
private static  void registerService(String serviceName, Class serviceClass,
        ServiceFetcher serviceFetcher) {
    SYSTEM_SERVICE_NAMES.put(serviceClass, serviceName);
    SYSTEM_SERVICE_FETCHERS.put(serviceName, serviceFetcher);
}
registerService(Context.LAYOUT_INFLATER_SERVICE, LayoutInflater.class,
        new CachedServiceFetcher() {
    @Override
    public LayoutInflater createService(ContextImpl ctx) {
        return new PhoneLayoutInflater(ctx.getOuterContext());
    }});
根据源码提供的接口,我们可以通过三种方式来获取LayoutInflater(虽然本质的获取方式只有一种,那就是调用context.getSystemService(Context.LAYOUT_INFLATER_SERVICE):
- (LayoutInflater)context.getSystemService(Context.LAYOUT_INFLATER_SERVICE);
- LayoutInflater.from(context);
- Activity.getLayoutInflater();
//Activity.getLayoutInflater()的获取方式也是通过LayoutInflater.from(context)来实现
@NonNull
public LayoutInflater getLayoutInflater() {
    return getWindow().getLayoutInflater();
}
//getWindow()返回的便是PhoneWindow对象
public PhoneWindow(Context context) {
    super(context);
    mLayoutInflater = LayoutInflater.from(context);
}
//PhoneWindow类中的getLayoutInflater()函数
@Override
public LayoutInflater getLayoutInflater() {
    return mLayoutInflater;
}
二. LayoutInflater中的Factory和Factory2的设计
Factory和Factory2的设计是为了扩展,LayoutInflater里面设计了怎么把XML布局文件转换成view对象树。我们可以根据需求实现这两个接口或者其中的一个接口,定义该怎么样把XML布局文件中的标签转换成view对象。
Factory和Factory2都设计了onCreateView()函数,唯一不同的是Factory2的onCreateView()函数多了一个View参数,方便使用者传入view充当view树的跟节点(如果有这个需求则实现Factory2)。
public interface Factory {
    public View onCreateView(String name, Context context, AttributeSet attrs);
}
public interface Factory2 extends Factory {
    public View onCreateView(View parent, String name, Context context, AttributeSet attrs);
}
//Factory2的实现类
private static class FactoryMerger implements Factory2 {
    private final Factory mF1, mF2;
    private final Factory2 mF12, mF22;

    FactoryMerger(Factory f1, Factory2 f12, Factory f2, Factory2 f22) {
        mF1 = f1;
        mF2 = f2;
        mF12 = f12;
        mF22 = f22;
    }

    public View onCreateView(String name, Context context, AttributeSet attrs) {
        View v = mF1.onCreateView(name, context, attrs);
        if (v != null) return v;
        return mF2.onCreateView(name, context, attrs);
    }

    public View onCreateView(View parent, String name, Context context, AttributeSet attrs) {
        View v = mF12 != null ? mF12.onCreateView(parent, name, context, attrs)
                : mF1.onCreateView(name, context, attrs);
        if (v != null) return v;
        return mF22 != null ? mF22.onCreateView(parent, name, context, attrs)
                : mF2.onCreateView(name, context, attrs);
    }
}
//设置类变量mFactory,一个LayoutInflater只允许设置一次mFactory。
public void setFactory(Factory factory) {
    if (mFactorySet) {
        throw new IllegalStateException("A factory has already been set on this LayoutInflater");
    }
    if (factory == null) {
        throw new NullPointerException("Given factory can not be null");
    }
    mFactorySet = true;
    if (mFactory == null) {
        mFactory = factory;
    } else {
        mFactory = new FactoryMerger(factory, null, mFactory, mFactory2);
    }
}
public void setFactory2(Factory2 factory) {
    if (mFactorySet) {
        throw new IllegalStateException("A factory has already been set on this LayoutInflater");
    }
    if (factory == null) {
        throw new NullPointerException("Given factory can not be null");
    }
    mFactorySet = true;
    if (mFactory == null) {
        mFactory = mFactory2 = factory;
    } else {
        mFactory = mFactory2 = new FactoryMerger(factory, factory, mFactory, mFactory2);
    }
}
三. LayoutInflater把XML布局文件实例化成view对象树
实现xml布局文件实例化成view对象树的功能主要在inflate()函数中完成。
XML布局文件中,有众多的标签,但是有五个标签,我们需要特别注意一下。针对这五个标签,LayoutInflater分别对其进行了特殊处理,而其他标签则直接转换成view对象:
private static final String TAG_MERGE = "merge";
private static final String TAG_INCLUDE = "include";
private static final String TAG_1995 = "blink";
private static final String TAG_REQUEST_FOCUS = "requestFocus";
private static final String TAG_TAG = "tag";
根据其标签,这里分为六个方面详细说明。
1. 正常标签的处理
2. merge标签的处理
3. include标签的处理
4. blink标签的处理
5. requestFocus标签的处理
6. tag标签的处理
要实现布局文件XML的实例化,就需要读取XML的内容,把XML中的内容转换成view对象的相应属性。Android使用了XmlResourceParser来加载XML的内容。根据是否提供了XmlResourceParser对象和XML布局文件相应的resourceID,inflate()有多个重载函数:
public View inflate(@LayoutRes int resource, @Nullable ViewGroup root) {
return inflate(resource, root, root != null);
}
//如果只提供了resourceID,需要把XML布局文件资源加载到XmlResourceParser中
public View inflate(@LayoutRes int resource, @Nullable ViewGroup root, boolean attachToRoot) {
final Resources res = getContext().getResources();
if (DEBUG) {
Log.d(TAG, "INFLATING from resource: \"" + res.getResourceName(resource) + "\" ("
+ Integer.toHexString(resource) + ")");
}
final XmlResourceParser parser = res.getLayout(resource);
try {
return inflate(parser, root, attachToRoot);
} finally {
parser.close();
}
}
public View inflate(XmlPullParser parser, @Nullable ViewGroup root) {
return inflate(parser, root, root != null);
}
/*如果传进来的ViewGroup为null,那attachToRoot为false。表面此次infate()没有跟节点,
*执行完infate()函数后,需要返回一个view充当跟节点
*/
public View inflate(XmlPullParser parser, @Nullable ViewGroup root, boolean attachToRoot) {
synchronized (mConstructorArgs) {
Trace.traceBegin(Trace.TRACE_TAG_VIEW, "inflate");
final Context inflaterContext = mContext;
final AttributeSet attrs = Xml.asAttributeSet(parser);
Context lastContext = (Context) mConstructorArgs[0];
mConstructorArgs[0] = inflaterContext;
View result = root;
try {
// Look for the root node.
int type;
while ((type = parser.next()) != XmlPullParser.START_TAG &&
type != XmlPullParser.END_DOCUMENT) {
// Empty
}
if (type != XmlPullParser.START_TAG) {
throw new InflateException(parser.getPositionDescription()
+ ": No start tag found!");
}
final String name = parser.getName();
if (DEBUG) {
System.out.println("**************************");
System.out.println("Creating root view: "
+ name);
System.out.println("**************************");
}
//处理"merge"标签(XML中的首个标签为merge标签)
if (TAG_MERGE.equals(name)) {
//此标签下必须要传入跟节点,否则抛出异常
if (root == null || !attachToRoot) {
throw new InflateException("以上inflate()函数的处理过程,分别处理了首个标签为merge和首个标签非merge的情况,我们先来看正常标签的处理,也就是首个标签非merge的情况。else的处理
1. 正常标签的处理
else的过程有四个步骤:
- 根据标签创建对应的view对象
- 标签属性保存到LayoutParams中
- 递归处理后续标签
- 所有view对象组成一颗多叉树,返回其跟节点view
24步骤的过程inflate()函数中已经比较明了,不详细说明。13步骤的过程如下:
//根据标签tag创建view对象并返回
private View createViewFromTag(View parent, String name, Context context, AttributeSet attrs) {
return createViewFromTag(parent, name, context, attrs, false);
}
View createViewFromTag(View parent, String name, Context context, AttributeSet attrs,
boolean ignoreThemeAttr) {
if (name.equals("view")) {
name = attrs.getAttributeValue(null, "class");
}
//获取theme主题资源
// Apply a theme wrapper, if allowed and one is specified.
if (!ignoreThemeAttr) {
final TypedArray ta = context.obtainStyledAttributes(attrs, ATTRS_THEME);
final int themeResId = ta.getResourceId(0, 0);
if (themeResId != 0) {
context = new ContextThemeWrapper(context, themeResId);
}
ta.recycle();
}
//处理"blink"标签,直接返回一个BlinkLayout对象,BlinkLayout也是一个view。
if (name.equals(TAG_1995)) {
// Let's party like it's 1995!
return new BlinkLayout(context, attrs);
}
try {
View view;
//如果有实现自己的factory,执行其onCreateView()函数
if (mFactory2 != null) {
view = mFactory2.onCreateView(parent, name, context, attrs);
} else if (mFactory != null) {
view = mFactory.onCreateView(name, context, attrs);
} else {
view = null;
}
if (view == null && mPrivateFactory != null) {
view = mPrivateFactory.onCreateView(parent, name, context, attrs);
}
/*如果没有实现自己的factory,则执行LayoutInflater提供的onCreateView()
*或者createView()函数:
*/
if (view == null) {
final Object lastContext = mConstructorArgs[0];
mConstructorArgs[0] = context;
try {
//处理原生view
if (-1 == name.indexOf('.')) {
view = onCreateView(parent, name, attrs);
/*如果标签的名字包含”.”,则执行createView()。什么时候标签的名字有”.”,
*我们自定义view的时候,一般使用全限定类名,比如:
* com.demo.customview.CustomImageView,当然,原生的view我们也可以使用
* 全限定类名
*/
} else {
view = createView(name, null, attrs);
}
} finally {
mConstructorArgs[0] = lastContext;
}
}
return view;
} catch (InflateException e) {
throw e;
}......
}
//使用原生view时,第二个参数prefix会被赋值为"android.view."。而自定义的view为第二个参数prefix为null
protected View onCreateView(View parent, String name, AttributeSet attrs)
throws ClassNotFoundException {
return onCreateView(name, attrs);
}
protected View onCreateView(String name, AttributeSet attrs)
throws ClassNotFoundException {
return createView(name, "android.view.", attrs);
}
//通过反射获取view对象。反射时,需要知道该类的全限定类名,因此,原生view需要加上"android.view."为prefix的值
public final View createView(String name, String prefix, AttributeSet attrs)
throws ClassNotFoundException, InflateException {
Constructor extends View> constructor = sConstructorMap.get(name);
if (constructor != null && !verifyClassLoader(constructor)) {
constructor = null;
sConstructorMap.remove(name);
}
Classextends View> clazz = null;
try {
Trace.traceBegin(Trace.TRACE_TAG_VIEW, name);
if (constructor == null) {
// Class not found in the cache, see if it's real, and try to add it
clazz = mContext.getClassLoader().loadClass(
prefix != null ? (prefix + name) : name).asSubclass(View.class);
if (mFilter != null && clazz != null) {
boolean allowed = mFilter.onLoadClass(clazz);
if (!allowed) {
failNotAllowed(name, prefix, attrs);
}
}
constructor = clazz.getConstructor(mConstructorSignature);
constructor.setAccessible(true);
sConstructorMap.put(name, constructor);
} else {
// If we have a filter, apply it to cached constructor
if (mFilter != null) {
// Have we seen this name before?
Boolean allowedState = mFilterMap.get(name);
if (allowedState == null) {
// New class -- remember whether it is allowed
clazz = mContext.getClassLoader().loadClass(
prefix != null ? (prefix + name) : name).asSubclass(View.class);
boolean allowed = clazz != null && mFilter.onLoadClass(clazz);
mFilterMap.put(name, allowed);
if (!allowed) {
failNotAllowed(name, prefix, attrs);
}
} else if (allowedState.equals(Boolean.FALSE)) {
failNotAllowed(name, prefix, attrs);
}
}
}
Object lastContext = mConstructorArgs[0];
if (mConstructorArgs[0] == null) {
// Fill in the context if not already within inflation.
mConstructorArgs[0] = mContext;
}
Object[] args = mConstructorArgs;
args[1] = attrs;
final View view = constructor.newInstance(args);
if (view instanceof ViewStub) {
// Use the same context when inflating ViewStub later.
final ViewStub viewStub = (ViewStub) view;
viewStub.setLayoutInflater(cloneInContext((Context) args[0]));
}
mConstructorArgs[0] = lastContext;
return view;
}......
}
//首个标签处理结束后,接下来处理其子标签
final void rInflateChildren(XmlPullParser parser, View parent, AttributeSet attrs,
boolean finishInflate) throws XmlPullParserException, IOException {
rInflate(parser, parent, parent.getContext(), attrs, finishInflate);
}
//子标签的处理过程
void rInflate(XmlPullParser parser, View parent, Context context,
AttributeSet attrs, boolean finishInflate) throws XmlPullParserException, IOException {
final int depth = parser.getDepth();
int type;
boolean pendingRequestFocus = false;
//循环获取布局文件中的标签,根据标签的不同做相应的处理
while (((type = parser.next()) != XmlPullParser.END_TAG ||
parser.getDepth() > depth) && type != XmlPullParser.END_DOCUMENT) {
if (type != XmlPullParser.START_TAG) {
continue;
}
final String name = parser.getName();
//处理"requestFocus"标签
if (TAG_REQUEST_FOCUS.equals(name)) {
pendingRequestFocus = true;
consumeChildElements(parser);
//处理"tag"标签
} else if (TAG_TAG.equals(name)) {
parseViewTag(parser, parent, attrs);
//处理"include"标签
} else if (TAG_INCLUDE.equals(name)) {
if (parser.getDepth() == 0) {
throw new InflateException("通过以上源码,正常标签的处理过程还是比较清晰的。根据标签的不同,反射获取其对应的view对象,把标签的属性值保存到view对象的LayoutParams中,然后递归处理其子标签。并把所有的view对象组成一颗多叉树。返回跟节点view。
2. merge标签的处理
merge标签只在inflate()函数和rInflate()稍微处理了以下,后续子标签的处理跟正常标签的处理一样(rInflate()),并不复杂。见上面源码分析。
merge标签只能使用在XML的首个标签中,如果子标签中含有merge标签,会抛出异常。另外,merge标签本身并会转换成view对象。如果想优化布局,减少view的层层嵌套,建议使用merge标签。
正常的RelativeLayout 布局:
<RelativeLayout xmlns:android="http://schemas.android.com/apk/res/android"
    xmlns:tools="http://schemas.android.com/tools"
    android:layout_width="match_parent"
    android:layout_height="match_parent" >

    <TextView
        android:layout_width="wrap_content"
        android:layout_height="wrap_content"
        android:text="merge标签使用" />

RelativeLayout>
merge布局:
<merge xmlns:android="http://schemas.android.com/apk/res/android"
    xmlns:tools="http://schemas.android.com/tools"
    android:layout_width="match_parent"
    android:layout_height="match_parent" >

    <TextView
        android:layout_width="wrap_content"
        android:layout_height="wrap_content"
        android:text="merge标签使用" />

merge>
3. include标签的处理
include标签的使用:
<include layout="@layout/content_main" />
或者
<include layout="?attr/theme_layout" />
接上面源码中include标签的分析:
else if (TAG_INCLUDE.equals(name)) {
if (parser.getDepth() == 0) {
throw new InflateException("由于include标签可以把另外一个XML布局文件加入到LayoutInflater中进行解析,因此其parseInclude()解析过程比较长,主要的工作有几个方面:
- 确定include标签包含进来的XML布局文件存在
- 设置theme主题
- XML布局文件中的标签转换成view对象
- 标签属性保存到View的LayoutParams中
- 递归处理后续标签
- view的ID设置,VISIBLE可见性设置等
- 所有view对象组成一颗多叉树,返回其跟节点view
private void parseInclude(XmlPullParser parser, Context context, View parent,
AttributeSet attrs) throws XmlPullParserException, IOException {
int type;
//传进来的跟节点view必须是ViewGroup类型,否则抛出异常
if (parent instanceof ViewGroup) {
// Apply a theme wrapper, if requested. This is sort of a weird
// edge case, since developers think the overwrites
// values in the AttributeSet of the included View. So, if the
// included View has a theme attribute, we'll need to ignore it.
/*提取include标签所在的XML布局文件的theme主题(注意,attrs是传进来的,
*并不是include进来的XML布局文件的标签属性集)
*/
final TypedArray ta = context.obtainStyledAttributes(attrs, ATTRS_THEME);
final int themeResId = ta.getResourceId(0, 0);
final boolean hasThemeOverride = themeResId != 0;
if (hasThemeOverride) {
context = new ContextThemeWrapper(context, themeResId);
}
ta.recycle();
// If the layout is pointing to a theme attribute, we have to
// massage the value to get a resource identifier out of it.
//include标签中包含进来一个layout,必须要通过layoutID找到这个layout,要不然抛出异常
int layout = attrs.getAttributeResourceValue(null, ATTR_LAYOUT, 0);
if (layout == 0) {
final String value = attrs.getAttributeValue(null, ATTR_LAYOUT);
if (value == null || value.length() <= 0) {
throw new InflateException("You must specify a layout in the"
+ " include tag: tag doesn't support android:theme, so
// nothing special to do here.
rInflate(childParser, parent, context, childAttrs, false);
//处理正常的标签
} else {
//把标签转换成view对象
final View view = createViewFromTag(parent, childName,
context, childAttrs, hasThemeOverride);
final ViewGroup group = (ViewGroup) parent;
//获取 View 的 id 和其 Visiable 属性
final TypedArray a = context.obtainStyledAttributes(
attrs, R.styleable.Include);
final int id = a.getResourceId(R.styleable.Include_id, View.NO_ID);
final int visibility = a.getInt(R.styleable.Include_visibility, -1);
a.recycle();
// We try to load the layout params set in the 4. blink标签的处理
blink标签的使用:
blink标签的处理也比较简单,直接返回BlinkLayout对象。BlinkLayout其实就是一个FrameLayout,这个控件最后会将包裹内容一直闪烁(就和电脑版QQ消息提示一样)。
5. requestFocus标签的处理
requestFocus标签的使用:
    <EditText
        android:id="@+id/editText"
        android:layout_width="wrap_content"
        android:layout_height="wrap_content">
        <requestFocus />
    EditText>
接上面源码中requestFocus标签的处理:
        if (TAG_REQUEST_FOCUS.equals(name)) {
            pendingRequestFocus = true;
            consumeChildElements(parser);//消耗剩下的子标签
        }
    //requestFocus标签的使用是为了让父标签获得焦点,因此需要调用parent的获取焦点的函数
    if (pendingRequestFocus) {
        parent.restoreDefaultFocus();
    }
requestFocus标签已经是最小的标签了,一般requestFocus标签中不再放置其他标签了,如果谁还在requestFocus标签中再放入其他标签,不再做处理。直接读取到标签末尾。
final static void consumeChildElements(XmlPullParser parser)
        throws XmlPullParserException, IOException {
    int type;
    final int currentDepth = parser.getDepth();
    while (((type = parser.next()) != XmlPullParser.END_TAG ||
            parser.getDepth() > currentDepth) && type != XmlPullParser.END_DOCUMENT) {
        // Empty
    }
}
ViewGroup
//如果此view已经获得了焦点,那直接返回。否则调用父类View的restoreDefaultFocus()函数
public boolean restoreDefaultFocus() {
    if (mDefaultFocus != null
            && getDescendantFocusability() != FOCUS_BLOCK_DESCENDANTS
            && (mDefaultFocus.mViewFlags & VISIBILITY_MASK) == VISIBLE
            && mDefaultFocus.restoreDefaultFocus()) {
        return true;
    }
    return super.restoreDefaultFocus();
}
View
public boolean restoreDefaultFocus() {
    return requestFocus(View.FOCUS_DOWN);
}
public boolean requestFocus(int direction, Rect previouslyFocusedRect) {
    return requestFocusNoSearch(direction, previouslyFocusedRect);
}
//设置焦点
private boolean requestFocusNoSearch(int direction, Rect previouslyFocusedRect) {
    // need to be focusable
    if ((mViewFlags & FOCUSABLE) != FOCUSABLE
            || (mViewFlags & VISIBILITY_MASK) != VISIBLE) {
        return false;
    }

    // need to be focusable in touch mode if in touch mode
    if (isInTouchMode() &&
        (FOCUSABLE_IN_TOUCH_MODE != (mViewFlags & FOCUSABLE_IN_TOUCH_MODE))) {
           return false;
    }

    // need to not have any parents blocking us
    if (hasAncestorThatBlocksDescendantFocus()) {
        return false;
    }

    handleFocusGainInternal(direction, previouslyFocusedRect);
    return true;
}
6. tag标签的处理
根据官方的定义,tag标签是使用来标记view的。也可以用来在视图中存储数据,而不必另外新建一个数据结构。其中,id也就是其key值,需要保证是唯一的,否则会抛出IllegalArgumentException异常。一般如果我们在xml中定义了tag标签,其为我们生成的id是唯一的,但是如果单纯使用setTag()方法给view设置tag,建议在res/values/strings.xml中定义resources标签来生成key(ID),来确保唯一性。
tag标签的使用:
"@+id/tag"
    android:value="tag标签"/>
接上面源码中tag标签的处理:
        } else if (TAG_TAG.equals(name)) {
            parseViewTag(parser, parent, attrs);
        }
private void parseViewTag(XmlPullParser parser, View view, AttributeSet attrs)
throws XmlPullParserException, IOException {
final Context context = view.getContext();
final TypedArray ta = context.obtainStyledAttributes(attrs, R.styleable.ViewTag);
//获取tag标签的id
final int key = ta.getResourceId(R.styleable.ViewTag_id, 0);
//获取tag标签的value值
final CharSequence value = ta.getText(R.styleable.ViewTag_value);
//在view对象中保存id和value值
view.setTag(key, value);
ta.recycle();
consumeChildElements(parser);//消耗tag标签的子标签,不做其他任何处理
}View
//view中使用了SparseArray来保存tag值
private SparseArray疑问:
LayoutInflater加载过程中,theme主题的设置
include标签中theme主题的设置
参考:
https://blog.csdn.net/l540675759/article/details/78176074
https://www.cnblogs.com/ldq2016/p/5386646.html