AndroidUI系列 - ViewGroup实现瀑布流
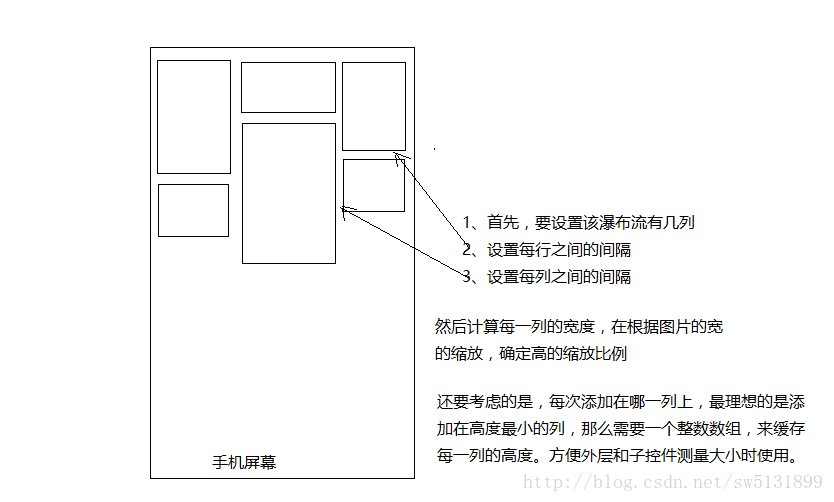
其实瀑布流现在用的越来越少了,更多的是使用MD的风格了。风靡一时的瀑布流现在渐渐地开始退居后幕了。不过,瀑布流也是个不错的自定义控件练习方式。相对简单的实现逻辑,可以帮助更好的更快的上手ViewGroup的自定义,以及onMeasure和onLayout等方法的理解和学习。先看看效果。
很简单的逻辑,外围能滑动,因为加了一层ScollView,当然也可以不加,为了方便就加了。
直接贴代码。
package com.example.administrator.myapplication.flow;

import android.content.Context;
import android.content.res.TypedArray;
import android.util.AttributeSet;
import android.view.View;
import android.view.ViewGroup;

import com.example.administrator.myapplication.R;

/**
 * Created by ShuWen on 2017/6/9.
 */

public class WaterFallLayout extends ViewGroup {

    private int mTop[];
    private int mColNumber = 3;//默认3列
    private int mHorozontalSpace = 20;//每列间隔20px
    private int mVerticalSpace = 20;//每行之间

    private int childWidth = 0;
    private int maxHeight = 0;
    private int minColNumber = 0;

    public WaterFallLayout(Context context) {
        super(context);
        init(context,null);
    }

    public WaterFallLayout(Context context, AttributeSet attrs) {
        super(context, attrs);
        init(context,attrs);
    }

    public WaterFallLayout(Context context, AttributeSet attrs, int defStyleAttr) {
        super(context, attrs, defStyleAttr);
        init(context,attrs);
    }

    private void init(Context context, AttributeSet attrs){
        TypedArray typedArray = context.obtainStyledAttributes(attrs, R.styleable.WaterFallLayout);
        mColNumber = typedArray.getInt(R.styleable.WaterFallLayout_mColNumber,3);
        mHorozontalSpace = DensityUtil.dip2px(context,typedArray.getDimension(R.styleable.WaterFallLayout_mHorozontalSpace,20));
        mVerticalSpace = DensityUtil.dip2px(context,typedArray.getDimension(R.styleable.WaterFallLayout_mVerticalSpace,20));
        mTop = new int[mColNumber];
    }

    @Override
    protected void onMeasure(int widthMeasureSpec, int heightMeasureSpec) {
        super.onMeasure(widthMeasureSpec, heightMeasureSpec);
        //测量模式
        int widthMeasureMode = MeasureSpec.getMode(widthMeasureSpec);
        int heightMeasureMode = MeasureSpec.getMode(heightMeasureSpec);

        //默认大小
        int widthMeasureSize = MeasureSpec.getSize(widthMeasureSpec);
        int heightMeasureSize = MeasureSpec.getSize(heightMeasureSpec);

        //测量之后的宽高
        int measuredWidth = 0;
        int measuredHeight = 0;

        //测量所有子控件
        for (int i = 0; i < getChildCount(); i++) {
            View view = getChildAt(i);
            measureChild(view,widthMeasureSpec,heightMeasureSpec);
        }

        //计算每列的宽
        childWidth = (widthMeasureSize - mColNumber * mHorozontalSpace) / 3;

        //计算控件的宽 若设置了确定的大小,就采用设置大小
        if (widthMeasureMode == MeasureSpec.EXACTLY) {
            measuredWidth = widthMeasureSize;
        } else {
            if (getChildCount() > mColNumber) {
                measuredWidth = widthMeasureSize;
            } else {
                measuredWidth = childWidth * getChildCount() + (getChildCount() - 1) * mHorozontalSpace;
            }
        }

        //计算控件的高 若设置了确定的大小,就采用设置大小
        if (heightMeasureMode == MeasureSpec.EXACTLY) {
            measuredHeight = heightMeasureSize;
        } else {
            measuredHeight = getMaxHeight();
        }

        setMeasuredDimension(measuredWidth, measuredHeight);
    }

    @Override
    protected void onLayout(boolean changed, int l, int t, int r, int b) {
        int left, top, right, bottom;
        //再次布局时,清除上次缓存数据
        clearTop();

        int childCount = getChildCount();
        for (int i = 0; i < childCount; i++) {
            View viewChild = getChildAt(i);
            int measuredHeight = viewChild.getMeasuredHeight();
            int measuredWidth = viewChild.getMeasuredWidth();

            int childHeight = measuredHeight * childWidth / measuredWidth;
            //找到最小高度列
            int minColNum = getMinColNumber();

            left = minColNum*(mHorozontalSpace + childWidth);
            top = mTop[minColNum];
            right = left+childWidth;
            bottom = top + childHeight;

            viewChild.layout(left,top,right,bottom);
            //记录每一行的高
            mTop[minColNum] += childHeight + mVerticalSpace;
        }
    }

    private void clearTop() {
        for (int i = 0; i < mTop.length; i++) {
            mTop[i] = 0;
        }
    }

    public int getMaxHeight() {
        for (int i = 0; i < mTop.length; i++) {
            if (mTop[i] > maxHeight){
                maxHeight = mTop[i];
            }
        }
        return maxHeight;
    }

    public int getMinColNumber() {
        for (int i = 0; i < mTop.length; i++) {
            if (mTop[minColNumber] > mTop[i]){
                minColNumber = i;
            }
        }
        return minColNumber;
    }
}
该控件对应的一些属性值。
<resources>
    <declare-styleable name="WaterFallLayout">
        <attr name="mColNumber" format="integer"/>
        <attr name="mHorozontalSpace" format="dimension"/>
        <attr name="mVerticalSpace" format="dimension"/>
    declare-styleable>
resources>
还有一个方法类,将dp转px。
package com.example.administrator.myapplication.flow;

import android.content.Context;

/**
 * Created by ShuWen on 2017/6/9.
 */

public class DensityUtil {
    /**
     * 根据手机的分辨率从 dp 的单位 转成为 px(像素)
     *
     * @param context
     * @param dpValue
     * @return
     * @date   2015年10月28日
     */
    public static int dip2px(Context context, float dpValue) {
        final float scale = context.getResources().getDisplayMetrics().density;
        return (int) (dpValue * scale + 0.5f);
    }

    /**
     * 根据手机的分辨率从 px(像素) 的单位 转成为 dp
     *
     * @param context
     * @param pxValue
     * @return
     * @date   2015年10月28日
     */
    public static int px2dip(Context context, float pxValue) {
        final float scale = context.getResources().getDisplayMetrics().density;
        return (int) (pxValue / scale + 0.5f);
    }
}
然后看看MainActivity
package com.example.administrator.myapplication;

import android.os.Bundle;
import android.support.v7.app.AppCompatActivity;
import android.view.ViewGroup;
import android.widget.ImageView;

import com.example.administrator.myapplication.flow.WaterFallLayout;

import java.util.Random;


public class MainActivity extends AppCompatActivity {

    WaterFallLayout waterfall;

    private static int IMG_COUNT = 5;

    @Override
    protected void onCreate(Bundle savedInstanceState) {
        super.onCreate(savedInstanceState);
        setContentView(R.layout.activity_main);
        waterfall = (WaterFallLayout) findViewById(R.id.waterfall);
        for (int i = 0; i < 20; i++) {
            ImageView imageView = new ImageView(this);
            imageView.setLayoutParams(new ViewGroup.LayoutParams(ViewGroup.LayoutParams.MATCH_PARENT, ViewGroup.LayoutParams.MATCH_PARENT));
            Random random = new Random();
            Integer num = Math.abs(random.nextInt());
            if (num % IMG_COUNT == 0) {
                imageView.setImageResource(R.drawable.a0);
            } else if (num % IMG_COUNT == 1) {
                imageView.setImageResource(R.drawable.a1);
            } else if (num % IMG_COUNT == 2) {
                imageView.setImageResource(R.drawable.a2);
            } else if (num % IMG_COUNT == 3) {
                imageView.setImageResource(R.drawable.a3);
            } else if (num % IMG_COUNT == 4) {
                imageView.setImageResource(R.drawable.a4);
            }else if (num % IMG_COUNT == 5) {
                imageView.setImageResource(R.drawable.a5);
            }
            waterfall.addView(imageView);
        }
    }


}
看看布局。
<RelativeLayout xmlns:android="http://schemas.android.com/apk/res/android"
    xmlns:tools="http://schemas.android.com/tools"
    android:layout_width="match_parent"
    android:layout_height="match_parent"
    xmlns:app="http://schemas.android.com/apk/res-auto"
    tools:context="com.example.administrator.myapplication.MainActivity">


    <ScrollView
        android:layout_width="match_parent"
        android:layout_height="match_parent">
        <com.example.administrator.myapplication.flow.WaterFallLayout
            android:id="@+id/waterfall"
            android:layout_width="wrap_content"
            android:layout_height="wrap_content"
            app:mColNumber="3"
            app:mHorozontalSpace="5dp"
            app:mVerticalSpace="5dp">

        com.example.administrator.myapplication.flow.WaterFallLayout>
    ScrollView>

RelativeLayout>
简单粗暴,这个例子有利于理解ViewGroup的一些计算逻辑,为其他复杂自定义控件打下基础。
