关于SeekBar的简单介绍
本篇博客主要讲解如何简单使用SeekBar(只是抛砖引玉,有什么错误的地方还请大神指出来),在查看源码的时候你会发现,seekbar其实是ProgressBar的子类,但是ProgressBar是不跟用户交互的,只是提供显示任务进度的作用,而SeekBar则是对ProgressBar的功能进行扩充,使其可以和用户进行交互,即响应用户的点击和拖动事件。
先来看一下本篇博客最终实现的效果图:

其中第一个SeekBar是系统原生的SeekBar,我没有对里面的属性进行任何的修改,而第二个Seek我自定义了它的progressDrawable和thumb。
好了,现在我们看一下如何实现效果图上的SeekBar。
首先在刚开始的时候提到过SeekBar是ProgressBar的子类,但是ProgressBar有两个Progress,分别为Progress和secondProgress,它们之间的默认的层级关系如下:
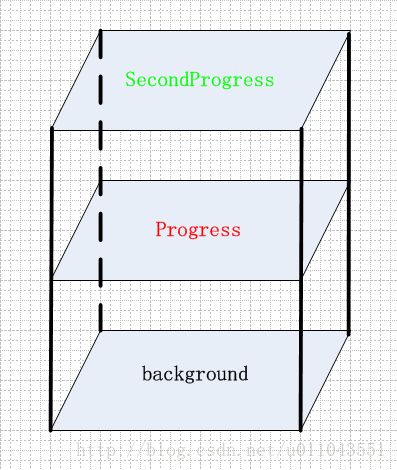
这个层级在不需要与用户拖动动作进行交互时是OK,一旦我们需要响应用户的拖动动作,又需要显示secondProgress,那么我们就需要更改一下它们之间的层级关系了(我也不清楚这样描述合不合理,有大神清楚的可以帮忙指出)。因为我们用户拖动改变的是progress的进度,也就是在处于第二层,试想一下,如果secondProgress的进度为100%的话,那岂不是我们怎么滑动都看不见progress(因为被遮挡了)。
所以我们需要在设置progressdrawable的时候重新设置一下它们的层级关系。
新的层级关系如下:

好了,我们通过代码更新secondprogress的进度,然后用户手动拖动改变的是progress的进度,不会存在遮挡的问题,像这种样式的进度条一般在视频播放或者音乐播放的场景下比较常见,因为这时需要更新两个任务的进度,一个是播放任务的进度,一个是缓冲任务的进度。(我看了一下网易音乐的UI,它的更牛X,在缓冲的时候thumb还是有环形progress的,这个后期在说吧!!)
下面看一下代码上的实现(主要是依靠xml文件的实现);
首先准备好以下素材:
SeekBar的背景、progress、secondProgress;这里提供一下供大家参考一下:
背景:
ic_line_black_24dp.xml
<vector xmlns:android="http://schemas.android.com/apk/res/android"
        android:width="200dp"
        android:height="3dp"
        android:viewportWidth="24.0"
        android:viewportHeight="24.0">
    <path
        android:fillColor="#FF000000"
        android:pathData="M0,13h24v-2L0,11v2z"/>
vector>
progress:
ic_line_red_24dp.xml
<vector xmlns:android="http://schemas.android.com/apk/res/android"
        android:width="200dp"
        android:height="3dp"
        android:viewportWidth="24.0"
        android:viewportHeight="24.0">
    <path
        android:fillColor="#FFFF0000"
        android:pathData="M0,13h24v-2L0,11v2z"/>
vector>
secondProgress:
ic_line_green_24dp.xml
<vector xmlns:android="http://schemas.android.com/apk/res/android"
        android:width="200dp"
        android:height="3dp"
        android:viewportWidth="24.0"
        android:viewportHeight="24.0">
    <path
        android:fillColor="#FF00FF00"
        android:pathData="M0,13h24v-2L0,11v2z"/>
vector>
这里拿到的drawable我们还不能直接使用,需要将其转换成clipDrawable,通过使用clip标签进行转换,文件如下:
main_progress_drawable.xml
<clip xmlns:android="http://schemas.android.com/apk/res/android"
    android:drawable="@drawable/ic_line_red_24dp">

clip>
second_progress_drawable.xml:
<clip xmlns:android="http://schemas.android.com/apk/res/android"
    android:drawable="@drawable/ic_line_green_24dp">
clip>
现在我们可以利用我们准备好的素材设置我们的seekbar了,seekbar的progressDrawable如下:
progress_drawable.xml:
<layer-list xmlns:android="http://schemas.android.com/apk/res/android">
    <item
        android:id="@android:id/background"
        android:drawable="@drawable/ic_line_black_24dp" />
    <item
        android:id="@android:id/secondaryProgress"
        android:drawable="@drawable/second_progress_drawable" />
    <item
        android:id="@android:id/progress"
        android:drawable="@drawable/main_progress_drawable" />
layer-list>
这里我们又用到了layer-list标签,通过标签就可以看到,这玩意可以影响一个view的层级,注意每个item的android:id这个属性的值,这个与seekbar应用的布局中声明的id是对应的。在这个layer-list标签中,我们将progress置于secondProgress的上面,解决了层级间的遮挡问题。
主布局文件:
activity_layout.xml:
<RelativeLayout xmlns:android="http://schemas.android.com/apk/res/android"
    android:layout_width="match_parent"
    android:layout_height="match_parent"
    android:background="@android:color/transparent">

    <SeekBar
        android:layout_alignParentTop="true"
        android:layout_width="match_parent"
        android:layout_height="wrap_content" />

    <SeekBar
        android:layout_alignParentLeft="true"
        android:layout_centerInParent="true"
        android:background="@android:color/transparent"
        android:id="@+id/seekBar"
        android:layout_width="match_parent"
        android:layout_height="wrap_content"
        android:progressDrawable="@drawable/progress_drawable"
        android:thumb="@drawable/test" />
    <Button
        android:onClick="startTest"
        android:layout_alignParentBottom="true"
        android:text="Start Test"
        android:textAllCaps="false"
        android:layout_width="match_parent"
        android:layout_height="wrap_content" />
RelativeLayout>
附加一段测试代码:
package com.example.zhuyuqiang.helloworld;

import android.os.CountDownTimer;
import android.support.v7.app.AppCompatActivity;
import android.os.Bundle;
import android.view.View;
import android.widget.SeekBar;

public class MainActivity extends AppCompatActivity {

    private SeekBar mSeekBar;
    @Override
    protected void onCreate(Bundle savedInstanceState) {
        super.onCreate(savedInstanceState);
        setContentView(R.layout.activity_main);
        mSeekBar = (SeekBar)findViewById(R.id.seekBar);
    }

    @Override
    protected void onResume() {
        super.onResume();

    }

    public void startTest(View view){
        mSeekBar.setProgress(0);
        mSeekBar.setSecondaryProgress(0);
        new CountDownTimer(10000,100){
            @Override
            public void onTick(long millisUntilFinished) {
                android.util.Log.e("zyq","time = "+millisUntilFinished);
                mSeekBar.setSecondaryProgress(100-(int) (millisUntilFinished/100));
            }

            @Override
            public void onFinish() {
                mSeekBar.setSecondaryProgress(100);
                new CountDownTimer(10000,100){
                    @Override
                    public void onTick(long millisUntilFinished) {
                        mSeekBar.setProgress(100-(int) (millisUntilFinished/100));
                    }

                    @Override
                    public void onFinish() {
                        mSeekBar.setProgress(100);
                    }
                }.start();
            }
        }.start();
    }
}
在点击事件中,先更新secondProgress的进度,也就是我们假想中的缓冲进度,然后更新progress的进度。有兴趣的可以自己根据代码重新试一下,在这里就不多说了!!!
有兴趣的朋友可以以关注我,遇到问题大家一起讨论一下!!