Android ButterKnife依赖注入框架的引入和使用
转自: http://blog.csdn.net/yayun0516/article/details/52713324
欢迎Follow我的GitHub, 关注我的CSDN. 其余参考Android目录.
ButterKnife依赖注入框架的引入和使用 --由吧主转载
推荐文章:
如果你喜欢上了一个程序员小伙,献给所有的程序员女友
俗话说:“不会偷懒的程序员不是好的程序员!”。作为一名Android开发,是不是经常厌烦了大量的findViewById以及setOnClickListener代码,而ButterKnife是一个专注于Android系统的View注入框架,让你从此从这些臃肿的代码中解脱出来。
首先看一下在Android Studio中引入ButterKnife步骤如下:
在项目上右键,选择Open Module Settings,如下:
选择APP->dependencies->“加号”->Library dependency如下:
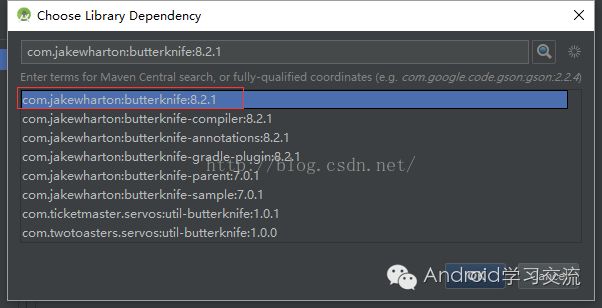
输入butterknife如下:
选中目标点击OK,可以看出最新的ButterKnife已经升级到了8.2.1版本。还需要配置两个文件:
1.在project的build.gradle中
2.在module的build.gradle中
这时butterknife的环境就配置好了,可以运行测试一下:
xml version="1.0" encoding="utf-8"?>
xmlns:android="http://schemas.android.com/apk/res/android"
    android:layout_width="match_parent"
    android:layout_height="match_parent">

            android:id="@+id/tv1"
        android:layout_width="match_parent"
        android:layout_height="wrap_content"
        android:gravity="center"
        android:text="Hello World!"
        android:textSize="18sp" />
MainActivity.Java如下:
package com.example.administrator.myapplication;

import android.os.Bundle;
import android.support.v7.app.AppCompatActivity;
import android.widget.TextView;

import butterknife.BindView;
import butterknife.ButterKnife;

public class MainActivity extends AppCompatActivity {
    @BindView(R.id.tv1)
    TextView tv1;
    @Override
    protected void onCreate(Bundle savedInstanceState) {
        super.onCreate(savedInstanceState);
        setContentView(R.layout.activity_main);
        ButterKnife.bind(this);
        tv1.setText("Hello ButterKnife");
    }
}
调用@BindView传入TextView的id,然后在下面声明变量tv1,最后在onCreate方法中调用ButterKnife的bind方法绑定控件。
运行实例如下:
OK,届时butterknife引入成功!
下面看一下,引入Button的点击事件监听,布局文件如下:
xml version="1.0" encoding="utf-8"?>
xmlns:android="http://schemas.android.com/apk/res/android"
    android:layout_width="match_parent"
    android:layout_height="match_parent"
    android:orientation="vertical">

            android:id="@+id/tv1"
        android:layout_width="match_parent"
        android:layout_height="wrap_content"
        android:gravity="center"
        android:text="Hello World!"
        android:textSize="18sp" />
            android:id="@+id/btn1"
        android:text="BUTTON1"
        android:layout_width="match_parent"
        android:layout_height="wrap_content" />
MainActivity.java:
@BindView(R.id.btn1)
Button btn1;
@OnClick(R.id.btn1)
public void test(View view) {
    Toast.makeText(MainActivity.this, "test", Toast.LENGTH_SHORT).show();
}
@Onclick传入Button的id为Button设置点击事件监听,运行实例如下:
推荐文章
1、Android面试经验大解密
2、Android的viewHolder模式解剖
3、Android中必须学习的七大开源项目(开发项目必看)
4、如何自学Android, 教大家玩爆Android(成为大神必看)
5、2016 Google hosts 持续更新【更新 于:2016-08-27】(免费必备)
6、Android面试经验总结(面试成功必备)
7、Android Studio 个性化设置(装逼必备)
8、Android Studio 2.2 正式起航(玩爆Android Studio 2.2必备)
Android Studio 2.2 新功能实例代码:
Android Studio 2.2新功能实例源码(玩爆Android Studio 2.2必备)
Android Studio 2.2新功能介绍:
What's new in Android development tools - Google I/O 2016(YouTube视频需要自备梯子)
【GitHub】https://github.com/xiaole0310
【csdn博客】http://blog.csdn.net/xiaole0313
【新浪微博】http://weibo.com/u/5439466748
【知乎】http://www.zhihu.com/people/yang-shou-le
【简书】http://www.jianshu.com/users/1a47e8afa34a
【技术群】279126311 [满]
【技术群】484572225 [未]
【Email】[email protected]
Android Studio 2.2 新功能实例代码:
Android Studio 2.2新功能实例源码(玩爆Android Studio 2.2必备)
如果你有好的文章想和大家分享,欢迎投稿,直接向我投递文章链接即可。
欢迎扫描关注我们的微信公众号(ysle_0313),不要错过每一篇干货~
一键关注我们微信公众号 ysle_0313


