Hadoop大数据框架研究(5)——ArcGIS Enterprise(Linux)之GeoAnalyticsServer的集群环境部署
近期对hadoop生态的大数据框架进行了实际的部署测试,并结合ArcGIS平台的矢量大数据分析产品进行空间数据挖掘分析。本系列博客将进行详细的梳理、归纳和总结,以便相互交流学习。
ArcGIS Enterprise (V10.5)作为新一代ArcGIS服务器端产品,包含了Datastore、Server、Portal、WebAdaptor四个基本组件。其部署模式可以根据不用的应用场景、机器环境灵活配置。实际大数据分析环境多数都是Linux环境,因此,我这准备了四个CentOS7的虚拟机来搭建Linux环境下的ArcGIS矢量大数据分析集群。
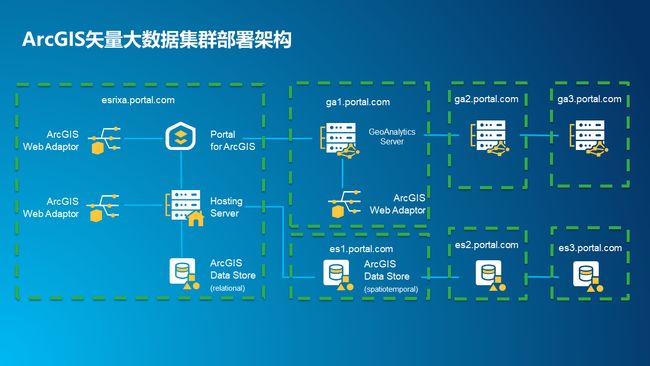
为了方便后期扩展,集群部署策略选择为:150搭建ArcGIS Enterprise基础环境,安装Portal、托管Server、托管的关系型Datastore、Portal与Server各自的WebAdaptor;151搭建nfs共享目录(生产环境建议存储与计算节点分开),作为GA集群的站点目录,安装GA Server;152搭建时空大数据存储的Datastore环境;后期可以根据应用需要随时扩展计算与时空大数据存储节点,如集群架构图示意。本测测试环境只扩展了计算节点,增加153机器,部署GA Server,并加入到152的GA站点。
A.部署规划:
192.168.0.150 esrixa.portal.com——Portal、Host Server、Datastore(托管关系型)、WebAdaptor
192.168.0.151 ga1.portal.com——GA Server、GA站点nfs共享目录
192.168.0.152 es1.portal.com——DataStore(时空大数据存储)
192.168.0.153 ga2.portal.com——GA Server
B.虚拟机环境准备(参考基础环境准备博客)
1.机器名及网络环境配置;
2.添加hosts相关机器;
3.关闭和禁用防火墙;
4.JDK的配置;
5.创建arcgis用户和用户组;
6.解除 Linux 系统的最大进程数和最大文件打开数限制;
7.虚拟机与本地共享目录配置;
C.Enterprise基础环境搭建(150机器)
1.确保创建arcgis用户和用户组,使用arcgis账号执行arcgis相关产品安装;
2.通过本地共享目录连接安装介质,并拷贝到arcgis账号下的相关目录中
[arcgis@esrixa ~]$ cd /mnt/hgfs/vmwareFiles
[arcgis@esrixa vmwareFiles]$ cp ArcGIS_Server_Linux_1051_156429.tar.gz /home/arcgis/arcgis105/
3.确保arcgis账号的相关权限,开始解压并执行安装程序,首先安装ArcGIS Server;
[arcgis@esrixa arcgis105]$ tar -zxvf ArcGIS_Server_Linux_1051_156429.tar.gz
[arcgis@esrixa ArcGISServer]$ ./Setup -m console
========================================================================
                  ArcGIS Server 10.5.1 Diagnostic Tool
                        Hostname: esrixa.portal.com
========================================================================
 DIAG000: Check for installation as root                       [PASSED]
 DIAG001: Check for 64-bit architecture                        [PASSED]
 DIAG002: Check OS version                                     [PASSED]
 DIAG003: Check hostname for invalid characters                [PASSED]
 DIAG024: Check /etc/hosts for hostname entry                  [PASSED]
 DIAG004: Check installed packages                             [PASSED]
 DIAG005: Check system limits                                  [PASSED]
 DIAG008: Check HTTP port                                      [PASSED]
 DIAG009: Check HTTPS port                                     [PASSED]
 DIAG010: Check Xvfb ports                                     [PASSED]
------------------------------------------------------------------------
There were 0 failure(s) and 0 warning(s) found:
Enter 'q' to quit or press enter to continue:
确认各个验证都通过后,回车继续,一路回车,指定安装路径或者同意默认路径/home/arcgis/arcgis/server。
DO YOU ACCEPT THE TERMS OF THIS LICENSE AGREEMENT? (Y/N): y
===============================================================================
Choose Install Folder
---------------------
Where would you like to install?
  Default Install Folder: /home/arcgis/arcgis/server
ENTER AN ABSOLUTE PATH, OR PRESS  TO ACCEPT THE DEFAULT
直到提示指定授权文件,确保arcgis账号有授权文件的相关权限及授权文件的许可功能与安装产品对应。
===============================================================================
Authorization File
------------------
Please enter the full path to your authorization file provided by Esri.
Example:
/path/to/server.ecp
Path: (Default: /path/to/file.ecp): /home/arcgis/arcgis105/server.ecp
如果授权失败,可以使用安装目录下的工具授权authorizeSoftware,授权成功后通过浏览器创建站点就和windows没有区别。
===============================================================================
Installation Complete
---------------------
ArcGIS Server 10.5.1 has been successfully installed to:
/home/arcgis/arcgis/server
However, the software authorization was not completed successfully.
You can retry the software authorization by running the script
/home/arcgis/arcgis/server/tools/authorizeSoftware.
PRESS  TO EXIT THE INSTALLER:
4.同样的操作,解压并安装Portal for ArcGIS
[arcgis@esrixa PortalForArcGIS]$ ./Setup -m console
========================================================================
                Portal for ArcGIS 10.5.1 Diagnostic Tool
                        Hostname: esrixa.portal.com
========================================================================
 DIAG000: Check for installation as root                       [PASSED]
 DIAG001: Check for 64-bit architecture                        [PASSED]
 DIAG002: Check OS version                                     [PASSED]
 DIAG003: Check hostname for invalid characters                [PASSED]
 DIAG005: Check system limits                                  [PASSED]
 DIAG004: Check installed packages                             [PASSED]
 DIAG016: Check Portal for ArcGIS ports                        [PASSED]
 DIAG024: Check localhost resolution                           [PASSED]
 DIAG029: Check file system type                               [PASSED]
------------------------------------------------------------------------
There were 0 failure(s) and 0 warning(s) found:
Enter 'q' to quit or press enter to continue:
通过验证后,一路回车,指定安装路径或者接受默认路径:/home/arcgis/arcgis
DO YOU ACCEPT THE TERMS OF THIS LICENSE AGREEMENT? (Y/N): y
===============================================================================
Choose Install Folder
---------------------
Where would you like to install?
  Default Install Folder: /home/arcgis/arcgis
ENTER AN ABSOLUTE PATH, OR PRESS  TO ACCEPT THE DEFAULT
直到提示指定授权文件
===============================================================================
Authorization File
------------------
Please enter the full path to your authorization file provided by Esri.
Example:
/path/to/portal.ecp
Path: (Default: /path/to/file.ecp): /home/arcgis/arcgis105/portal.ecp
安装完成后,浏览器初始化portal
===============================================================================
Installation Complete
---------------------
Congratulations. Portal for ArcGIS 10.5.1 has been successfully installed to:
/home/arcgis/arcgis/portal
You will be able to access Portal for ArcGIS 10.5.1 by navigating to
https://localhost:7443/arcgis/home.
PRESS  TO EXIT THE INSTALLER:
5.同样的操作,解压并安装ArcGISDataStore
[arcgis@esrixa ArcGISDataStore_Linux]$ ./Setup -m silent -l yes
========================================================================
                ArcGIS Data Store 10.5.1 Diagnostic Tool
                        Hostname: esrixa.portal.com
========================================================================
 Check for installation as root                                [PASSED]
 Check for 64-bit architecture                                 [PASSED]
 Check OS version                                              [PASSED]
 Check hostname for invalid characters                         [PASSED]
 Check installed packages                                      [PASSED]
 Check ArcGIS Data Store ports                                 [PASSED]
 Check hostname IP address mismatches                          [PASSED]
 Check Spatiotemporal big data store requirements              [WARNING]
------------------------------------------------------------------------
There were 0 failure(s) and 1 warning(s) found:
WARNINGS:
------------------------------------------------------------------------
*** Check Spatiotemporal big data store requirements: If you will
be using Spatiotemporal big data store, please check the system
requirements.  One or more Spatiotemporal big data store requirements
were not met:
     1.) The vm.max_map_count is set too low (65530). Run sysctl -w
     vm.max_map_count=262144 or set vm.max_map_count to at least 262144
     in /etc/sysctl.conf:
	vm.max_map_count = 262144
     2.) Memory swappiness is set to 30.  Set vm.swappiness to 1 in
     /etc/sysctl.conf:
	vm.swappiness = 1
Note: For changes to /etc/sysctl.conf to take effect you should run
sysctl -p or restart the system.
[ArcGIS Data Store 10.5.1 Installation Details]
UI Mode..................silent
Agreed to Esri License...yes
Installation Directory.../home/arcgis/arcgis/datastore
如果没有设置/etc/sysctl.conf的虚拟内存空间及内存交换权重,会有相关提示。
Starting installation of ArcGIS Data Store 10.5.1...
...ArcGIS Data Store 10.5.1 installation is complete.
You will be able to configure ArcGIS Data Store 10.5.1 by navigating to https://localhost:2443/arcgis/datastore.
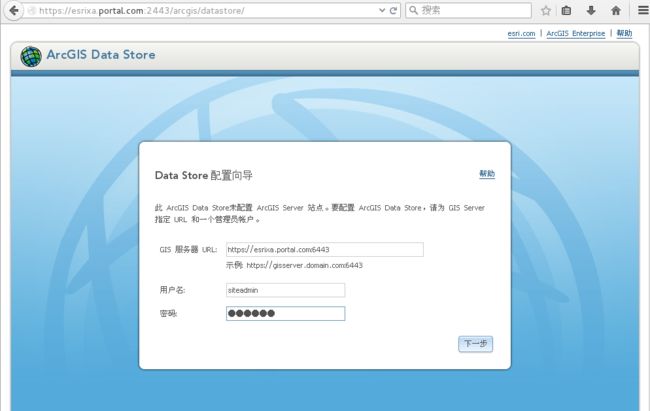
安装完成后使用浏览器进去配置,输入Server地址及账号密码,选择前两个,托管关系型和缓存切片。
6.检查JDK环境并部署及配置Tomcat
[arcgis@esrixa ~]$ java -version
[root@esrixa hgfs]# cd /mnt/hgfs/vmwareFiles
[root@esrixa vmwareFiles]# cp apache-tomcat-8.5.23.zip /usr/local
[root@esrixa vmwareFiles]# cd /usr/lcoal
[root@esrixa local]# unzip apache-tomcat-8.5.23.zip
[root@esrixa local]# rm -rf apache-tomcat-8.5.23.zip
[root@esrixa local]# mv apache-tomcat-8.5.23 tomcat8
在Linux下只能选择Tomcat作为Web容器来部署WebAdaptor,因此,需要创建密钥及自签名证书。
[root@esrixa tomcat8]# openssl req -newkey rsa:2048 -nodes -keyout /usr/local/tomcat8/esrixa.key -x509 -days 365 -out /usr/local/tomcat8/esrixa.crt
Generating a 2048 bit RSA private key
.......................................................+++
.............................................................+++
writing new private key to '/usr/local/tomcat8/esrixa.key'
-----
You are about to be asked to enter information that will be incorporated
into your certificate request.
What you are about to enter is what is called a Distinguished Name or a DN.
There are quite a few fields but you can leave some blank
For some fields there will be a default value,
If you enter '.', the field will be left blank.
-----
Country Name (2 letter code) [XX]:cn
State or Province Name (full name) []:shanxi
Locality Name (eg, city) [Default City]:xian
Organization Name (eg, company) [Default Company Ltd]:esri
Organizational Unit Name (eg, section) []:arcgis
Common Name (eg, your name or your server's hostname) []:esrixa.portal.com
Email Address []:[email protected]
[root@esrixa tomcat8]# openssl pkcs12 -inkey /usr/local/tomcat8/esrixa.key -in /usr/local/tomcat8/esrixa.crt -export -out /usr/local/tomcat8/esrixa.pfx
Enter Export Password:
Verifying - Enter Export Password:
[root@esrixa tomcat8]#
配置Tomcat
[root@esrixa tomcat8]# cat /usr/local/tomcat8/conf/server.xml


    keystoreFile="/usr/local/tomcat8/esrixa.pfx" keystoreType="pkcs12" keystorePass="arcgis" >


[root@esrixa tomcat8]# 以root用户启动tomcat并验证,浏览器输入https://esrixa.portal.com能够出现tomcat页面即配置成功。
[root@esrixa bin]# ./startup.sh
Using CATALINA_BASE:   /usr/local/tomcat8
Using CATALINA_HOME:   /usr/local/tomcat8
Using CATALINA_TMPDIR: /usr/local/tomcat8/temp
Using JRE_HOME:        /usr/local/jdk1.8.0_151
Using CLASSPATH:       /usr/local/tomcat8/bin/bootstrap.jar:/usr/local/tomcat8/bin/tomcat-juli.jar
Tomcat started.
7.WebAdaptor安装及配置
[arcgis@esrixa vmwareFiles]$ cp Web_Adaptor_Java_Linux_1051_156442.tar.gz /home/arcgis/arcgis105
[arcgis@esrixa vmwareFiles]$ tar -zxvf Web_Adaptor_Java_Linux_1051_156442.tar.gz
[arcgis@esrixa arcgis105]$ cd webAdaptor
[arcgis@esrixa WebAdaptor]$ ./Setup -m silent -l yes
[arcgis@ga1 WebAdaptor]$ ./Setup -m silent -l yes
[ArcGIS Web Adaptor (Java Platform) 10.5.1 Installation Details]
UI Mode..................silent
Agreed to Esri License...yes
Installation Directory.../home/arcgis/webadaptor10.5.1
Starting installation of ArcGIS Web Adaptor (Java Platform) 10.5.1...
...ArcGIS Web Adaptor (Java Platform) 10.5.1 installation is complete.
安装完成后,配置WebAdaptor,需要拷贝 /home/arcgis/webadaptor10.5.1/java/arcgis.war,并重命名一个为server,也就是说使用arcgis作为portal的Adaptor,使用server作为托管Server的Adaptor。
[root@esrixa home]# cp /home/arcgis/webadaptor10.5.1/java/arcgis.war /usr/local/tomcat8/webapps/
[root@esrixa home]# cp /home/arcgis/webadaptor10.5.1/java/arcgis.war /usr/local/tomcat8/webapps/server.war
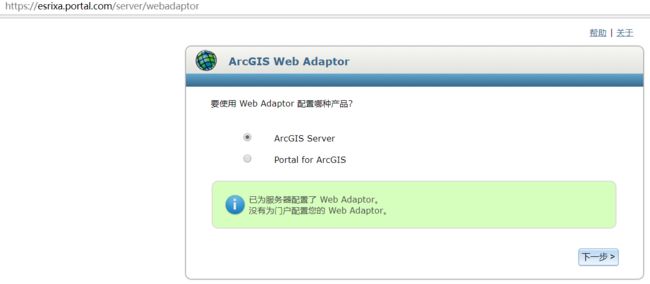
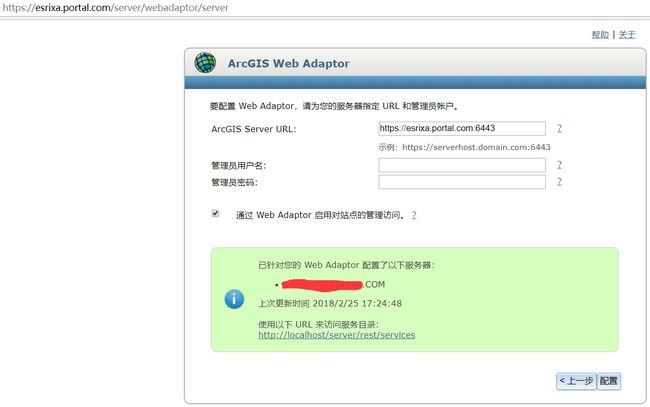
然后浏览器验证并为server和portal配置Adaptor——https://esrixa.portal.com/arcgis、https://esrixa.portal.com/server
如果出现问题需要重装时,可以在安装目录下找到卸载命令uninstall_ArcGISServer
[arcgis@esrixa server]$ ./uninstall_ArcGISServer
C.GA机器的安装及配置(151与153机器)
软件安装和Enterprise基础环境完全相同,只是许可功能必须包含GA Server的功能。另外,只有151的机器需要创建站点,153直接以机器的形式添加到151的站点当中。
1.nfs共享目录创建及本地目录挂载
[root@ga1 local]# mount -t nfs 192.168.0.151:/usr/local/nfsShareFiles /home/data/gaserver
2.安装完成后,创建站点时使用挂载共享目录的本地目录/home/data/gaserver
创建完登陆站点,可以查看站点信息
在站点下计算机选择添加计算机把ga2添加进来,然后可以在站点集群中查看集群包含ga1、ga2两个机器并且状态都是启动。
3.spark的Web UI配置
配置spark的WebUI可以看到正在进行任务的执行状态。在ga站点的/home/data/gaserver/config-store/platformservices目录下的三个目录中,进入下级找到Compute_Platform的config.json,设置enableWebUI:true。
[arcgis@ga1 ~]$ cd /home/data/gaserver/config-store/platformservices
{"id":"c5ef4642-e09b-44c4-b13c-e52e475524c0","type":"COMPUTE_PLATFORM","provider":"Spark",
"info":{"secretKey":"{crypt}QJBAebUvcBStEnsflweYcIp4fdqs2PyOFtoAkDzMriN4AG/AJ1fsZg==",
"clusterURL":"spark://GA2.PORTAL.COM:7077,GA1.PORTAL.COM:7077",
"enableWebUI":true,"ssl":false,"version":"1.6.0"}}
然后登陆ga站点的admin页面,重启计算平台服务。
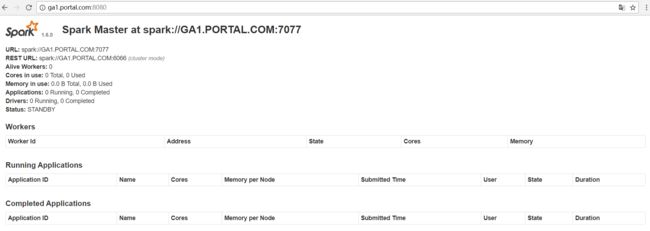
启动后检查平台服务下三个服务状态均正常时,浏览器输入http://ga2.portal.com:8080/和http://ga1.portal.com:8080/,可以看出spark集群和之前讲到HA集群模式一致。ga2为alive状态,ga1为standby状态。
{
   "id": "ce4df583-5926-469e-b005-489ae20f68e1",
   "type": "MESSAGE_BUS",
   "provider": "RabbitMQ",
   "info": {
       "password": "7043317a2b6d71775147666f714f4f55434d726c326e384d6367394b653252593041474f6d5446426c33453d",
       "platformTopics": ["arcgis-admin-events"],
       "port": 27271,
       "version": "3.2.3",
       "ssl": true,
       "user": "1d90c728-cdb8-457e-9d85-8660dc5c86a3"
   }
}
{
"id": "c5ef4642-e09b-44c4-b13c-e52e475524c0",
"type": "COMPUTE_PLATFORM",
"provider": "Spark",
"info": {
"secretKey": "{crypt}QJBAebUvcBStEnsflweYcIp4fdqs2PyOFtoAkDzMriN4AG/AJ1fsZg==",
"clusterURL": "spark://GA2.PORTAL.COM:7077,GA1.PORTAL.COM:7077",
"enableWebUI": true,
"ssl": false,
"version": "1.6.0"
}
}{
"id": "85082f3f-b95b-4220-ba66-609fd31f2170",
"type": "SYNCHRONIZATION_SERVICE",
"provider": "ZooKeeper",
"info": {
"connectionString": "GA2.PORTAL.COM:2181,GA1.PORTAL.COM:2181",
"port": 2181,
"zkLeaderElectionPort": 2190,
"zkPeerPort": 2182,
"ssl": false,
"version": "3.5.0-alpha"
}
}{
"configuredState": "STARTED",
"details": [
{
"machine": "GA2.PORTAL.COM",
"realtimeState": "STARTED"
},
{
"machine": "GA1.PORTAL.COM",
"realtimeState": "STARTED"
}
]
}D.时空大数据存储Datastore安装及配置(152机器)
1.修改Linux操作系统配置(设置swappiness和max_map_count,主要是配置时空大数据存储的datastore节点)swappiness,Linux内核参数,控制换出运行时内存的相对权重。swappiness参数值可设置范围在0到100之间。 低参数值会让内核尽量少用交换,更高参数值会使内核更多的去使用交换空间。默认值为60:当剩余物理内存低于40%(40=100-60)时,开始使用交换空间。
swappiness参数值说明:
vm.swappiness = 0 仅在内存不足的情况下,使用交换空间。
vm.swappiness = 1,进行最少量的交换,而不禁用交换。
vm.swappiness = 10,当系统存在足够内存时,推荐设置为该值以提高性能。
vm.swappiness = 60,默认值
vm.swappiness = 100,内核将积极的使用交换空间。
max_map_count代表进程能拥有的最多内存区域,elasticsearch至少需要262144
[root@es1 ~]$ vim /etc/sysctl.conf
[root@es1 ~]$ cat /etc/sysctl.conf
# System default settings live in /usr/lib/sysctl.d/00-system.conf.
#
# To override those settings, enter new settings here, or in an /etc/sysctl.d/.conf file
#
# For more information, see sysctl.conf(5) and sysctl.d(5).
vm.max_map_count=262144
vm.swappiness=1
[root@es1 ~]$ sysctl -p
2.安装Datastore,与esrixa上操作相同,输入esrixa.portal.com的站点信息,配置时空大数据存储类型。
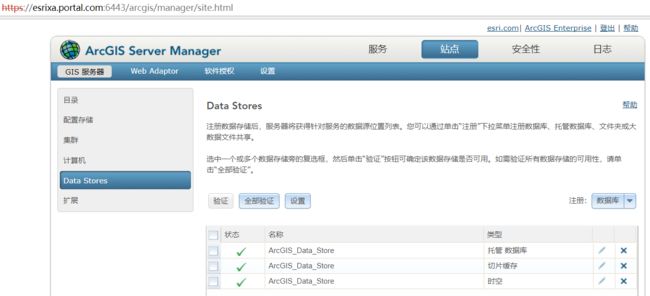
3.在esrixa.portal.com站点上验证配置的datastore,确保可用。
E.Enterprise联合配置
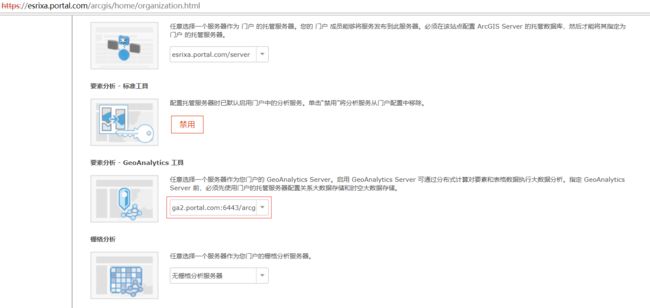
1.在esrixa.portal.com节点的portal配置相关服务器信息,添加esrixa.portal.com的server作为托管服务器,添加ga2.portal.com的server集群作为矢量大数据分析的服务器。
2.注册大数据文件共享——文件共享、HDFS和HIVE
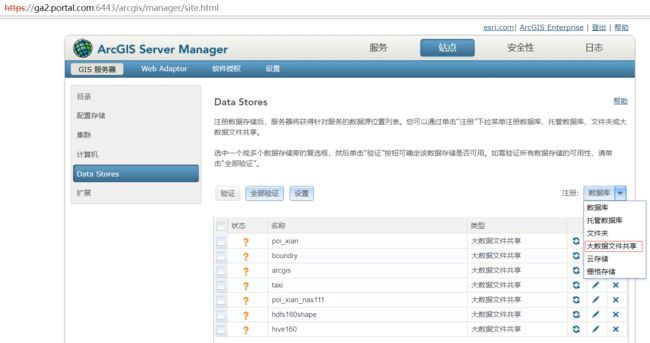
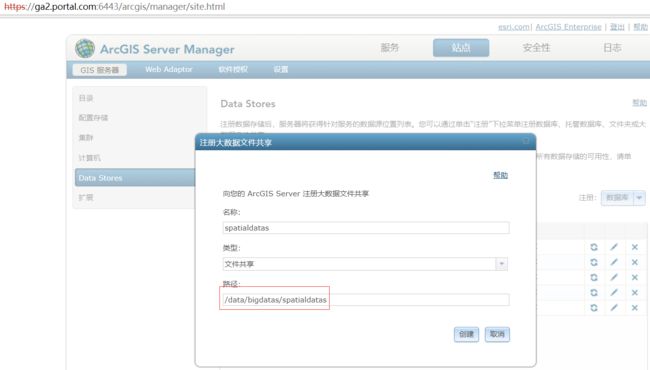
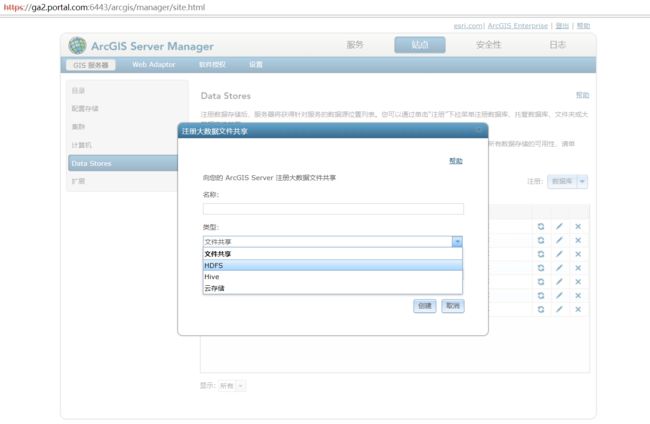
在ga站点管理页面的data stores节点,选择注册数据库后的小三角,可以注册大数据文件共享,类型可以选择文件共享、HDFS、HIVE、云存储四种。(注:大数据文件共享如果失败,可以尝试在ga站点机器注册)
a.文件共享配置及使用
数据目录:\\192.168.0.111\nas3\bigdatas\spatialdatas,其下有taxi目录包含csv数据,poi_xian包含shape数据;注册时以挂载到ga站点的本地目录(如:/data/bigdatas/spatialdatas)作为输入参数,然后可以根据数据类型进行相应配置。
b.hdfs注册与使用
在ga的站点中datastore下选择数据库后面的小三角,可以选择大数据文件共享,然后类型中选择hdfs
需要说明的是,即使配置HA高可用的hadoop集群环境,经过测试在注册hdfs时也只能选择active的节点,以ip或机器名加端口形式注册,其他形式(hdfs://HA/bigdatas)都不能成功。
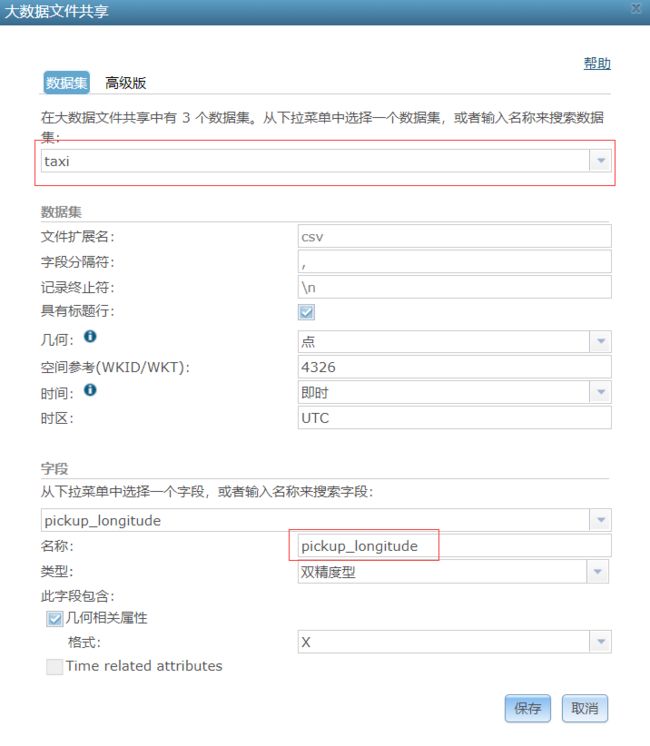
注册成功后,点击右侧编辑按钮进行相关配置,本测试环境使用纽约出租车数据(csv格式,单文件2g左右),选择bigdatas目录下的taxi目录,就是这里的数据集,csv数据在taxi目录下,配置主要是配置几何信息,选择字段分别对应后保存。
这样在portal中使用ga大数据分析工具是,选择浏览数据,就可以发现刚才配置hdfs存储的数据集,添加作为分析数据源。
c.hive注册与使用
注意连接地址是hive配置时设置的hive.metastore.uris值thrift://node1.gisxy.com:9083。同样,可以编辑数据的空间信息和时间格式。
F.使用测试
1.Portal环境在线使用ga矢量大数据分析工具
2.ArcGIS Pro种使用ga矢量大数据分析工具

