从零搭建 Spring Boot 后端项目(九)
单元测试
简介
单元测试是先mock一些正常边界异常条件来对接口进行操作,并且期望接口返回什么内容,最后接口实现了之后再重新测试一遍。单元测试要测试任何可能的错误,单元测试不是用来证明你是对的,而是为了证明你没有错。在TDD(Test-Driven Development)开发模式中,重点强调在开发功能代码之前,先编写测试代码。单元测试不仅仅用来保证当前代码的正确性,更重要的是用来保证代码修复、改进或重构之后的正确性。当然这里没有,而是给一个单元测试的模板,要注意的是,我们不要为了单测而单测
JUnit 5介绍
这里简单介绍一下我们会用的单测工具 JUnit 5 : JUnit 5 = JUnit Platform + JUnit Jupiter + JUnit Vintage,并且JUnit 5 只支持Java 8 及以上版本
- JUnit Platform: Junit Platform是在JVM上启动测试框架的基础
- JUnit Jupiter: JUnit Jupiter提供了JUnit5的新的编程模型,是JUnit5新特性的核心。内部包含了一个测试引擎,用于在Junit Platform上运行
- JUnit Vintage: 由于JUint已经发展多年,为了照顾老项目,JUnit Vintage提供了兼容JUnit4.x,Junit3.x的测试引擎
常用注解
- @Test表示方法是测试方法
- @DisplayName为测试类或者测试方法设置展示名称
- @DisplayNameGeneration 自定义名称生成器
- @BeforeEach表示在每个单元测试之前执行,在Junit4中,这个注解叫@Before
- @AfterEach表示在每个单元测试之后执行,在Junit4中,这个注解叫@After
- @BeforeAll表示在所有单元测试之前执行,但只会执行一次,在Junit4中是@BeforeClass
- @AfterAll表示在所有单元测试之后执行,但只会执行一次,在Junit4中是@AfterClass
- @Tag表示单元测试类别,类似于JUnit4中的@Categories
- @Disabled表示测试类或测试方法不执行,类似于JUnit4中的@Ignore
- @Timeout表示测试方法运行如果超过了指定时间将会返回错误
- @ExtendWith为测试类或测试方法提供扩展类引用
- @ParameterizedTest表示方法是参数化测试,测试方法执行时,自动添加一些参数
- @RepeatedTest表示方法可重复执行
- @TestFactory 测试工厂进行动态测试
- @TestTemplate 测试模板
- @TestMethodOrder 测试方法的执行顺序,默认是按照代码的前后顺序执行的
- @Nested 表示一个非静态的测试方法,也就是说@BeforeAll和@AfterAll对此方法无效,如果单纯地执行此方法,并不会触发这个类中的@BeforeAll和@AfterAll方法
JUnit5断言(Assertions类)
JUnit Jupiter附带了许多JUnit 4拥有的断言方法,并添加了一些可以很好地用于Java 8 lambdas的断言方法。
所有JUnit5断言都是 org.junit.jupiter.api.Assertions 中的静态方法断言类
- assertEquals 断言传入的预期值与实际值是相等的
- assertNotEquals 断言传入的预期值与实际值是不相等的
- assertArayEquals 断言传入的预期数组与实际数组是相等的
- assertNull 断言传入的对象是为空
- assertNotNull 断言传入的对象是不为空
- assertTrue 断言条件为真
- assertFalse 断言条件为假
- assertSame 断言两个对象引用同一个对象,相当于"==”
- assertNotSame 断言两个对象引用不同的对象,相当于"!=”
注:上面的每一个方法,都有对应的重载方法,可以在前面加一个String类型的参数,表示如果断言失败时的提示
使用 JUnit 5 注意事项
- 不用使用 System.out 方式输出,应该用断言类(Assertion),避免人眼对比结果
- 单元测试代码必须写在如下工程目录:src/test/java
- 和数据库相关的单元测试,可以设定自动回滚机制,不给数据库造成脏数据
- 核心业务、核心应用、核心模块的增量代码确保单元测试通过
- 对于单元测试,要保证测试粒度足够小,有助于精确定位问题,一般是方法级别,最多是类
- 单元测试代码需要维护
- 一个好的单测在重构和更改代码后,可以很快的帮助我们找到错误
步骤
每一层的单元测试,应该与项目结构相对应,这里我们分以 dao 层, service 层, controller 层分别写单测
- 因为我们的 springboot 2.3 版本引入 JUnit 5 作为单元测试默认库,所以,我们这里不用再手动导入包依赖了

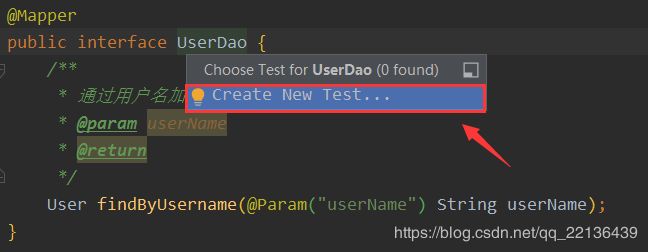
- 首先是测试dao层的单测示例,这里以UserDao为例,这里IDEA支持自动生成测试类,并且有两种方式,第一种,
Alt+Insert,然后选择Test,第二种,Ctrl + Alt +T,然后选择Create New Test...,这里之所以选择第二种方式,是因为,第二种方式,还有别的用法,之后会讲

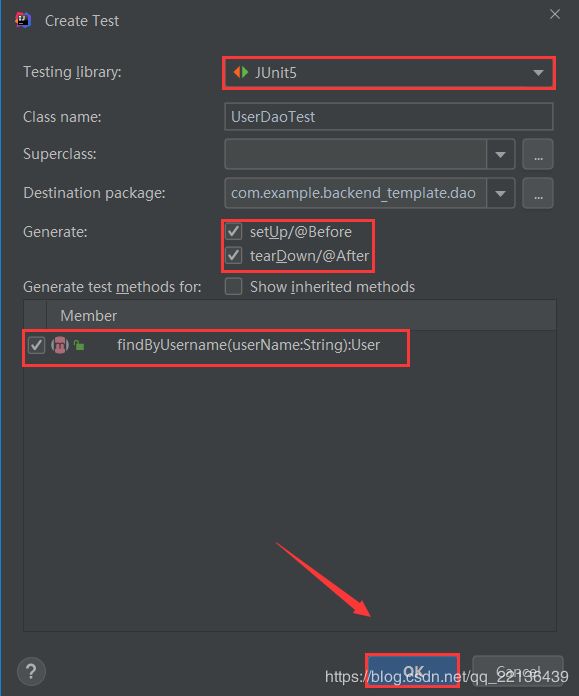
- 然后选择如下内容,最后点击OK键,即可自动生成测试类


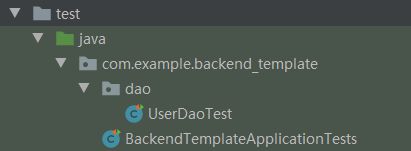
- 内容如下
package com.example.backend_template.dao; import org.junit.jupiter.api.AfterEach; import org.junit.jupiter.api.BeforeEach; import org.junit.jupiter.api.Test; import static org.junit.jupiter.api.Assertions.*; class UserDaoTest { @BeforeEach void setUp() { } @AfterEach void tearDown() { } @Test void findByUsername() { } } - 接下来做一个简单的断言测试,修改UserDaoTest类为如下所示(如果在测试类再按
Ctrl + Alt +T,则可以退回到被测试类,不用我们一层一层的找,很方便,再按Ctrl + Alt +T,就可以实现被测类与测试类之间的反复横跳了)
package com.example.backend_template.dao;

import org.junit.jupiter.api.AfterEach;
import org.junit.jupiter.api.BeforeEach;
import org.junit.jupiter.api.Test;
import org.springframework.beans.factory.annotation.Autowired;
import org.springframework.boot.test.context.SpringBootTest;
import org.springframework.transaction.annotation.Transactional;

import static org.junit.jupiter.api.Assertions.*;

//初始化SpringBoot上下文
@SpringBootTest
//提供事务功能
@Transactional
class UserDaoTest {

   @Autowired
   private UserDao userDao;

   //执行所有方法前都要执行的方法
   @BeforeEach
   void setUp() {
   }

   //执行所有方法后都要执行的方法
   @AfterEach
   void tearDown() {
   }

   @Test
   void findByUsername() {
       //通过断言测试,不会有提示
       assertNotNull(userDao.findByUsername("user"),"未找到该用户!");
   }
}
-
点击测试方法左边的启动按钮,即可测试该方法,当然也可以点击类上的启动按钮,这样会启动所有的测试方法,如果能成功运行,则说明单测成功了,反之为不通过(不通过分为断言失败,和代码错误,代码错误要更正)

-
接下来,我们还可以分别测试service层和controller层的类,这里先测试service下的RedisService类,这里只测
String get(String key)方法,自动生成的类如下package com.example.backend_template.service; import org.junit.jupiter.api.AfterEach; import org.junit.jupiter.api.BeforeEach; import org.junit.jupiter.api.Test; import static org.junit.jupiter.api.Assertions.*; class RedisServiceTest { @BeforeEach void setUp() { } @AfterEach void tearDown() { } @Test void get() { } } -
修改如下
package com.example.backend_template.service;

import org.junit.jupiter.api.AfterEach;
import org.junit.jupiter.api.BeforeEach;
import org.junit.jupiter.api.Test;
import org.springframework.beans.factory.annotation.Autowired;
import org.springframework.boot.test.context.SpringBootTest;

import static org.junit.jupiter.api.Assertions.*;

//初始化SpringBoot上下文
@SpringBootTest
class RedisServiceTest {

    @Autowired
    private RedisService redisService;

    //执行所有方法前都要执行的方法
    @BeforeEach
    void setUp() {
    }

    //执行所有方法后都要执行的方法
    @AfterEach
    void tearDown() {
    }

    @Test
    void get() {
        //通过断言测试,不会有提示
        assertNotNull(redisService.get("name"),"未找到该值!");
    }
}
这里你的断言可能通不过,因为你的redis里,可能并没有存name值,你可以根据自己的情况写一些断言这里只是简单示例而已
-
给controller/RedisController写单测,自动生成的代码如下
package com.example.backend_template.controller; import org.junit.jupiter.api.AfterEach; import org.junit.jupiter.api.BeforeEach; import org.junit.jupiter.api.Test; import static org.junit.jupiter.api.Assertions.*; class RedisControllerTest { @BeforeEach void setUp() { } @AfterEach void tearDown() { } @Test void setRedis() { } @Test void getRedis() { } } -
修改后的代码如下
package com.example.backend_template.controller; import org.junit.jupiter.api.AfterEach; import org.junit.jupiter.api.BeforeEach; import org.junit.jupiter.api.Test; import org.springframework.beans.factory.annotation.Autowired; import org.springframework.boot.test.context.SpringBootTest; import org.springframework.test.web.servlet.MockMvc; import org.springframework.test.web.servlet.RequestBuilder; import org.springframework.test.web.servlet.request.MockMvcRequestBuilders; import org.springframework.test.web.servlet.setup.MockMvcBuilders; import org.springframework.web.context.WebApplicationContext; import static org.springframework.test.web.servlet.result.MockMvcResultHandlers.print; import static org.springframework.test.web.servlet.result.MockMvcResultMatchers.status; //初始化SpringBoot上下文 @SpringBootTest class RedisControllerTest { @Autowired private WebApplicationContext wac; private MockMvc mockMvc; @BeforeEach void setUp() { mockMvc = MockMvcBuilders.webAppContextSetup(wac).alwaysDo(print()).build(); } @AfterEach void tearDown() { } @Test void setRedis() throws Exception { RequestBuilder request = MockMvcRequestBuilders.post("/redis/setRedis").content("L"); mockMvc.perform(request).andExpect(status().isOk()).andDo(print()); } @Test void getRedis() throws Exception { RequestBuilder request = MockMvcRequestBuilders.get("/redis/getRedis"); mockMvc.perform(request).andExpect(status().isOk()).andDo(print()); } } -
此时运行 setRedis() 测试方法后,返回的结果如下,其中 Body = true 表示,我们存储操作成功
... MockHttpServletResponse: Status = 200 Error message = null Headers = [Content-Type:"application/json"] Content type = application/json Body = true Forwarded URL = null Redirected URL = null Cookies = [] -
运行getRedis()测试方法后,返回的结果为,其中 Body = L 表示,我们的返回值
MockHttpServletResponse: Status = 200 Error message = null Headers = [Content-Type:"text/plain;charset=UTF-8", Content-Length:"1"] Content type = text/plain;charset=UTF-8 Body = L Forwarded URL = null Redirected URL = null Cookies = [] -
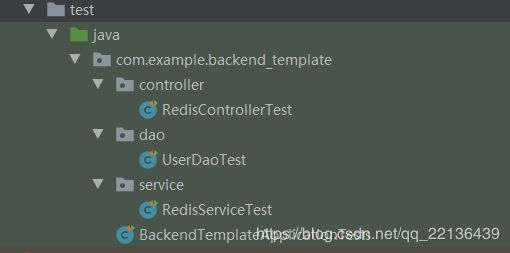
如下是最后的测试目录结构(以上的单元测试只是简单的示例,要写一个完备的单元测试,需要熟练的运用注解与断言,当然,写了一个好的单元测试后,你在回归测试或者重构代码时,会让你事半功倍)

项目地址
项目介绍:从零搭建 Spring Boot 后端项目
代码地址:https://github.com/xiaoxiamo/backend-template
下一篇
十、数据校验