搭建前端node服务器,用于前端开发过程中快速模拟接口请求和数据。(node.js + express)
前提说明
阅读本文的前提是,您已安装并了解node.js。
如果没有,请移步至node.js官网
跳过说明,直接使用? 请前往 github地址
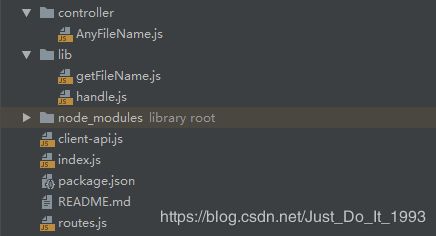
目录结构
开始
1. 创建package.json
{
  "name": "mock-server",
  "version": "1.0.0",
  "description": "node + express 前端专用服务器,用于提供接口、模拟mock数据",
  "main": "index.js",
  "author": "lee-xin",
  "license": "ISC",
  "scripts": {
    "mock": "node index.js"
  },
  "dependencies": {
    "express": "^4.16.4"
  }
}
2. 创建index.js (服务器运行文件)
const express = require('express')
const app = express()

// 使用routes文件批量设置路由
app.use('/', require('./routes'))

app.listen(3000, () => console.log('App listening on port 3000'))
3. 创建routes.js(接口路由)
const router = require('express').Router()

// 客户端接口,定义所有类型的接口(键值对),键名即接口名,和接口处理函数的名字相同(便于批量获取)
const clientApi = require('./client-api')

// 获取指定文件夹下所有文件的方法,返回Promise对象(异步)
const getFileName = require('./lib/getFileName')

// 存放接口处理函数的对象
let handleFunc = {}

getFileName('./controller').then(res => {
    // 读取文件
    res.forEach(file => {

        // 获取每个文件
        let fileName = file.split('.')[0];

        // 复制每个文件中的处理函数对象,存到handleFunc中
        Object.assign(handleFunc, require(`./controller/${fileName}`))
    })

    // 根据api接口名,匹配处理函数,并依次设置路由
    Object.keys(clientApi.getApi).forEach(apiKey => {

        if(handleFunc[apiKey]){
            router.get(clientApi.getApi[apiKey], handleFunc[apiKey])
        }
    })
    Object.keys(clientApi.postApi).forEach(apiKey => {

        if(handleFunc[apiKey]){
            router.post(clientApi.postApi[apiKey], handleFunc[apiKey])
        }
    })
}).catch(e => {
    console.log(e)
})

module.exports = router
4. 创建文件夹 lib(存放工具函数)
5. 在 lib 文件夹中创建getFileName.js(批量读取文件,用于自动读取接口处理函数)
/**
 * 读取文件夹下的所有文件
 */
const fs = require('fs')

module.exports = (foldPath) => {
    return new Promise((resolve, reject) => {
        fs.readdir(foldPath, (err, files) => {
            if(err){
                reject(err)
            } else {
                resolve(files)
            }
        })
    })
}
6. 在 lib 文件夹中创建handle.js(提供统一的方法,处理接口请求)
/**
 * 统一处理请求函数
 * @param req
 * @param res
 */

// 设置跨域
const setHeader = (res) => {
    res.header("Access-Control-Allow-Origin", "*");
    //允许的header类型
    res.header("Access-Control-Allow-Headers", "content-type");
    //跨域允许的请求方式
    res.header("Access-Control-Allow-Methods", "DELETE,PUT,POST,GET,OPTIONS");
}
const send401 = (req, res) => {
    setHeader(res)
    let data = {
        status: 401,
        description: '您的登录状态已失效,请重新登录'
    };
    res.status(401).send(data).end();
}
const send404 = (req, res) => {
    setHeader(res)
    let data = {
        status: 404,
        description: '404 Not Found'
    };
    res.status(404).send(data).end();
}
const send500 = (req, res, msg) => {
    setHeader(res)
    let data = {
        status: 500,
        description: msg || '404 Not Found'
    };
    res.status(500).send(data).end();
}
const sendSuccess = (req, res, data) => {
    setHeader(res)
    res.status(200).send(data).end();
}
const sendFailure = (req, res, err) => {
    setHeader(res)
    res.status(200).send(err).end();
}

module.exports = {
    send401,
    send404,
    send500,
    sendSuccess,
    sendFailure
}
7. 创建client-api.js (客户端接口声明)
/**
 * 后台所有接口,需要在这里声明
 * get类型的接口,在getApi中添加
 * post类型的接口,在postApi中添加
 * 注:接口名需要与controller文件夹中的处理函数一一对应
 */
const getApi = {
    testGet: '/testGetApi'
}

const postApi = {
    testPost: '/testPostApi'
}

module.exports = {
    getApi, postApi
}
8. 创建 controller 文件夹(存放后台接口文件)
9. 在 controller 文件夹中创建一个js文件或多个(名字不重复即可,用于提供单个接口处理函数),格式如下:
/**
 * 引入handle函数统一处理请求
 */
const handle = require('../lib/handle')

const testGet = (req, res) => {
    handle.sendSuccess(req, res, {
        code: 'req-success',
        success: true,
        msg: 'Request successfully !'
    })
}
const testPost = (req, res) => {
    handle.sendFailure(req, res, {
        code: 'req-fail',
        success: false,
        msg: 'Request failed'
    })
}

// 注:接口处理函数名,必须和routes.js中的接口名一一对应
module.exports = {
    testGet, testPost
}
运行
1. 安装依赖
$ npm install
国内可使用淘宝镜像。如何安装?
$ cnpm install
2. 运行
D:\项目文件夹\mock-server>npm run mock

> [email protected] mock D:\项目文件夹\mock-server
> node index.js

App listening on port 3000
测试
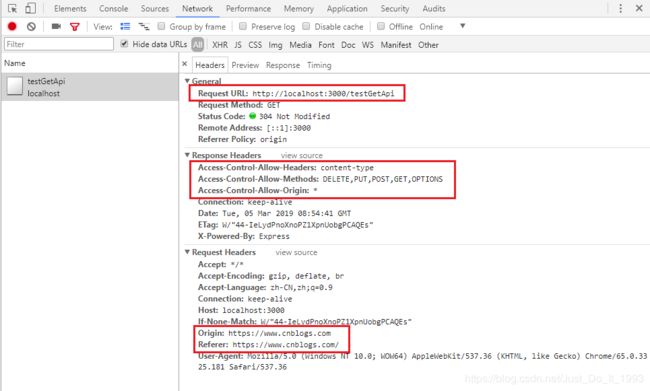
1. 在cnblog域名下请求成功(因为我们在接口处理函数中配置了跨域规则为 ‘*’)

2. 本地服务器请求成功

再次提醒
增加或修改接口,请在client-api.js中操作,并在controller文件夹中同步接口处理函数
如果您觉得对您有帮助,麻烦 github 给个star呗
如有问题,请在本文留言,或前往项目 issues 提出
