Centos6.5上安装MySQL各个版本数据库步骤(一)
1、mysql数据库下载地址
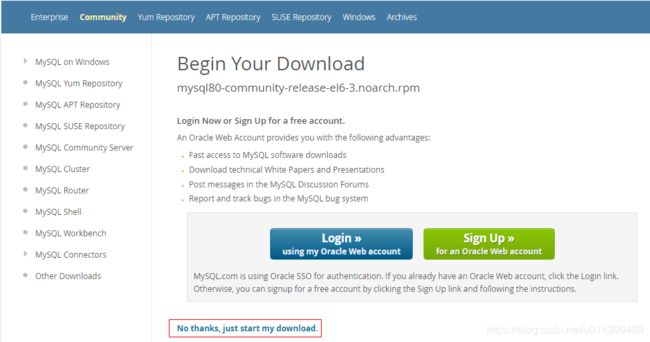
1)官网下载地址:https://dev.mysql.com/downloads/repo/yum/ 点击Download按钮下载,选择No thanks, just start my download 直接下载mysql的rpm文件,上传到服务器目录即可
2)如果网络好使用 wget https://dev.mysql.com/get/mysql80-community-release-el6-3.noarch.rpm 命令下载到服务器即可
2、安装mysql版本
1)安装mysql数据库之前需要检查当前系统是否已经安装mysql数据库

    [root@zero tools]# rpm -qa | grep mysql
	mysql-community-common-5.5.62-2.el6.x86_64
	php-mysql-5.3.3-49.el6.x86_64
	mysql-community-libs-compat-5.5.62-2.el6.x86_64
	mysql-community-server-5.5.62-2.el6.x86_64
	mysql-community-libs-5.5.62-2.el6.x86_64
	mysql-community-devel-5.5.62-2.el6.x86_64
	mysql-community-release-el6-7.noarch
	mysql-community-client-5.5.62-2.el6.x86_64
	[root@zero tools]#

出现以上信息说明系统已经安装mysql5.5.62版本数据库,需要卸载旧版本安装新版本

    [root@zero tools]# rpm -e --nodeps   mysql-community-common-5.5.62-2.el6.x86_64
	[root@zero tools]# rpm -e --nodeps   php-mysql-5.3.3-49.el6.x86_64
	[root@zero tools]# rpm -e --nodeps   mysql-community-libs-compat-5.5.62-2.el6.x86_64
	[root@zero tools]# rpm -e --nodeps   mysql-community-server-5.5.62-2.el6.x86_64
	[root@zero tools]# rpm -e --nodeps   mysql-community-libs-5.5.62-2.el6.x86_64
	[root@zero tools]# rpm -e --nodeps   mysql-community-devel-5.5.62-2.el6.x86_64
	[root@zero tools]# rpm -e --nodeps   mysql-community-release-el6-7.noarch
	[root@zero tools]# rpm -e --nodeps   mysql-community-client-5.5.62-2.el6.x86_64

卸载完成需要在执行

    [root@zero tools]# rpm -qa | grep mysql
    [root@zero tools]#

说明已经卸载完成
2)以上下载的安装包中在安装mysql的yum源,这个源包括mysql版本比较多 5.5、5.6、5.7、8.0版本
	备注:如果只需要安装某个版本mysql数据库可以单独下载某个版本,可以到官网 http://dev.mysql.com/downloads/repo/yum下载。
	开始安装:

	[root@zero tools]# rpm -ivh mysql80-community-release-el6-3.noarch.rpm
    Preparing...             ########################################### [100%]
    1:mysql-community-release########################################### [100%]
    [root@zero tools]#

可以查看当前能够支持的数据库版本信息

	[root@zero tools]# vi /etc/yum.repos.d/mysql-community.repo

    # Enable to use MySQL 5.5
	[mysql55-community]
	name=MySQL 5.5 Community Server
	baseurl=http://repo.mysql.com/yum/mysql-5.5-community/el/6/$basearch/
	enabled=1
	gpgcheck=1
	gpgkey=file:///etc/pki/rpm-gpg/RPM-GPG-KEY-mysql

	# Enable to use MySQL 5.6
	[mysql56-community]
	name=MySQL 5.6 Community Server
	baseurl=http://repo.mysql.com/yum/mysql-5.6-community/el/6/$basearch/
	enabled=0
	gpgcheck=1
	gpgkey=file:///etc/pki/rpm-gpg/RPM-GPG-KEY-mysql

	# Enable to use MySQL 5.7
	[mysql57-community]
	name=MySQL 5.7 Community Server
	baseurl=http://repo.mysql.com/yum/mysql-5.7-community/el/6/$basearch/
	enabled=0
	gpgcheck=1
	gpgkey=file:///etc/pki/rpm-gpg/RPM-GPG-KEY-mysql

	[mysql80-community]
	name=MySQL 8.0 Community Server
	baseurl=http://repo.mysql.com/yum/mysql-8.0-community/el/6/$basearch/
	enabled=0
	gpgcheck=1
	gpgkey=file:///etc/pki/rpm-gpg/RPM-GPG-KEY-mysql

备注:enabled = 1 说明安装的时候会安装当前版本,相反 enabled = 0 不会安装当前版本
测试我们安装5.5版本数据库,所以设置5.5版本mysql enabled=1
修改之后不要忘记  :wq保存退出操作

修改要安装的数据库版本有两种方式,一种是 vi /etc/yum.repos.d/mysql-community.repo 编辑文件修改(上面方法)
另一种是通过命令方式:

备注:或者用yum-config-manager命令方式开启或关闭。

[root@zero tools]# yum-config-manager --enable mysql55-community
[root@zero tools]# yum-config-manager --disable mysql56-community
[root@zero tools]# yum-config-manager --disable mysql57-community
[root@zero tools]# yum-config-manager --disable mysql80-community

可以不需要都执行,只需要把开启的关闭,把需要安装的开启即可

3)yum安装mysql组件

	[root@zero tools]#  yum install mysql-community-client mysql-community-devel mysql-community-server php-mysql

	Dependencies Resolved

	===========================================================================================================
	 Package                             Arch           Version                Repository                 Size
	===========================================================================================================
	Installing:
	 mysql-community-client              x86_64         5.5.62-2.el6           mysql55-community          15 M
	 mysql-community-devel               x86_64         5.5.62-2.el6           mysql55-community         2.9 M
	 mysql-community-server              x86_64         5.5.62-2.el6           mysql55-community          38 M
	 php-mysql                           x86_64         5.3.3-49.el6           base                       86 k
	Installing for dependencies:
	 mysql-community-common              x86_64         5.5.62-2.el6           mysql55-community         277 k
	 mysql-community-libs                x86_64         5.5.62-2.el6           mysql55-community         1.7 M
	 mysql-community-libs-compat         x86_64         5.5.62-2.el6           mysql55-community         1.6 M
	 perl-DBI                            x86_64         1.609-4.el6            base                      705 k
	 php-common                          x86_64         5.3.3-49.el6           base                      530 k
	 php-pdo                             x86_64         5.3.3-49.el6           base                       80 k
	Updating for dependencies:
	 openssl                             x86_64         1.0.1e-57.el6          base                      1.5 M

	Transaction Summary
	===========================================================================================================
	Install      10 Package(s)
	Upgrade       1 Package(s)

	Total size: 62 M
	Total download size: 38 M

4) 启动mysql命令,并设置开机自启动。

	[root@zero tools]# service mysqld start
	Starting mysqld:                                           [  OK  ]
	[root@zero tools]# chkconfig mysqld on
	[root@zero tools]#

5) 设置mysql的密码

	[root@zero tools]# mysql_secure_installation

	NOTE: RUNNING ALL PARTS OF THIS SCRIPT IS RECOMMENDED FOR ALL MySQL
	      SERVERS IN PRODUCTION USE!  PLEASE READ EACH STEP CAREFULLY!
	In order to log into MySQL to secure it, we'll need the current
	password for the root user.  If you've just installed MySQL, and
	you haven't set the root password yet, the password will be blank,
	so you should just press enter here.

	Enter current password for root (enter for none):
	ERROR 1045 (28000): Access denied for user 'root'@'localhost' (using password: YES)
	Enter current password for root (enter for none):
	OK, successfully used password, moving on...

	Setting the root password ensures that nobody can log into the MySQL
	root user without the proper authorisation.

	Set root password? [Y/n] Y
	New password:
	Re-enter new password:
	Password updated successfully!
	Reloading privilege tables..
	 ... Success!


	By default, a MySQL installation has an anonymous user, allowing anyone
	to log into MySQL without having to have a user account created for
	them.  This is intended only for testing, and to make the installation
	go a bit smoother.  You should remove them before moving into a
	production environment.

	Remove anonymous users? [Y/n] Y
	 ... Success!

	Normally, root should only be allowed to connect from 'localhost'.  This
	ensures that someone cannot guess at the root password from the network.

	Disallow root login remotely? [Y/n] Y
	 ... Success!

	By default, MySQL comes with a database named 'test' that anyone can
	access.  This is also intended only for testing, and should be removed
	before moving into a production environment.

	Remove test database and access to it? [Y/n] N
	 ... skipping.

	Reloading the privilege tables will ensure that all changes made so far
	will take effect immediately.

	Reload privilege tables now? [Y/n] Y
	 ... Success!

	Cleaning up...


	All done!  If you've completed all of the above steps, your MySQL
	installation should now be secure.

	Thanks for using MySQL!


	中间会设置用户登录密码
6) 用刚创建的密码登录mysql数据库

	[root@zero tools]# mysql -uroot -p
	Enter password:
	Welcome to the MySQL monitor.  Commands end with ; or \g.
	Your MySQL connection id is 1
	Server version: 5.5.62 MySQL Community Server (GPL)

	Copyright (c) 2000, 2018, Oracle and/or its affiliates. All rights reserved.

	Oracle is a registered trademark of Oracle Corporation and/or its
	affiliates. Other names may be trademarks of their respective
	owners.

	Type 'help;' or '\h' for help. Type '\c' to clear the current input statement.

	mysql>

	出现以上界面说登录mysql成功!

7) 设置mysql数据库运行远程连接

	mysql> grant all privileges on *.* to 'root'@'%' identified by 'root';    (赋予全部权限在所有数据库和所有表上给root用户在任何主机上)
	Query OK, 0 rows affected (0.00 sec)

	mysql> flush privileges;
	Query OK, 0 rows affected (0.00 sec)

	mysql>
以上就是数据安装过程,又不对的地方欢迎指正,共同学习!!


